![]()
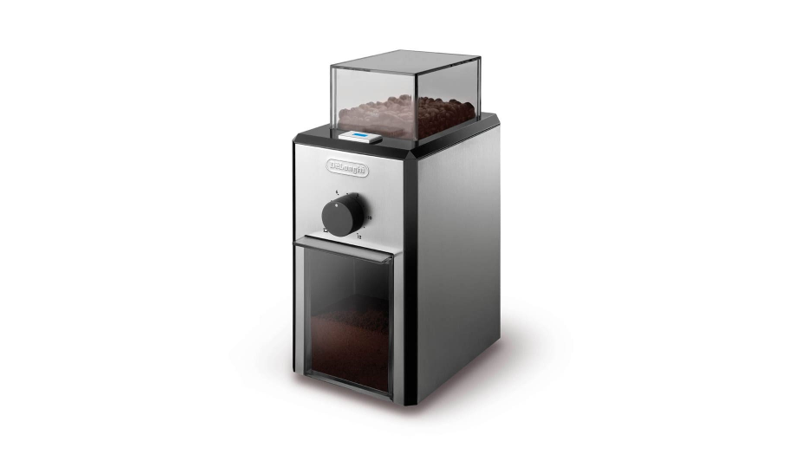
COFFEE GRINDERKG 79/89

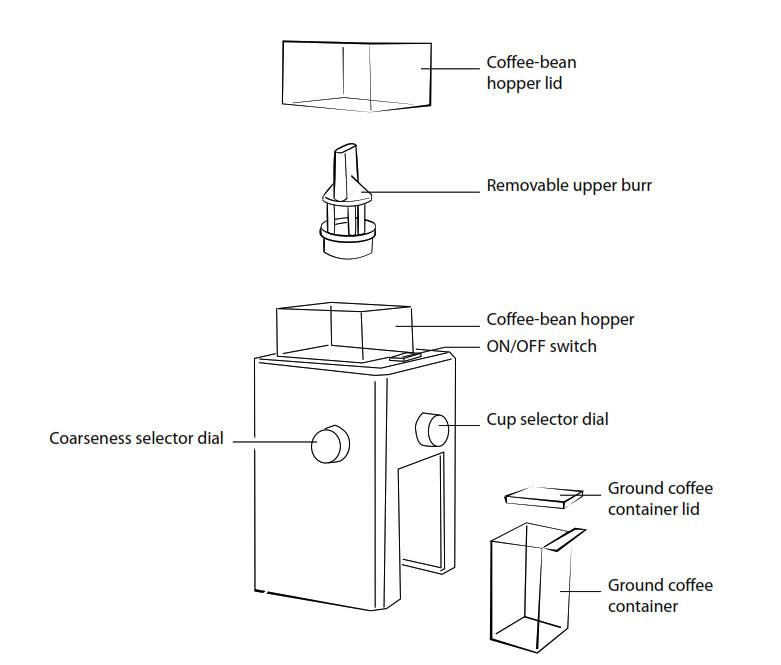
DESCRIPTION OF APPLIANCEThe following terms are used throughout the instruction manual
SAFETY
Fundamental safety warnings
![]() Danger! This is an electrical appliance and may therefore cause electric shock.You should therefore respect the following safety warnings:
Danger! This is an electrical appliance and may therefore cause electric shock.You should therefore respect the following safety warnings:
- Never touch the plug with damp hands.
- Make sure the socket used is freely accessible at all times, enabling the appliance to be unplugged when necessary.
- Unplug directly from the plug only. Never pull the power cable as you could damage it.
- If the appliance is faulty, do not attempt to repair. Turn it off, unplug from the mains socket and contact the Technical Assistance service. See enclosed guarantee.
- If the plug or power cable is damaged, it must be replaced by the De Longhi Technical Assistance service only to avoid all risk. See enclosed guarantee
- Do not place the appliance in water.Attention: remove the plug from the socket before cleaning.
- Do not allow the power supply cable to hang over the edge of the table or other work surface or come into contact with hot surfaces.
- Important: Do not use the appliance continuously for more than 60 seconds. Leave the appliance to cool for 10 minutes before re-use.
 Danger! Keep all packaging (plastic bags, polystyrene foam) away from children.
Danger! The appliance is not intended for use by persons (including children) with reduced physical, sensory or mental capabilities, or lack of experience and knowledge unless they have been given supervision or instruction concerning use of the appliance by a person responsible for their safety. Children should be supervised to ensure that they do not play with the appliance.• Do not place on or near a hot gas or electric burner, or in a heated oven.• Check grinding chamber for presence of foreign obects before using.
Connecting the appliance
 Important! Check that the mains power supply voltage corresponds to the value indicated on the rating plate on the bottom of the appliance.
Only connect the appliance to a correctly installed socket with a minimum capacity of 10A and that is supplied with an efficient earth connection.If the power socket does not match the plug on the appliance, have the socket replaced with a suitable type by a qualified professional.
Use in compliance with destination
This appliance must only be employed for the use for which it has been designed.Any other use must be considered improper.This appliance is not suitable for commercial use.The manufacturer is not liable for damage deriving from improper use of the appliance.Never chop ice or use the grinder other than as described in the instructions.
InstructionsRead these instructions carefully before using the appliance.– Failure to respect these instructions may result in burns or damage to the appliance. The manufacturer is not liable for damage deriving from failure to respect these instructions.
![]() Please note: Keep these instructions. If the appliance is passed to other persons, they must also be provided with these instructions.
Please note: Keep these instructions. If the appliance is passed to other persons, they must also be provided with these instructions.
 Important information for correct disposal of the product in accordance with EC Directive 2002/96/EC.At the end of its working life, the product must not be disposed of as urban waste.It must be taken to a special local authority differentiated waste collection center or to a dealer providing this service.Disposing of a household appliance separately avoids possible negative consequences for the environment and health deriving from inappropriate disposal and enables the constituent materials to be recovered to obtain significant savings in energy and resources. As a reminder of the need to dispose of household appliances separately, the product is marked with a crossed-out wheeled dustbin.
The appliance complies with the following EC directives:• Low Voltage Directive 2006/95/EC.• Directive EMC 89/336/EEC and subsequent amendments 92/31/EEC and 93/68/EEC.Materials and accessories coming into contact with food conform to EEC directive 1935/2004.
INTRODUCTION
Thank you for choosing this coffee grinder. To get the best results it is advisable to read these instructions before using the appliance. This is the only way to ensure optimum results and maximum safety. The manufacturer is not liable for damage deriving from the failure to comply with the user instructions.
About grinding coffeeThe correct grinding coarseness will give the most flavourful cup of coffee.The correct coarseness of the grind depends on the method in which the coffee is to be prepared.Generally, the finer the grind the more quickly the coffee should be prepared, which is why coffee ground for use in an espresso machine is much finer than coffee brewed in a drip or filter system. Coffee that is ground too fine for a particular brewing process – (e.g fine espresso grind used in a drip filter coffee machine) will result in over-extraction and bitter, pungent tasting coffee.Conversely, coffee that is too coarse for a particular preparation method will result in under-extraction and weak, watery coffee. If the correct grind is used, adding more coffee simply makes a brew stronger without making it bitter.In addition to providing a number of grind settings, coffee grinders provide a consistent grind. This is important to ensure the extraction is consistent across all of the ground coffee particles.
Before first use
Before using the coffee grinder, wipe the housing and bean hopper with a clean damp cloth. Wash the coffee bean hopper lid, ground coffee container and ground coffee container lid in hot soapy water, then rise and dry thoroughly.The ground coffee holder, its lid and the bean hopper lid can be washed in the top rack of a dishwasher.
![]() Please note: The burr can not be washed and must be kept dry at all times. Clean the burr with a stiff bristled brush.
Please note: The burr can not be washed and must be kept dry at all times. Clean the burr with a stiff bristled brush.
Operating the coffee grinder
- Ensure the coffee grinder is unplugged. Fit the ground coffee container and its lid in their correct position. Check that the assembly is correctly positioned in the body.
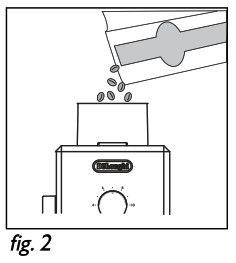
- Remove the lid of the coffee bean hopper (fig. 1) and fill the bean hopper to the level desired (fig. 2). Do not fill above the “max.”level. Replace the lid and make certain that it is correctly positioned, pressing it down till the end (fig. 3).

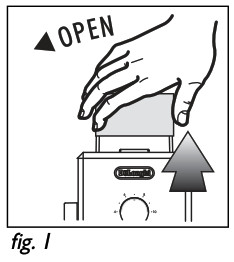

Important: If the lid is not in the correct position the grinder will not work.
![]() Please note: This product is designed to grind whole coffee beans only.
Please note: This product is designed to grind whole coffee beans only.
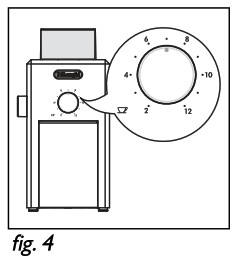
- Set the quantity of ground coffee by positioning the cup selector dial (Fig. 4) according to the desired quantity.
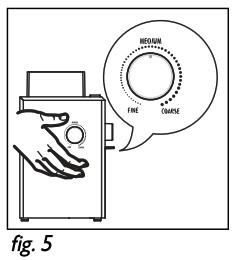
- Set the ground coffee coarseness level by adjusting the ground coffee coarseness dial (Fig. 5) to the desired level.
- Insert the plug into an electrical socket.
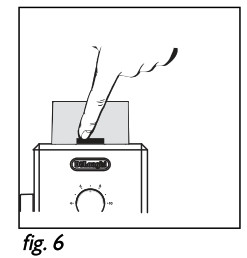
- Press the ON/OFF switch to start the appliance (Fig. 6).
- Once the selected quantity has been ground, the appliance will stop automatically.
- If you want to stop the appliance before grinding is complete, press the ON/OFF switch.
- The ground coffee is now ready for preparation.
- To obtain additional ground coffee, repeat the operating cycle.Always first make sure that the ground coffee does not go above the “max.” level of the ground coffee container.
![]() Please note: Selected settings will be retained from one use to the next.
Please note: Selected settings will be retained from one use to the next.
ImportantFor your appliance to run correctly, make certain that:– The lid to the coffee-bean hopper is correctly positioned.– The ground coffee container and its lid are correctly placed in the body of the appliance.
TIPS
It is best to store coffee beans in a cool, dry place. Beans should be kept in an opaque, airtight container.– Grind the coffee just prior to preparing it.Selecting the level of coarseness of your ground coffee.– Use the coarseness selector dial (Fig. 5) to adjust the grind according to the type of coffee maker.– Generally, the quicker the water goes through the ground coffee, the finer the ground coffee should be.A “medium” ground is thus suited to making filter coffee while a “very fine” ground is needed to make an Espresso.– For the first use, we suggest that you use an intermediate position and then adjust the setting to your taste.Once you have used the appliance a few times, you will find the ideal grind setting to suit your taste and brewing method.Important: Do not change the grind setting while the appliance is running.Suggested Grind Settings:Selecting the number of cups– Use the cup selector dial (Fig. 4) to program the quantity of ground coffee you want.– The mill grinds approx. 1 tablespoon of coffee per cup selected.
MAINTENANCE
– To keep all your coffees aroma and to avoid a degradation of the ground coffee, empty the ground coffee holder after each use.– Always disconnect the grinder from the power supply before cleaning.– Never place the grinder, power supply cord or plug in water or under running water.– Do not use strong detergents or abrasive pads to clean the appliance.– Clean the lids and the ground coffee container in warm, soapy water.– To remove the upper burr, set the coarseness selector dial (Fig. 5) to the fine position then take hold of the top of the burr of the upper mill with your fingers and turn clockwise, then pull it vertically to remove.– Carefully clean the inside of the coffee-bean hopper with a damp cloth.– To replace the upper burr, set the coarseness selector dial (Fig. 5) to the coarse position, insert the burr and turn it once counter-clockwise.– Carefully clean the ground coffee dispenser and the body of the appliance with a damp cloth making sure no coffee residue is blocking the ground coffee dispenser.
Electrical requirementsBefore using this appliance ensure that the voltage indicated on the product corresponds with the main voltage in your home, if you are in any doubt about your supply contact your local electricity company.The flexible mains lead is supplied connected to a B.S. 1363 fused plug having a fuse of 13 amp capacity. Should this plug not fit the socket outlets in your home, it should be cut off and replaced with a suitable plug, following the procedure outlined below.Note: Such a plug cannot be used for any other appliance and should therefore be properly disposed of and not left where children might find it and plug it into a supply socket – with the obvious consequent danger.N.B. We recommend the use of good quality plugs and wall sockets that can be switched off when the machine is not in use. important: the wires in the mains lead fitted to this appliance are coloured in accordance with the following code:
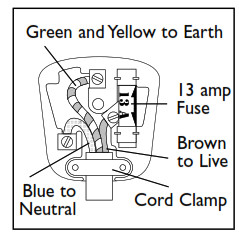
GREEN AND YELLOW EARTHBLUE NEUTRALBROWN LIVE
As the colours of the wires in the mains lead of this appliance may not correspond with the coloured markings identifying the terminals in your plug, proceed as follows:The wire which is coloured green and yellow must be connected to the terminal in the plug which is marked with the letter E or by the earth symbol![]() or coloured green or green and yellow.
or coloured green or green and yellow.
The wire which is coloured blue must be connected to the terminal which is marked with the letter N or coloured black.The wire which is coloured brown must be connected to the terminal which is marked with the letter L or coloured red.When wiring the plug, ensure that all strands of wire are securely retained in each terminal. Do not forget to tighten the mains lead clamp on the plug. If your electricity supply point has only two pin socket outlets, or if you are in doubt, consult a qualified electrician.Should the mains lead ever require replacement, it is essential that this operation be carried out by a qualified electrician and should only be replaced with a flexible cord of the same size.After the replacement of a fuse in the plug, the fuse cover must be refitted. If the fuse cover is lost, the plug must not be used until a replacement cover is obtained. The colour of the correct replacement fuse cover is that of the coloured insert in the base of the fuse recess or elsewhere on the plug. Always state this colour when ordering a replacement fuse cover. Only 13amp replacement fuses which are asta approved to B.S. 1362 should be fitted. This appliance conforms to the Norms EN 55014 regarding the suppression of radio interference.Warning – this appliance must be earthed
![]()
De’Longhi Appliances – Via L. Seitz, 47 – 31100 Treviso Italia
[xyz-ips snippet=”download-snippet”]