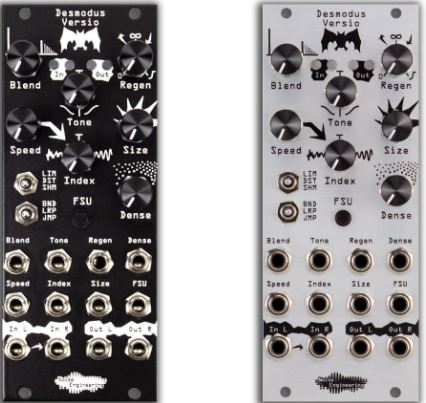
Desmodus Versio Stereo reverb/DSP platform

Power
To power your Noise Engineering module, turn off your case. Plug one end of your ribbon cable into your power board so that the red stripe on the ribbon cable is aligned to the side that says -12v and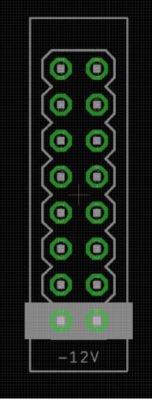 each pin on the power header is plugged into the connector on the ribbon. Make sure no pins are overhanging the connector! If they are, unplug it and realign.Line up the red stripe on the ribbon cable so that it matches the white stripe and/or -12v indication on the board and plug in the connector.Screw your module into your case BEFORE powering on the module. You risk bumping the module’s PCB against something metallic and damaging it if it’s not properly secured when powered on.You should be good to go if you followed these instructions. Now go make some noise!A final note. Some modules have other headers — they may have a different number of pins or may say NOT POWER. In general, unless a manual tells you otherwise, DO NOT CONNECT THOSE TO POWER.
Warranty
Noise Engineering backs all our products with a product warranty: we guarantee our products to be free from manufacturing defects (materials or workmanship) for one year from the date of the original retail purchase (receipt or invoice required). The cost of shipping to Noise Engineering is paid by the user. Modules requiring warranty repair will either be repaired or replaced at Noise Engineering’s discretion. If you believe you have a product that has a defect that is out of warranty, please contact us.This warranty does not cover damage due to improper handling, storage, use, or abuse, modifications, or improper power, or other voltage application.
Input and output voltages
All CV inputs expect 0-5 V. All pots act as offsets and sum with the input CV. The FSU gate input responds to signals above +2 V. The audio inputs clip around 16 V peak to peak.
Interface
Blend: Dry/wet balance control. When turned fully left, the unmodified input signal is passed through. Fully right, only the processed signal is heard. Points in the middle give you a mix of both.

A good way to hear Blend is with high Regen values and Tone and Index set to 12 o’clock.Tone: A filter in the reverb tank. This is a bipolar control: turning the knob to the left controls a lowpass filter, and to the right controls a highpass filter. In the center, the filter is disabled.
A good way to hear Tone is with high Regen values, and Blend and Index at 12 o’clock.Regen: Amount of feedback in the reverb tank. Regen controls a wide range of tones and behaviors.All the way to the left, feedback is minimized. As you turn up to about 12 o’clock, DV generates shorter reverbs, emulating smaller synthetic spaces. Past this point, the reverb reaches 100% feedback, creating spaces with an infinite tail. Past 3 o’clock, the infinite reverb is ducked by new sounds at the input, creating sidechain-type effects.Speed: The speed of the internal LFO. The LFO can modulate the delay lines, and the modulation amount is controlled by the Index parameter.A good way to hear Speed is with a low Size setting, Density and Index fully clockwise, and a high Regen setting.Index: The amount of LFO sent to the delay lines that make up the reverb. This is a bipolar control: in the center the LFO is disabled. To the left, the LFO modulates the delay lines randomly. To the right, the LFO modulates the delay lines with a sine wave. The Speed parameter controls the rate of the LFO.A good way to hear Index is with a low Size setting, Density fully clockwise, Speed at 12 o’clock, and a high Regen setting.
Interface (cont.)
Size: The delay time of the reverb.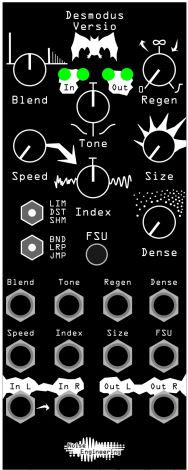 A good way to hear Size is with a percussive input and all other parameters at 12 o’clock.Dense: The spacing of the delay lines. To the left, the effect sounds more like a delay; to the right, the delays are smeared into reverb.A good way to hear Dense is with a percussive input, Size fully clockwise, and all other parameters at 12 o’clock.FSU: This control maxes out the Regen control and mutes the input to the reverb when the button is pressed, or when a high gate is sent to its input.A good way to hear this button’s effect is with Blend above 12 o’clock and a low Regen value.In L/In R: Audio input. If R is not patched, the signal from L is normalized to both inputs.Out L/Out R: Stereo output pair.LIM/DST/SHM: Reverb style.
- LIM (Limit): A clean reverb, using limiting within the reverb tank to contain feedback. A good way to hear LIM is with moderate Regen values and starting with all other parameters at 12 o’clock, then playing with Tone and Index/Speed.
- DST (Distort): Similar to LIM, but instead of limiting within the reverb tank, slight saturation is applied for a more distorted sound. A good way to hear DST is with high Regen values and starting with all other parameters at 12 o’clock, then adjusting Size and Tone to taste.
- SHM (Shimmer): A demonic pitch-shifting algorithm. Adds a one-octave pitch shift that feeds back into the input. A good way to hear SHM is with high Regen values, and all other parameters at 12 o’clock. Create haunting effects by introducing subtle modulation with Speed and Index.
BND/LRP/JMP: Changes how the delay lines respond when the panel controls are modulated. To hear each mode clearly, turn Regen fully clockwise and modulate the Size parameter.
- BND (Blend): Crossfades the delay times for smoother changes.
- LRP (Interpolate): Slowly changes delay line length, has audible pitch-shift effects due to the delay lines changing length.
- JMP (Jump): Quickly changes delay line length, for audible and fast changes.
Patch Tutorial
First patches:
For your first patch, use a simple, short sound, like a pulse, snare, or click. Patch to In L, and patch Out L and R to your mixer. Set the Blend, Index, and Tone controls to 12 o’clock to start, and play with Regen, Size, Dense, and LIM/DST/ SHM to get an idea of what DV is all about.Use the Tone control to shape the reverb to your liking, and use the Index and Speed controls to add some movement to your reverb.Hold the FSU button to create an epic wall of sound.Try patching a CV signal from a sequencer or other modulation source to Size. Play with the BND/LRP/JMP switches to hear the different ways the reverb can be modulated externally.Unlatch your input, and turn Regen past 12 o’clock. DV will start to self oscillate. Use the front panel controls to manipulate the tones it generates. Drop it back to fully left to stop the self-oscillation.
Simple delay:
Set Blend, Tone, and Index to 12 o’clock, Regen to 10 o’clock, and dense fully counterclockwise. Play with Size, LIM/DST/SHM, and Tone to shape your delay.
Kick ducker:
Patch a kick (or another percussive sound) to the input, and turn regen fully clockwise. Set Blend to 12 o’clock and the other parameters to taste. Each kick will duck the reverb, creating a rhythmic ambiance.
Instant IDM:
Patch a modulation source like Clep Diaz to the Size parameter and set the lower switch to LRP or JMP. Play with the rest of the parameters to get some ridiculous delay modulation.
Updating Firmware
Desmodus Versio’s firmware can be updated by the user via our firmware webapp. In the unlikely event that the need arises, firmware patches will be available on that site. Alternate firmware available now transforms the DV from a reverb into completely different modules, and open-source firmware development support, DIY resources, and documentation are available here.
To update the firmware on your Desmodus Versio:
- 1. Turn off the power to your case and unscrew DV.
- 2. Remove the power connector on the back of DV.
- 3. Plug a micro USB connector into the port on the pack of the module, and the other end into your computer.
- 4. Follow the instructions in the webapp.
Desmodus Conservation
We’ve known for a long time that we wanted to do a reverb, and it seemed like a pretty obvious opportunity for us to revisit our core values and support another conservation charity. With a reverb module, bats seemed like a pretty obvious connection: many bat species use echolocation, where they send out an ultrasonic signal, and then listen for subtle shifts in the returned echo. Those shifts can tell them incredible details about their environment, including the location of prey — even while they are both moving! Bats are the most species-diverse group of mammals, and critically important to ecosystems. Insect-eating bats eat literally tons of insects annually, including those that damage crops. One estimate says bats are worth more than US$3.7 BILLION /year in reduced crop damage and pesticide use! They also pollinate a variety of crops and disperse seeds for a lot of plants, including plants that we humans are fond of. In addition, bats are in trouble. Habitat loss and other human-made causes are among the biggest threats. And in North America, a new fungal pathogen called White-nose Syndrome is killing bat colonies as they hibernate (in some places, leading to complete devastation of colonies).We’ve partnered with Bat Conservation International (www.batcon.org), the global leader in bat conservation. We’ve committed to donating a portion of the proceeds from every DV sold to bat conservation. That means you can pat yourself on the back for buying a Desmodus Versio, knowing you’re doing some good in the world! Want to know more about bats? Learn how to build a bat house? Find out what you can do? Check out the BCI website.
Design Notes
We have wanted to make a reverb for a long, long time. Our biggest block was always having a suitable computational platform. The platform we use for our oscillators is phenomenal for oscillators but does not have enough storage for most audio effects.In mid-2019, Electrosmith sent us a platform that they were developing for the DIY market to test and give feedback on. This platform would become the core of the Daisy line that they now sell. The first nontrivial test we did with Daisy was to port some of the reverb work that Stephen had been developing on and off for years. Stephen performed at MOTS LA in the summer of 2019 with the Daisy prototype running this reverb literally taped to the side of his case.At that time, we were in the midst of designing our own platform similar to Daisy (code-named George) though after one iteration we decided that where Electrosmith had decided to go with the Daisy Seed was going to be a suitable platform for us so adopted the Seed for our hardware backend. The stars aligned and we were pretty confident we were close to release by the end of that year.We announced Desmodus Versio at NAMM 2020. A few weeks later, we got the first inkling that something was amiss when the factories in China (where we get PCBs and parts) didn’t really return from the Lunar New Year holiday. It seems like no time after that when the COVID-19 pandemic became official and 2020 became a year entirely out of our control. Releasing a new module no matter how much anticipated became untenable for nearly six months (but we appreciate all the emails desperate for the module!). Supply chains broke down, California (and almost everywhere else) shut down, our manufacturing came to a virtual halt, and our employees were sent to work from home sans new hardware to test, since we didn’t yet have it. It took several months (and another unexpected iteration or two) before we got to a point where we could actually put Desmodus into production. Oh and yes… Stephen grew as much of a beard as he is capable of for the development of this product.
Special Thanks
Stephen Hensley![]() ElectroSmithCynthia HitchcockBat Conservation InternationalAll the people who emailed to tell us how excited and interested they were, despite the wait!
ElectroSmithCynthia HitchcockBat Conservation InternationalAll the people who emailed to tell us how excited and interested they were, despite the wait!
References
[xyz-ips snippet=”download-snippet”]