DeVilbiss 7305 Suction Unit series User Manual
IEC SYMBOLS

IMPORTA NT SAFEGUARDS
When using electrical products, especially when children are present, basic safety precautions should always be followed. Read all instructions before using. Important information is highlighted by these terms:DANGER– Urgent safety information for hazards that will cause serious injury or death.WARNING– Important safety information for hazards that might cause serious injury.CAUTION– Information for preventing damage to the product.NOTE– Information to which you should pay special attention.
READ ALL INSTRUCTIONS BEFORE USING THIS DEVICE. SAVE THESE INSTRUCTIONS.
DANGERTo reduce the risk of electrocution:
- Do not use while bathing.
- Do not place or store product where it can fall or be pulled into a tub or sink.
- Do not place in or drop into water or other liquid.
- Do not reach for a product that has fallen into water. Unplug immediately
warning
To reduce the risk of burns, electrocution, fire or injury to persons:
- Close supervision is necessary when this product is used by, on, or near children or physically incapacitated individuals.
- Use this product only for its intended use as described in this guide.
- Never operate this product ifa. It has a damaged power cord or plug.b. It is not working properly.c. It has been dropped or damaged.d. It has been dropped into water.Return the product to an authorized DeVilbiss Healthcare service center for examination and repair.
- Keep the power cord away from heated surfaces.
- Never use while drowsy or asleep.NOTE– The 7305D series is not factory equipped with an internal rechargeable battery; it may be purchased separately and installed by your DeVilbiss Healthcare provider.7305P series is factory equipped with an internal rechargeable battery and all information regarding battery operation in this guide is applicable.
DANGER
The DeVilbiss Suction Unit is a vacuum suction device designed for the collection of nonflammable fluid materials in medical applications only. Improper useduring medical applications can cause injury or death. For all medical applications:
- All suctioning should be done in strict accordance with appropriate procedures that have been established by a licensed medical authority.
- Some attachments or accessories may not fit the tubing supplied. All attachments or accessories should be checked prior to use to assure proper fit.
International Travel
The 7305 series is equipped with a switch mode power supply allowing operation on any AC voltage (100-240 VAC, 50/60 Hz). However the correct power cord must be used to connect to adaptable wall power.NOTE– Check power cord for adaptability before using.
INTRODUCTION
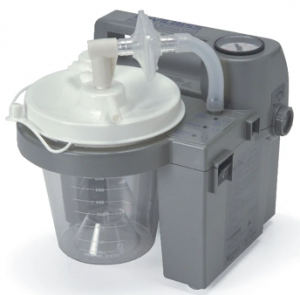
Your DeVilbiss Suction Unit is a compact medical suctioning device which has been designed for reliable, portable operation. Because of the small size, light weight and DCoperation, the DeVilbiss Suction Unit is ideal for providing suction in the home, in transport with optional DC cord, or if your model has an internal rechargeable battery, the unitcan be operated anywhere. Three container options give the choice between the standard disposable containers or an optional long-term reusable container. Following therecommended operating and maintenance procedures outlined in this instruction guide will maximize the life of this product.
Contraindications
The DeVilbiss Suction Unit should not be used for:
- thoracic drainage
- nasogastric suction
Intended Use Statement
The device is to be used to remove fluids from the airway or respiratory support system and infectious materials from wounds.The device creates a negative pressure (vacuum) that draws fluids through disposable tubing that is connected to a collection bottle. The fluids are trapped in the collection bottle for proper disposal. It is for use on the order of a physician only
Accessory/Replacement Items
The following items can be purchased separately as accessories or replacement items for your 7305 Series DeVilbiss Suction Unit:
| Description | Part No. | Description | Part No. |
| 6’ patient tubing | 6305D-611 | Collection Container Kit (1200 ml reusable container, external bacteria filter, elbow, 43/8” tubing) | 7314D-603 |
| 800 Disposable Container (container and lid only) for use with external bacteria filter (48 pack) | 7305D-602 | 1200 ml reusable container (external bacteria filter, elbow, 43/8” tubing) (6 pack) | 7314D-604 |
| Collection Container Kit (800 ml disposable container, external bacteria filter, elbow, 3 3/8” and 6’tubing package) | 7305D-603 | Carrying case | 7305D-606 |
| External bacteria filter (non-sterile) (12 pack) For reusable container and disposable container with external filter | 7305D-608 | AC to DC adapter/charger | 7305P-613 |
| Collection Container Kit (Internal filter cartridge, splash guard, 800 ml container, 43/8” and 6’ tubing package) | 7305D-633 | 12V DC power cord (1 each) | 7304D-619 |
| 800 ml disposable container with internal filter cartridge, splash guard and 43/8” tubing (48 each) | 7305D-632 | Hospital grade power cord (120 VAC) | 099HD-614 |
| Filter cartridge (12 pack) (For Disposable Container with internal filter) | 7305D-635 | Power cord for US | 6710D-609 |
| Splash Guard (12 pack) for Disposable Container with internal filter cartridge | 7305D-641 | Power cord for Continental Europe | 7305P-631 |
NOTE– The use of electrical cables and accessories other than those specified in this manual or referenced documents may result in increased electromagnetic emissions from the product or decreased electromagnetic immunity of the product.
Important Parts
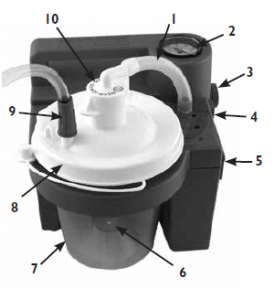
- 43/8” connection tubing
- Vacuum gauge
- Vacuum regulator knob
- DC power input (on side)
- Power switch
- Splash guard
- Collection container
- Lid
- Patient tubing
- Filter cartridge
AC to DC Adapter (not shown)DC power cord (not shown) optionalInternal rechargeable battery (not shown) 7305P series onlyCarrying case (not shown) 7305P series only
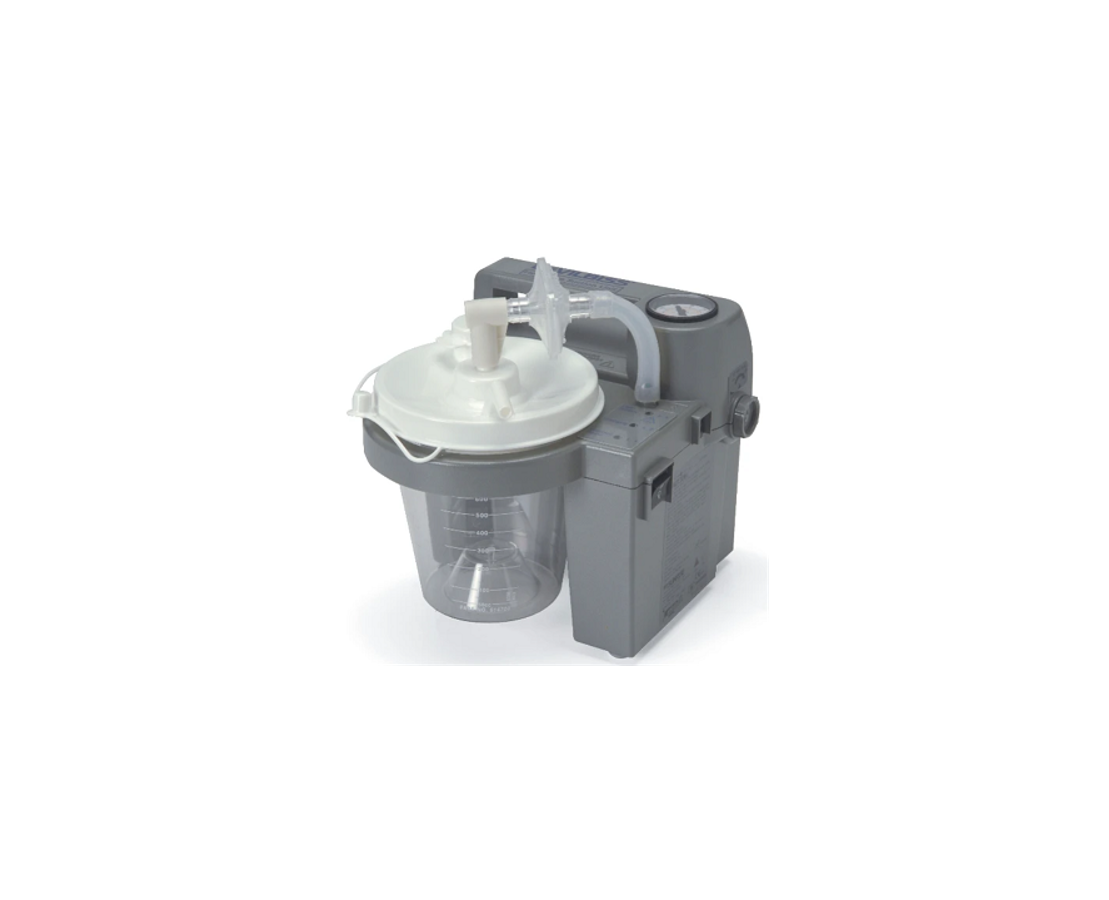
With Disposable Container and External Bacteria Filter
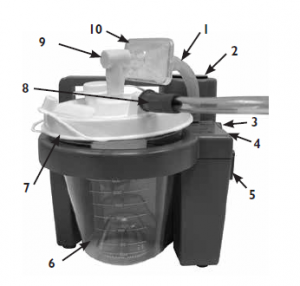
- 33/8” connection tubing
- Vacuum gauge
- Vacuum regulator knob
- DC power input (on side)
- Power switch
- Collection container
- Lid
- Patient tubing
- Connection elbow
- External bacteria filter AC to DC Adapter (not shown)
DC power cord (not shown) optionalInternal rechargeable battery (not shown) 7305P series onlyCarrying case (not shown) 7305P series only
With Reusable Container and External Bacteria Filter
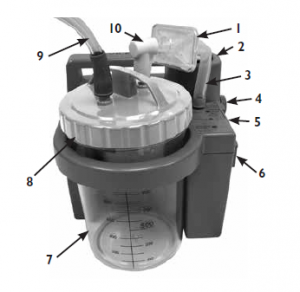
- External bacteria filter
- Vacuum gauge
- 43/8” connection tubing
- Vacuum regulator knob
- DC power input (on side)
- Power switch
- Collection container
- Lid
- Patient tubing
- Connection elbow
AC to DC Adapter (not shown)DC power cord (not shown) optionalInternal rechargeable battery (not shown) 7305P series onlyCarrying case (not shown) 7305P series only
7305 Series DeVilbiss Containers
Disposable Container with Internal Filter Cartridge and Splash Guard
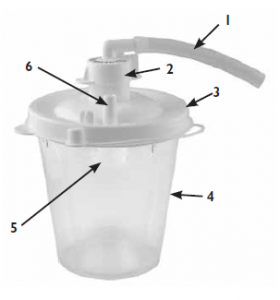
- 43/8” connection tubing
- Filter cartridge (Do not get wet)
- Lid
- Jar
- Splash guard
- Patient tubing connector
Disposable Container with External Bacteria Filter
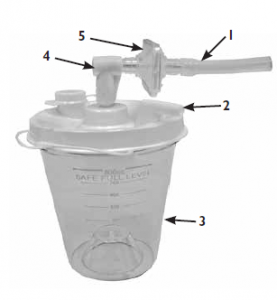
- 33/8” connection tubing
- Patient tubing connector
- Jar
- Connection elbow
- Bacteria filter
Reusable Container with External Bacteria Filter
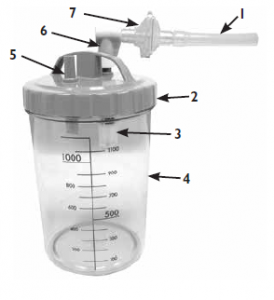
- 43/8” connection tubing
- Lid with o-ring
- Overflow valve
- Jar
- Patient tubing connector
- Connection elbow
- Bacteria filter
Internal Filter Cartridge Set-Up
Disposable Container w/Internal Filter Cartridge & Splash Guard
- Fully charge battery for 17 hours (7305P series only).
- Ensure splash guard is securely attached to inside of lid over filter
- Securely attach lid to
- Insert container into
- Attach 43/8” tubing from filter cartridge to tubing connector.
- The patient tubing should be connected to the container lid at the outlet labeled <Patient>.
- Please assure that all connections are secure and without leaks before
- Verify that unit is at desired suction level before beginning patient
External Filter Set-Up
Disposable Container or Reusable Container with External Bacteria Filter
- Fully charge battery for 17 hours (7305P series only).
- Securely attach lid to
- Insert container into
- Connect either end of the 43/8” reusable tubing or 33/8 ” disposable tubing to the tubing connector then connect the other end to the bacteria Ensure that the clear side of the bacteria filter is toward elbow and container when installing/re-installing. Do not reverse direction of filter.
- The bacteria filter should then be connected to the 90˚ elbow connection, and the 90˚ connection should be connected to the top of the container lid where it says <Vacuum>.
- The patient tubing should be connected to the container lid at the outlet labeled <Patient>.
- Please assure that all connections are secure and without leaks before
- Verify that unit is at desired suction level before beginning patient
HOW TO OPERATE YOUR 7305 SERIES DEVILBISS SUCTION UNIT
Before connecting the unit to the AC adapter or 12V DC cord, make sure that the power switch located on the side of the unit is in the “Off” position. Select power source desired.
LED Explanations:
L1- Green– External power supplied to unit from AC power source or DC cord. Illuminated when external power is supplied.L2 – Yellow– Battery is being charged. Light will go out when battery is fully charged. (7305P Series only)L3 – Red– Low battery. Seek another power source and charge battery as soon as possible when light remains on continuous. (7305P Series only)AC OPERATION– Plug the small connector of the AC adapter into the DC power input located on the side of the unit. Plug the AC end into a grounded wall-outlet power source.NOTE– The power supply may become warm to the touch during charging or running of the unit. This is normal.12V DC OPERATION– (such as a car lighter receptacle). Plug the small connector of the DC power cord into the DC power input on the side of the unit. Plug the large connector into the 12V DC power receptacle of the automobile.BATTERY OPERATION– Verify that your unit has an internal rechargeable battery; factory installed on models 7305P series or provider installed on models 7305D series (installed as an option). To ensure proper operation from internal battery, fully charge the battery for 17 hours as explained in the Battery Charging section. To operate the unit from an internal rechargeable battery, ensure that no external power sources are plugged into the DC power input on the side of the unit.Turn the unit “On” using the power switch located on the side of the unit. The power indicator light displayed on the top of the unit will indicate which power source is being used by staying continuously lit when external power is connected.
WARNING
If the unit is not receiving power from an external source or the battery was not recharged immediately, the low battery indicator light will remain on and the performance of the unit will drop off rapidly. Switch to another power source immediately after the low battery light appears to avoid an interrupted suction procedure.
Adjust the vacuum level from 80 to 550 mm Hg by turning the vacuum regulator knob located on the side of the unit (clockwise to increase vacuum and counter-clockwise to decrease vacuum). The gauge located on the top of the unit near the handle will allow you to select a specific level of vacuum. To accurately read the gauge, block the patient end of the hose or cap off the collection bottle and allow the gauge to reach a stable vacuum reading.NOTE– Gauge is for reference only. If the unit sustains a severe drop, accuracy of the gauge must be checked. Suction at the patient is automatically obstructed when liquid level reaches the float shut-off located on the underside of the container lid.NOTE– Always transport unit with vacuum regulator knob rotated fully clockwise in case unit is dropped.CAUTION– When automatic float shut-off is activated, contents of the container should be emptied. Further suctioning could cause damage to the vacuum pump.CAUTION– Should fluid be aspirated back into the unit, equipment provider servicing is necessary as possible vacuum pump damage may result.
BATTERY CHARGING
On 7305P series, the units are equipped with a factory-installed rechargeable battery. The unit will have a light for low battery and charge indication. On 7305D series, the units are not factory equipped with a rechargeable battery; check with your equipment provider to determine if your unit has been upgraded with a rechargeable battery.
When you connect the unit to an AC or DC power source using the AC adapter or DC power cord, the green external power light will illuminate. The yellow charge indicator will be illuminated while the battery is charging. Verify that this illuminates when charging begins. As the charge nears a full charge, the yellow LED may flash on and off for several minutes. This is normal.
NOTE – Charge battery for a minimum of 17 hours before first use.NOTE – Fully recharge battery after each use. The unit will continue to float charge the battery after the charge indicator turns off, so leave the unit connected to AC when not in use.CAUTION– Discharging the battery completely will shorten the life of the battery. Do not operate the unit more than a few minutes if the low battery indicator light is lit. Recharge as soon as possible.NOTE – Unit run time will decrease as the battery ages.NOTE – Unit run time will also be reduced by letting the battery sit at a discharged state for extended periods.STORAGE NOTE – Battery should be charged for a minimum of 17 hours prior to storage, and at least once every 6 months. Important – If battery recharge is delayed beyond 6 months, battery may be able to provide full run time after completion of 3 full charge and discharge cycles.NOTE– A fully charged battery will provide approximately 60 minutes of continuous operation at a zero vacuum level (free flow). Operation time will decrease with higher vacuum levels.NOTE– When charging the battery, use an external power source and verify that the charge light illuminates when the unit is in the “Off’ position. If the battery does not charge, please be sure the model you are using has a battery installed prior to contacting your authorized DeVilbiss Healthcare provider.NOTE– The internal rechargeable battery is sealed lead-acid. Contact your local authorities for instruction on proper disposal.NOTE– Do not connect the AC adapter to an outlet controlled by a switch to ensure power is supplied to unit at all times.NOTE– Do not connect the DC power cord to an outlet that is not constantly energized.
CLEANING INSTRUCTIONS
Preparation
- Shut off unit using power switch and allow vacuum to Disconnect power source from the DC input receptacle on the unit.
- Disconnect tubing and remove container from
- Carefully remove lid and empty
NOTE– Container should be emptied and cleaned after each use.
warning
To prevent possible risk of infection from contaminated cleaning/disinfection solutions, always prepare fresh solution for each cleaning cycle and discard solution after each use.
Disposable Collection Container with Internal Filter Cartridge
The disposable collection container and lid are meant for single-patient use.
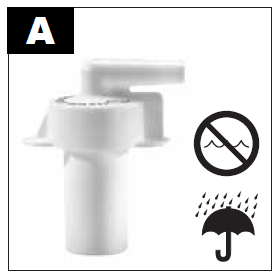
- Remove filter cartridge and 4-3/8” tubing and set aside.NOTE– Filter MUST NOT get wet. The filter material cannot be removed from the elbow (figure A).
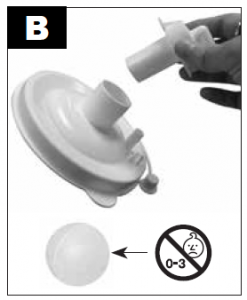
 warningDo not remove float ball from lid. If removed, float ball may pose a choking hazard (figure B).
 - Wash container, lid and splash guard in warm water/dishwashing solution. Rinse with clean, warm water.
- Soak in 1 part vinegar (>=5% acetic acid concentration) to 3 parts water (131˚F-149ºF/55˚C-65˚C) solution for 60 minutes. Rinse with clean, warm water and air dry.NOTE– The disassembled container may also be washed in a dishwasher, top shelf only, using a cycle with a water temperature between 131ºF-149ºF/55ºC-65ºC.

Disposable Collection Container with External Bacteria Filter
- Remove bacteria filter, 3-3/8” tubing, and connection elbow and set aside.
- Wash jar and lid in a solution of warm water with a mild, liquid detergent (e.g. Dawn or Palmolive) and rinse with clean, warm tap water.
- Soak in 1 part vinegar (>=5% acetic acid concentration) to 3 parts water (131˚F-149ºF/55˚C-65˚C) solution for 60 minutes. Rinse with clean, warm water and air dry.NOTE– The disposable collection container and lid are meant for single-patient use.NOTE– The disassembled container may also be washed in a dishwasher, top shelf only, using a cycle with a water temperature between 131ºF-149ºF/55ºC-65ºC.
Reusable Collection Container with External Bacteria Filter
- Remove bacteria filter, 4-3/8” tubing, and connection elbow and set aside. Remove o-ring and overflow valve from lid.
- Wash jar, lid, o-ring, and overflow valve in a solution of warm water with a mild, liquid detergent (e.g. Dawn or Palmolive) and rinse with clean, warm tap water.
- For single patient use: After washing, disinfect using one of the following methods:a. Soak in 1 part vinegar (>=5% acetic acid concentration) to 3 parts water (131ºF-149ºF/55ºC-65ºC) solution for 60 minutes. Rinse with clean, warm water and air dry in a clean environment.b. Wash with rubbing alcohol and air dry in a clean environment.c. Wash with a commercial (bacterial-germicidal) disinfectant. Follow disinfectant manufacturer’s recommended dilution rates and instructions carefully.
- For multi-patient use: After washing:a. After parts are completely dry, place jar and lid in autoclave with the open end down. Ensure parts are not touching. Run one sterilization steam cycle at 250°F(121°C) for 15 minutes. NOTE-Jar is guaranteed up to 30 cycles of autoclave sterilization at the indicated conditions.b. Dispose of and replace filter, tubing and elbow between patients.
Suction Unit (single-patient use)
- With the power switch in the “Off” position, disconnect the DeVilbiss Suction Unit from all external power sources.
- Wipe the housing with a clean cloth and any commercial (bacterial-germicidal) disinfectant.CAUTION– Do not submerge in water as this will result in damage to the vacuum pump.NOTE–Do not use any cleaners or disinfectants that contain ammonia, benzene and/or acetone to clean the unit.
Tubing (single-patient use)
- Disconnect the tubing from the unit.
- Rinse thoroughly by running warm tap water through it.
- Follow by soaking in a solution of 1 part vinegar (>=5% acetic acid concentration) to 3 parts water (131ºF-149ºF/55ºC-65ºC) for 60 minutes. Rinse with clean, warm water and air dry.
- Keep the outer surface of the tubing clean by wiping with a clean, damp cloth.
Carrying Case (single-patient use)
- Wipe the case using a clean cloth dampened with detergent and/or disinfectant.Note– Disinfection information is based on AARC Clinical Practice Guideline Suctioning of the Patient in the Home.
Suction Unit (multi-patient use)
Device Cleaning and Disinfection When There is a Patient ChangeWhen medical devices have already been used with a patient, contamination with human pathogenic germs should be assumed (unless there is evidence to the contrary), and the next patient, user or third party should be protected by appropriate handling and preparation. Therefore, when there is a patient change, people must be protected during the transport and handling of the device and the device must be fully processed, i.e., cleaned and disinfected, by suitably trained personnel before reuse to protect the next patient. The complete processing may only be done by the manufacturer or by a qualified DeVilbiss provider/service technician.Note – When the unit is used as per instructions under normal conditions the interior of the unit is protected from exposure to pathogens by the in-line filter on the collection container, hence no disinfection of internal components is necessary.Note – If the unit is used without an in-line filter then the interior of the unit has been exposed to pathogens and the unit cannot be disinfected.Note – If the following processing of the unit by a qualified DeVilbiss provider/technician is not possible, the unit must not be used by another patient!DeVilbiss Healthcare recommends that at least the following procedures be carried out by the manufacturer or a qualified third party between uses by different patients.
- Dispose of all accessory components that are not suitable for reuse, i.e., collection container, filter, tubing and carrying case.
- With the power switch in the “Off” position, disconnect the DeVilbiss Suction Unit from all external power sources.
- Visually inspect unit for any damage, missing parts, etc.
- Wipe the housing with a clean cloth and a commercial (bacterial-germicidal) disinfectant that meets the requirements listed in the NOTE below and is used as per the disinfectant manufacturer’s recommended dilution rates and instructions.CAUTION – Do not submerge in water as this will result in damage to the vacuum pump.NOTE – Do not use any cleaners or disinfectants that contain ammonia, benzene and/or acetone to clean the unit
Maintenance
Inspect suction tubing and container for leaks, cracks, etc. before each use.
DANGER
Electric shock hazard. Do not attempt to open or remove cabinet, there are no user-serviceable internal components. If service is required, return unit to a qualified DeVilbiss Healthcare provider or an authorized service center. Opening or tampering with the unit will void warranty.
Changing Filter Cartridge (single-patient use) Disposable Container
- Change filter cartridge if overflow occurs or every two months, whichever comes first.
- Turn unit “off”.
- Remove filter cartridge and 43/8” tubing.
- Install new cartridge and tubing.NOTE– Do not substitute any other material for this filter cartridge. Substitution may lead to contamination or poor performance; use only DeVilbiss filter cartridges.NOTE– The filter cartridge contains a hydrophobic filter. If the filter media becomes wet, air flow will be stopped. The filter cartridge must then be replaced. Do not remove filter media from filter cartridge.NOTE– Filter cartridges are included with each disposable container. They are also available separately (7305D-635 12/pack).
Changing Bacteria Filter (single-patient use) Reusable Container and/or Disposable Container
- Change bacteria filter if overflow occurs or every two months, whichever comes first.
- Remove filter by disconnecting it from suction unit and lid assembly.
- Replace with a clean DeVilbiss bacteria filter (non-sterile) and remount to suction unit and lid. Ensure that the clear side of the bacteria filter is toward elbow and container when installing/re-installing. Do not reverse direction of filter. Additional filters (7305D-608 12/pack) may be purchased from your authorized DeVilbiss Healthcare provider.NOTE– Do not substitute any other material for this bacteria filter. Substitution may lead to contamination or poor performance; use only DeVilbiss filters.NOTE– Bacteria filter must be changed between patients.
TROUBLESHOOTING
NOTE– Your DeVilbiss Suction Unit contains no user-serviceable parts. If you believe your unit is not working properly, BEFORE YOU RETURN IT TO THE HOME MEDICAL EQUIPMENT PROVIDER WHERE YOU PURCHASED IT, please take a few moments to check for these possible causes:
| PROBLEM | ACTION |
| Unit does not turn on, but green external power light is illuminated. | 1. Check power sources and connections.
2. Ensure wall outlet is live by plugging in a lamp. 3. If running from an internal battery, ensure that your unit has a battery installed. 4. If battery is installed, check that it is fully charged. |
| Pump runs, but there is no vacuum. | 1. Check that all tubing is connected properly.
2. Check tubing connections for breaks or leaks. 3. Ensure that float shut-off is not activated. 4. Check for leaks or cracks in container assembly. |
| Low vacuum. | 1. Use vacuum adjustment knob to increase vacuum level.
2. Check system for leaks. 3. Push vacuum adjustment knob in toward unit and then release. |
| Battery will not charge but charge light is illuminated. | 1. Ensure that unit is equipped with an internal battery by contacting your DeVilbiss equipment provider.
2. Verify that charge light turns on. 3. Check electrical connections during charging. 4. Ensure wall outlet is live by plugging in a lamp. |
Specifications/Classifications
| Size | H x W x D inches (cm) |
| 7305P & 7305D Series | 9.0 x 7.0 x 8.0 (22.9 x 17.8 x 20.3) |
| Weight | lb. (kg) |
| 7305D Series | 3.8 (1.7) |
| 7305P Series | 6.3 (2.9) |
| Electrical Requirements | 100-240 V AC 50/60 Hz .75 A max; 12 V DC, 33 W max |
| Internal Rechargeable Battery | |
| 7305P Series | Factory Equipped |
| 7305D Series | Not Factory Equipped (provider-installed option) |
| Vacuum Range | |
| 7305P & 7305D Series | 80 to 550 mm Hg |
| Air Flow @ pump inlet: | 27 LPM (free flow) typical (may be less when running from internal battery) |
| Container Capacity | |
| 7305 D & P Series | 800 ml (cc) Disposable (2 filter options) |
| 7305 D & P Series – Optional | 1200 ml (cc) Reusable |
| Environmental Conditions | |
| Operating Temperature Range | 32°F (0°C) – 104°F (40°C) |
| Operating Relative Humidity | 0-95% |
| Operating Atmospheric Pressure | 10.2 psi (70 kPa) – 15.4 psi (106 kPa) |
| Storage & Transport Temperature Range | -40°F (-40°C) – 158°F (70°C) |
| Storage & Transport Relative Humidity | 0-95% |
| Storage & Transport Atmospheric Pressure | 7.3 psi (50 kPa) – 15.4 psi (106 kPa) |
| Warranty | |
| 7305P Series | Two-years limited, excluding internal battery and container |
| 7305D Series | Two-years limited, excluding container |
| Internal Battery | 90-day |
| Approvals | |
| 7305D & 7305P Series | IEC 601-1; CAN/CSA-C22.2 No. 601.1-M90; UL 60601-1, EN 60601-1-2 |
| 7305P meets RTCA/D-160D | DO-160D – section 21 Category M For battery operation only Airline use |
| Equipment Classifications | |
| With respect to protection from electric shock | Class I and internally powered |
| Degree of protection against electric shock | Type BF Applied Parts |
| Degree of protection against ingress of liquids | IPX2 and ordinary power supply |
| Mode of Operation | Intermittent Operation: 30 minutes on, 30 minutes off |
| Equipment not suitable for use in the presence of a flammable anesthetic mixture with air or with oxygen or nitrous oxide. | |
| ISO Classification | |
| 7305P Series only – Electrically powered medical suction equipment for field and transport use according to ISO 10079-1 : 1999 | |
| High Flow/High Vacuum | |
| 7305D Series – Electrically powered medical suction equipment for non-transport use according to ISO 10079-1 : 1999 |
PROVIDER’S NOTES
No routine calibration or service is required provided the device is used in accordance with the manufacturer’s directions. In case of a change of patient, the device must be reconditioned to protect the user. Reconditioning must only be carried out by the manufacturer or service provider. Between patients:
- Visually inspect unit for any damage, missing parts
- Ensure that unit and accessories are
- Use an independent vacuum gauge to verify the unit provides the proper vacuum level as stated in
- Discard and replace collection container, filter, and tubing between
- Wipe the surface using a clean cloth dampened with
TWO-YEAR LIMITED WARRANTY
The compressor portion of the DeVilbiss Suction Unit 7305P & 7305D Series (excluding internal rechargeable batteries) is warranted to be free from defective workmanship and materials for a period of two years from date of purchase. Internal rechargeable batteries are warranted for 90 days. Any defective part(s) will be repaired or replaced at DeVilbiss Healthcare’s option if the unit has not been tampered with or used improperly during that period. Make certain that any malfunction is not due to inadequate cleaning or failure to follow the instructions. If repair is necessary, contact your DeVilbiss Healthcare Provider or DeVilbiss Service Department for instructions: U.S.A. 800-338-1988 or 814-443-4881, Europe +49-(0) 621-178-98-0.NOTE–This warranty does not cover providing a loaner unit, compensating for costs incurred in rental while said unit is under repair, or costs for labor incurred in repairing or replacing defective part(s).THERE IS NO OTHER EXPRESS WARRANTY. IMPLIED WARRANTIES, INCLUDING THOSE OF MERCHANTABILITY AND FITNESS FOR A PARTICULAR PURPOSE, ARE LIMITED TO THE DURATION OF THE EXPRESS LIMITED WARRANTY AND TO THE EXTENT PERMITTED BY LAW ANY AND ALL IMPLIED WARRANTIES ARE EXCLUDED. THIS IS THE EXCLUSIVE REMEDY AND LIABILITY FOR CONSEQUENTIAL AND INCIDENTAL DAMAGES UNDER ANY AND ALL WARRANTIES ARE EXCLUDED TO THE EXTENT EXCLUSION IS PERMITTED BY LAW. SOME STATES DO NOT ALLOW LIMITATIONS ON HOW LONG AN IMPLIED WARRANTY LASTS, OR THE LIMITATION OR EXCLUSION OF CONSEQUENTIAL OR INCIDENTAL DAMAGES, SO THE ABOVE LIMITATION OR EXCLUSION MAY NOT APPLY TO YOU.This warranty gives you specific legal rights, and you may also have other rights which vary from state to state.
Manufacturer’s Note
Thank you for choosing a DeVilbiss Suction Unit. We want you to be a satisfied customer. If you have any questions or comments, please send them to our address on the back cover.For Service Call Your Authorized DeVilbiss Healthcare Provider:
| Phone | Purchase Date | Serial # |
DEVILBISS GUIDANCE AND MANUFACTURER’S DECLARATION
WARNING
Medical Electrical Equipment needs special precautions regarding Electromagnetic Compatibility (EMC) and needs to be installed and put into service according to the EMC information provided in the accompanying documents.Portable and Mobile RF Communications Equipment can affect Medical Electrical Equipment.The equipment or system should not be used adjacent to or stacked with other equipment and that if adjacent or stacked use is necessary, the equipment or system should be observed to verify normal operation in the configuration in which it will be used.NOTE– The EMC tables and other guidelines provide information to the customer or user that is essential in determining the suitability of the Equipment or System for the Electromagnetic Environment of use, and in managing the Electromagnetic Environment of use to permit the Equipment or System to perform its intended use without disturbing other Equipment and Systems or non-medical electrical equipment.
| Guidance and Manufacturer’s Declaration – Emissions All Equipment and Systems | |||
| This device is intended for use in the electromagnetic environment specified below. The customer or user of this device should assure that it is used in such an environment. | |||
| Emissions Test | Compliance | Electromagnetic Enforcement – Guidance | |
| RF Emissions CISPR 11 | Group 1 | This device uses RF energy only for its internal function. Therefore, its RF emissions are very low and are not likely to cause any interference in nearby electronic equipment. | |
| RF Emissions CISPR 11 | Class B Radiated and Conducted Emissions |
This device is suitable for use in all establishments including domestic, and those directly connected to the public low-voltage power supply network that supplies buildings used for domestic purposes. |
|
| Harmonics IEC 61000-3-2 | Class A | ||
| Flicker IEC 61000-3-3 | Complies | ||
| Immunity Test | IEC 60601 Test Level | Compliance Level | Electromagnetic Environment – Guidance |
| Electrostatic Discharge (ESD) IEC 61000-4-2 | ±6kV contact
±8kV air |
±6kV contact
±8kV air |
Floors should be wood, concrete or ceramic tile. If floors are synthetic, the relative humidity should be at least 30%. |
| Electrical Fast Transient/burst IEC 61000-4-4 | ±2kV on AC Mains | ±2kV on AC Mains | Mains power quality should be that of a typical commercial or hospital environment. |
| Surge
IEC 61000-4-5 |
±1kV Differential
±2kV Common |
±1kV Differential
±2kV Common |
Mains power quality should be that of a typical commercial or hospital environment. |
| Voltage dips, short interruptions and voltage variations on power supply input lines IEC 61000-4-11 | >95% Dip for 0.5 Cycle
60% Dip for 5 Cycles 30% Dip for 25 Cycles >95% Dip for 5 Seconds |
>95% Dip for 0.5 Cycle
60% Dip for 5 Cycles 30% Dip for 25 Cycles >95% Dip for 5 Seconds |
Mains power quality should be that of a typical commercial or hospital environment. If the user of this device requires continued operation during power mains interruptions, it is recommended that the device be powered from an uninterruptible power supply or battery. |
| Immunity Test | IEC 60601 Test Level | Compliance Level | Electromagnetic Environment – Guidance |
| Power Frequency 50/60Hz Magnetic Field
IEC 61000-4-8 |
3A/m |
3A/m |
Power frequency magnetic fields should be that of a typical location in a typical commercial or hospital environment. |
|
Conducted RF IEC 61000-4-6 |
3 Vrms from 150 kHz to 80 MHz |
V1 = 3 Vrms |
Portable and mobile RF communications equipment should be separated from the device by no less than the recommended separation distances calculated/listed below:
D=(3.5/V1)√P |
|
Radiated RF IEC 61000-4-3 |
3 V/m 80 MHz to 2.5 GHz |
E1 = 3V/m |
D=(3.5/E1)√P 80 to 800 MHz
D=(7/E1)√P 800 MHz to 2.5 GHz Where P is the maximum power rating in watts and D is the recommended separation distance in meters. Field strengths from fixed transmitters, as determined by an electromagnetic site survey, should be less than the compliance levels (V1 and E1). Interference may occur in the vicinity of equipment containing a transmitter. |
| For transmitters rated at a maximum output power not listed above, the recommended separation distance D in meters (m) can be estimated using the equation applicable to the frequency of the transmitter, where P is the maximum output power rating of the transmitter in watts (W) according to the transmitter manufacturer.
Note 1: At 80 MHz and 800 MHz, the separation distance for the higher frequency range applies. Note 2: These guidelines may not apply in all situations. Electromagnetic propagation is affected by absorption and reflection from structures, objects, and people. |
|||
| Recommended Separation Distances Between Portable and Mobile RF Communications Equipment and this device. This device and system are NOT Life-Supporting | |||
| This device is intended for use in the electromagnetic environment in which radiated disturbances are controlled. The customer or user of this device can help prevent electromagnetic interference by maintaining a minimum distance between portable and mobile RF Communications Equipment and the device as recommended below, according to the maximum output power of the communications equipment. | |||
|
Maximum Output Power (Watts) |
Recommended Separation Distances for the device (meters) | ||
| 150 kHz to 80 MHz
D=(1.1667)√P |
80 to 800MHz
D=(1.1667)√P |
800 MHz to 2.5 GHz
D=(2.3333)√P |
|
| 0.01 | 0.11667 | 0.11667 | 0.23333 |
| 0.1 | 0.36894 | 0.36894 | 0.73785 |
| 1 | 1.1667 | 1.1667 | 2.3333 |
| 10 | 3.6894 | 3.6894 | 7.3785 |
| 100 | 11.667 | 11.667 | 23.333 |
| For transmitters rated at a maximum output power not listed above, the recommended separation distance D in meters (m) can be estimated using the equation applicable to the frequency of the transmitter, where P is the maximum output power rating of the transmitter in watts (W) according to the transmitter manufacturer.Note 1: At 80 MHz and 800 MHz, the separation distance for the higher frequency range applies.Note 2: These guidelines may not apply in all situations. Electromagnetic propagation is affected by absorption and reflection from structures, objects, and people. |
Read More About This Manual & Download PDF:
[xyz-ips snippet=”download-snippet”]

 warningDo not remove float ball from lid. If removed, float ball may pose a choking hazard (figure B).