![]() DV54 auto adjust CPAP series
DV54 auto adjust CPAP series

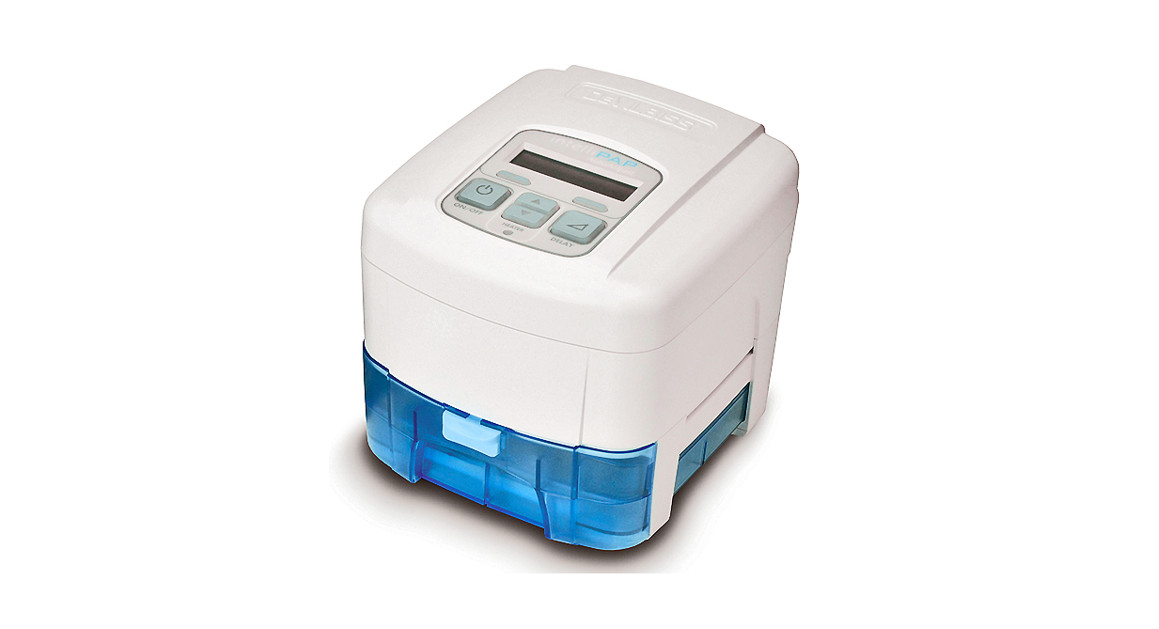
DeVilbiss® intellipap® positive airway pressure DeviceCAUTION–USA Federal law restricts this device to sale by, or on the order of a physician. Made in the USA of US & Imported Parts. Instruction Guide.
Key Features
DV54 / DV5HH
SYMBOL DEFINITIONS
IMPORTANT SAFEGUARDS READ ALL INSTRUCTIONS BEFORE USING THIS DEVICE SAVE THIS INSTRUCTIONDANGER
- Electric Shock Hazard – Do not use while bathing.
- Electric Shock Hazard – Do not immerse this device into water or any other liquid.
- Electric Shock Hazard – Do not attempt to open or remove the cabinet. There are no user-serviceable internal components. If service is required, return the product to your home care provider. Opening or tampering with the product will void the warranty.
WARNING
- The DeVilbiss IntelliPAP should be used only with masks recommended by DeVilbiss, your physician, or respiratory therapist.
- To avoid rebreathing of exhaled air, do not use a CPAP mask unless the device is turned on and providing a supply of air. Venting in the mask should never be blocked. When the device is turned on and providing a fresh supply of air, exhaled air is flushed out of the mask vent. However, when the device is not operating, exhaled air may be rebreathed. breathing of exhaled air for longer than several minutes can in some circumstances lead to suffocation. This warning applies to most CPAP devices.
- The DeVilbiss IntelliPAP is not a life support device and may stop operating with certain device faults or with a power failure. It is intended to be used on spontaneously breathing individuals weighing 66 lbs/30 Kg or greater.
- To avoid electric shock, always unplug the power cord from the wall outlet power source when performing the cleaning.
- Use only accessories recommended by DeVilbiss.
- Always remove the water chamber from the optional humidifier cradle before filling.
- If water has spilled onto the humidifier cradle or it has been submerged into water, unplug the power cord from the power source immediately. Allow the device to dry completely before use.
- Never block air openings of the humidifier cradle or chamber. Do not insert objects into any openings or tubes.
- For proper operation, place the system on a flat, sturdy, level surface.
- The optional humidifier is intended for single-patient use only.
- If the system is placed on the floor, do not position it where it may be stepped on when getting out of bed.
CAUTION
- The circular data port connector located on the back of the IntelliPAP is used to attach accessories to the device. The connector must only be used with accessories approved for use by DeVilbiss. Do not attempt to attach any other device to this connector as it may damage the CPAP or the accessory device.
- Never rinse or place the device in water. Never allow liquids to get into or around any of the ports, switches, or air filter; doing so will result in device damage. If this occurs, discontinue use and remove the power cord from the power source. Allow the device to completely dry before use.
- Do not place the IntelliPAP where it can be knocked onto the floor or where the power cord may create a trip hazard.
- Only the DeVilbiss DV5 series Heated Humidifier system is recommended for use with the IntelliPAP. Other humidifier systems may prevent the device from detecting snoring and may cause inappropriate pressure levels in the mask.
- Empty and dry humidifier water chamber before transporting.
INSTRUCTIONSIntended useThe DeVilbiss IntelliPAP Model DV54 Series AutoAdjust CPAP is intended for use in treating OSA in spontaneously breathing patients 30 Kg (66 lbs) and above by means of application of positive air pressure. The device is to be used in home and clinical environments.Indications For use (optional Heated Humidifier) Use the advice and prescription of a licensed physician to help relieve the symptoms of dryness of the throat, nasal passages, and the mouth, which are common with positive airway pressure therapy. This is especially true in dry climates and during the cold season when humidity in the air is typically lower than at other times.ContraindicationDo not use the IntelliPAP system if your upper airway has been bypassed.NOTE–Symptoms of dryness of the throat, nasal passages, and the mouth are common with positive airway pressure therapy. The IntelliPAP features an optional humidifier system to help minimize these effects.
KEY Features (page 2, Figures a-F)
| DeVilbiss intellipap Device (Figures a and B)1. Keypad/LCD Display (see Figure C)2. Air Supply Port on Back3. Air Supply Port on Bottom (for optional humidifier)4. Air Supply Port Plug5. Heater Power Connector (for optional humidifier)6. AC Power Connector7. DC Power Connector8. Data Port9. Power Cord (appropriate to your wall outlet) (not shown)10. Air Inlet Filter Opening11 Connector Cover (not shown) | Humidifier cradle (Figure D)1. Heater plate2. Heater power connector3. Storage compartment for connector cover (on bottom)4. Air supply port inlet5. Air supply port outlet6. Flow generator release button7. Flow generator locking tabs |
| Keypad (Figure c)1. On/Off2. Previous Item3. Next Item4. Delay5. Decrease Value6. Increase Value7. Heater Power LED (for optional humidifier)Ask your equipment provider for information about other DeVilbiss masks, equipment, and accessories. | Water chamber (Figure e)1. Chamber lid2. Chamber base3. Heat transfer plate (on bottom)4. Sealing gasket5. Water level indicators (front and sides)6. Chamber release latch7. Chamber disassembly leverTherapy Management system (Figure F)1. SmartLink ® (optional) |
SYSTEM ASSEMBLY
Without Heated Humidification
- Locate the air supply port and heater power connector on the bottom of the IntelliPAP device. Ensure that each opening has the appropriate soft cover securely attached.
- Place the IntelliPAP on a stable surface such as a nightstand or table. If you wish, you may also place the device on the floor at the bedside, being careful to place the unit where it won’t be kicked or stepped on. Ensure that the air inlet in the back of the device is not blocked by anything such as curtains or bedding.
NOTE–Never place the IntelliPAP system on a soft surface such as a bed or couch during operation.
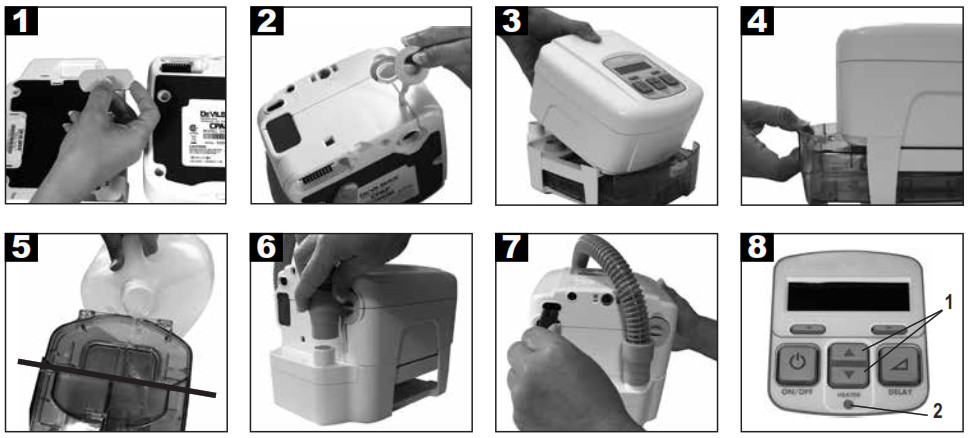
With Heated HumidificationCAUTION–The height of the IntelliPAP must be lower than the mask when using a humidifier to prevent water from getting into mask.1. If your system includes a humidifier, please follow steps in Figures 1-7.
a. Locate the heater power connector on the bottom of the device. Remove the connector cover and insert it into the store opening in the bottom of the humidifier cradle.b. Locate the air supply port at the bottom of the device. Remove the port plug and insert it into the air supply port in the back of the device.c. Place device onto humidifier cradle and click into place.d. Fill clean chamber to fill line with distilled water and insert into the cradle.
NOTE-Always use distilled water to avoid mineral buildup inside the chamber. Do not overfill.
Basic CPAP controls
| Name | Symbol | Function |
| ON/OFF | The ON/OFF button starts and stops the flow of air from the device. | |
| HEATER |  |
If your IntelliPAP has a heater/ humidifier attached, these buttons adjust the heater setting.Increase the setting for more humidity and decrease the setting for less humidity. |
| DELAY | The Delay button activates the comfort delay feature and only functions if this feature has beenenabled. To understand how to set the parameters of this feature, please refer to the Using theComfort Delay Feature found on page EN – 7. |
NOTE– The left and right arrow keys on the control panel provide access to menus for specific settings. Ask your home care provider for more information.
OPERATION
1. Fully insert the power cord into the back of the device. Plug the other end of the power cord into the AC wall outlet.2. Attach air supply tubing to air supply port in the back of the device.3. Prepare the mask (supplied by your equipment provider) by referring to the mask’s instruction guide.4. Connect the air supply tubing to the mask.
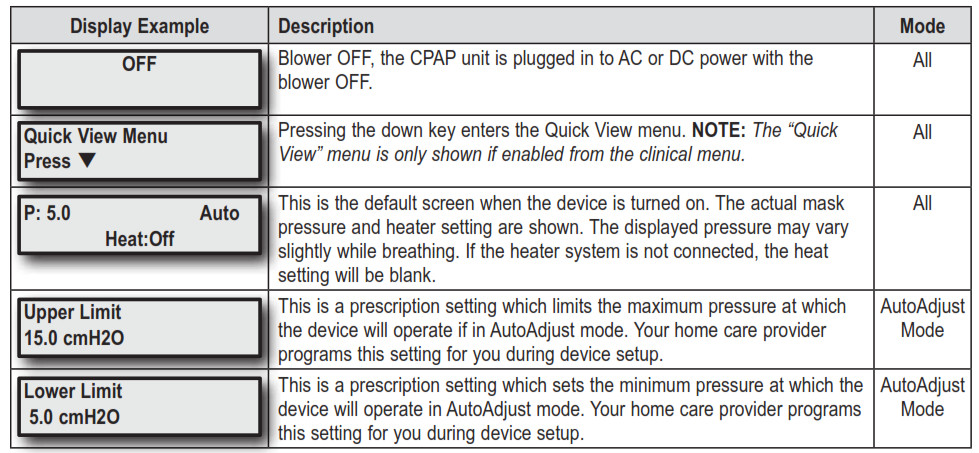
NOTE–The air supply tubing supplied with the device is specially designed to prevent kinking and allow you to receive optimal airflow. Use only the 22 mm diameter, smooth-bore, kink-resistant tubing supplied with this device or an air supply tubing recommended by your equipment provider.Start-upPut on your mask and press the ON/OFF button on the keypad OR put on your CPAP mask and take a few breaths to turn on airflow automatically. The pressure in your mask will rise to the set pressure in about 10 seconds.NOTE–If the device does not automatically start after taking 2-3 breaths, this feature may have been disabled. If Auto ON/ OFF is disabled, you must manually press the ON/OFF button to start and stop the device.The keypad display shows the actual mask pressure while the device is in use. Because this is the actual pressure, the device pressure reading may vary slightly as you breathe.If your DeVilbiss IntelliPAP system includes a humidifier, its heater controls and status are displayed.NOTE– If the display on your device is not similar to those listed above, refer to the section titled “Patient Messages” on page EN-8.
Controlling the Humidity (optional)The heater setting can be adjusted within a range of 1 to 10. The optimum temperature setting is dependent on the ambient temperature and humidity of your room. If your room temperature is low and/or the relative humidity is high, then a lower temperature setting may be necessary to prevent excess condensation in the air supply tubing. If the room temperature is high and/or the relative humidity is low, then a higher temperature setting may be necessary for optimum comfort.The heater setting of 1 results in a heater plate temperature of approximately 84°F (29°C). The heater setting of 10 results in a heater plate temperature of approximately 149°F (65°C).NOTE–Always allow at least 10 minutes of cooling time after turning the device off before removing the water chamber from the humidifier cradle.
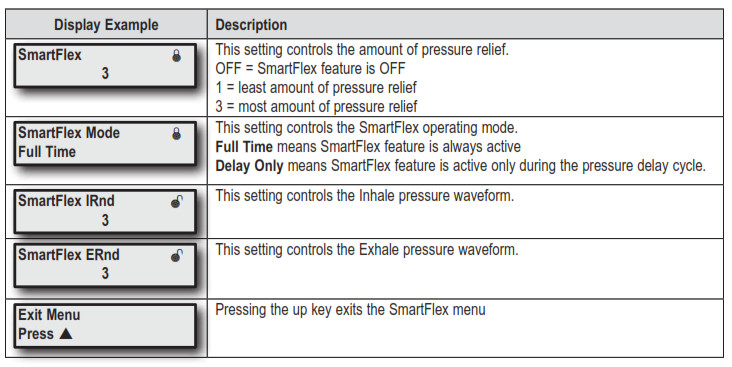
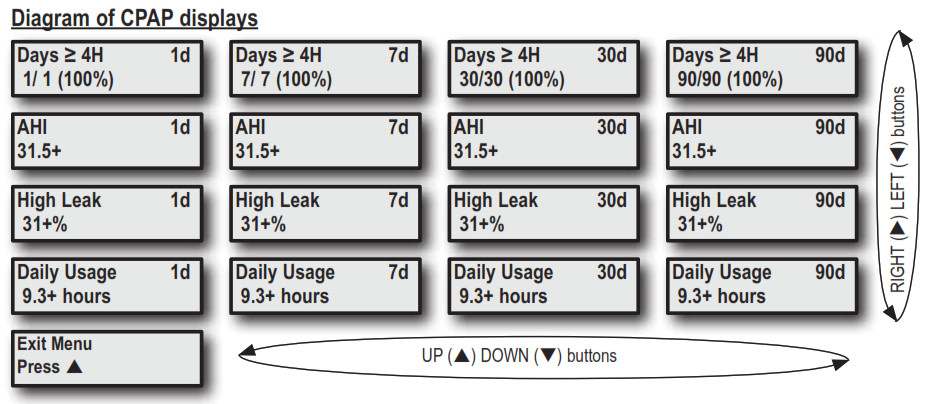
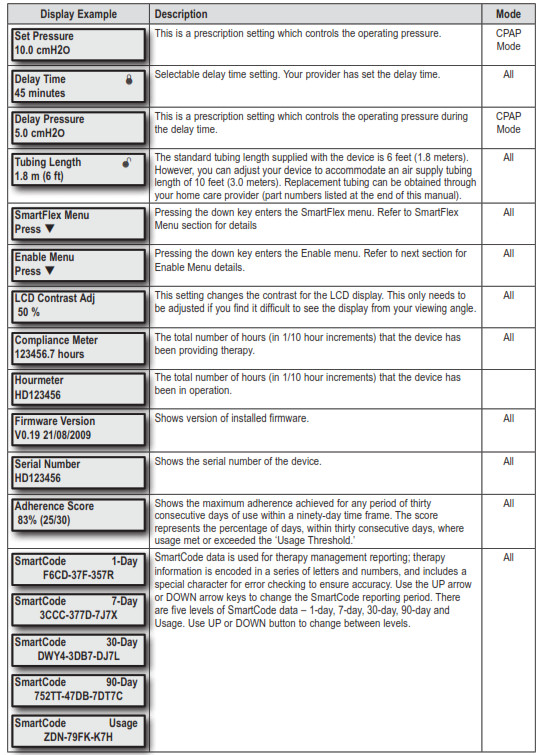
WARNING Do not attempt to fill the humidifier while it is attached to the humidifier cradle. Damage to the humidifier cradlemay occur.CAUTION– Use only distilled water that is at room temperature. Do not add any medication or other additives to the water.CAUTION– For proper operation, ensure the flow generator is OFF before inserting the humidifier chamber.WARNING Never touch the heater plate on the humidifier cradle. Never touch the heat transfer plate on the bottom of the water chamber. These plates can reach temperatures as high as 149°F (65°C) during operation.Do not operate the heater if the water chamber is empty. The heater plate may be turned off using the keypad heater control when being used without water.SmartCode and adherence score information Your homecare provider may contact you to retrieve SmartCode and Adherence Score information. To display the SmartCode, press the LEFT arrow key once. Use the UP arrow or DOWN arrow keys to change the SmartCode reporting period. Press the LEFT arrow key again to display the Adherence Score.The Quick View Menu shows a summary of information that is reported in the SmartCode data. Information in the Quick View includes: Number of days used more than 4 hours (or can be set to 5 hours by a clinician), AHI (Apnea/Hypopnea Index), High Leak percent (percent of time at leak >95 L/m), and Daily Usage (average hours per day used). Each parameter can be viewed in any of four-time periods, 1 day, 7 days, 30 days and 90 days.Compliance information can be viewed without turning the CPAP on. With the blower OFF (display shows OFF), press the left or right arrow keys on the keypad to scroll through the information.Generating Compliance Reports for Employer/Insurer/Physician SmartCode reports satisfy most requirements for ongoing compliance/adherence information, and the software retains 1,023 days (2.8 years) of data. We recommend you work with your provider to establish a routine for clearing SmartCode data to ensure current usage information is available. The compliance meter should be cleared only after the required report is generated, submitted, and approved by the requestor. Once cleared, a new cycle of 2.8 years begins and the only source for the previous data will be the hard-copy reports.NOTE-Only the provider has access to clear the meter.Using the smartFlex FeatureYour IntelliPAP has a SmartFlex pressure relief feature to help make it easier for exhale against your prescribed pressure by lowering the pressure slightly when you exhale. The pressure returns to your prescribed pressure during inhale to maintain your therapy.The SmartFlex menu is available in all modes and is a sub-menu that allows you to control various functions of your IntelliPAP. It is accessed by pressing the down button while “SmartFlex Menu” is shown on the Display.SmartFlex pressure relief includes three settings for exhale relief; 1, 2, and 3. (1 is the least amount of relief, 3 is the most amount of relief). Setting SmartFlex pressure relief to OFF turns the SmartFlex feature OFF.The pressure waveform can also be adjusted independently for inhale and exhale to smooth the transition when SmartFlex pressure relief is active. The pressure waveform settings are SmartFlex-i (IRnd) and SmartFlex-e (ERnd) with settings from 0 to 5 in steps of 1 (0 is the least amount of smoothing, 5 is the most amount of smoothing).SmartFlex pressure relief can be operated Full Time or during the Delay Only. The display will show “FLX” in the top row of the default screen (between CPAP pressure and Mode) while SmartFlex pressure relief is operating.When SmartFlex pressure relief is turned on Full Time, the pressure relief operates at all times when you are breathing on the device. When SmartFlex pressure relief is set to Delay Only, the pressure relief operates only during the Comfort Delay period and turns off after the delay period is finished.The device contains a SmartFlex disengagement feature. If a patient is experiencing a respiratory event while the CPAP is in the relief pressure mode, after a limited time the CPAP will shift to the prescription pressure and remain at this pressure until normal breathing resumes.Using the comfort Delay Feature Your IntelliPAP has a comfort delay feature to help make it easier for you to fall asleep. The airflow will start at low pressure and then gradually ramp up to the prescribed setting over the last few minutes of the specified delay time.
NOTE–When the delay comfort feature is activated, a message will flash on the display periodically, indicating the amount of time remaining in the delay.You can adjust the amount of time spent in comfort delay by using the advanced device controls. The Delay Time can be adjusted from 0 to 45 minutes in 5-minute increments.NOTE–If you are unable to change the delay time, your provider has locked this setting.Press the delay button to activate the comfort delay feature. The airflow pressure will drop to the prescribed comfort delay pressure.In the final 10 minutes of the delay period, the pressure will gently rise to the pressure prescribed for your therapy. You may repeat the comfort delay by pressing the delay button again if you have not fallen asleep during the first use.NOTE-The AutoAdjust will not adjust the pressure setting during the comfort delay period, allowing you to fall asleep without responding to early respiratory events.Shut DownPress the ON/OFF button to turn the device off. You may also simply remove your mask. After a few seconds, the device will display the message “Mask Off. Please check mask fit.” If you do not put the mask on again the device will automatically turn off in about 20 seconds. Pressing any button will remove the message from the display.NOTE–If the DeVilbiss IntelliPAP does not turn off automatically, the Auto-OFF feature may have been disabled. In this case, you must manually turn the device off.Enable Menu ListThe Enable menu is available in all modes and is a sub-menu that allows you to control various functions of your IntelliPAP.It is accessed by pressing the down button while “Enable Menu” is shown on the Display.
| Display Example | Enable Menu Item Description |
 |
This option controls the Auto-OFF feature, which automatically stops the flow of air after taking off the mask. The device will require at least 30 seconds to turn OFF depending on the kind of mask used. When Auto-OFF is enabled, Auto-ON is also enabled. If the unlocked symbol is shown, you are able to adjust this setting. If the locked symbol is shown, this setting can only be adjusted by your provider. |
 |
This option controls the Auto-ON feature, which automatically starts the flow of air after breathing once or twice into the mask. This is always enabled when Auto-OFF is enabled. If the unlocked symbol is shown, you are able to adjust this setting. If the locked symbol is shown, this setting can only be adjusted by your provider. |
 |
This option controls the mask fit check feature. The airflow to your mask is constantly measured and if the amount of airflow exceeds 95 liters/minute for more than 10% of the time used, a notification will be created. This notification will be displayed the next time you use IntelliPAP. |
 |
Low backlight Enable will keep the backlight dim during operation. Low backlight Disabled will turn the backlight OFF during operation. |
 |
Pressing the up key exits the Enable menu. |
PATIENT MESSAGESYour IntelliPAP will alert you of issues that may require some action on your part in order to make your therapy more effective. You can press any key or button to clear the message from the display, but the IntelliPAP will operate normally even if the message is not cleared. Two kinds of messages are displayed: Reminders and Notifications. RemindersReminders alert you when parts of your system need to be replaced. Some components of your system wear over time and, if not replaced, may compromise your therapy. If you see a message on the display that is not listed below, you may have the optional DeVilbiss SmartLink Module attached to your device (Fig. F), which provides additional messages. Refer to the documentation that was provided with the SmartLink Module.
Clean Filter – The filter should be checked every 10 days for signs of dirt or wear so that it can be cleaned as needed.This message helps to remind you to check it regularly.NotificationsNotifications identify conditions in your IntelliPAP that may require action by you or your equipment provider in order to maintain a high level of therapy. If you see a message on the display that is not listed below, you may have the optionalDeVilbiss SmartLink Module attached to your device (Fig. F), which provides additional messages. Refer to thedocumentation that was provided with the SmartLink Module.Delay Running xx Minutes Left – While a comfort delay session is active, this message is flashed on the display every 5seconds to let you know how much time is left in the delay.Mask Leak – This message means the IntelliPAP has detected a large amount of airflow during therapy for at least 10% of the time during your previous use session. This notification is displayed when the device is turned on. If this message is displayed, put on the mask and adjust the headgear to ensure the mask is properly fitted to your face. Follow the mask manufacturer’s directions for adjusting the mask and headgear for proper fitting.Mask Off – This message appears due to a poor mask fit or a removed mask. Check for leaks around the mask seal and make adjustments as necessary according to the mask manufacturer’s instructions. This message will be displayed until the high airflow problem is corrected. If the high airflow condition persists for about 20 seconds, the device will automatically turn off if Auto-OFF is enabled.Device Fault – If a device fault message is displayed, refer to Troubleshooting for instructions.
INTELLIPAP TRAVAL INFORMATION
International Power ChangesYour IntelliPAP is approved for sale and use in North America and is equipped with a universal power supply that is automatically capable of accepting line voltages of 100 to 240V~ 50/60Hz. Simply contact your equipment provider for the correct style power cord for the region in which you will be traveling (refer to Accessories/Replacement Items for the correct part number) to adapt your unit to the country’s power.AltitudeYour IntelliPAP automatically compensates for changes in altitude between sea level and 9000 ft (2750 m). You do not need to make adjustments to the device for changes in altitude.
INTELLIPAP DC OPERATION
Battery powerYour IntelliPAP can be operated from a 12V DC power source in a motor home, boat or other recreational vehicle using the 12V DC cable. Alternatively, you can power your IntelliPAP using a 12V DC stand-alone battery with a DC battery clamp on the adapter and 12V DC cable. All cables are available from your equipment provider (refer to Accessories/Replacement Items for the correct part numbers). The stand-alone battery connection uses clamps that attach to the terminal connections of the battery.NOTE–The heater for the IntelliPAP’s humidification system will not operate directly from a 12V DC power source. If you need humidification, non-heated humidification is still available. Alternately, instead of connecting12V DC power directly to the IntelliPAP, you can pass the DC power through an inverter that will deliver AC power to the system. This will allow the heater to function. The power rating of the inverter must be at least 200 watts @ 110V~ / 400 watts @ 220V~.NOTE–The IntelliPAP will automatically switch power sources between AC and 12V DC if both sources are available. If your unit is connected to both AC and 12V DC power sources, it will operate on AC power as long as AC power is present, and automatically switch to 12V DC power if AC power is lost. When AC power is restored, it will return to the AC source. You do not need to reset or adjust any settings when the power source switches, but remember that your heater will not operate on 12V DC.
SUPPLEMENTAL OXYGEN
WARNING-OXYGEN USE
- Oxygen supports combustion. To avoid possible physical injury, do not smoke while using this device with supplemental oxygen. Do not use this device near hot objects, volatile substances or sources of open flames.
- Always turn on the IntelliPAP before turning on the oxygen source. Turn off the oxygen source before turning off the IntelliPAP.
- This device is not suitable for use in the presence of a flammable anesthetic mixture.
- At a fixed flow rate of supplemental oxygen, the inhaled oxygen concentration will vary depending on the pressure setting, patient breathing pattern, mask selection, and leak rate. This warning applies to most types of CPAP devices.
- Never allow the oxygen source to run continuously while connected to the IntelliPAP if the device is not in use. If the IntelliPAP is not being used, turn off the oxygen flow.
CAUTION
- Oxygen is a prescribed gas and should only be administered under the supervision of a physician.
- The flow setting of the oxygen source must be specified by a physician.
Supplemental oxygen is sometimes prescribed in addition to CPAP for treatment of Obstructive Sleep Apnea. If your physician prescribed oxygen for your sleep therapy, you can add the oxygen in one of two ways:
- Obtain the optional oxygen adapter (part #7353D-601) from your home care provider and connect it to the air supply port on the IntelliPAP. Connect one end of the air supply tubing to the open end of the adapter and the other end of the air supply tubing to the mask.
- If your mask is equipped with an oxygen port, your physician may request that you apply oxygen directly to your mask.
ACCESSORIES/REPLACEMENT
| Replacement Items | |||
| Air-inlet filter (4/pk) | DV51 D-602 | Heater connection cover | DV51 D-605 |
| Fine particle filter (4/pk) | DV51 D-603 | Oxygen adapter | 7353D-601 |
| Air supply tubing (6′) | DV51 D-629 | Carrying case | DV51 D-610 |
| Air supply plug | DV51 D-604 | Heated Humidifier | DV5HH |
| Humidifier Chamber | DV5C | Chamber Sealing Gasket | DV5C-614 |
| Power Items | |||
| AC power cord (USA) | DV51 D-606 | AC power cord (Australia) | DV51 D-609 |
| AC power cord (UK) | DV51D-608 | DC power cord | DV51D-619 |
| AC power cord (EU) | DV51D-607 | DC battery clamp-on adapter (requires DC Power Cord DV51D-619) | DV51D-696 |
| DeVilbiss Masks | |||
| FlexSee Masks | Serenity€ Masks | ||
| Large, Silicone | 9354L | Large, Silicone | 9352L |
| Medium, Silicone | 9354D | Medium, Silicone | 9352D |
| Small, Silicone | 9354S | Small, Silicone | 9352S |
| Large, Gel | 9354GL | Large, Gel | 9352GL |
| Medium, Gel | 9354G | Medium, Gel | 9352G |
| Small, Gel | 9354GS | Small, Gel | 9352GS |
| Large, ComfortTouch” Silicone | 9354LR | Large, ComfortTouch Silicone | 9352LR |
| Medium, ComfortTouch Silicone | 9354DR | Medium, ComfortTouch Silicone | 9352DR |
| Small, ComfortTouch Silicone | 9354SR | Small, ComfortTouch Silicone | 9352SR |
| Large, ComfortTouch Gel | 9354GLR | Large, ComfortTouch Gel | 9352GLR |
| Medium, ComfortTouch Gel | 9354GR | Medium, ComfortTouch Gel | 9352GR |
| Small, ComfortTouch Gel | 9354GSR | Small, ComfortTouch Gel | 9352GSR |
| EasyFit° Nasal | Available in Silicone (S, M, L, XL), Gel (S, M, L) or SilkGel (S, M, L). Contact your equipment provider | ||
| EasyFit Full Face | Available in Silicone (S, M, L, XL), Gel (S, M, L) or SilkGel (S, M, L). Contact your equipment provider |
MAINTENANCE
DANGER Electric shock hazard-Do not attempt to open or remove the cabinet; there are no user-serviceable components inside. If service is required, contact your equipment provider for instructions on obtaining service. Opening or attempting to service your device will void the warranty.
WARNING Disconnect supply before servicing.Pressure Accuracy–The IntelliPAP is designed to provide accurate pressure performance from the factory without additional calibration. No routine service is required provided the device is used in accordance with the manufacturer’s directions.NOTE–Some countries require periodic servicing and calibration of this kind of medical device. Contact your equipment provider for further information.Standard Air-Inlet Filter–Check the filter every 10 days and clean it if necessary. Replace the filter every 6 months or sooner if it is damaged. The standard filter is designed to filter particles larger than 3.0 microns in size. The IntelliPAPMUST have the standard filter in place during operation.Optional Fine Particle Filter–Check the filter every 10 days and replace it if it is dirty or damaged; otherwise replace the filter every 30 days. The optional fine particle filter is designed to filter particles as small as 0.3 microns in size.
CLEANING
WARNING
To avoid electric shock, always unplug the power cord from the wall outlet power source before cleaning.CAUTION–Never rinse or place the device in water. Never allow liquids to get into or around any of the ports, switches, or air filters; doing so will result in product damage. If this occurs, do not use the device. Contact your equipment provider for service.
Device cabinet
- Unplug the IntelliPAP from the power source. Wipe the cabinet with a clean, damp cloth every few days to keep the cabinet dust-free.
- Allow the device to dry completely before plugging it into a power source.
Filters
Air-Inlet Filter
- The air-inlet filter should be checked every 10 days and cleaned as necessary. The filter is located in the rear of the device.CAUTION–Proper filter function is important for the operation of the device and to protect the device from damage.
- To clean, remove the dark outer foam filter from the frame.
- Wash the filter in a solution of warm water and dishwashing detergent, and rinse with water. Allow the filter to dry completely. If the filter (part #DV51D-602) is damaged, contact your equipment provider for a replacement.
- Ensure the filter is completely dry before installation and use.
Fine Particle Filter (Optional)
- If you have an optional fine particle filter (part #DV51D-603), inspect this filter and replace it if it shows signs of dirt or damage. Do not wash.
- Install the fine particle filter behind the standard filter.
NOTE–If the fine particle filter is not installed first according to the directions, the life of the filter will be reduced requiring more frequent replacement.
Optional Heated HumidifierWater Chamber – Humidifier water chamber should be cleaned daily.
- Press on the chamber release latch and pull out the water chamber from the cradle (Fig 4).
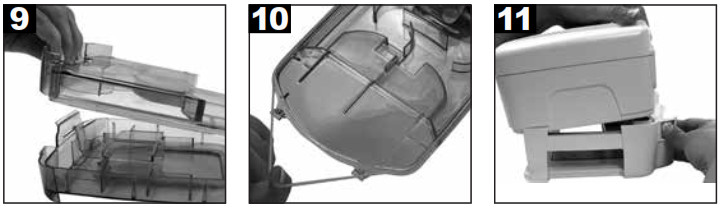
- Separate the chamber halves by pressing forward on the chamber disassembly lever and lifting the lid of the chamber (Fig 9).
- Remove the sealing gasket from the chamber lid (Fig 10).
- Hand washes the parts in a solution of warm water and mild dishwashing detergent.CAUTION–Do not use any solutions that contain bleach, chlorine, alcohol, scented oils, or other aromatic-based ingredients to clean the humidifier components or tubing. These solutions may reduce the life of the product.
- Allow the parts to dry before reassembly.
CAUTION–Inspect the gasket seal before each use to ensure that it is properly seated in the groove around the entire chamber.NOTE– The disassembled chamber may also be washed once per week in a dishwasher on the delicate or glassware cycle, top shelf only.
Humidifier Cradle – The humidifier cradle should be cleaned as needed.
- Turn off the heater and unplug from the power source. Allow the system to cool for at least 10 minutes.
- Detach flow generator from the cradle; first remove water chamber then fully depress the flow generator release button to separate (Fig 4).NOTE–Flow generator release button must be pressed completely to separate.
- Use a soft, damp cloth to clean the surfaces of the unit.
TubingThe air supply tubing should be cleaned daily. Remove the tubing from the device and mask. Use a mild detergent and water to clean the inside of the tubing. Rinse the tubing and allow to air dry.Mask and HeadgearClean the mask and headgear according to the manufacturer’s instructions.
TROUBLESHOOTING
WARNING Electric Shock Hazard – Do not remove the device cabinet; there are no user-serviceable internal components. The cabinet should only be removed by a qualified DeVilbiss provider.
| Issue | Possible Cause | Remedy |
| Nothing shows on the display. | 1. Device is not plugged in or the power cord is not fully inserted. | la. Verify that the power cord is firmly connected to the IntelliPAP and the power outlet.lb. If you are using a DC power source, make sure the cable connections are secure. Verify that battery is charged. |
| 2. Optional Humidifier-The flow generator is not fully seated on the humidifier cradle. | 2. Refer to assembly instructions (Fig. 1-7). | |
| 3. There is no outlet power. | 3. Locate a suitable functioning power source. | |
| The IntelliPAP does not start when breathing into the mask. | 1. The Auto-ON feature has been disabled. | 1. Use the ON/OFF button to start and stop the device. |
| 2. There is no power to the device. | 2. Verify that the power cord is firmly connected to the device and the power outlet. | |
| 3. Breath is not deep enough for the Auto-ON feature to detect. | 3. Breathe deeply in and out to start the device. | |
| 4. You are using a full face mask that has an anti-asphyxia valve. | 4. Auto-ON may not work because your exhaled breath escapes through the open valve. Use the ON/OFF button to start and stop the device. | |
| 5. The air supply port plug is missing or not fully inserted. | 5. Make sure the air supply port plug is fully inserted into the unit. | |
| 6. The humidifier chamber is not fully engaged into the cradle or is missing. | 6. Slide the humidifier chamber fully into the slot. Verify the latching lever snaps into place. | |
| The airflow has stopped unexpectedlyduring use or reports mask leak. | 1. The Auto-OFF feature has detected large airflow because of the loosely fitting mask. | 1. Ensure you have a good mask fit; adjust mask and headgear. |
| 2. During use, your mouth opens and you begin to mouth-breathe. | 2. Contact equipment provider for a chin strap or different mask to prevent mouth-breathing. | |
| 3. The optional humidifier chamber is not fully engaged or is missing. | 3. Slide the humidifier chamber fully into the cradle. Verify the release latch clicks into place. | |
| 4. The air supply port plug is missing from the back of the CPAP or is not fully inserted. | 4. Ensure the air supply port plug is fully inserted into the back of the CPAP. | |
| The display shows a device fault. | An error has occurred in the device and requires servicing. | Contact your equipment provider for service. |
| Apnea symptoms have recurred. | 1. Air filter may be dirty. | 1. Clean or replace the air filter and relocate the device away from drapes or other dusty surfaces. |
| 2. Apnea condition has changed. | 2. Contact your physician or equipment provider. |
| Issue | Possible Cause | Remedy |
| Skin becomes irritated wheremask contacts face. | 1. Headgear is too tight or improperly adjusted. | 1. Loosen headgear to reduce contact pressure on face. |
| 2. Your mask may not be sized properly or is not the most appropriate shape for you. | 2. Contact physician or equipment provider. | |
| Dryness of throat or nose. | Inadequate humidity. | la. Add a DeVilbiss DV5 heated humidifier.lb. Increase the heater setting on the humidifier. |
| Water condensation collecting in the hose causing a gurgling sound. | 1. Humidification is too high. | 1. Reduce humidifier heater setting. |
| 2. Room temperature fluctuates from higher to lower levels through the night. | 2. Increase room temperature. | |
| Air from flow generator seems to be too warm. | 1. Air filters are dirty. | 1. Clean filters. |
| 2. Air inlet port is blocked. | 2. Unblock air inlet. | |
| 3.Room temperature is too high. | 3. Lower room temperature. | |
| 4. Device is located near a heat source. | 4. Locate the device away from the heat source. | |
| 5. Humidifier (optional) heater setting is too high. | 5. Lower heater setting. | |
| Nasal, sinus or ear pain, runny nose | You may have a reaction to airflow pressure. | Discontinue use and contact the physician. |
| Heater setting is not visible on the display | 1. The flow generator is not fully seated on the humidifier cradle. | 1. Ensure proper contact is made (Fig. 3). |
| 2. Your CPAP device is not equipped with an optional humidifier. |
SPECIFICATIONS
CAPA
Size …………………………………………………………………………………………….. 4.2”H x 6.5”W x 6.9”D (10.7cm x 16.5cm x 17.5cm)Weight …………………………………………………………………………………………………………………………………………. 1.22 kg (2.7 lbs.)Electrical Requirements AC ………………………………………………………………………………………………………. 100-240V~, 50/60 HzElectrical Requirements DC …………………………………………………………………………………………………… 10.4 – 15 VDC, 5 AmpsMaximum Power Consumption ………………………………………………65 watts max from AC power source (flow generator only)Pressure Range ……………………………………………………………………………………………………………………………………3-20 cmH2OOperating Temperature Range …………………………………………………………………………………………. 41˚F to 104˚F (5˚C to 40˚C)Operating Humidity Range ………………………………………………………………………………………….0% to 95% RH non-condensingOperating Atmospheric Conditions ………………………………………………………………………………Sea level to 9,000 feet (2743 m)Storage & Transportation Temperature Range …………………………………………………………… -40°F to +158°F (-40°C to 70°C)Storage & Transportation Humidity Range …………………………………………………………………….0% to 95% RH non-condensingMaximum Limited Pressure ……………………………………………………………………………………………..20 cmH2O under normal useSound Pressure Level (tested per ISO 17510) …………………………………………………………………………………………………26 dBASound Power Level ………………………………………………………………………………………………………………………………………38 dBASmartCode ®Technology is protected under US patent 8649510
HumidifierHumidity Output (in the operating flow range): …………………………………………………………………………………… ≥10 mgH2O/l airSize: …………………………………………………………………………………………2.6” H x 6.3” W x 8.4” D (6.6 cm x 16.0 cm x 21.3 cm)Weight: ……………………………………………………………………………………………………………………………………..1.75 lbs. (0.794 Kg)Power Consumption: …………………………………………………………………………………………………………………………………. 85 WattsDV5HH Electrical Requirements ………………………………………………………………………………………………….100-240VAC, 0.95 AHeater Plate Thermal Cutout:………………………………………………………………………………………………………………305°F (152°C)Power/Temperature Control: …………………………………………………………………………..The setting of 1 (minimum) to 10 (maximum)Heater Plate Temperature: …………………………………………………………………….84°F to 149°F (approx. 29°C to approx. 65°C)Operating Temperature Range …………………………………………………………………………………………. 41˚F to 104˚F (5˚C to 40˚C)Operating Humidity Range ………………………………………………………………………………………….0% to 95% RH non-condensingOperating Atmospheric Pressure Range: …………………………………………………………………………………………..70.0 – 106.0 kPA
Filter specificationsStandard Filter ………………………………………………………………………………………………………………………..> 3.0-micron particlesOptional Fine Particle Filter ………………………………………………………………………………………………………> 0.3-micron particlesDynamic short-term pressure accuracy with and without DV5HH Humidifier (periso 17510-1:2007)
| Waveform | Volume [mL] | Breath Rate [min-1] | Set Pressure[cmH2O] | Pressure Accuracy[Pk-Pk cmH20] |
| Sinusoidalcycle with I:E = 1:1 | 500 | 10, 15, 200.5 | 3.0 | 0.5 |
| 7.0 | ||||
| 12.0 | 1.0 | |||
| 16.0 | 1.0 | |||
| 20.0 | 1.0 |
Maximum Flow-rate (per iso 17510-1:2007)
| Test Pressures | |||||
| 3,0 cmH2O | 7,0 cmH2O | 12,0 cmH2O | 16,0 cmH2O | 20,0 cmH2O | |
| Measured pressure at the patient connection port (cmH2O) | 3. | 6. | 11.0 | 15.0 | 19.0 |
| Average flow at the patient connection port (I/min) | 84. | 127. | 137. | 130.0 | 114. |
Long Term Static Pressure Accuracy ………………………………………………………………………………………………….. +/- 0.5 cmH2OAdditional specificationsWarranty ……………………………………………………………………………………………………………… Please contact the homecare providerEquipment classification with respect to protection from electric shock ……………………………………………………………… Class IIDegree of protection from electric shock ……………………………………………………………………………………. Type BF Applied PartDegree of protection against ingress of liquids ………………………………………………………………………….. IPXI Drip-proof verticalMode of operation …………………………………………………………………………………………………………………………………. ContinuousEquipment not suitable for use in the presence of a flammable anesthetic mixture with air or with oxygen or nitrous oxide
DEVILBISS GUIDANCE AND MANUFACTURER,S DECLARATION
WARNING
Medical Electrical Equipment needs special precautions regarding EMC and needs to be installed and put into service according to the Electromagnetic Compatibility [EMC] information provided in the accompanying documents.Portable and Mobile RF Communications Equipment can affect Medical Electrical Equipment.The equipment or system should not be used adjacent to or stacked with other equipment and that if adjacent or stacked use is necessary, the equipment or system should be observed to verify normal operation in the configuration in which it will be used.NOTE– The EMC tables and other guidelines provide information to the customer or user that is essential in determining the suitability of the Equipment or System for the Electromagnetic Environment of use, and in managing the Electromagnetic Environment of use to permit the Equipment or System to perform its intended use without disturbing other Equipment and Systems or non-medical electrical equipment.
| Guidance and Manufacturer’s Declaration — Emissions All Equipment and Systems | |||
| This device is intended for use in the electromagnetic environment specified below. The customer or user of this device should assure that it is used in such an environment. | |||
| Emissions Test | Compliance | Electromagnetic Enforcement — Guidance | |
| RF Emissions CISPR 11 | Group 1 | This device uses RF energy only for its internal function. Therefore, its RF emissions are very low and are not likely to cause any interference in nearby electronic equipment. | |
| RF Emissions CISPR 11 | Class Band Conducted Emissions | This device is suitable for use in all establishments including domestic, and those directly connected to the public low-voltage power supply network that supplies buildings used for domestic purposes. | |
| HarmonicsIEC 61000-3-2 | Class A | ||
| FlickerIEC 61000-3-3 | Complies | ||
| immunity Test | IEC 60601 Test Level | Compliance Level | Electromagnetic Environment – Guidance |
| Electrostatic Discharge (ESD) IEC 61000-4-2 | ±6kV contact ±8kV air | ±6kV contact ±8kV air | Floors should be wood, concrete or ceramic tile. If floors are synthetic, the relative humidity should be at least 30%. |
| Electrical Fast Transient/burst IEC 61000-4-4 | ±2kV on AC Mains | ±2kV on AC Mains | Mains power quality should be that of a typical commercial or hospital environment. |
| SurgeIEC 61000-4-5 | ±1 kV Differential ±2kV Common | ±1 kV Differential ±2kV Common | Mains power quality should be that of a typical commercial or hospital environment. |
| Voltage dips, short interruptions and voltage variations on power supply input linesIEC 61000-4-11 | >95% Dip for 0.5 Cycle60% Dip for 5 Cycles30% Dip for 25 Cycles>95% Dip for 5 Seconds | >95% Dip for 0.0.5 Cycle60% Dip for 5 Cycles30% Dip for 25 Cycles>95% Dip for 5 Seconds | Mains power quality should be that of a typical commercial or hospital environment. If the user of this device requires continued operation during power mains interruptions, it is recommended that the device be powered from an uninterruptible power supply or battery. |
| Immunity Test | IEC 60601 Test Level | Compliance Level | Electromagnetic Environment – Guidance |
| Power Frequency 50/60Hz Magnetic FieldIEC 61000-4-8 | 3ivrn | 3A/m | Power frequency magnetic fields should be that of a typical location in a typical commercial or hospital environment. |
| Conducted RFIEC 61000-4-6 | 3 Vrms from150 kHz to 80 MHz | V1 = 3 Vrms | Portable and mobile RF communications equipment should be separated from the device by no less than the recommended separation distances calculated listed belch…D=(3,5N1),(15 |
| Radiated RF IEC 61000-4-3 | 3 V/m80 MHz to 2.5 GHz | El = 3V/m | D.(3.5./E1),ID 80 to 800 MHzD,(7/E1),FP 800 MHz to 2.5 GHzWhere P is the maximum power rating in watts and D is the recommended separation distance in meters.Field strengths from fixed transmitters. as determined by an electromagnetic site survey. should be less than the compliance levels (VI and El).Interference may occur in the vicinity of equipment containing a transmitter. |
| For transmitters rated at a maximum output power not listed above. the recommended separation distance Din meters (m) can be estimated using the equation applicable e to the frequency of the transmitter. where P is the maximum output power rating of the transmitter in watts (W) according to the transmitter manufacturer.Note 1: At 80 MHz and 800 MHz. the separation distance for the higher frequency range applies.Note 2: These guidelines may not apply in all situations. Electromagnetic propagation is affected by absorption and reflection from structures. objects. and people | |||
| Recommended Separation Distances Between Portable and Mobile RF Communications Equipment and this device. This device and system are NOT Life-Supporting | |||
| This device is intended for use in the electromagnetic environment in which radiated disturbances are controlled. The customer or user of this device can help prevent electromagnetic interference by maintaining a minimum distance between portable and mobile RF Communications Equipment and the device as recommended below. according to the maximum output ganef of the communications equipment. | |||
| Maximum Output Power (Watts) | Recommended Separation Distances for the device (meters) | ||
| 150 kHz to 80 MHzD=(1.1667) | 80 to 800MHzD=(1.1667) | 800 MHz to 2.5 GHzD,(2.3333)413 | |
| 0.01 | 0.11667 | 0.11667 | 0.23333 |
| 0.1 | 0.36894 | 0.36894 | 0.73785 |
| 1 | 1.1667 | 1.1667 | 2.3333 |
| 10 | 3.6894 | 3.6894 | 7.3785 |
| 100 | 11.667 | 11.667 | 23.333 |
| For transmitters rated at a maximum output power not listed above. the recommended separation distance Din meters (m) can be estimated using the equation applicable e to the frequency of the transmitter. where P is the maximum output power rating of the transmitter in watts (W) according to the transmitter manufacturer.Note 1: At 80 MHz and 800 MHz. the separation distance for the higher frequency range applies.Note 2: These guidelines may not apply in all situations. Electromagnetic propagation is affected by absorption and reflection from structures. objects. and people. |
ADVANCED MENU CONTROLSWith the device on, press the “Next” or “Previous” buttons on the keypad to scroll through the items on the display.
| Name | Symbol | Function |
| PREVIOUS ITEM | Pressing this button displays the previous menu option. | |
| NEXT ITEM | Pressing this button displays the next menu option. | |
| SETTING CHANGE | |
These buttons allow you to adjust the setting that is shown on the display. |
Please note that the values displayed are examples only.Patient Menu LayoutThe following charts show by Mode each Display you will scroll through using the Next or Previous buttons on the keypad.Pressing the Down key at the Enable Menu Display will allow you to enter this submenu – then use Next or Previous buttons to scroll through it; press the Up button to return to the main menu. Once the final Display is reached, pressing The next button will return you to the first Display.NOTE-If the unlocked symbol is shown, you are able to adjust this setting. If the locked symbol is shown, this setting can only be adjusted by your provider.
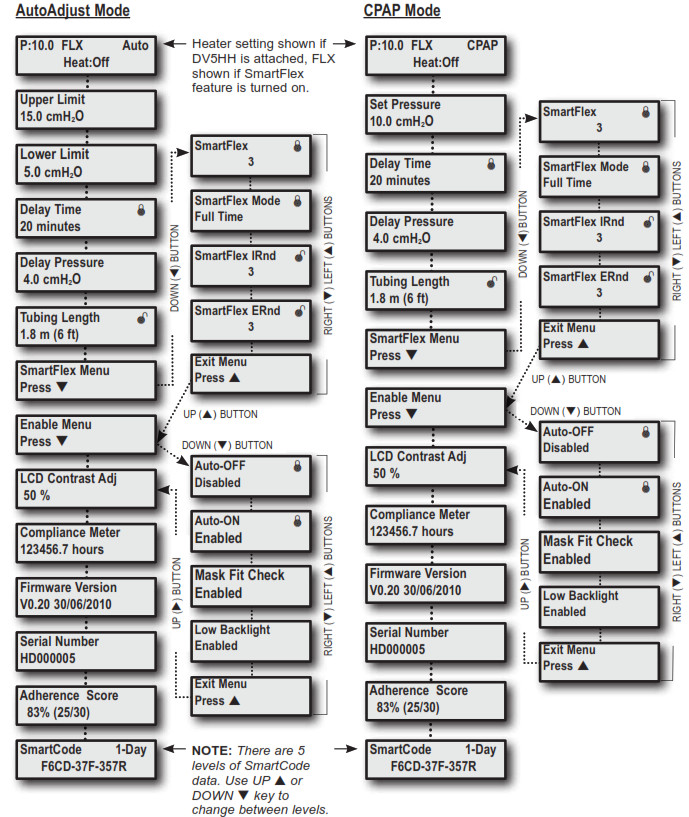
SmartFlex Menu ListThe SmartFlex menu is available in all modes and is a sub-menu that allows you to control various functions of your device. It is accessed by pressing the down button while in this Advanced Menu.
 Blower off MenusCompliance information can be viewed without turning the CPAP on. With the blower OFF (display shows OFF), press the left or right arrow keys on the keypad to scroll through the information.

Quick View Menu LayoutThe Quick View Menu shows a summary of information that is reported in the SmartCode data. Information in the Quick View includes: Number of days used more than 4 hours (or can be set to 5 hours by a clinician), AHI (Apnea/Hypopnea Index), High Leak percent (percent of the time at leak >95 L/m), and Daily Usage (average hours per day used). Each parameter can be viewed in any of four time periods, 1 day, 7 days, 30 days, and 90 days.The following chart shows the Quick View information that is available on your CPAP display if viewing this information has been enabled by your provider. The Quick View menu shows a summary of your SmartCode data for 1, 7, 30, and 90 day periods. Each of the time periods contains info for “Number of Days > x hrs”, Apnea-Hypopnea Index (AHI), High Leak % (>95 L/m), and Average Daily Hours of while breathing use.
SmartCode Data and adherence score informationYour healthcare provider may contact you to retrieve SmartCode data and Adherence Score information. To display the SmartCode data, press the LEFT arrow key once. Use the UP arrow or DOWN arrow keys to change the SmartCode reporting period. Press the LEFT arrow key again to display the Adherence Score.
DefinitionsNot all of the features in the table below are available in all models; some are optional and some depend on what your physician and/or home care provider has selected. The table shows the items you may see, and describes the feature associated with each item. Also, some features are only available in certain modes or with the DeVilbiss SmartLinkTherapy Management Module – these are noted in the ‘Mode’ column below. If you do not see some of these options, your model or configuration does not support them.Please note that the values displayed are examples only.
NOTE– If the unlocked symbol is shown, you are able to adjust this setting. If the locked symbol is shown, this setting can only be adjusted by your provider.
![]()
| DeVilbiss Healthcare LLC100 DeVilbiss DriveSomerset, PA 15501-2125USA800-338-1988 • 814-443-4881 | DeVilbiss Healthcare GmbHKamenzer Straße 368309 MannheimGERMANY+49 (0) 621-178-98-0 |

DeVilbiss Healthcare LLC • 100 DeVilbiss Drive • Somerset, PA 15501 • USA800-338-1988 • 814-443-4881 • www.DeVilbissHealthcare.comDeVilbiss ® , IntelliPAP ® , SmartLink ® , SmartCode ® , FlexSet ® , EasyFit ® , and DeVilbiss Serenity ® are registered trademarks of DeVilbiss Healthcare. SmartFlex™ and ComfortTouch™ are trademarks of DeVilbiss Healthcare.© 2014 DeVilbiss Healthcare LLC. 09.14 All Rights Reserved.A-DV54 Rev.A-DV54
[xyz-ips snippet=”download-snippet”]