![]()
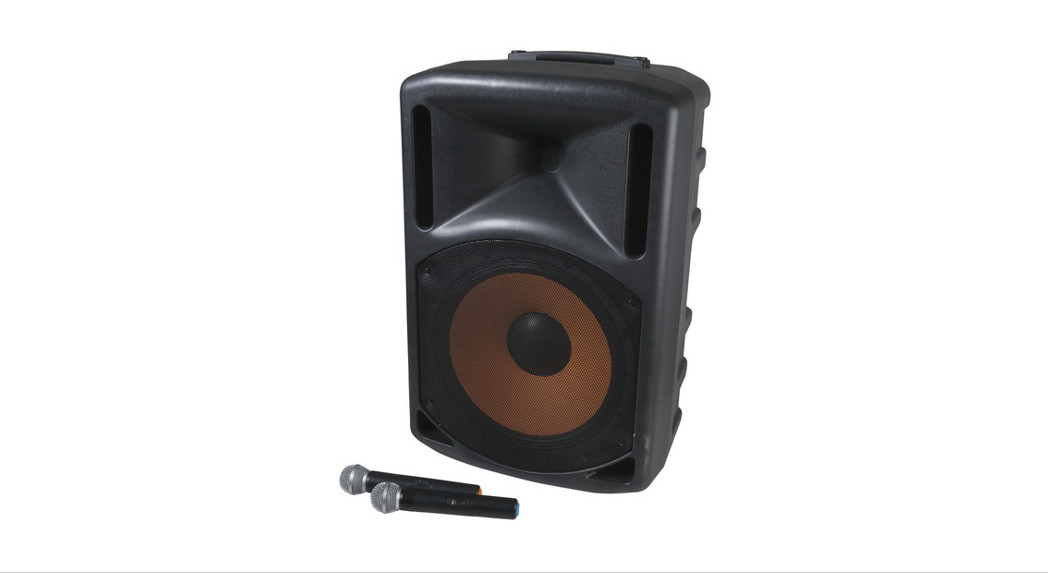
User Manual15” PA System withTwo Wireless UHF MicrophonesCS-2491
SECTION 1: WELCOME TO THE SPEAKER FAMILY
BEFORE YOU BEGIN – IMPORTANT INFORMATIONBefore using your speaker system please review the following for important information on safety and protection.
- Read these instructions
- Keep these instructions
- Heed all warnings
- Follow all instructions
- Do not use this apparatus near water
- Clean only with a dry cloth
- Do not block any ventilation openings. Install by the manufacturer’s instructions.
- Do not install near any heat sources such as radiators, heat registers, stoves, or other apparatus (including amplifiers) that produce heat.
- Do not void the safety purpose of the polarised or grounding-type plug. A polarised plug has two blades with one wider than the other. A grounding-type plug has two blades and a third grounding prong. The wide blade or the third prong is provided for your safety. If the provided plug does not fit into your outlet, consult an electrician for the replacement of the obsolete outlet.
- Protect the power cord from being walked on or pinched, particularly at plugs, receptacles, and the point where they exit from the apparatus.
- Only use attachments/ accessories specified by the manufacturer.
- Use only with the cart, stand, tripod, bracket, or table specified by the manufacturer, or sold with the apparatus. When a cart is used, use caution whenmoving the cart/apparatus combination to avoid injury from tip-over.
- Unplug this apparatus during lightning storms or when unused for long periods of time.
- Refer all servicing to qualified service personnel. Servicing is required when the apparatus has been damaged in any way, such as power supply cord or plug isdamaged, liquid has been spilled or objects have fallen into the apparatus, the apparatus has been exposed to rain or moisture, does not operate normally, orhas been dropped.
- If referring to service instructions in this manual: CAUTION! – These servicing instructions are for use by qualified service personnel only. To reduce the risk of electric shock do not perform any servicing. Other than that contained in the operating instructions unless you are qualified to do so.
- Important Warning – The lightning flash with an arrowhead symbol within an equilateral triangle, is intended to alert the user within the product’s enclosure that may be of sufficient magnitude to constitute a risk of electric shock to persons. The exclamation point within an equilateral triangle is intended to alert the user to the presence of important operating and maintenance (servicing) instructions in the literature accompanying the product.
- Electromagnetic Compatibility – The speaker has good electromagnetic shielding and good electromagnetic compatibility but the speaker inside has high magnetism, it may affect your TV, Computer, and other electronic products, so when in use keep away from these items. The controller also has electromagnetic radiation and infrared radiation when in use, so the same applies.
- To completely disconnect this apparatus from the AC mains, disconnect the power supply cord plug from the AC receptacle.
- Warning! To reduce the risk of fire or electric shock, do not expose this apparatus to rain or moisture.
- Do not expose this equipment to dripping or splashing and ensure that no objects filled with liquids, such as vases, are placed on the equipment.
- The main plug of the power supply cord shall remain readily operable.
- The USB interface on the product can not be used for other devices charging.
SECTION 2: PRECAUTIONS
Do not under any circumstances operate the unit with an AC power supply less than 110V or greater than 220V. Doing so may result in serious damage to your speaker system which will not be covered by a warranty.A robust AC supply is necessary for maximum performance. If the supply is too weak the bass performance may be affected and if it sags (drops) too much the system may self-mute to protect itself. As soon as the appropriate AC supply is restored it will continue to operate. Plugging multiple systems into the same outlet and long extension cord runs may affect the AC supply to the systems.CAUTION!In compliance with safety agency criteria and proper system operation, it is critical that the system installer observe all electrical safety practices at all times and provide proper earth grounding for all AC power connections.
POWER AMPLIFIERS – OPERATING TEMPERATUREThe design of the amplifier is such that it is very energy efficient and as a result does not get extremely hot. In the rare event that it does get too hot it will automatically shut down to protect itself. When its temperature has returned to within its operating range it will turn back on. A condition under which this may occur is when the system is operated in very high ambient temperatures and the heat sink on the rear of the enclosure is in direct sunlight. Always ensure adequate cooling and appropriate shade
CARE & MAINTENANCE
While your speakers are rugged and will provide years of service, some common sense care in handling will prevent damage and preserve appearance.
- If your speaker will be frequently moved, consider a padded carrying bag.
- If your speakers have been subjected to prolonged exposure to extremely low temperatures, avoid subjecting them to heavy mechanical shock and warm thespeakers up by playing at a low volume for one hour before playing at loud levels.
- Keep the exterior of the speaker enclosure clean. Clean only with a dry cloth.
- The speakers are not intended for fixed installation in outdoor environments.Moisture can damage the speaker cone and surround, cause corrosion of electrical contacts, and create an electrical shock hazard. Protect your speakers from moisture avoid exposing the speakers to direct moisture. Any electrically powered device can produce dangerous shock hazards when wet or exposed to moisture. Keep speaker out of extended or intense direct sunlight. The driver’s integrity may be affected and finished surfaces will be degraded by long-term exposure to intense ultra-violet (UV) light.This apparatus contains potentially lethal voltages. To prevent electric shock or hazard, do not remove chassis, input module or AC input covers. No user-serviceable parts inside. Refer servicing to qualified service personnel.
MOUNTING/SUSPENDING SPEAKERS
The speakers are designed for portable applications in which the speakers will be stacked directly on the floor, stage, speaker stands, or a solid, stable platform.When placed on a smooth surface such as polished wood or linoleum, the speakers may move due to acoustical energy output. Precautions should be taken to assure that the speaker does not fall off the stage or table on which it is placed. Optional accessory items are available from professional and after-market suppliers to facilitate the suspension and wall/ceiling mounting of the speakers. Only those items recommended by professionals should be used. When using these items, review all enclosed documentation and carefully follow all instructions and safety precautions.
CAUTION! Suspension of speakers should be done by qualified persons following safe rigging standards and practices. Unsafe mounting or overhead suspension of any heavy load can result in serious injury and equipment damage.CAUTION! When suspending this product carefully follow the instructions and local ordinances. Do not attempt to use unless you have read and understood all instructions including the user’s guide. Attachment of the loudspeaker to a supporting structure should be referred to a qualified professional.
SECTION 3: QUICKSTART
Congratulations on your purchase of the Professional Loudspeakers! We know you are anxious to get up and running as fast as possible, which is why you are reading this section. The following will help you get set up as soon as possible.
PACKING CONTENTS
1 x Speaker2 x Wireless UHF Microphones1 x 10” (1.5m) IEC Power Cable1 x User Guide2 x Bracket (only B, S type included)
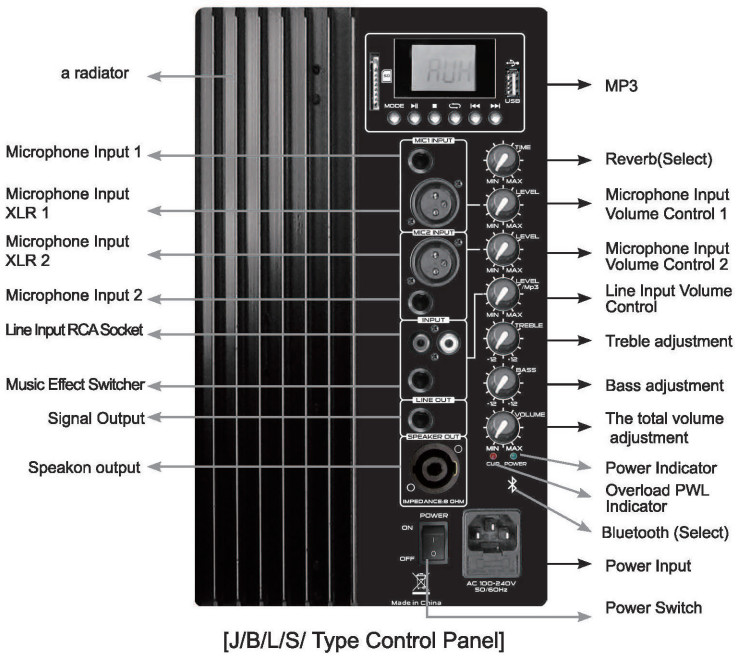
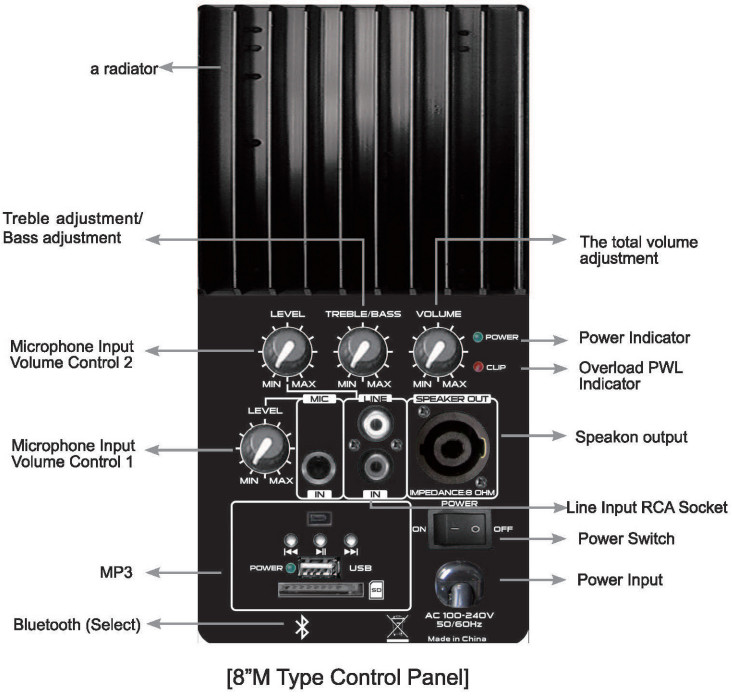
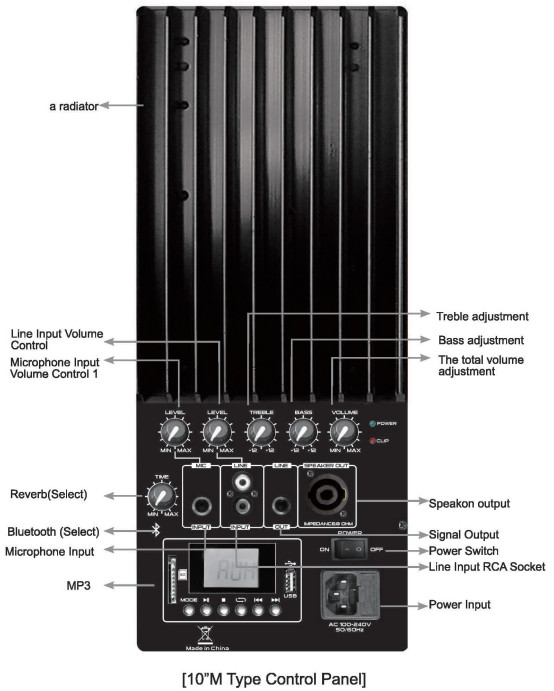
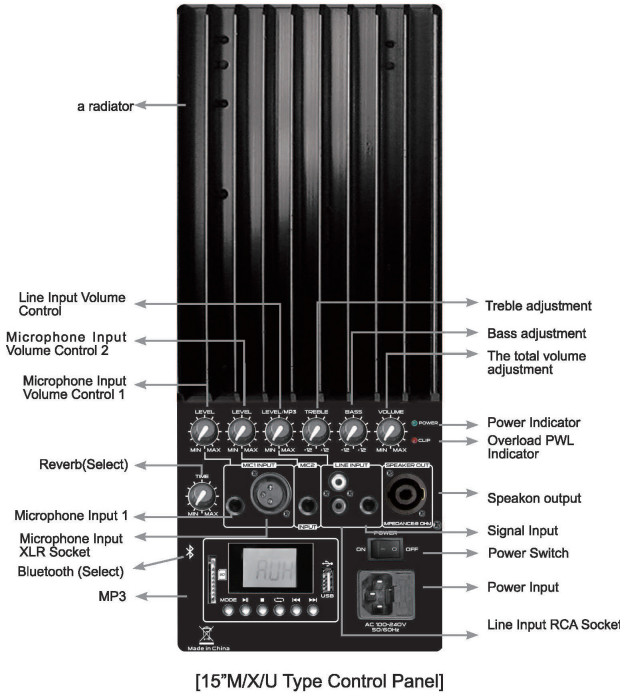
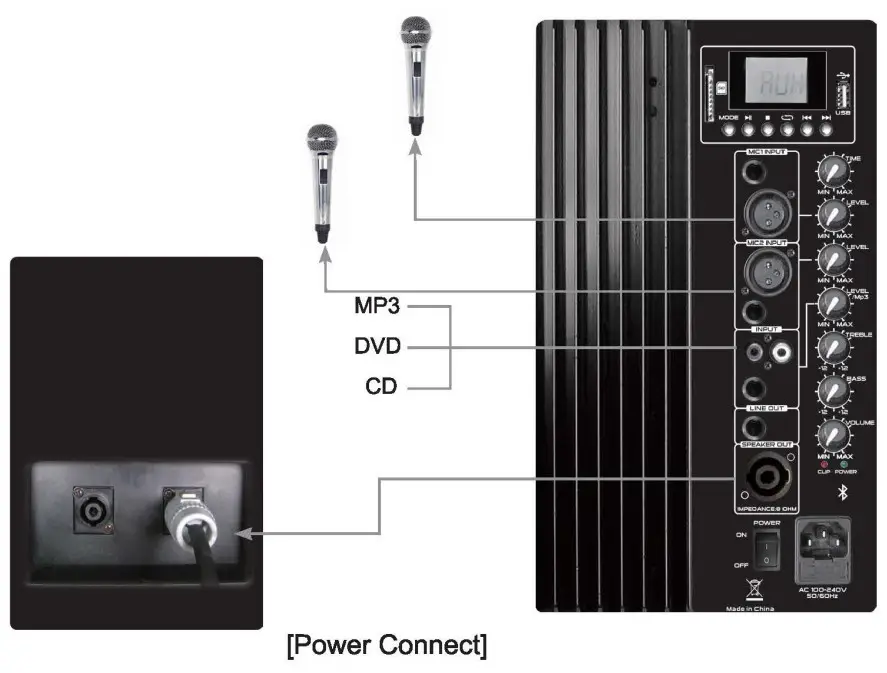
- Refer to the control panel.
- Turn the controls fully counter-clockwise.
- Set the MIC/LINE switch:• If a microphone will be connected directly to MIC1 or MIC2, set the MIC/LINE switch to the MIC position(depressed). The MIC LED will illuminate when the power is turned on.• If a mixer, CD player, cassette tape, or electronic musical instrument (the “source”) will be connected directly to MIC1 or MIC2, set the MIC/LINE switch to the LINE position (disengaged).
- Plug the power cable into a properly grounded 3-wire AC power outlet.
- Plug the XLR cable from the mixer or microphone into the MIC1 or MIC2 connector.
- Connect other sources (if used) to the LINE 1 and LINE 2 input connectors.
- Power-Up Procedure:The main power switch is located on the input panel on the back of the enclosure. Always ensure that the speaker system is the last thing you power-up, and the first thing to turn off when operating your complete PA system. If speaker systems are daisy-chained together always turn off the last system in the chain first. Power “on” is indicated by the illumination of the logo on the front of the enclosure and the power “on” LED.• First, switch on the power switch.• Next, turn on the power switch.• Reverse this process when shutting down your system.
- Set Volume• If you are using an audio mixing console, refer to the manufacturer’s instructions to properly set the gain structure.• Turn up your sources to the level that will be used in performance and talk, sing or play into the system.• Bring the MIC1 or MIC2 control up (clockwise) until the desired volume has been reached, If you are using a microphone, turn the MIC1 or MIC2 control up slowly to avoid feedback.
- Check the limit LED• The limit indicator flashes when the loudspeaker’s onboard amplifiers are approaching maximum output. Occasional flashes are normal for very loudoperations. However, if the LIMIT LED stays illuminated, the sound may be distorted and it is an indication that more speakers or a lower performance volume may be required for your specific application.
SECTION 4: ABOUT THE SPEAKER
- Live sound reinforcement, speech and vocals, music playback in entertainment, A/V, and institutional venues – especially when ease of use and portability are important factors.
- Amplification, mixing, and monitoring for electronic musical instruments.
- Everywhere you need to be heard.
- Line Level and Direct Microphone Input Capability.
- Unique Mix/Loop signal flow function for extended system application.
- Integrated M8 suspension points for easy rigging.
- Multi-angle enclosure for main or monitor applications.
- Efficient Class-D amplifier technology.
- Highly designed composite enclosures for durability, lightweight, acoustic performance.
- With controllable MP3 and SD card player. The player also has a FM radio function, it switches by the player “Input” key.
- Wireless microphone distance less in 30m.
- Bluetooth connects distance within 10m with no obstruction.
SPECIFICATIONS
| System Type: | Self-powered 15”, two-way, bass-reflex design |
| Frequency Response: Power: | 40Hz-20KHz |
| Power: | 300W |
| Distortion: | Less than 0.1% at rated power |
| Woofer: | 15’’ |
| Magnet: | 50Oz |
| Voice Coil: | 50mm KSV |
| Tweeter: | 34mm Driver |
| Sensitivity: | 98dB |
| Impedance: | 8ohm |
| Boost EQ: | LF ±8dB HF ±5dB |
| Audio Input: | RCA Input & 1/4 Right Channel Input |
| Input Signal Adjustment: | 0-3V |
| AC Input: | 100-240V 50/60Hz 160W |
BACK PANEL
LIMIT INDICATORThe LIMIT LED (Red) Illuminates to indicate that the system is approaching clipping.The threshold for this is actually about 2dB below clipping. An occasional flickering of this light on the loudest peaks is acceptable. If this LED is on for more than the duration of brief dynamic peaks, the system is being over-driven. Continuously overdriving the system willresult in unpleasant and fatiguing distortion and may lead to premature failure of your speaker system.
SPEAKERS HAVE THE FOLLOWING OPTIONAL FUNCTION:
- Wireless Microphone – If with wireless microphone marks on the control panel, you could use a wireless microphone. When the speaker is powered on, just turn the microphone switch to ‘OK’ and the wireless microphone will automatically search for a signal in the speaker.
- Bluetooth Connect – If the speaker with Bluetooth connects function, you can connect your Bluetooth device eg. a mobile phone, to the speaker. When in use, just press mode below the screen, change the mode to Bluetooth connection. Then the speaker can search for a Bluetooth signal, just open your Bluetooth device and connect to the speaker.
 AC/DC Switch When switching to DC, DC work. AC Disconnect, When switch to AC, AC work. DC disconnect.
- DC12V DC12V input.
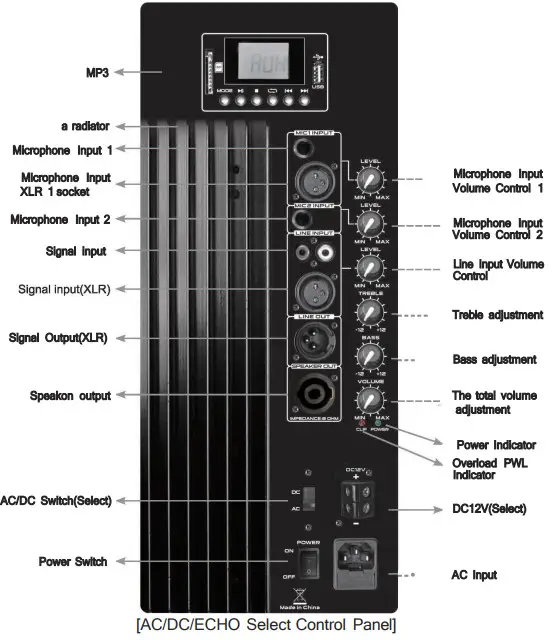 AC/DC Switch When switching to DC, DC work. AC Disconnect, When switch to AC, AC work. DC disconnect.
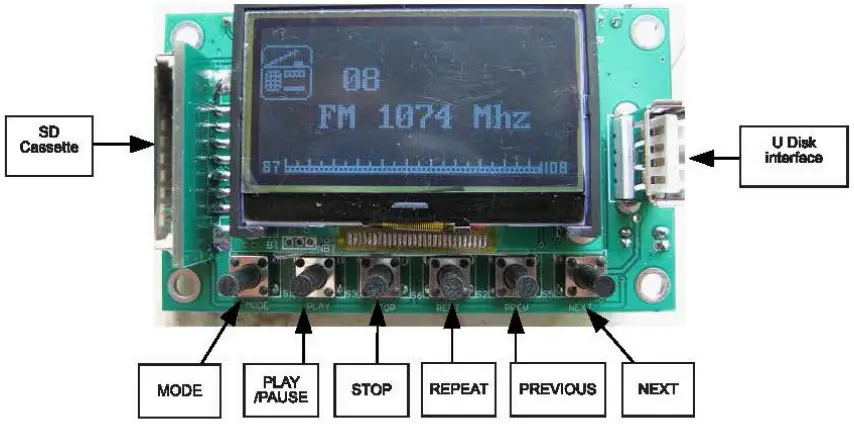
DISPLAY MODULE OPERATING INSTRUCTION FEATURES
- Support MP3 format music from “USB disk”, SD/MMC card.
- Support FM radio. Play latest insert equipment prior.
- LCD indicates.
- Have off-power remember function, can remember the song number before off-power, when on, return to play the song before off-power.
KEY DESCRIPTION:
- Six key “source of sound select (mode)”, “play/pause”, “stop”, “circle, “up”, “next”.
| Key Definition | Key Type | USB | SD | FM |
| Source of Sound/MODE | Short Press | The change source sequence is USB-SD-AUX-FM | ||
| Play/Pause | Short Press | Switch on play and pause | Start to search the channel, in searching short press, will stop search and play the first channel in search | |
| Stop | Short Press | Stop | N/A | |
| Cycle | Short Press | Select repeat pattern “ONE”‘ALI: “R” change on | N/A | |
| Up | Long Press | Volume to “0” | ||
| Next | Long Press | Volume rise “32” until |
MP3/WMA PLAYER SPECIATIONFunction Introduction
KEY FUNCTION:“Mode”, “Play/Pause”, “Stop”, “Repeat”, “Previous”, “Next”
| Definition | Key Type | USB | SD | FM | Bluetooth |
| Mode | Short Press | Switch device – FM-USB-SDBLU TOOTH | |||
| Continuous Press | POWER OFF/ POWER ON | ||||
| Play/ Pause | Short Press | Play or Pause PlayingPlay or Pause Playing | Scan FM channel auto | NOT define | |
| Stop | Short Press | Stop PlayingStop Playing | Not define | ||
| Repeat | Short Press | Select repeat mode ONE (repeat one), ALL (repeat one), RANDOM (random),INTRO (Introduce). | Selectrepeatmode ONE (repeatone), ALL (repeatone), RANDOM (random), INTRO (Introduce). | Not Define | |
| Previous | Short Press | Previous Song | Previous Song | Previous Channel | Not Define |
| Continuous Press | Fast Backwards | Fast Backwards | Not DefineNot Define | ||
| Next | Short Press | Next Song | Next Song | Next Channel | Not Define |
| Continuous Press | Fast Forwards | Fast Forwards | Not Define |
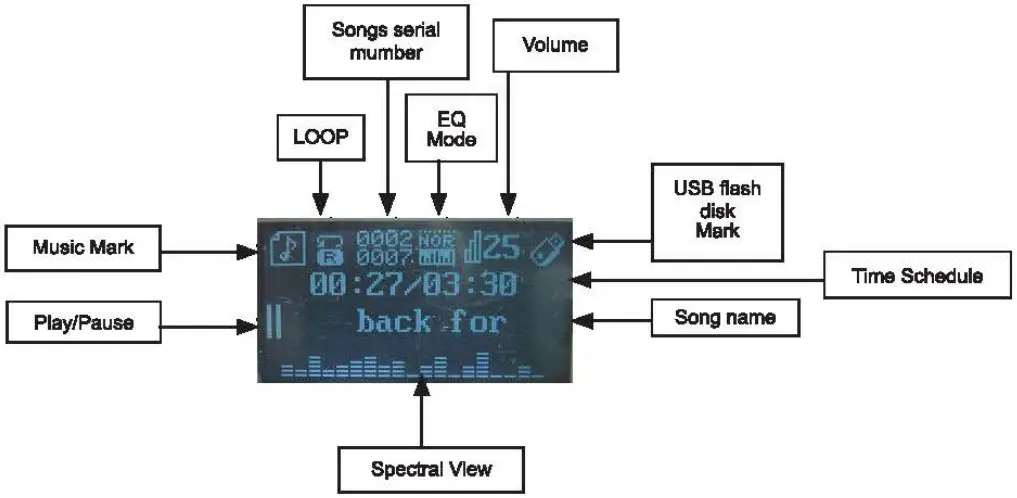
LCD DIAPLAY INTRODUCTION
PLAYING SONG IN USB MEMORY
PLAYING SONG IN SD/MMC CARD
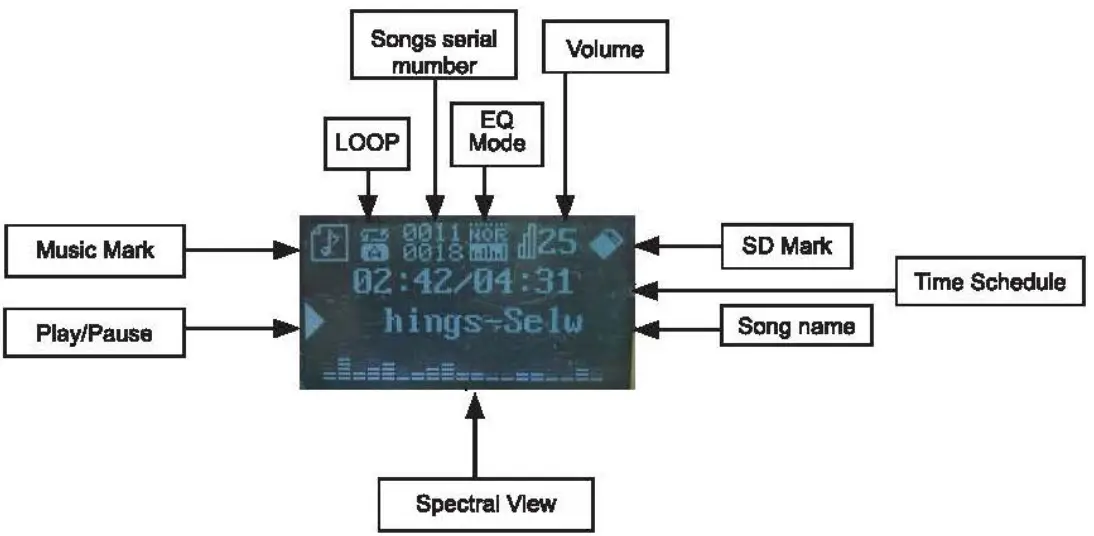
FM STATUS

BLUETOOTH
- Use mobile Phone search Bluetooth device named as “Bluetooth”
- Connect Bluetooth, input ID code: 0000.
- After connection, the Music of the mobile phone can be transferred to KE0003.

NOTE:
- Support Bluetooth 2.0+EDR Spec
- Support A2DP V1.2, AVRCP V!.4, HSP V1.2, HFP V1.5 profiles
- 5 Volume adjusting
- Up to 10m range
OPERATION
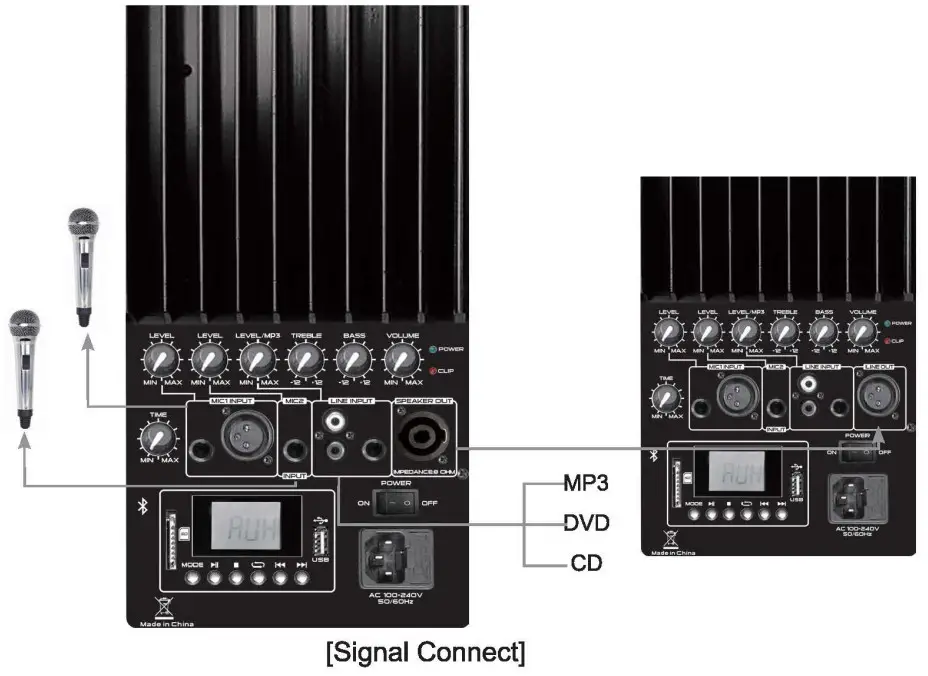
- Check the signal PQL key and volume key in the low position.
- According to up “line connection” to connect the line well.
- Start sequence: First, open the amplifier power, then open “channel” power or enter SD card or MP3, 15 seconds after, adjust signal PWL switching and volume switching to the proper position. Signal PWL should adjust ‘til the red light doesn’t flash, then adjust the volume to the proper position.
- Adjust treble, bass, switch to the proper position, and satisfy different audience effects.
- Before using a microphone, first, adjust the volume to the low, then connect the microphone to the 6.35 socket or XLR socket. This speaker can accept 1-2 microphones. When using microphones, adjust the microphone volume and also adjust the background signal volume. Pay attention to avoid signal feedback and cause squeaking.
- After use, cut off the power of the router signal and remove the SD Card or MP3. Turn the volume, signal PWL and microphone volume to low, then cut off the power to the amplifier.
- If a long time with no use has passed, it is safe to pull off the power of the amplifier.
SECTION 5: LOUDSPEAKER PLACEMENT & SUSPENSION
The following guidelines will help you achieve optimum sound wherever you use your loudspeakers.Raise the speakers as high as possible.For the best results, try to get the high-frequency horn at least 2-4 feet above the heads of the audience. If the speakers are too low, the people in the back of the audience will not receive the best-qualified sound.Place the speakers between the microphones and the audience.Feedback occurs when the microphones pick up sound from the speakers and “feeds” the sound back through the sound system. If space is limited, point the speakers away from the microphones to reduce feedback.Locate the speakers away from turntables.Low-frequency feedback occurs when the output of the speaker is picked up by the tonearm of the turntable and is re-amplified. A heavy, solid turntable base and shock mounting can also reduce this type of feedback in DJ applications.Use more speakers in large or highly reverberant spaces.Spreading speakers throughout these spaces will produce much better sound than trying to compensate with loudness level or equalization. For very long distances, the use of another set of speakers with time delay is recommended.Stand speakers upright for PA – Tilt the speakers back on the side for stage monitoring. Upright stance provides even coverage over a wide area. The speakers are also designed with two slanted positions for stage monitoring applications.Using the suspension points.Caution! Suspension of the speakers should be done by qualified persons following safe rigging standards and practices. Unsafe mounting or overhead suspension of any heavy load can result in serious injury and equipment damage.Caution! When suspending this product carefully follow instructions and local ordinances. Do not attempt to use unless you have read and understood allinstructions including the User’s Guide. Attachment of the loudspeaker to supporting structure should be referred to a qualified professional.Caution! Do not suspend the speaker from the pull-back point. Before suspending the system, inspect all components involved for cracks, deformations, corrosion, and/or missing or damaged parts that could reduce the strength and safety of the installation.
- Remove suspension point caps.
- Insert load-rated shoulder eyebolt with washer and tighten appropriately. Never suspend more than one speaker system from its suspension points.
Distributed by:TechBrands by Electus Distribution Pty. Ltd.320 Victoria Rd, RydalmereNSW 2116 AustraliaPh: 1300 738 555Int’l: +61 2 8832 3200Fax: 1300 738 500www.techbrands.comMade in China
References
[xyz-ips snippet=”download-snippet”]