DIGOO INOUT Weather Station Clock Instruction Manual
Operating Instructions
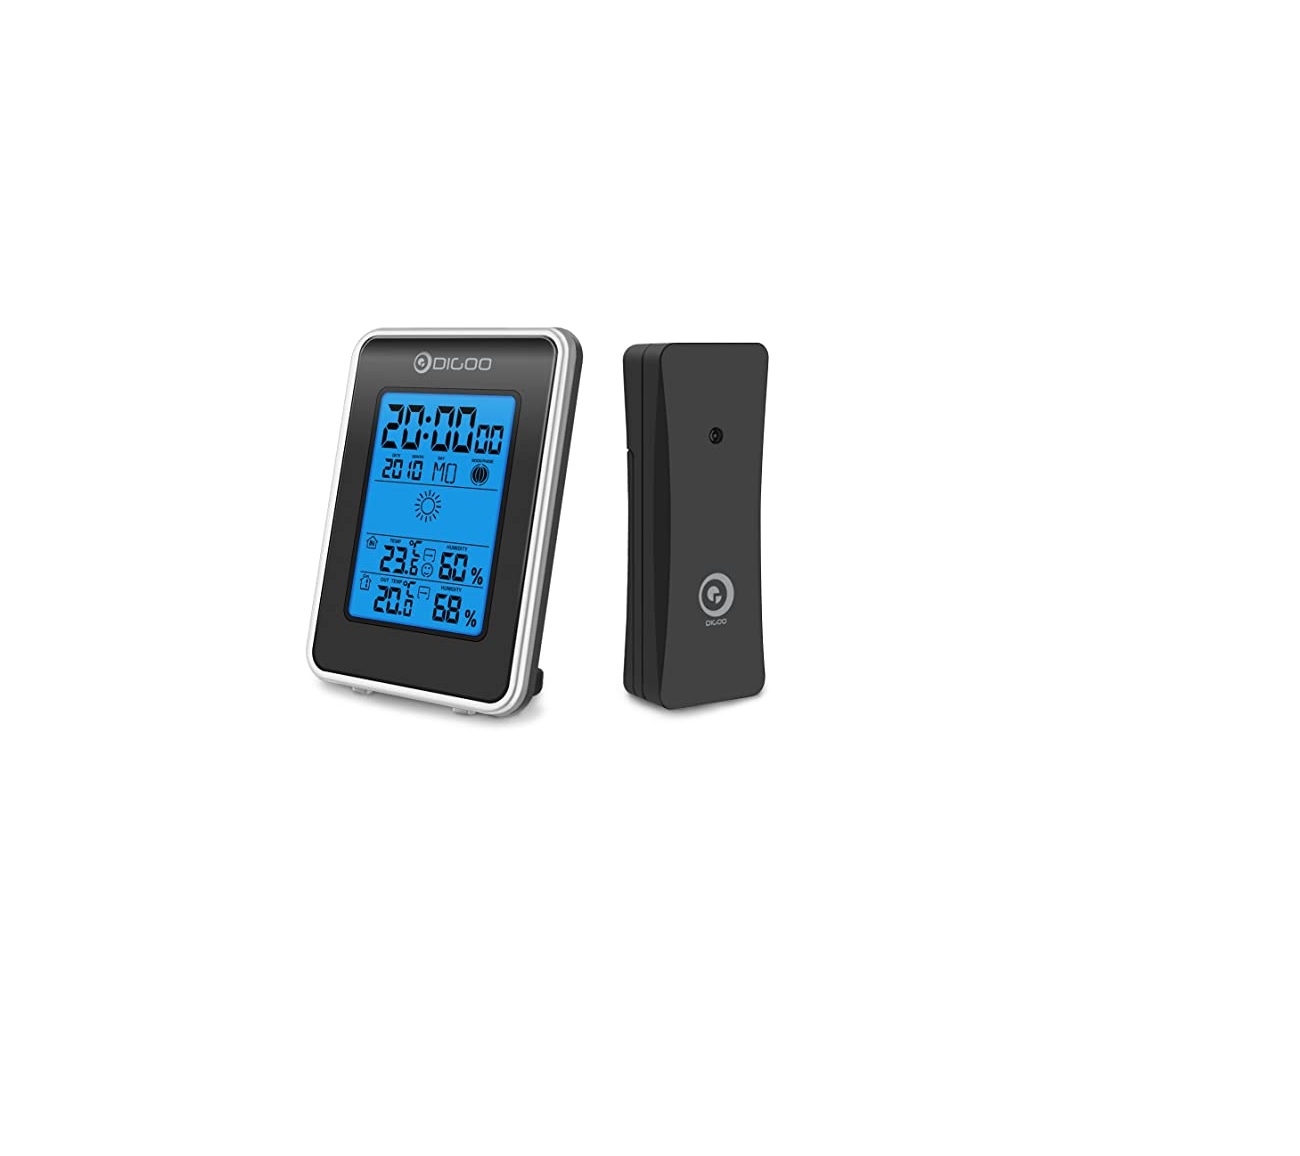
IN/OUT Weather Station ClockModel: DG-TH1981(Indoor Unit)DG-R8H(Outdoor Sensor)
OVERVIEW
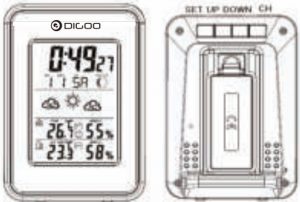
- MAIN UNIT
 SNOOZE/LIGHT
 - SENSOR
 SNOOZE/LIGHT
FEATURES
- 12/24H current time display
- Perpetual calendar
- Alarm with snooze function
- 7 languages weekday display
- Moon phase display
- Weather forecast
- Temperature in ¥ or
- Indoor temperature range: -10¥ ~ +50¥
- Indoor humidity range: 20% ~ 90%
- Outdoor temperature range: -20¥ ~ +60¥
- Outdoor humidity range: 20% ~ 90%
- Records Max/Min indoor/outdoor temperature and humidity values
- 4 comfort level index
- Blue backlight
- Temperature alert function
- Temperature trend
GETTING STARTEDMAIN UNIT INSTALLATION
- Remove the battery compartment cover.
- Insert 2xAAA batteries matching the correct polarity (+and-).
SENSOR INSTALLATION
- Remove the battery compartment cover.
- Insert 2xAAA batteries matching the correct polarity (+and-).
WEATHER FORECASTThere are 4 weather icons which can be displayed in any of following combinations:
- Sunny
- partly cloudy
- cloudy
- Rainy
 Sunny
Sunny partly cloudy
 cloudy
 Rainy
Rainy4 COMFORT LEVEL INDEX
 |
Temperature: 20℃-26.9℃ Humidity:41%-69% | |
humidity≥70% |
|
humidity ≤40% | No Smile face | Temperature: <20℃ or ≥27℃ Humidity:41%-69% |
TEMPERATURE TREND ILLUSTRATION
| Temperature Trend Indicators | Illustration |
 |
The unit displays when power on. |
 |
When detecting 1℃ up from previous temperature, or the temperature goes up by 1℃(or more) within an hour, the unit displays this. |
 |
When detecting 1℃ down from previous temperature, or the temperature goes down by 1℃ (or more) within an hour, the unit displays this. |
TEMPERATURE & HUMIDITY
- Once the batteries are installed, the weather station will begin searching for a signal. Within 3 minutes, the weather station will receive the RF signal and display current weather status.
- Press “DOWN” key to switch ¥/.
- Press and release the “UP” key repeatedly, the current in/out temperature and hum- idity will alternate between the MAX/MIN temperature recordings and the current values.
- In MAX/MIN temperature display mode, hold pressing “UP” key to reset indoor and outdoor MIN/MAX data to current values at the same time.
OUTDOOR TEMPERATURE ALERT SETAt normal time displaying mode, hold pressing `DOWN’ button for seconds to enter temperature alert setting. The figure to be set will be flashing by 1HZ. The setting order is temperature alert function (ON/OFF) —high temperature alert values setting —low temperature alert values setting — exit. (Default high temperature alert values : 70¥/158; Default low temperature alert values: -50¥/-58.) Press `UP’ button to get one step increased on the settings, and hold for 2 seconds will get 8 steps increased per second. Press `DOWN’ button to get one step decreased on the settings, hold for 2 seconds will get 8 steps decreased per second. Press `SET’ button to confirm the setting. If no operation within 30 seconds, it will exit automatically and keep current settings.
433.92 MHz CONNECTION TIPS:The transmission range is about 100 meters from the transmitter to the weather station (in open area). The weather station should receive the temperature data within 3 minutes after set-up. If the temperature data is not received within 3 minutes after setting up, please check the following:
- The distance of weather station or transmitter should be at least 5~6.5 feet (1.5~2 meters) away from any interfering sources such as computer monitors or TV sets.
- Avoid positioning the weather station onto or in the immediate proximity of metalwindow frames.
- Using other electrical products such as headphones or speakers operating on the same signal frequency will cause interference. 4. Neighbors operating electrical devices on the same signal frequency can also cause interference.
CONNECTION W/ MAX 3 EXTERNAL SENSORS
- The weather station can receive data from up to maximum 3 sensors.
- Make sure you put each sensor in your desired area.
- Press “CH” key to switch the channel among CH1, 2 or 3 and read temperature info.
TIME SET
- Press and hold “SET” key for 2 seconds to enter time setting.
- The figure to be set will be flashing.
- Press “UP” or “DOWN” button to change the settings.
- Hold pressing “UP” or “DOWN” button for 8 steps per second movement.
- Press “SET” key to confirm and go to next setting.
- The setting order is: Year, Month, Date, Weekday languages, 12/24-hr format, Hour, Minute.
- Press “SET” again to confirm and exit setting.
- Moon phase is changed automatically.
ALARM SET
- Press “SET” key and you will see “AL” in the lower right corner of the display, then hold pressing “SET” for 2 seconds to enter alarm setting.
- The figure to be set will be flashing.
- Press “UP” or “DOWN” to change the settings. 9. Hold pressing “UP” or “DOWN” button for 8 steps per second movement.
- Press “SET” key to confirm and go to next setting.
- The setting order is: Hour Minute.
- Press “SET” again to confirm and exit setting.
- Press “UP” key to turn on or off alarm function. When the alarm icon on the screen, it indicates the alarm is ON.
- Alarm ring lasts for 2 minutes.
SNOOZE FUNCTION
- Press “SNOOZE LIGHT” buttons at the bottom of the unit, then the alarm sound would be stopped and resound in 5 minutes.
- Press any other key to turn the alarm off and the alarm would be activated again automatically after 24 hours.
BACKLIGHTPress “SNOOZE LIGHT” to turn on backlight, it will last for 20 seconds.
7 LANGUAGES WEEKDAY DISPLAY
| COUNTRY | GERMANY | ENGLISH | ITALIAN | FRENCH | NETHERLANDS | SPANISH | DANISH |
| ABBREVIATION | GE | EN | IT | FR | NE | ES | DA |
| SUNDAY | SO | SU | DO | DI | ZO | DO | SO |
| MONDAY | MO | MO | LU | LU | MA | LU | MA |
| TUESDAY | DI | TU | MA | MA | DI | MA | TI |
| WEDNESDAY | MI | ME | ME | ME | WO | MI | ON |
| THURSDAY | DO | TH | GI | JE | DO | JU | TO |
| FRIDAY | FR | FR | VE | VE | VR | VI | FR |
| SATURDAY | SA | SA | SA | SA | ZA | SA | LO |
MOONPHASE DISPLAY
 |
New Moon |  |
FULL MOON |
 |
Waxing crescent |  |
Waning Gibbous |
 |
First quarter |  |
Last quarter |
 |
Waxing Gibboous | |
Waning Crescent |
PRECAUTIONS
- Do not clean any part of the product with benzene, thinner or other solvent chemicals. When necessary, clean it with a soft cloth
- Never immerse the product in water. This will damage the product
- Do not subject the product to extreme force, shock, or fluctuations in temperature or humidity.
- Do not tamper with the internal components.
- Do not mix new and old batteries or batteries of different types.
- Do not mix alkaline, standard or rechargeable batteries with this product.
- Remove the batteries if storing this product for a long period of time.
- Do not dispose of this product as unsorted municipal waste. Collection of such waste separately for special treatment is necessary.
[xyz-ips snippet=”download-snippet”]