![]()
Dimplex 20L Evaporative Cooler Instruction Manual

PLEASE READ THE INSTRUCTION MANUAL CAREFULLY BEFORE USING THE UNIT.
WARNINGS & PRECAUTIONS
Warnings
- Never place the unit near gas appliances, flames or flammable liquids.
- Never hit or shake the unit. Doing so may cause damage.
- Never cover or obstruct the air inlet or outlet. Doing so may cause overheating.
- Never spray water on or place the unit near water. Doing so may cause electric shock.
- Never connect other appliances to the same power outlet.
- Never connect or disconnect the power plug with wet hands. Doing so may cause electric shock.
- Never insert fingers or objects through the guards when the unit is operating.
- Never use an extension cord.
- Always have a professional technician, manufacturer or service agent replace a damaged power cord.
Precautions
- This appliance is for indoor use only.
- Do not use the unit near windows or where water collects. Rain and water collection may lead to a risk of fire or electric shock.
- Do not place the unit in a damp place or where humidity is high (such as a bathroom).
- Do not leave the unit operating while unattended.
- Do not place the unit in direct sunlight to avoid surface discolouration.
- This appliance is not intended for use by persons (including children) with reduced physical, sensory or mental capabilities, or lack of experience and knowledge, unless they have been given supervision or instruction concerning use of the appliance by a person responsible for their safety.
- Children should be supervised to ensure they do not play with the appliance.
- Avoid electromagnetic interference. Keep the unit at least 1 metre away from electric appliances such as televisions and radios.
- Avoid scratching and damaging the surface. Do not use chemical solvents (i.e. Benzene, alcohol) to clean the surface.
- Place the unit on a stable surface when operating.
- Unplug the unit before filling, cleaning, servicing or maintenance.
- Electrical connections must be in accordance with National or Local Codes.
- The rear of the unit must be at least 50cm away from the wall.
- If the supply cord is damaged, it must be replaced by the manufacturer, its service agent or similarly qualified persons in order to avoid a hazard.
- The product design and specifications are subject to change without prior notice.
WARNING – KEEP BATTERIES OUT OF REACH OF CHILDREN
- Swallowing may lead to serious injury in as little as 2 hours or death, due to chemical burns and potential perforation of the oesophagus.
- If you suspect your child has swallowed or inserted a button battery immediately call the 24-hour Poisons Information Centre on 13 11 26 (in Australia) or 0800 764 766 (in New Zealand) for fast, expert advice.
- Examine devices and make sure the battery compartment is correctly secured, e.g. that the screw or other mechanical fastener is tightened. Do not use if the compartment is not secure.
- Dispose of used button batteries immediately and safely. Flat batteries can still be dangerous.
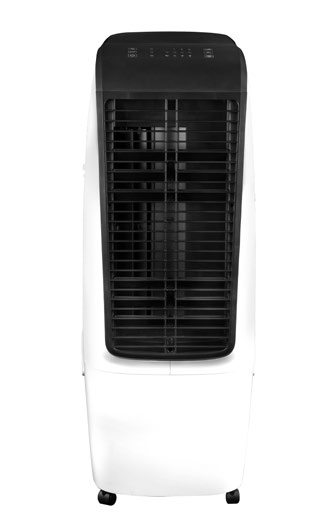
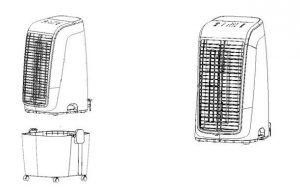
STRUCTURE


OPERATION
DISPLAY PANEL & REMOTE CONTROL


BEFORE FIRST USE
- Please read these instructions carefully before use and keep them for future reference.
- Check your local main voltage whether it is the same as stated on the appliance.
- Before using for the first time, remove any protective films or stickers from the appliance and ensure the power supply is “Off”.
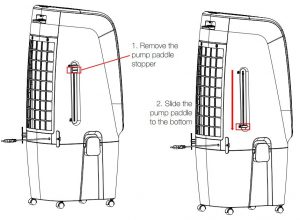
IMPORTANT! First remove the pump paddle stopper (4) as shown below, then slide the pump paddle (5) to the bottom. This is so the pump extends down into the tank for cooling/humidification.
Note: The buzzer beeps twice when the power supply is first turned on. The unit is in ‘standby’ until the On/Off button is pressed.
On/Off ButtonPress the On/Off button to turn the unit “On”. The default settings when first turned on are; medium fan speed, normal mode, and no timer.
To turn the unit “Off” press this button again. The unit may take a few seconds to power off completely.
Fan Speed ButtonThe fan speed can be selected in the following sequence: silent > low > medium > high. The selected fan speed LED indicator light will illuminate accordingly.
Cooling ButtonPress this button once to turn on the cooler/humidifier function, the pump will start and the cooler LED will illuminate. Press this button again to turn off the cooler function, and to use as a fan only.
Swing ButtonPress this button to turn on the swing function, the louvres will move left to right and the swing LED indicator light will illuminate. Press the button again to turn off the swing function.
Timer ButtonThe timer can be set via the following sequence: 1H > 2H > 4H > 8H > Off. The time isn’t accumulated and the MAX timer is 8H. The set time will be indicated by the LED lights on the display panel.
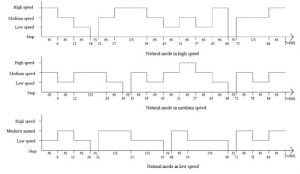
Mode ButtonThe default mode after turning “On” is normal. Press this button to select modes in this sequence: normal > natural > sleep. The mode indicator light will illuminate accordingly (NOTE: the natural and sleep modes are unavailable if silent fan speed is selected).
Normal: Constant wind speed.Natural: Changing wind speeds (the indicator lights only show the initial wind speed when the speed changes, and other changes are not indicated).Sleep: In natural sleep mode, the wind speed LED changes with the 30-minute cycle change, but does not indicate with the change of natural wind.
- High: 30 minutes high speed natural wind > 30 minutes medium level natural wind > low level natural wind (until turned off).
- Medium: 30 minutes medium level natural wind > low level natural wind (until turned off).
- Low: Low level natural wind (until turned off).
OTHER FUNCTIONSEnvironmental protection function:If no operation is detected within 60 seconds, all LED’s turn semi-bright. When operation is detected, the LED’s enter full brightness immediately.
Water level protection function:When the cooling function is first turned on, the water pump works for 50 seconds. If the low water is detected, then the pump will stop working and a buzzer alarms for 10 seconds.
Separation power off function:When the water pump is removed from the tank, the unit will turn off immediately.
Air dry functionIf the honeycomb filter needs to be dried after using the cooler/humidifier function (e.g. before packing the unit away), press and hold the “fan speed” button on the panel for 3 seconds to activate the air dry function. When the air dry function is activated, the fan speed turns to high speed automatically and runs for 20 minutes. During ‘Air dry’, other functions are turned off and can’t be used. The high fan speed indicator will illuminate and flash for the 20 minute duration.
If the “On/Off” button is pressed before the 20 minutes are complete, the remaining ‘Air dry’ time won’t be saved, and you’ll need to start again.
Power failure memory function:
- If there is a power failure during operation, when power resumes, the unit will automatically turn back on and beep ten times. After 30 seconds the unit will resume the last settings it was operating in.
- To speed up the process, press the “On” button within 30 seconds of the power being restored, and it will operate immediately.
Prevent long time useThe unit turns off automatically after continuously working for 15 hours. This function can prevent the unit from running for long periods, especially if the user forgets to turn the unit “Off”.
Uninterrupted memory function:When the unit is turned on and in a running state, it will resume the same functions before it was last turned “Off” (except sleep and natural mode). The timer also has an uninterrupted memory function.
Filling the water tankIn order to use the cooling/humidifier function, you need to fill the water tank. For your convenience, the water tank can be filled from the top of the unit (1) saving removing the water tank.
Filling from the topOpen the water cover (1), and slowly pour filtered/clean water into the compartment with a jug (as per below), and then close the water cover.

Removing & filling the water tankLoosen the water tank fixtures (6) on both sides of the unit, and slide the pump paddle up (5) to move the pump to the top of the tank. The top part of the unit should be free to detach from the water tank. Slowly pour water into the water tank (7) with a jug.

Once the water tank has been filled to the MAX fill line, replace the top part of the unit back onto the water tank, fasten the water tank fixtures (6), and slide the pump paddle back into the water tank.
OTHER USESThis unit can also be used as a fan. Before using as a fan only, use the ‘air dry’ function to completely dry the unit and the honeycomb filter. Follow steps above ‘Removing & filling the water tank’, and remove the water tank from the top part of the unit. Once the upper part is removed, it can be used as a normal fan, ensuring it is placed on a stable level surface.
Using the Remote Control

- Open the battery cover of the remote control, and insert a 3V CR2032 battery.
- Please point to the receiver (9) when using the remote control.
- If the battery voltage is low, please open the battery cover as per the diagram and replace with a new battery (CR2032). Then replace the battery cover.
CLEANING & MAINTENANCE
CLEANINGOver time, dust can accumulate on the surface, air outlet and filters, which can affect the performance. It is recommended to clean the unit at least once a week of any dust build up.
- Turn the unit OFF and disconnect the appliance from the main power supply before commencing any cleaning.
- Remove any dust build up with a soft brush or vacuum cleaner.
- Wipe the surface of the unit with a soft damp cloth. Mild detergent can be used for any stubborn marks.
- Do not allow electrical parts to come in contact with water or any other liquids.
- Do not use abrasive sponges, scouring pads, or a stiff brush to clean this appliance.
- When the unit is not being used for long periods, it’s recommended to remove the water tank, drain the water, and reinstall then turn on the ‘air dry’ function to completely dry the internal parts. Once fully dry, unplug the power cord, and pack the unit away in a dry, well ventilated space – preferably in its original box.

- Do not dispose of electrical appliances as unsorted municipal waste.
- Use separate collection facilities.
- Contact your local government for information regarding the collection systems available.
- If electrical appliances are disposed of in landfills or dumps, hazardous substances can leak into the ground water, polluting the food chain and damaging health and well-being.
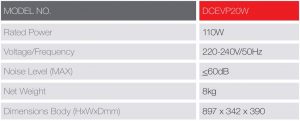
TECHNICAL & REFERENCE DATA
MAINTENANCEIt is recommended to change the water in the tank every 2 days.If the unit fails to operate efficiently, is broken or other problems arise, unplug and do not operate. Ask for advice by calling your local after sales service agent or the Customer Care Centre on 1300 556 816.
WARRANTYThe warranty period is 24 months from the date of purchase. For service advice, please contact the Customer Care Centre on 1300 556 816.
Glen Dimplex Australia Pty Ltd1340 Ferntree Gully Road,Scoresby 3179, VictoriaAustraliaPh: 1300 556 816
References
[xyz-ips snippet=”download-snippet”]