User Manual
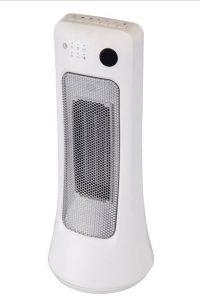
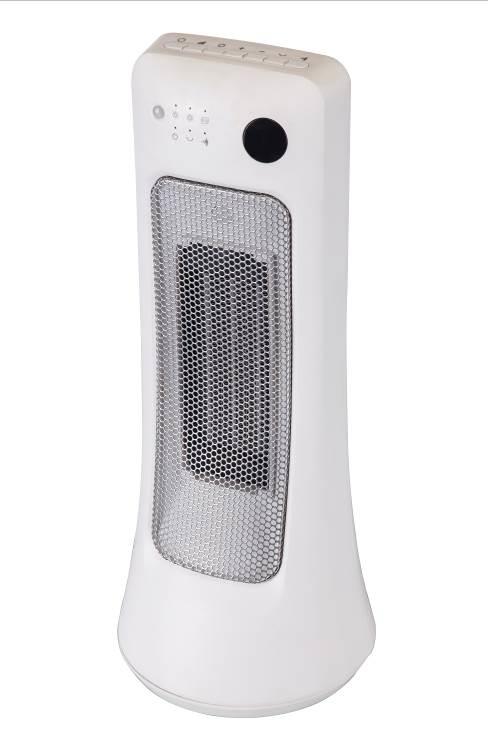
Dimplex 2kW Ceramic Heater DHCER20SW
PLEASE READ THE INSTRUCTION MANUAL CAREFULLY BEFORE USING THE UNIT.
WARNINGS AND PRECAUTIONS
Warnings
- Never place the unit near gas appliances, flames or flammable liquids.
- Never hit or shake the unit. Doing so may cause damage.
- Never cover or obstruct the air inlet or outlet. Doing so may cause overheating.
- Never spray water on or place the unit near water. Doing so may cause electric shock.
- Never connect other appliances to the same power outlet.
- Never connect or disconnect the power plug with wet hands. Doing so may cause electric shock.
- Never insert fingers or objects through the guards when the unit is operating.
- Never use an extension cord.
- Always have a professional technician, manufacturer or service agent replace a damaged power cord.
Precautions
- This appliance is for indoor use only.
- Do not use the unit near windows or where water collects. Rain and water collection may lead to a risk of fire or electric shock.
- Do not place the unit in a damp place or where humidity is high (such as a bathroom).
- Do not leave the unit operating while unattended.
- Do not place the unit in direct sunlight to avoid surface discolouration.
- This appliance is not intended for use by persons (including children) with reduced physical, sensory or mental capabilities, or lack of experience and knowledge, unless they have been given supervision or instruction concerning use of the appliance by a person responsible for their safety.
- Children should be supervised to ensure they do not play with the appliance.
- Avoid electromagnetic interference. Keep the unit at least 1 metre away from electric appliances such as televisions and radios.
- Avoid scratching and damaging the surface. Do not use chemical solvents (i.e. Benzene, alcohol) to clean the surface.
- Place the unit on a stable surface when operating.
- Unplug the unit before cleaning, servicing or maintenance.
- Electrical connections must be in accordance with National or Local Codes.
- The rear of the unit must be at least 50cm away from the wall.
- Do not place the appliance on its side, back or front while in storage or transport. The unit must be left in an upright position 2 hours before operation.
- If the supply cord is damaged, it must be replaced by the manufacturer, its service agent or similarly qualified persons in order to avoid a hazard.
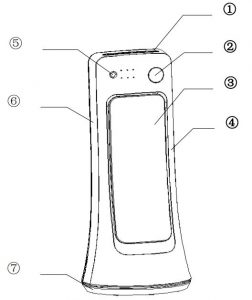
STRUCTURE
- Control panel
- LED display
- Front grille
- Front cover
- Movement sensor
- Back cover
- Base
OPERATION
DISPLAY PANEL
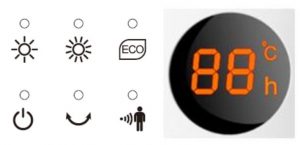
CONTROL PANEL

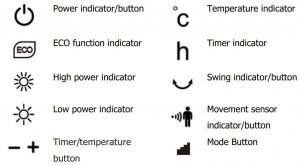
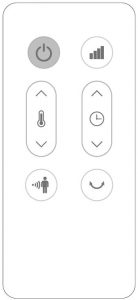
REMOTE CONTROL
ON / OFFThis button is used to switch the unit ON and OFF.
TIMERA timer can be set so the unit turns off automatically after a set period. When Pressing the TIMER button twice, the ‘h’ indicator will illuminate. Press the ‘+/-’ button to set the timer between 0-12 hours. Each press of the ‘+/-’ button increases/decreases the set time in 1 hour increments. If a time isn’t set within 5 seconds, the unit will exit the timer function and revert to displaying the room temperature.
MODE This button is used to switch between pre-set operating modes. By simply pressing the button, you can regulate the mode from LOW Power, HIGH Power or FAN depending on your needs. The unit automatically starts in LOW Power mode.
SWINGThe unit will begin to oscillate after pressing the SWING button, and the indicator light will illuminate. To turn off the SWING function, press the swing button again, and the swing will stop and the indicator light will switch off.
ECO MODEWhen ECO Mode is selected, the unit will automatically adjust to suitable settings according to the room temperature. When the room temperature is below 18°C, the unit will operate in HIGH Power, and when the room is above 18°C, the machine will operate in LOW Power. When the room reaches 22°C the unit will stop working, until the room temperature decreases, and will then start working again.
MOVEMENT SENSOR MODEThe MOVEMENT SENSOR function means you never have to worry if you have left the heater on. When activated, it detects movement and remains on. If it detects no movement for 15 minutes, it will stop working and enter standby mode. The unit will resume working when movement is detected again. This provides an extra safety feature as well saving you power when not in use.
REMOTE CONTROLThe remote control can be used to operate all functions.
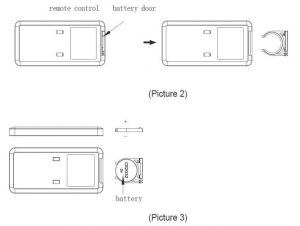
- Remove the battery cover at the back of remote control (Picture 2).
- Insert the battery (included) [Picture 3].
- Replace the battery cover.
Operation
- Connect the unit to a power supply and switch on.
- The unit will be in standby mode and sound a ‘beep beep’ once connected to the power supply. The ON/OFF indicator light will illuminate.
- Press the ON/OFF button to turn the unit ON.
- The unit defaults to: Low Power, no swing and a temperature setting of 25°C.
- Press the Mode button to change the setting. The mode is changed in sequence: Low Power, High Power & Eco mode. The respective indicator light will illuminate to show what mode is selected.
- Press the ECO button to put the unit into ECO Mode.
- Press the TIMER button once, to set a time for the unit to turn off automatically. The number will flash on the LED display when the time is ready to be set. Time is set in 1 hour increments, and can be set up to 12 hours. Press the ‘+/-’ buttons to set the desired time.
- Press the temperature button twice to set the temperature. The numbers will flash on the LED display when the temperature is ready to be set. The temperature can be set between 5-35°C. Press the ‘+/-’ buttons to set the desired temperature.
- Press the MOVEMENT SENSOR button to activate this mode. Press again to deactivate this mode.
- Press the ON/OFF button to turn the unit off. It will take approx. 10 seconds for the fan to turn off and enter standby mode.
CLEANING AND MAINTENANCE
Cleaning
Your unit is designed to remove dirt and other atmospheric impurities by drawing air through the air filter. Do NOT block the air filter, as this will impair the efficiency of the unit. Pushing the unit up against a wall or operating it in close proximity to long window drapes will also impair the unit’s air flow and efficiency.
- Disconnect the appliance from the main supply and allow to completely cool down.
- Use a soft cloth to wipe any dust from the heaters surface. If the surface is too dirty, use warm soapy water and a soft cloth to clean. Do not use solvents or abrasive products.
- It’s important to clean the filters regularly. Gently wash the filter in mild, soapy water, dry and replace. Be sure to re-fit the rear screen securely. No special tools are required for this.
- If storing the heater, ensure it has completely cooled down, is dry and packed away in a cool dry place.
IMPORTANTThe control panel must not come into contact with water or any other liquids.
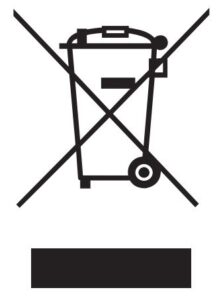
- Do not dispose of electrical appliances as unsorted municipal waste. Use separate collection facilities.
- Contact your local government for information regarding the collection systems available.
- If electrical appliances are disposed of in landfills or dumps, hazardous substances can leak into the ground water, polluting the food chain and damaging health and well-being.
MaintenanceIf the unit fails to operate efficiently, is broken or other problems arise, unplug and do not operate.
Ask for advice by calling your local after sales service agent or the Customer Care Centre on 1300 556 816 (AU) / 0800 666 2824 (NZ).
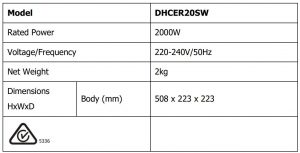
TECHNICAL REFERENCE DATA
WARRANTYThe warranty period is 12 months from the date of purchase. For service advice, please contact the Customer Care Centre on 1300 556 816 (AU) / 0800 666 2824 (NZ).
Glen Dimplex Australia Pty Ltd1340 Ferntree Gully Road,Scoresby 3179, VictoriaAustraliaPh: 1300 556 816
Glen Dimplex Australasia Ltd38 Harris Road, East Tamaki,Auckland 2013New ZealandPh: 0800 666 2824
Dimplex 2kW Ceramic Heater DHCER20SW User Manual – Dimplex 2kW Ceramic Heater DHCER20SW User Manual –
Questions about your Manual? Post in the comments!
[xyz-ips snippet=”download-snippet”]