User Manual


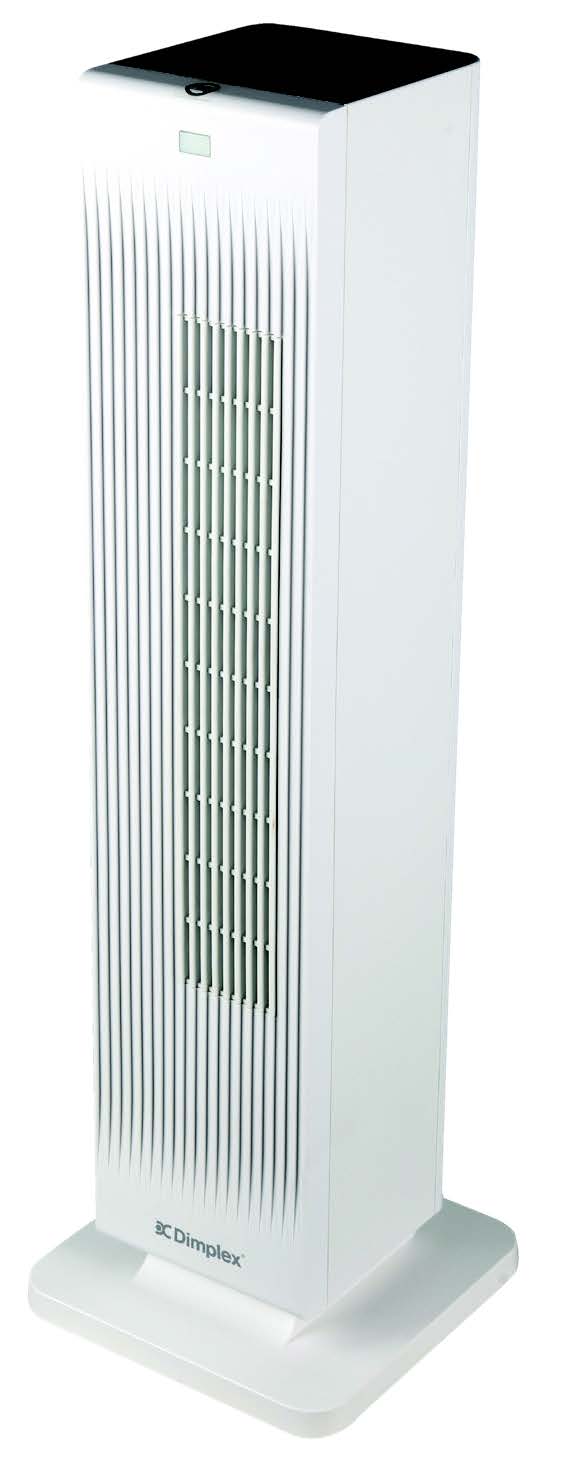
Dimplex DHCER20HC 2 In 1 Ceramic Heater And Cooling Fan
Please read the following instructions carefully before using the device and keep this user manual for future reference.
WARNING
- This appliance may be used by children aged from 8 years and above and persons withreduced physical, sensory or mental capabilities or lack of experience and knowledge if theyhave been given supervision or instruction concerning use of the appliance in a safe way and understand the hazards involved. Children shall not play with the appliance.
- Cleaning and user maintenance shall not be made by children without supervision.
- Children of less than 3 years should be kept away unless continuously supervised.
- Children aged from 3 years and less than 8 years shall only switch on/off the applianceprovided that it has been placed or installed in its intended normal operating position and they have been given supervision or instruction concerning use of the appliance in a safe way and understand the hazards involved. Children aged from 3 years and less than 8 years shall not plug in, regulate and clean the appliance or perform user maintenance.
- CAUTION — Some parts of this product can become very hot and cause burns. Particularattention has to be given where children and vulnerable people are present.
- If the supply cord is damaged, it must be replaced by the manufacturer, its service agent orsimilarly qualified persons in order to avoid a hazard.
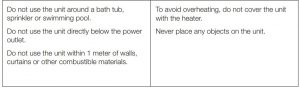
 Warning: in order to avoid overheating, do not cover the heater.
- The heater must not be located immediately below a socket-outlet.
- Do not use this heater in the immediate surroundings of a bath, shower or swimming pool.
PRODUCT FEATURES
- Heat in winter and cool in summer
- Improved element design allows better wind flow:– Improves heating efficiency– Room heat up time– Decreases noise levels down to 40dB
- PTC ceramic heating element automatically regulates the power used according to the room’s ambient temperature. This increases heating efficiency as well as increasing the product’s lifespan.
- 2 heat settings
- Digital temperature control from 15ºC to 35ºC (heating only)
- Tip-over safety protection
- Double over-heat protection (thermistor, temperature fuse).
- High or low fan settings
- Timer function (1-12h).
- Infrared remote control
- Oscillation/swing function
COMPONENTS DESCRIPTION
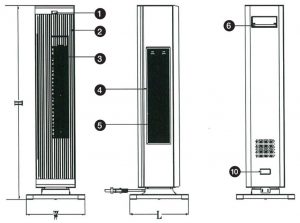
- Remote control receiver
- Front cover
- Wind outlet
- Filter holder
- Filter
- Remote control holder
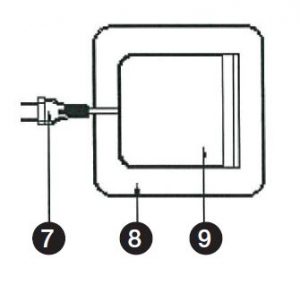
- Power cord
- Plastic base
- Control panel
- Power switch
ASSEMBLY INSTRUCTIONS
Securely attach the base to the main ceramic heater/tower fan unit.
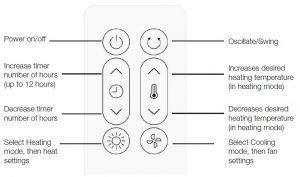
OVERVIEW OF CONTROL AND DISPLAY PANELS
Control panel buttons
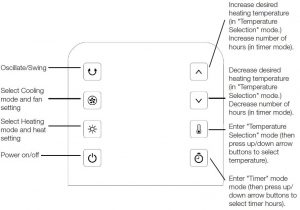
Remote control buttons
The indicators below light up to show when the unit is in the following modes:
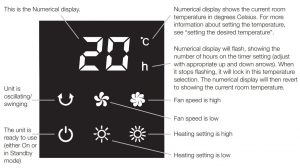
After changing any settings, the control panel on the unit will be illuminated to full brightness for 1 minute. After this, it will dim itself.
OPERATING FUNCTIONS
Setting the desired temperature:
- The temperature shown on the numerical display on the heater is the current temperature.
- To adjust the desired heating temperature:

- When setting the desired heat temperature, the numerical display on the heater will flash with the desired temperature (adjust with appropriate up and down arrows). After 5 seconds without input, the numerical display will stop flashing and it will lock in this desired temperature selection. The heater will now heat up to this temperature. The numerical display will have reverted to showing the current room temperature (rather than the desired heating temperature).
- You can select between 15ºC and 35ºC
If both the timer and set temperatures are set, the numerical display will alternate every 30seconds between showing the remaining time on the timer and the current room temperature.
Setting the timer:
The unit has a run back timer: while the unit is on, set the number of hours for the unit to operate until switching off automatically
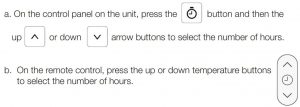
- When setting the desired number of hours for the timer, the control panel “h” signal will light up next to the numerical display, which will flash with the desired number of hours (adjust with appropriate up and down arrows). To confirm this timer setting, either press the button or leave the numerical display to flash for 5 seconds. After this, the timer duration is set. The numerical display will have reverted to showing the current room temperature.
- You can select between 1 and 12 hours
If both the timer and set temperatures are set, the numerical display will alternate every 30seconds between showing the remaining time on the timer and the current room temperature.
Notes on oscillation/swing function:
In heating mode, when the unit reaches the set temperature, it will stop heating and blowingair. As a result, the oscillation/swing function will also stop. The heating, air movement andoscillation/swing functions will resume if the temperature in the room decreases.
Installing the battery into the remote control
- Pull out the battery door at the back side of the remote control.

2. Pay attention to the battery polarity, and insert the battery to the tray of the door.
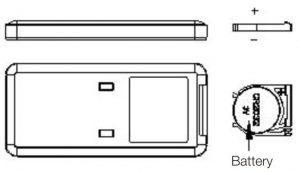
3. Push the battery door (with the battery) into the remote control.
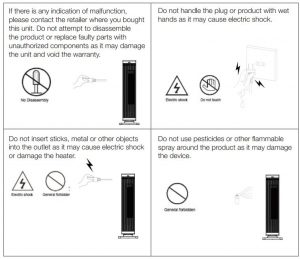
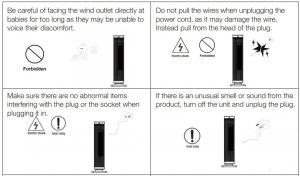
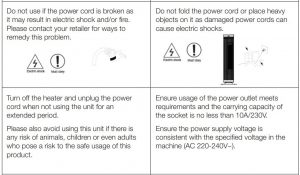
SAFETY WARNINGS
To avoid dangerous usage and to get the most out of your unit, please read the safety instructions below.
Please note the following symbols in the diagram below:

CLEANING & MAINTENANCE
Ensure that the device is switched off before cleaning or maintenance, then follow the belowsteps:
- Pull out the plug, and make sure the heater has become cool.
- Use a soft cloth to wipe the dust on the unit’s surface. If the surface is quite dirty, you mayuse a damp cloth to clean it, ensuring that the water temperature is lower than 50ºC andonly mild detergents are used.
- If the unit is wet after cleaning, wipe and dry with a soft cloth.
Do not use gasoline, paint thinners or any other harsh substances to clean as it may damagethe surface of the unit.
When storing the heater away, ensure it is placed in a dry area. If the unit has been heating,please allow it to cool down before packing away.
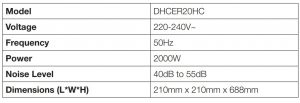
UNIT SPECIFICATIONS
ENVIRONMENTAL PROTECTION
 This marking indicates that this product should not be disposed with otherhousehold waste. To prevent possible harm to the environment or human health from uncontrolled waste disposal, recycle it responsibly to promote the sustainable reuse of material resources. To return your used device, please use your region’s return and collection systems or contact the retailer where the product was purchased. They may be able to take this product for environmentally safe recycling.
Glen Dimplex New Zealand Ltd38 Harris Road, East TamakiAuckland, New ZealandP.O. Box 58473, BotanyManukau 2163, New Zealand
Phone: 09 274 8265Fax: 09 274 8472Email: Web: www.dimplex.co.nz
Dimplex DHCER20HC 2 In 1 Ceramic Heater And Cooling Fan User Manual – Dimplex DHCER20HC 2 In 1 Ceramic Heater And Cooling Fan User Manual –
Questions about your Manual? Post in the comments!
[xyz-ips snippet=”download-snippet”]