 INSTRUCTION MANUAL
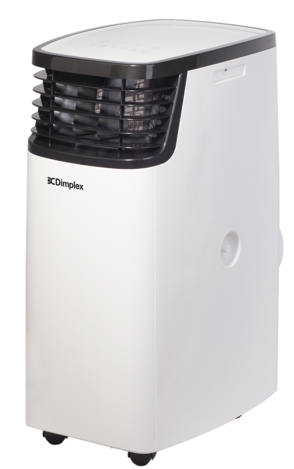
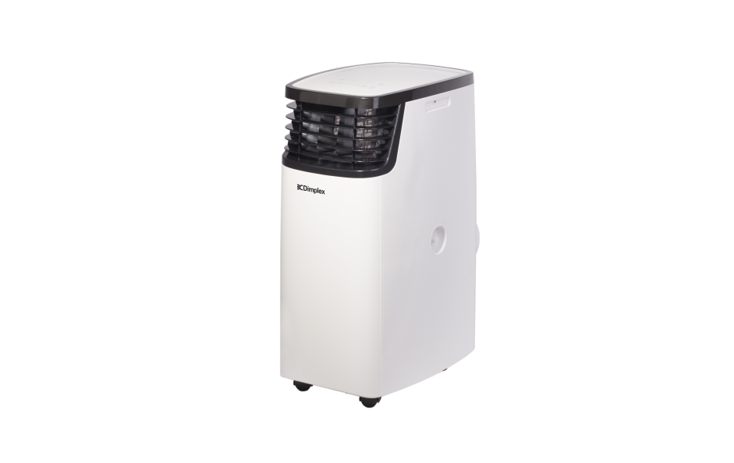
MULTIDIRECTIONALPORTABLE AIR CONDITIONERModel: DCP11MULTI & DCP14MULTIFor domestic household use only.
![]() IMPORTANTTHESE INSTRUCTIONS SHOULD BE READ CAREFULLY AND RETAINED FOR FUTURE REFERENCE.Note also the information presented on the appliance
IMPORTANTTHESE INSTRUCTIONS SHOULD BE READ CAREFULLY AND RETAINED FOR FUTURE REFERENCE.Note also the information presented on the appliance
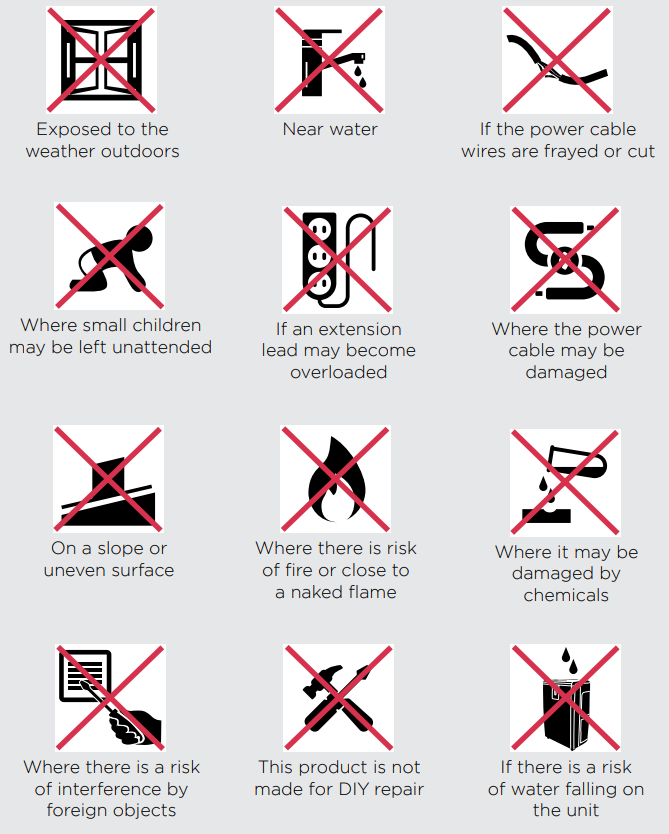
CAUTION: FAILURE TO FOLLOW THESE INSTRUCTIONS MAY CAUSE INJURY AND/OR DAMAGE AND MAY INVALIDATE YOUR WARRANTY
Please read the operating instructions carefully before using your Portable Air Conditioner for the first time and keep them in a safe place.
WARNING – This appliance must not be used in a bathroom.WARNING – Do not use this appliance in the immediate surroundings of a bath, a shower, or a swimming pool.
- If the mains lead is damaged it must only be replaced by the manufacturer’s service agent or a similarly qualified person in order to avoid a hazard.
- This appliance is not intended for use by persons (including children) with reduced physical, sensory or mental capabilities, or lack of experience and knowledge unless they have been given supervision or instruction concerning the use of the appliance by a person responsible for their safety.
- Children should be supervised to ensure they do not play with the appliance.
- Prior to cleaning or other maintenance, the appliance must be disconnected from the supply mains.
- Never immerse the appliance in water or other liquids.
- Operate this unit only on a firm, flat surface to avoid the risk of water leakage. Ensure that the unit is kept upright at all times.
- Do not place on soft, unstable, or non-horizontal/angled surfaces.
- Never operate the appliance if a cable or connector has been damaged, after appliance malfunction or if the appliance was dropped or is otherwise damaged.
- Please ask a professional service agent to repair the product. Improper repair may cause danger to users.
- Disconnect the appliance from mains power whenever it is not in use, before relocating it, and before cleaning.
- Operate the appliance only at the voltage specified on the rating label.
- Only connect the unit to a properly installed and easily accessible socket so that you can quickly disconnect the plug if necessary. o not connect this product to the mains using an extension lead.
- This product is only intended for INDOOR RESIDENTIAL applications. This product should not be used for commercial or industrial or leisure applications or in small enclosed spaces.
- Never use the mains lead as a carrying strap or pulling lead.
- To avoid a fire or electrocution hazard, NEVER put the cord near heat registers, radiators, stoves, or heaters.
- DO NOT cover cord with carpeting, throw rugs, runners, or similar coverings.
- DO NOT route cord under furniture or appliances. Take care to position the cord away from traffic areas and where it will not be a tripping hazard.
- DO NOT use the unit near windows or where water collects. Rain and water collection may lead to a risk of fire or electric shock.
- Only operate this appliance with a minimum of 50cm clearance all around i.e. away from walls, furniture, and overhanging objects such as curtains or a shelf.
- WARNING: To avoid the danger of suffocation please remove all packaging materials particularly plastic and EPS and keep these away from vulnerable people, children, and babies.
- NEVER drop or insert any object or fingers into any openings.
- Do not cover or obstruct the air inlet and outlets.
- Do not use the appliance in locations where paint, petrol, or other flammable liquids are used or stored.
- Do not use bug sprays or other flammable cleansers/vapor sprays on or around the unit.
- Always switch off the unit and take the plug out of the socket:If you are not using the unitBefore you clean or carry out maintenance on the unitIf a fault occursIn the event of an electrical storm.
- Avoid electromagnetic interference. Keep the unit at least 1 meter away from electrical appliances such as televisions & radios.
- The air conditioner must always be stored and transported upright. In case of doubt, we suggest you wait for at least 24 hours before the operation. (Please keep the unit upright at all times).
- This portable air conditioner is fitted with a compressor delay protection circuit. This protects the unit from possible damage due to the rapid starting and stopping of its compressor. The compressor will begin operation 3.5 minutes after the unit has been switched ON or if the mode is changed from dehumidifying to cooling.
- The appliance shall be installed in accordance with national wiring regulations.

Specification
|
Model no. |
DCP11MULTI | DCP14MULTI |
|
Colour |
White/Black | |
|
Power supply |
220-240V~, 50Hz | |
| Operating temperature |
5-43°C |
|
| Thermostat range |
17-30°C |
|
|
Rated Input Power |
1.28kW | 1.6kW |
| Cooling Capacity | 3.2kW |
4kW |
|
Dehumidification Capacity (30°C, 80%RH) |
50L/day | 70L/day |
| Noise Level Minimum (Lo) |
69dB(A) |
|
|
Noise Level Maximum (Hi) |
70dB(A) | |
| Air Volume (lo/Med/Hi) |
350/450/540 |
|
|
Refrigerant |
R410A | |
| Fan speeds |
3 |
|
|
Modes |
Sleep/Dry/Cool/Auto | |
| Timer |
0-24 hours |
|
|
Dimensions (w x d x h) |
335 x 538 x 765mm | |
| Min room size | 15m² |
18m² |
|
Max room size |
23m² | 26m² |
| Weight net | 30.5kg |
31kg |
| Weight gross | 34kg |
34.5kg |
Parts
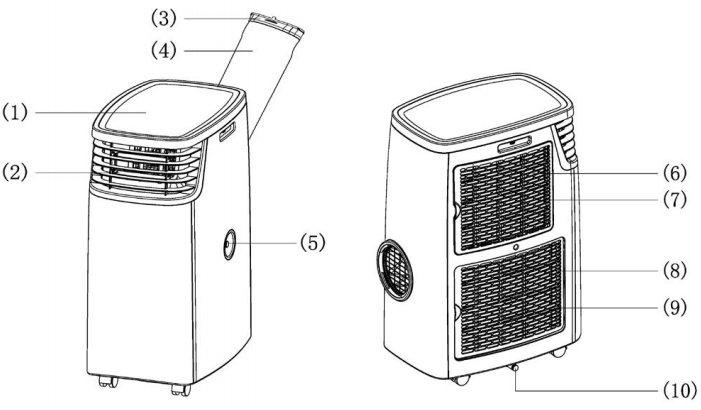
(1) Control panel(2) Remote control receiver(3) Hose adaptor(4) Exhaust hose(5) Upper drainage hole(6) Cool air inlet(7) Cool air filter(8) Hot air inlet(9) Hot air filter(10) Lower drain hole

Control Panel
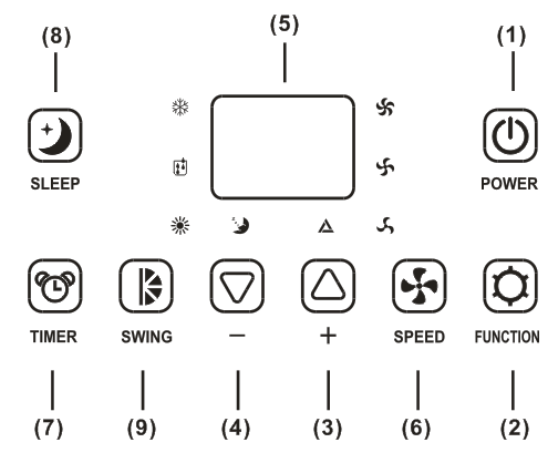
(1) Power button(2) Function button(3) Temp increase (+) button(4) Temp decrease (-) button(5) LED display screen(6) Speed button(7) Timer button(8) Sleep button(9) Swing button
Indicator lights: *heating not applicable for all models.
![]() The light only will be lightened when the unit has a heating function.
The light only will be lightened when the unit has a heating function.
LED Display
- The LED display indicates the current set temperature or the timer setting.
- When the set temperature or the timer is adjusted, the new setting is shown on the display.
- The LED display is also used to show error codes should a fault occur.
Installation
PREPARATION
NOTE: All the illustrations in the manual are for explanatory purposes only. Your machine may be slightly different. The unit can be controlled by the control panel or with the remote control.EXHAUST HOSEThe exhaust hose and adaptor must be installed or removed in accordance with the set FUNCTION. For COOL & DRY functions, the exhaust hose must be installed. For FAN only – the exhaust hose should be removed.EXHAUSTING HOT AIRIn the COOL function, the appliance must be placed close to a window or opening so the warm exhaust air can be expelled outside.CHOOSING THE RIGHT LOCATIONYour installation location should meet the following requirements:• Make sure that you install your unit on an even surface to minimize noise and vibration.• The unit must be installed near a sufficient power outlet, and if using a continuous drainage method, then the plug areas should be accessible.• The unit should be located at least 50cm from the nearest wall to ensure proper air circulation. The horizontal louver blade should be at least 50cm away from obstacles.• The exhaust hose can be extended, however, it’s best to keep it to the minimum length required. Ensure the hose doesn’t have any sharp bends, sagging areas or kinks• DO NOT cover the Intakes, outlets, or remote control signal receptor of the unit, as this could cause damage to the unit.

Installation
EXHAUST HOSE INSTALLATION1. Rotating the exhaust hose according to the direction in Fig (1) will remove the hose from the unit.2. Rotating the exhaust hose according to the direction in Fig (2) will attach the hose to the unit.3. Extend the exhaust hose to a length of no more than 400mm. The exhaust hose must be kept parallel and must not be bent up or down.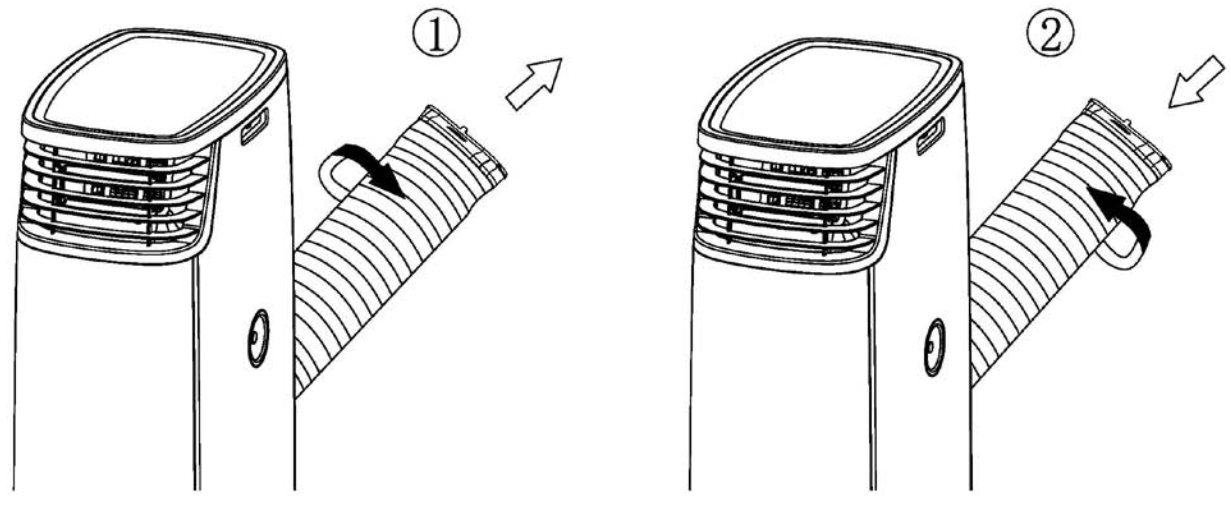 NOTE: This unit has a self evaporative system that removes excess condensation by means of evaporating water collected in the tank. Therefore saving you the hassle of having to use a drip tray or drainage hose. Please make sure the rubber cap is locked into position to avoid any leakage.NOTE: In high humidity areas, there may be excess water condensation produced that cannot be removed or evaporated. In this instance, the unit will need to be drained. View the WATER DRAINAGE section for details. The unit will automatically switch OFF when the internal water tank is full.
WINDOW KIT INSTALLATIONThe window slider kit has been designed to fit most standard vertical and horizontal window applications, however, it may be necessary for you to modify some aspects of the installation procedures for certain types of windows. The window slider kit can be fastened with screws (not supplied) if required.Refer to Fig. 1 & Fig. 2 below:
Vertical Installation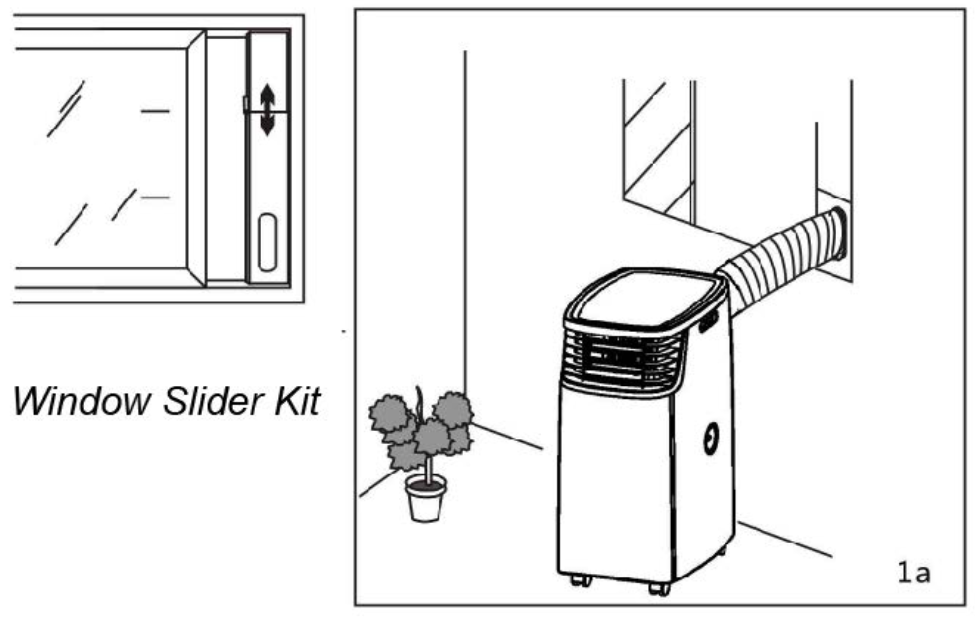
Horizontal Installation

Functions
POWERPress the POWER button to turn the unit ON or OFF.FUNCTIONPress the FUNCTION button to select between COOL, or DRY modes.COOLING MODE1. The exhaust hose needs to be installed for this mode and the rubber cap should be fitted to the drainage hole.2. To set this mode, press the FUNC button until the COOL indicator light illuminates on the control panel.3. Set the target temperature between 17-30°C by pressing the increase (+) or decrease (-) buttons until the desired temperature is displayed on the LED display.TIP: The most suitable temperature setting for a room during summer is 24°C.DEHUMIDIFICATION MODEThe exhaust hose needs to be connected. Remove the rubber cap from the drainage hole to connect the drain hose (not supplied).2. To set this mode, press the FUNCTION button until the DEHUM indicator light illuminates on the control panel.3. The fan speed is selected automatically by the unit and cannot be changed.NOTE: Keep windows and doors closed for the best dehumidifying effect.TEMP+ / TEMP-Press the TEMP+ button to increase the set temperature or press the TEMP- button to decrease the set temperature. The temperature can be set between 17- 30°C.NOTE: The time taken to reach the set temperature will depend on the environment and the size of the space in which the unit is operating in. For example, if the ambient temperature is too hot or the room is too large, the rate at which the temperature descends will be slow as the cooling may be less effective.
FAN SPEED
- The exhaust hose needs to be removed for this model.
- Press the SPEED button to select either LOW, MEDIUM, HIGH, or AUTO fan speeds.
- If AUTO fan speed is selected (during cooling mode) then either HIGH, MEDIUM, or LOW speed will be selected automatically according to the difference between the set temperature and ambient room temperature.
SWINGPress the SWING button to begin the automatic swing function. Press again to turn the SWING function off.SETTING THE TIMERA timer can be set to automatically turn the appliance ON or automatically turn it OFF.To set the unit to automatically turn ON, follow the below instructions:
- While the unit is OFF press the TIMER button to set the desired time. The timercan be set in 1-hour increments for up to 24 hours.
- After the TIMER has been set, choose what settings you’d like the unit to operate in.
- If the POWER button is pressed after completing the above, the timer will be canceled.
To set the unit to automatically turn OFF, follow the below instructions:
- While the unit is running, press the TIMER button and set the desired time (between 1-24 hours) for the unit to remain ON, before automatically turning OFF.
- If the POWER button is pressed before the TIMER is up, it will cancel any TIMER set.
SLEEP MODE
- The SLEEP MODE maintains the optimum room temperature without excessive fluctuations in either temperature or humidity and with quieter operation.
- Press the SLEEP button to select the sleep comfort mode. When the unit is in COOLING mode and SLEEP mode is selected, the unit will increase the set temperature by 1°C each hour to a maximum of 2°C over two hours. These temperatures will be maintained for the remainder of the time set to help maximize sleep comfort.
- When setting the SLEEP mode please ensure you set the number of hours required by pressing the TIMER button. The hours set will be shown on the display by pressing either the TEMP+ or TEMP- buttons.NOTE: This function cannot be used in dehumidifying mode.
- The screen will be blank after 15 minutes of operation but can be re-activated when any key is pressed.
Error Codes
E1-Indicates open circuit or short circuit in temperature sensor and PCB.E2 – Indicates open circuit or short circuit in temperature sensor, copper tube, and PCB.E4 – Indicates the internal water container is full. Refer to the Water Drainage section below.dF – indicates the appliance is defrosting.Overheat Protection – This unit is fitted with an overheat prevention device. If the unit overheats it will automatically turn OFF. The unit can be restarted after 30 minutes.
Water Drainage
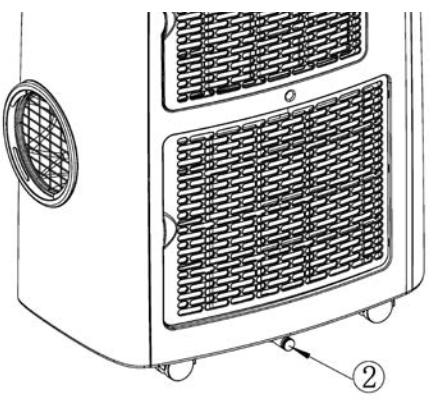
WATER DRAINAGE METHODWhen there is excess water condensation inside the unit, the unit will stop running and the error code ‘E4’ will display. This indicates that the water needs to be drained using the following procedure:Manual Drainage:
- Switch off and unplug the unit.
- Move the unit to a suitable location to drain the water. Consider placing a tray or suitable container under the outlet to catch any water.
- Remove the drain plug (2) refer to diagram.
- Slightly tilt the unit to the rear and drain the water out.
- Replace the drain plug before the next use.
Remote Control
The remote control can be used to perform all functions. Refer to the below diagram and button description • AUTO = Automatic fan speed• HI= High fan speed• MID = Medium fan speed• LOW = Low fan speed• TEMP = Increases / decreases set temperature• FUNC = Function (mode) selector• TIMER = Hourly programming• SLEEP = Sleep/night mode• SWING = turns swing On/Off• POWER = On/Off
Remote Control
Using the Remote Control
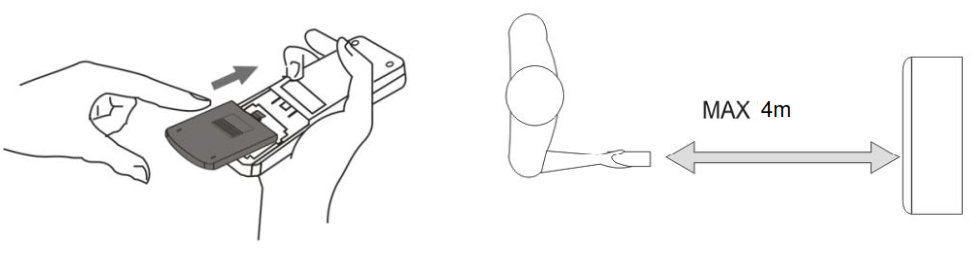
- Open the battery cover of the remote control, and insert 2 x AAA batteries.
- Please point to the receiver and be within 4m when using the remote control.
- If the battery voltage is low, please open the battery cover as per the diagram and replace it with new batteries (2 x AAA). Then replace the battery cover.
NOTE:
- If the remote control unit is replaced or disposed of, the batteries must be removed and discarded in accordance with current legislation as they are harmful to the environment.
- Do not mix old and new batteries. Do not mix alkaline, standard (carbon-zinc), or rechargeable (nickel-cadmium) batteries.
- Do not dispose of batteries in a fire. Batteries may explode or leak.
- If the remote control is not be used for a certain length of time, remove the batteries.
Cleaning
SAFETY PRECAUTIONS
- Always unplug the unit before cleaning or servicing.
- DO NOT use flammable liquids or chemicals to clean the unit.
- DO NOT wash the unit under running water. Doing so causes electrical danger.
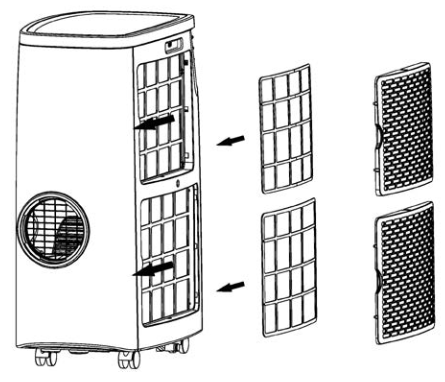
- DO NOT operate the machine if the power supply was damaged during cleaning.A damaged power cord must be replaced with a new cord from the manufacturer.AIR FILTERSCAUTION: Never operate the unit without a filter in place.
- Be sure to clean the air filter every week of operation for optimal performance.
- The water collection tray should be drained immediately after the “E4” error occurs, and before storage to prevent mold.
- In households with animals, you will have to periodically wipe down the grill to prevent blocked airflow due to animal hair.Following the below diagram, remove the filters from the back of the unit. Use a vacuum cleaner to remove dust from the filter. If further cleaning is required, the filter can be washed in lukewarm water (never hotter than 40 degrees). Ensure it is left to dry completely before reinstalling.Outside Cabinet1. Remove any dust build-up with a soft brush.2. Wipe the surface of the unit with a soft damp cloth. A mild detergent can be used for any stubborn marks.
- Do not use abrasive sponges, scouring pads, or a stiff brush to clean the unit.IMPORTANTThe control panel and other parts must not come into contact with water or any other liquids.
 Outside Cabinet1. Remove any dust build-up with a soft brush.2. Wipe the surface of the unit with a soft damp cloth. A mild detergent can be used for any stubborn marks.
Maintenance
StorageIf not using the unit for an extended period of time, after cleaning please:Turn the unit OFF, unplug and take care of the mains lead & plug.
- Drain any water from the unit according to the instructions in the previous sections.
- Run the appliance on FAN MODE for 12 hours in a warm room to dry out and prevent mold.
- Clean the air filter as described on the previous page.
- Remove the batteries from the remote control.
- Cover the unit and store it upright in a location where it will not receive direct sunlight.NB- Prolonged exposure to direct sunlight will discolor the enclosure.If the unit fails to operate efficiently, is broken or other problems arise, unplug and do not operate. Ask for advice by calling your local after-sales service agent or the Customer Care Centre on 1300 556 816 (AU) / 0800 666 2824 (NZ).
Warranty
Please refer to the warranty card in the box for warranty information. For any troubleshooting advice, please contact the relative Customer Care Centre below.Glen Dimplex Australia Pty Ltd Glen Dimplex New Zealand Ltd 1340 Ferntree Gully Road,
| Glen Dimplex Australia Pty Ltd
1340 Ferntree Gully Road, Scoresby 3179, Victoria Australia Ph: 1300 556 816 |
Glen Dimplex New Zealand Ltd
38 Harris Road, East Tamaki Auckland 2013 New Zealand Ph: 0800 666 2824 |
![]() Recycling: Do not dispose of electrical appliances as unsorted municipal waste. Use separate collection facilities. Contact your local government for information regarding the collection systems available. If electrical appliances are disposed of in landfills or dumps, hazardous substances can leak into the groundwater, polluting the food chain and damaging health and well-being.
Recycling: Do not dispose of electrical appliances as unsorted municipal waste. Use separate collection facilities. Contact your local government for information regarding the collection systems available. If electrical appliances are disposed of in landfills or dumps, hazardous substances can leak into the groundwater, polluting the food chain and damaging health and well-being.
Customer Care: 1300 556 816[email protected]www.dimplex.com.auSupplied by Glen Dimplex Australia1340 Ferntree Gully Road, Scoresby, Victoria, 3179
© Glen Dimplex Australia. All rights reserved. Material contained in this publication may not be reproduced in whole or in part, without prior permission in writing of Glen Dimplex Australia.
References
[xyz-ips snippet=”download-snippet”]