
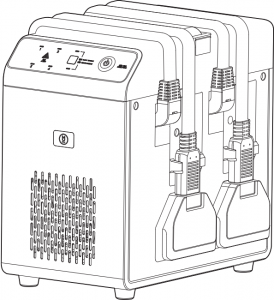
2600W 4-ChannelIntelligent Battery Charger
User Guidev1.4 2019.06
![]()
Disclaimer
Thank you for purchasing the 2600W 4-Channel Intelligent Battery Charger (hereinafter referred to as the “Product”). Read this disclaimer carefully before using this Product. By using this Product, you hereby agree to this disclaimer and signify that you have read it fully. Please use this Product in strict accordance with the manual and be sure to pay attention to the warnings. SZ DJI TECHNOLOGY CO., LTD. and its affiliated companies assume no liability for damage(s) or injuries incurred directly or indirectly from improper use of this Product. Misuse includes, but is not limited to, using unapproved chargers, charging unapproved batteries, short-circuiting, overheating, modifying the Product, or touching the terminals with skin or metal.DJITM is a trademark of SZ DJI TECHNOLOGY CO., LTD. (abbreviated as “DJI”) and its affiliated companies. Names of products, brands, etc., appearing in this manual are trademarks or registered trademarks of their respective owner companies. This Product and manual are copyrighted by DJI with all rights reserved. No part of this Product or manual shall be reproduced in any form without the prior written consent or authorization of DJI.This disclaimer is produced in various languages. In the event of divergence among different versions, the Chinese version shall prevail when the Product in question is purchased in China, and the English version shall prevail when the Product in question is purchased in any other region.
Warning
- DO NOT use this product under direct sunlight, in rain, or in a damp environment.
- Keep the battery charger away from heat, pressure, water, flammable gases, and corrosives.
- The battery charger should be kept in an environment with a temperature range of 32° F to 113° F (0° C to 45° C).
- Place the battery charger on a flat and stable surface. In order to prevent fire hazards, make sure the device is properly insulated and that there is sufficient space for ventilation (at least 50 cm).
- In case of fire, be sure to use a dry powder fire extinguisher. A liquid fire extinguisher may lead to an electrical hazard.
- DO NOT unplug the cables while the battery charger is in use. Remove batteries after charging is complete.
- If there is any noticeable buildup, wipe the metal terminals with a clean, dry cloth.
- DO NOT use the battery charger during a thunderstorm.
- Please refer to the batteries’ user guide for more safety instructions before use.
- The AC power cable’s input current is 16 A. Please use a power outlet that can provide a current exceeding 16 A.
- When the battery charger is connected to a power outlet, the GND cable must be connected to the GND port on the battery charger. Make sure that the other end of the GND cable is on the ground. Please see Step 1 in Using the Battery Charger on how to connect the GND cable.
- DO NOT hold the charging cables to carry the battery charger. Otherwise, the cables may be damaged.
- DO NOT use the battery charger in an area where batteries are stored. There should be a distance of at least 30 cm between the battery charger and any charging batteries. Otherwise, the battery charger or charging batteries may be damaged by excessive heating and may even lead to a fire hazard.
- Keep the battery charger away from inflammable materials while charging. DO NOT place the battery charger or charging batteries on a blanket or any carpeted surfaces when in use.
- For activation or firmware updates, the battery charger must be connected to the remote controller of either the MG-1P or T16. Make sure the remote controller has been updated to the latest version before activating or updating the battery charger.
- To ensure the battery’s performance and prolong the battery’s service life, in quick charge mode, the battery will not be charged to a power level of 100%. Switch to slow charge mode if you want to charge the battery to 100%.
In the Box
2600W 4-Channel , ×1Intelligent Battery Charger *
GND Cable , ×1
![]()
User Guide × 1After-sales Service Card × 1Product Information Card × 1
* This 2600W 4-Channel Intelligent Battery Charger is available in two versions. One version is compatible with T16 batteries and one version is compatible with MG-12000P batteries. The version compatible with T16 batteries has an adapter at the end of the charging cable, while the version compatible with MG-12000P batteries does not. The general descriptions in this manual apply to both versions. The illustrations in this manual may vary from the actual product.To make sure the battery charger is working normally, please purchase an official DJI AC cable depending on the plug type of your region.
Introduction
Featuring the functionality of a battery charger and charging hub, the 2600W 4-Channel Intelligent Battery Charger can connect with up to four batteries. The max output power of the battery charger is 2600 watts and users can choose between two different charging modes: quick charge and slow charge. While charging, the battery charger monitors the batteries’ status and can automatically adjust the charging current if required. The battery charger continues to charge even if the ventilation holes are blocked.Users can check the battery charging status LEDs and the warning indicator on the operation panel of the battery charger to confirm if there are any errors. The battery charger can be connected to a remote controller, and users can launch the DJI MG app to see more detailed information regarding any errors. Additionally, the battery charger has the following functions: overcurrent protection, overcharging protection, overheating protection, and status display.
Overview
Battery Charger
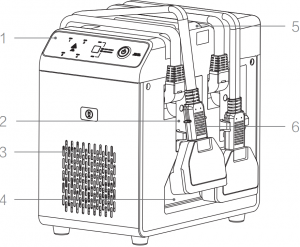
- Operation Panel
- Charging Cables Clamp
- Air Vent
- Charging Cables Storage *
- Handle
- Charging Cable **
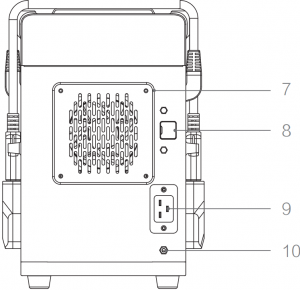
- Fan Cover
- USB-C Port Cover
- AC Power Port
- GND Port
* The battery charger compatible with MG-12000P batteries does not have this storage space.** The version compatible with T16 batteries has an adapter at the end of the charging cable, while the version compatible with MG-12000P batteries does not. The majority of the illustrations in this user guide show the battery charger compatible with T16 batteries.
Operational Panel
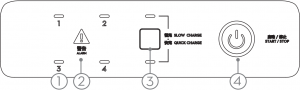
- Charging Status LED × 4Each LED indicates the charging status of the battery connected to a charging cable. The numbers (1-4) correspond to the position of the charging cable on the battery charger.
- Warning IndicatorThe warning indicator will be solid red if the battery charger detects any abnormalities.If this occurs, stop charging immediately. Only start to charge again once the indicator is no longer solid red.
- Mode ButtonPress to switch the charging mode. The default charging mode is quick charge.
- Power ButtonPress to turn the battery charger on and off.
Activation
The battery charger requires activation before using for the first time. If the warning indicator is solid green, it means the battery charger has not been activated. Please follow the steps below to activate your battery charger:
Method 1: Using DJI MG App
- Connect the battery charger to a power outlet.
- Connect the battery charger to your remote controller using a USB-C cable (not provided).
- Run the DJI MG app.
- Press the Power button to power on the battery charger.
- Follow the prompts to finish activation.
Method 2: Using DJI ASSISTANT™ 2
- Connect the battery charger to a power outlet.
- Connect the battery charger to your PC using a USB-C cable (not provided).
- Visit www.dji.com to download DJI Assistant 2. Install and run the software.
- Use your DJI account to log in.
- Press the Power button to power on the battery charger.
- Click “2600W 4-Channel Intelligent Battery Charger” and follow the prompts to finish activation.
 Make sure your PC or smart device can connect to the internet during activation.
Using the Battery Charger
Make sure that the GND cable is connected to the GND Port with the other end on the ground and follow the instructions below to use the battery charger. Up to 4 batteries can be connected to the 2600W 4-Channel Intelligent Battery Charger.
1. Connect the battery charger to a power outlet.
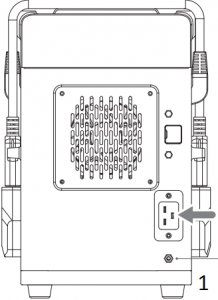

1 Insert the GND cable here with the other end grounded
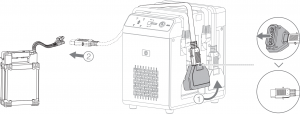
2. Connect the battery to the battery charger.
For the battery charger compatible with T16 batteries:
a. When charging a T16 battery, make sure the plug adapter is attached to the charging cable before attaching it to the battery you wish to charge.

![]() Before connecting the charging cable to the battery, make sure the plug adapter is securely attached to the charging cable. Note: it is normal for there to be approximately 0.8 mm of the yellow part of the cable visible even when it is securely attached.
Before connecting the charging cable to the battery, make sure the plug adapter is securely attached to the charging cable. Note: it is normal for there to be approximately 0.8 mm of the yellow part of the cable visible even when it is securely attached.
![]() Make sure to place the charging battery on the same side that the charging cable is fixed to the battery charger.
Make sure to place the charging battery on the same side that the charging cable is fixed to the battery charger.
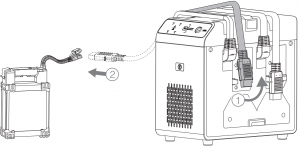
b. If users wish to charge MG-12000P batteries using the battery charger compatible with T16 batteries, first detach the plug adapter from the charging cable, then connect the charging cable to the MG-12000P battery’s charging and balancing port.
![]() • Although the battery charger compatible with T16 batteries can be used to charge MG12000P batteries by removing the plug adapters, it is not recommended to charge T16 batteries and MG-12000P batteries at the same time. Doing so may negatively affect the charging performance, or even damage the battery charger permanently.• Make sure to store plug adapters in a safe place for future use.
• Although the battery charger compatible with T16 batteries can be used to charge MG12000P batteries by removing the plug adapters, it is not recommended to charge T16 batteries and MG-12000P batteries at the same time. Doing so may negatively affect the charging performance, or even damage the battery charger permanently.• Make sure to store plug adapters in a safe place for future use.
For the battery charger compatible with MG-12000P batteries:Connect the battery’s charging and balancing port to the charging cable.
![]() Make sure to place the charging battery on the same side that the charging cable is fixed to the battery charger.
Make sure to place the charging battery on the same side that the charging cable is fixed to the battery charger.
3. Make sure all cables are correctly connected and press the Power button on the operation panel of the charger. The four LEDs, the warning indicator, and the quick charge and slow charge indicators will simultaneously flash. After powering on, the only lights remaining will be the Charging Status LEDs representing the batteries currently connected. This indicates that the self-diagnosis is complete, and the device is working normally. For more information about how to check if there are any errors during self-diagnosis, refer to LEDs and Warning Indicator Description. Alternatively, connect the charger to a remote controller and launch the DJI MG app to see detailed information about the errors.
4. If no errors are detected during self-diagnosis, the battery charger will begin to charge the batteries. Press the Mode button to choose quick charge or slow charge mode (the default charging mode is quick charge).In quick charge mode, the battery charger will charge T16 batteries in order of their power level, starting from highest to lowest. If MG-12000P batteries are being charged, the battery charger will first charge the two batteries with the highest power level, followed by the remaining two batteries.In slow charge mode, the battery charger will first charge the batteries with the lower power levels. Once all batteries have the same power level, they will all be charged simultaneously. This applies to both T16 and MG-12000P batteries
![]() • Before use, make sure there are no obvious defects on the battery charger or batteries (e.g., jams, breakages, or short circuits).• DO NOT turn the battery charger on unless the batteries are correctly connected.• When charging MG-12000P batteries in quick charge mode, note that the battery charger will not reorder the charging priority if a battery is removed. This may lead to only one battery being charged rather than a pair of batteries.
• Before use, make sure there are no obvious defects on the battery charger or batteries (e.g., jams, breakages, or short circuits).• DO NOT turn the battery charger on unless the batteries are correctly connected.• When charging MG-12000P batteries in quick charge mode, note that the battery charger will not reorder the charging priority if a battery is removed. This may lead to only one battery being charged rather than a pair of batteries.
![]() • In both quick charge and slow charge mode, the battery charger will automatically adjust the charging current based on the condition of the batteries being charged. For example, when in quick charge mode, if the battery temperature is below 59° F (15° C) the charging current will be limited and the charging time will be prolonged. The charging time depends on the battery model and battery temperature. The lower the battery temperature, the longer the charging time will be. For different battery models, the charging temperature range is different. Please see the battery’s user guide to check its charging temperature range.
• In both quick charge and slow charge mode, the battery charger will automatically adjust the charging current based on the condition of the batteries being charged. For example, when in quick charge mode, if the battery temperature is below 59° F (15° C) the charging current will be limited and the charging time will be prolonged. The charging time depends on the battery model and battery temperature. The lower the battery temperature, the longer the charging time will be. For different battery models, the charging temperature range is different. Please see the battery’s user guide to check its charging temperature range.
LEDs and Warning Indicator Description
During charging, the Status LED will blink when the corresponding charging battery is experiencing an abnormality due to the cable being disconnected, a high or low temperature, overvoltage, or overcurrent. Once charging is complete, the Status LED will be solid green. The battery can be disconnected from the battery charge.
Charging Mode and Log Exports:
| LED Blinking Pattern | Quick Charge Indicator | Slow Charge Indicator | Description | |
| Pulses green | / | Green | The battery in the corresponding position to the number is in quick charge mode. | |
| Blinks green | Green | / | The battery in the corresponding position to the number is in slow charge mode. | |
| Solid green | / | / | The charger’s logs are being exported. Please restart the charger after logs have been exported. |
Charging Indicators
| LED Blinking Pattern | Warning Sound | Description | |
| Solid yellow | / | The battery in the corresponding position to the number is connected and queued to charge. | |
| Solid green | / | The battery in the corresponding position to the number is fully charged. | |
| Blinks yellow once continuously | / | The temperature of the battery in the corresponding position to the number is too low, and the charging current is limited. | |
| Blinks yellow twice continuously | / | There is a large difference between the input voltage and the battery voltage. | |
| Blinks yellow three times continuously | / | The temperature of the battery in the corresponding position to the number is too low, and the battery charger has stopped charging. | |
| Blinks yellow four times continuously | / | The temperature of the battery in the corresponding position to the number is too high, and the battery charger has stopped charging. |
| Blinks red once continuously | D.D.D… | The battery in the corresponding position is not correctly connected or an unauthorized battery is connected (this warning will only appear 10 seconds after the battery is connected). | |
| Blinks red twice continuously | DD.DD.DD… | The connector short-circuited. Please check the battery or the battery charger. | |
| Solid red | DDD.DDD… | Critical error detected. |
Note: The quick charge or slow charge indicator will remain solid during charging.
If the status LEDs do not light after the batteries and the power outlet are correctly connected, there may be a problem with the battery charger. In this situation, the warning indicator will light to indicate the following abnormalities:
| Warning Indicator | Warning Sound | Description |
| Solid red | / | Self-diagnosis abnormal |
| Solid yellow | / | The input voltage is too low |
| Blinks yellow twice continuously | / | The fan of the 4850 module is abnormal |
| Blinks yellow three times continuously | / | The battery charger fan is abnormal |
| Blinks red once continuously | D.D.D…… | The 4850 module is abnormal |
| Solid red | DD.DD.DD…… | Main board is abnormal |
If there are any abnormalities, please connect the battery charger to a remote controller and run the DJI MG app to see more information. If the DJI MG app indicates that a module is abnormal or broken, please contact DJI or a DJI authorized dealer.
Firmware Update
Follow the instructions below to update the firmware using the DJI MG app. Users will be notified through the app when firmware updates are available.
- Connect the battery charger to a remote controller using a USB Type-C cable and connect the battery charger to a power outlet.
- Power on the remote controller, and press the Power button on the operational panel to power on the battery charger.
- Run the DJI MG app, and follow the prompts to update the firmware. Make sure your remote controller remains connected to the internet while updating.
![]() • Before using the battery, make sure there are no obvious defects on the ports or cables of the battery charger (e.g., jams, breakages, or short circuits).• DO NOT connect the batteries while updating the battery charger’s firmware.• DO NOT disconnect the battery charger while updating the battery charger’s firmware.• Retry update if update fails.
• Before using the battery, make sure there are no obvious defects on the ports or cables of the battery charger (e.g., jams, breakages, or short circuits).• DO NOT connect the batteries while updating the battery charger’s firmware.• DO NOT disconnect the battery charger while updating the battery charger’s firmware.• Retry update if update fails.
Storage and Maintenance
Battery Charger Storage
When the battery charger is not in use, disconnect the batteries from the battery charger and the battery charger from the power outlet. Follow the steps below to safely secure the charging cables.
- After disconnecting a battery, wrap the charging cable over the battery charger.
- Make sure the end of the charging cable is securely attached to the corresponding clamp on the side of the battery charger.
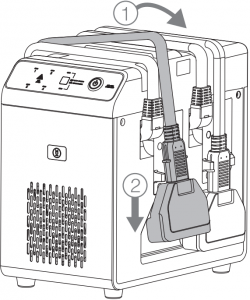
For the battery charger compatible with MG-12000P batteries, it is only necessary to secure the charging cable end to the clamp on the side of the battery charger.
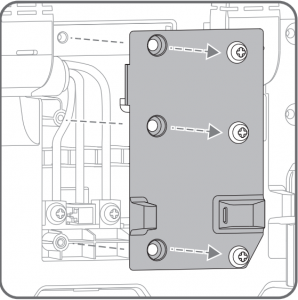
Replacing the Charging Cables
Follow these steps to replace the charging cables:1. Loosen the screws and remove the panel.
2. Loosen the A and B screws, and press the C cable to disconnect the charging cable. Make sure the charging cable is pointed vertically and slide the charging cable to the right to disconnect from the battery charger completely.
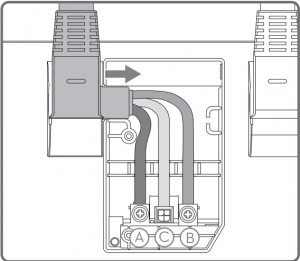
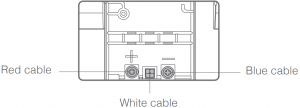
3. Make sure the red cable is aligned with “+”, and the blue cable with “-”. Secure the blue and red cables using the A and B screws and press the C cable to insert the white cable in the middle.
4. Clamp the new charging cable’s end to where the original cable was. Attach the panel and secure it using the screws.
![]() Make sure the new charging cable’s end is in the vertical position shown in Step 2. Otherwise, it may not be possible to attach the panel.
Make sure the new charging cable’s end is in the vertical position shown in Step 2. Otherwise, it may not be possible to attach the panel.
Specifications
| Compatible Battery Models | T16 Batteries, MG-12000P Batteries |
| Rated Input Voltage/Frequency | 110-220 V/ 50-60 Hz |
| Charging Voltage | T16: 58.8 V; MG-12000P: 50.4 V |
| Rated Current | T16: Quick charge 45 A; Slow charge 17.5 A; MG-12000P: Quick charge 24 A; Slow charge 12 A |
| Rated Power | 220 V: 2600 W; 110 V: 1200 W |
| Operation Temperature Range | -23° F to 122° F (-5° C to 50° C) |
| Dimensions | Approx. 314×303×220 mm |
| Weight | Approx. 9.14 kg |
Compliance Information
FCC Compliance
This device complies with Part 15 of the FCC Rules. Operation is subject to the following two conditions: (1) This device may not cause harmful interference, and (2) This device must accept any interference received, including interference that may cause undesired operation. Any changes or modifications not expressly approved by the party responsible for compliance could void the user’s authority to operate the equipment.
EU Compliance Statement: SZ DJI TECHNOLOGY CO., LTD. hereby declares that this device is in compliance with the essential requirements and other relevant provisions of the Directive 2014/30/EU.A copy of the EU Declaration of Conformity is available online at www.dji.com/euro-compliance EU contact address: DJI GmbH, Industriestrasse12, 97618, Niederlauer, Germany
![]()
Environmentally friendly disposal Old electrical appliances must not be disposed of together with the residual waste, but have to be disposed of separately. The disposal at the communal collecting point via private persons is for free. The owner of old appliances is responsible to bring the appliances to these collecting points or to similar collection points. With this little personal effort, you contribute to recycle valuable raw materials and the treatment of toxic substances.
IC ComplianceThis device complies with ICES-003 standard. Operation is subject to the following two conditions: (1) this device may not cause interference, and (2) this device must accept any interference, including interference that may cause undesired operation of the device.
DJI Support
If you have any questions about this document, please contact DJI by sending a message to [email protected].
Printed in China.YC.BZ.SS000863.05
[xyz-ips snippet=”download-snippet”]