964TELLOTT Robomaster TT Tello Talent Educational Drone
ROBOMASTER TT TELLO TALENTUser Manual v1.02021.03
Searching for KeywordsSearch for keywords such as “battery” and “install” to find a topic. If you are using Adobe Acrobat Reader to read this document, press Ctrl+F on Windows or Command+F on Mac to begin a search.Navigating to a TopicView a complete list of topics in the table of contents. Click on a topic to navigate to that section.Printing this DocumentThis document supports high resolution printing.
Using This Manual
LegendWarning
Important
Hints and Tips
Reference
Read Before the First FlightRead the following documents before using the RoboMaster TT: 1. RoboMaster TT User Manual 2. RoboMaster TT Quick Start Guide 3. RoboMaster TT Disclaimer and Safety Guidelines We recommend that you watch all tutorial videos on the official DJI website https://www.dji.com/ robomaster-tt and read the Disclaimer and Safety Guidelines before you fly. Prepare for your first flight by reviewing the Quick Start Guide and refer to this User Manual for more details.Download Software
1. Download the Tello app for activation, flying the aircraft, recording footage, and updating firmware. The iOS version of the Tello app is compatible with iOS v9.0 and later. The Android version of the Tello app is compatible with Android v4.4 and later.2. Download the Tello EDU app for programming. The iOS version of Tello EDU app is compatible with iOS v10.0 and later. The Android version of Tello EDU app is compatible with Android v4.4 and later.3. Download and install the DJI Education Hub at http://edu.dji.com/download and update the open-source controller firmware to the latest version using RoboMaster Assistant.
2 © 2020 Ryze Tech. All Rights Reserved.
Contents
Using This Manual
2
Legend
2
Read Before the First Flight
2
Download the Tello App
2
Units of Measurement
2
Product Profile
4
Introduction
4
Aircraft Diagram
4
Aircraft
5
Flight Modes
5
Aircraft Status Indicator
6
Vision Positioning System
7
Intelligent Flight Modes
8
Propellers
12
Propeller Guards
13
Flight Battery
14
Camera
15
Tello App
16
Connecting to the Aircraft
16
Camera View
16
Controlling the Aircraft
17
Flight
20
Flight Environment Requirements
20
Compliance with Regulations
20
Test Flight
20
Firmware Updates
21
Specifications
21
After-Sales Information
21
3 © 2020 Ryze Tech. All Rights Reserved.
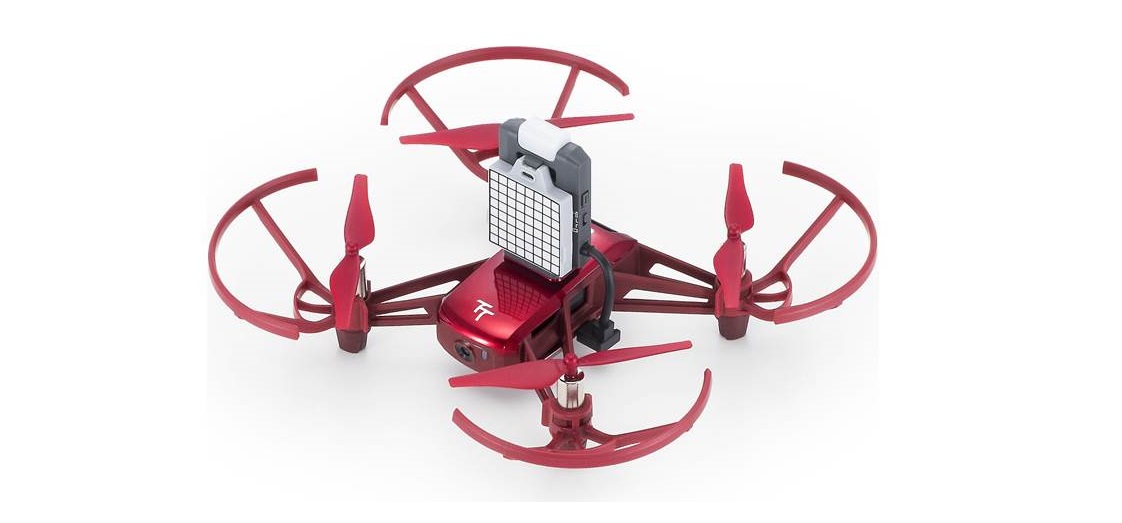
Product ProfileIntroductionRoboMaster TT includes the aircraft and the expansion kit. The aircraft is a small quadcopter that features a Vision Positioning System and an onboard camera. Using the Vision Positioning System and advanced flight controller, the aircraft can hover in place and fly indoors. Advanced features like 8D Flips, EZ Shots, and Bounce mode make it even more fun to use the aircraft. The camera captures 5MP photos and streams 720p live video to the Tello app on a mobile device. Experience DIY flight with an expansion kit that includes an open-source controller, dot-matrix display & distance-sensing module, and extension board, which can be programmed using Arduino, Scratch, MicroPython, and more. Use the Tello EDU app for programming when using a mobile device. The max flight time of the aircraft is approx. 8 minutes with an expansion kit mounted and 13 minutes without. Failsafe protection enables RoboMaster TT to land safely while the propeller guards can be used for enhanced safety. * Maximum flight time was tested in windless conditions flying at a consistent 9 mph (15 kph). This valueshould be taken for reference only.Aircraft Diagram
1
2
3
4
9
1. Propellers 2. Motors
3. Aircraft Status Indicator
5
8
10 6
4. Camera
7
5. Power Button
6
6. Antennas
7. Vision Positioning System
8. Flight Battery
9. Micro USB Port
10. Propeller Guards
11
11. Open-Source Controller
12
12. Dot-Matrix Display & Distance
Sensing Module
4 © 2020 Ryze Tech. All Rights Reserved.
AircraftThe RoboMaster TT contains a flight controller, video downlink system, Vision Positioning System, propulsion system, and a Flight Battery. Refer to the aircraft diagram in the Product Profile section.Flight ModesThe RoboMaster TT has two flight speeds that you can select when flying the aircraft manually: · Slow (default): The maximum flight attitude angle is 9° and the maximum flight speed is 6.7 mph(10.8 kph). · Fast: The maximum flight attitude angle is 25° and the maximum flight speed is 17.8 mph (28.8 kph).When flying the RoboMaster TT manually the aircraft utilizes its Vision Positioning System to automatically stabilize itself. If the conditions are such that the Vision Positioning System is unavailable the aircraft automatically changes to Attitude mode. The aircraft automatically changes to Attitude mode (ATTI mode) when the Vision Positioning System is unavailable. In Attitude mode the aircraft is not able to position itself and so is easily affected by its surroundings. Environmental factors such as wind can result in horizontal shifting, which may present hazards, especially when flying in confined spaces. When the aircraft enters Attitude mode, land in a safe place as soon as possible to avoid hazards.· To switch from Slow to Fast you must read and agree to the disclaimers and warnings that appear in the Tello app. Make sure you understand the differences between the two flight speeds.· Failsafe Protection automatically initiates landing if the mobile device’s signal is weak or is lost for 50 seconds, or the Tello app crashes.Vision Positioning SystemThe Vision Positioning System helps the aircraft maintain its current position. With the help of the Vision Positioning System, the aircraft can hover in place more precisely and fly indoors or outdoors in windless conditions. The main components of the Vision Positioning System are a camera and a 3D infrared module located on the underside of the aircraft.
Vision Positioning System
5 © 2020 Ryze Tech. All Rights Reserved.
ROBOMASTER TT TELLO TALENT User ManualUsing the Vision Positioning SystemThe Vision Positioning System is activated automatically when the aircraft is turned on. No further action is required. The Vision Positioning System is only effective when the aircraft is at altitudes of 1.0 to 98.4 ft (0.3 to 30 m) and works best at altitudes of 1.0 to 19.7 ft (0.3 to 6 m). If the aircraft is beyond this range, the Vision Positioning function may be affected, so extra caution is required.· The performance of the Vision Positioning System is affected by the surface being flown over. The aircraft automatically changes to Attitude mode when the Vision Positioning System is unavailable. In Attitude mode the aircraft is not able to position itself. Operate the aircraft with great caution in the following situations, which may cause the aircraft to enter Attitude mode: a. Flying at high speed below 2 ft (0.5 m). b. Flying over monochrome surfaces (e.g. pure black, pure white, pure red, pure green). c. Flying over highly reflective surfaces. d. Flying over water or transparent surfaces. e. Flying over moving surfaces or objects. f. Flying in an area where the lighting changes frequently or drastically. g. Flying over extremely dark (< 300 lux) or bright (> 100,000 lux) surfaces or towards bright sources of light (e.g. towards sunlight). h. Flying over surfaces without clear patterns or texture. i. Flying over surfaces with identical repeating patterns or textures (e.g. tiling). j. Flying over small and fine objects (e.g. tree branches or power lines). k. Flying at high speed of over 5 m/s at 4 ft (1 m).6 © 2020 Ryze Tech. All Rights Reserved.
ROBOMASTER TT TELLO TALENT User Manual· If the aircraft’s Vision Positioning system fails for 3 seconds when its flying altitude is above 20 ft (6 m), Failsafe Protection will automatically initiate landing. If the Vision Positioning system recovers during landing, Failsafe Protection will shut off and the aircraft will hover.· The Vision Positioning System may not be able to recognize patterns on the ground in very dark (< 300 lux) environments. DO NOT take off if there is a warning prompt in the Tello app telling you that the environment is too dark.· Keep the cameras and sensors clean at all times. Dirt or other debris may adversely affect their effectiveness.Intelligent Flight ModesThe RoboMaster TT features Bounce mode, 8D Flips, Throw & Go, Up & Away, and EZ Shots. To use an intelligent flight mode, ensure that the aircraft’s battery level is at least 50%, tap in the Tello app, then select a mode.Bounce ModeIn Bounce mode the aircraft automatically flies up and down between 1.6 and 3.9 ft (0.5 and 1.2 m) above a flat surface. If the aircraft detects an object below it (such as your hand) it increases its altitude then continues flying up and down.Using Bounce Mode 1. Press the power button once to turn the aircraft on. Launch the Tello app and tapto take off. 2. Tap and then select Bounce mode. Read the information prompt and thenselect Start. The aircraft will start flying up and down. 3. Extend your arm and place your palm 1 ft (30 cm) or more below the aircraft,keeping your palm open. The aircraft will increase its altitude then continue flying up and down. 4. Tap in the Tello app any time to exit Bounce mode.· Ensure there is sufficient space when using Bounce mode. Allow a radius of at least 7 ft (2 m) horizontally around the aircraft and allow at least 10 ft (3 m) above the aircraft.· Before using Bounce mode ensure that the Aircraft Status Indicator is periodically blinking green twice, indicating that the Vision Positioning System is available.· In Bounce mode, ensure your arm is extended and your palm is flat. DO NOT try to catch the aircraft. The distance between your palm and the aircraft should be at least 1 ft (30 cm).· Watch out for potential obstacles in your surrounding area (especially on the rear, left, and right sides of the aircraft) and stay clear of them to avoid accidents.· Be prepared to take control of the aircraft by tapping in the Tello app to exit Bounce mode in case of an emergency.· Be extra cautious when flying in dark (< 300 lux) or bright (> 10,000 lux) environments.7 © 2020 Ryze Tech. All Rights Reserved.
ROBOMASTER TT TELLO TALENT User Manual8D FlipsIn 8D Flips the aircraft automatically flips in one of eight different directions. Using 8D Flips 1. Press the power button once to turn the aircraft on. Launch the Tello app and tap to take off. 2. Tap and then select 8D Flips. Read the information prompt and then select Start.3. Swipe within the box shown in the app. The aircraft will flip in the direction you swipe. 4. Tap in the Tello app any time to exit 8D Flips.· Ensure there is sufficient space when using 8D Flips. Allow a radius of at least 7 ft (2 m) horizontally around the aircraft and allow at least 10 ft (3 m) above the aircraft.· Before using 8D Flips ensure that the Aircraft Status Indicator is periodically blinking green twice, indicating that the Vision Positioning System is available.· When using 8D Flips, the distance between you and the aircraft should be at least 3.5 ft (1 m). · Watch out for potential obstacles in your surrounding area (especially on the rear, left, andright sides of the aircraft) and stay clear of them to avoid accidents. · Be prepared to take control of the aircraft by tapping in the Tello app to exit 8D Flips incase of an emergency. · Be extra cautious when flying in dark (< 300 lux) or bright (> 10,000 lux) environments. · Exercise caution when using 8D Flips with the expansion kit mounted.Throw & GoThrow & Go lets you launch the aircraft by gently throwing it into the air. Using Throw & Go 1. Press the power button once to turn the aircraft on. 2. Tap and then select Throw & Go.3. Place the aircraft in your palm.8 © 2020 Ryze Tech. All Rights Reserved.
ROBOMASTER TT TELLO TALENT User Manual
4. Read the warning prompt and then tap to start. The propellers will start spinning slowly. Gently throw the aircraft upward and horizontally away from you, keeping the aircraft horizontal as you throw it. The propellers will start spinning more quickly and the aircraft will automatically hover in place. The propellers will stop if you do not throw the aircraft within 5 seconds of the propellers starting to spin slowly.· Only use Throw & Go in an open area and make sure that your flight path is clear of people, animals, and obstacles.· Throw & Go cannot be used after the aircraft has taken off. · Be careful when using Throw & Go and make sure you keep your fingers away from thepropellers even when they are spinning slowly. · Hold the aircraft horizontally, and gently throw the aircraft upward and horizontally awayfrom you. DO NOT throw the aircraft at a speed that exceeds 6 ft/s (2 m/s). DO NOT throw the aircraft at an angle to the horizontal greater than 20° and DO NOT flip the aircraft as you throw it. · Before using Throw & Go ensure that the Aircraft Status Indicator is periodically blinking green twice, indicating that the Vision Positioning System is available. · Watch out for potential obstacles in your surrounding area (especially on the rear, left, and right sides of the aircraft) and stay clear of them to avoid accidents. · Be extra cautious when flying in dark (< 300 lux) or bright (> 10,000 lux) environments.
EZ ShotsUsing 360 In 360, the aircraft records a short video while rotating 360 degrees. 1. Press the power button once to turn the aircraft on. Launch the Tello app and tap 2. Tap and then select 360. Read the information prompt and then select Start.
to take off.
3. The aircraft will rotate 360 degrees and record a video automatically. Tap to access the video.4. The aircraft will exit 360 once it has finished recording. You can also tap in the Tello app any time to exit 360.· Ensure there is sufficient space when using 360. Allow at least 2 ft (0.5 m) around the aircraft in all directions.· Before using 360 ensure that the Aircraft Status Indicator is periodically blinking green twice, indicating that the Vision Positioning System is available.· Watch out for potential obstacles in your surrounding area (especially on the rear, left, and right sides of the aircraft) and stay clear of them to avoid accidents.· Be prepared to take control of the aircraft by tapping in the Tello app to exit in case of an emergency.· Be extra cautious when flying in dark (< 300 lux) or bright (> 10,000 lux) environments.9 © 2020 Ryze Tech. All Rights Reserved.
ROBOMASTER TT TELLO TALENT User Manual
Using CircleIn Circle the aircraft records a short video while flying in a circle. 1. Press the power button once to turn the aircraft on. Launch the Tello app and tap 2. Tap and then select Circle. Read the information prompt and then select Start.
to take off.
3. The aircraft will fly in a circle around a point approximately 7 ft (2 m) in front of the aircraft nose and record a video.4. The aircraft will exit Circle once it has finished recording. You can also tap in the Tello app any time to exit Circle.· Ensure there is sufficient space when using Circle. Allow a radius of at least 10 ft (3 m) around the point 7 ft (2 m) in front of the aircraft nose, and at least 10 ft (3 m) above and below the aircraft.· Before using Circle ensure that the Aircraft Status Indicator is periodically blinking green twice, indicating that the Vision Positioning System is available.· Watch out for potential obstacles in your surrounding area (especially on the rear, left, and right sides of the aircraft) and stay clear of them to avoid accidents.· Be prepared to take control of the aircraft by tapping in the Tello app to exit Circle in case of an emergency.· Be extra cautious when flying in dark (< 300 lux) or bright (> 10,000 lux) environments.Using Up & Away In Up & Away the aircraft records a short video while flying upward and backward. 1. Press the power button once to turn the aircraft on. Launch the Tello app and tap to take off. 2. Tap and then select Up & Away. Read the information prompt and then select Start.
3. The aircraft will record a short video while flying upward and backward. 4. The aircraft will exit Up & Away once it has finished recording. You can also tapapp any time to exit Up & Away.
in the Tello
10 © 2020 Ryze Tech. All Rights Reserved.
ROBOMASTER TT TELLO TALENT User Manual· Ensure there is sufficient space when using Up & Away. Allow at least 20 ft (6 m) behind and 3.5 ft (1 m) above the aircraft.· Before using Up & Away ensure that the Aircraft Status Indicator is periodically blinking green twice, indicating that the Vision Positioning System is available.· Watch out for potential obstacles in your surrounding area (especially on the rear, left, and right sides of the aircraft) and stay clear of them to avoid accidents.· Be prepared to take control of the aircraft by tapping in the Tello app to exit Up & Away in case of an emergency.· Be extra cautious when flying in dark (< 300 lux) or bright (> 10,000 lux) environments.PropellersThe RoboMaster TT uses model 3044P propellers. There are two varieties of 3044P propellers, which are designed to spin in different directions. The presence or absence of marks on the propellers indicates which type they are and therefore which motors they should be attached to.Attaching the PropellersMount marked propellers on the motors with marked landing gear. Mount unmarked propellers on the motors with unmarked landing gear. When mounting, ensure that the gap between the bottom of the propeller cap and the motor is no bigger than needed to insert the propeller removal tool.Detaching the PropellersInsert the propeller removal tool between the propeller cap and the motor. Be sure to hold the motor while detaching the propeller.11 © 2020 Ryze Tech. All Rights Reserved.
ROBOMASTER TT TELLO TALENT User Manual· Always detach the propellers using the propeller removal tool. DO NOT remove the propellers by hand as doing so may damage the motors and you may get seriously hurt.· To avoid injury, stand clear of and DO NOT touch propellers or motors when they are spinning.· Only use original propellers and DO NOT mix propeller types. · Ensure that the propellers and motors are installed firmly and correctly before each flight. · Ensure that all propellers are in good condition before each flight. DO NOT use aged,chipped, or broken propellers.Propeller GuardsThe Tello Propeller Guards can be used to reduce the risk of harm or damage to people or objects resulting from accidental collisions with Tello aircraft.Mounting the Propeller GuardsMount each of the propeller guards to the aircraft landing gear beneath the motors. Push each propeller guard inwards to wrap it around the landing gear. Make sure it clicks into position and that the protruding parts of the landing gear securely fit into the notches on the propeller guards.Detaching the Propeller GuardsTo remove a propeller guard place your finger and thumb as shown in the figure below. With your thumb, gently apply a twisting force to the lip that protrudes from the propeller guard where it wraps around the landing gear.DO NOT use excessive force when removing propeller guards as doing so may damage the aircraft’s arms and you may get hurt.12 © 2020 Ryze Tech. All Rights Reserved.
ROBOMASTER TT TELLO TALENT User ManualFlight BatteryThe Flight Battery is a 3.8 V, 1100 mAh battery with charging/discharging protection. Fully charge the Flight Battery before each flight.Battery Features1. Overcurrent/Overvoltage Protection: The battery stops charging if an excessive current/voltage is detected.2. Overdischarge Protection: Discharging stops automatically to prevent excessive discharge. 3. Short Circuit Protection: The power supply is cut automatically if a short circuit is detected.Refer to the Tello Disclaimer and Safety Guidelines before use. Users take full responsibility for all operations and usage.Inserting the Flight BatteryInsert the Flight Battery into the aircraft as shown. Ensure the battery is mounted firmly.To remove the battery pull it out from the aircraft.Charging the Flight BatteryTo charge the Flight Battery connect the Micro USB port on the aircraft to a USB adapter (not provided) using a standard Micro USB cable. Charging Time: Approx. 1 hour and 30 minutes.The Aircraft Status Indicator blinks blue slowly during charging. The battery is fully charged when the Aircraft Status Indicator turns solid blue. Detach the USB adapter when the battery is fully charged.13 © 2020 Ryze Tech. All Rights Reserved.
ROBOMASTER TT TELLO TALENT User Manual · Always use an FCC/CE (depending on location) certified USB adapter that is rated at 5 V and 1.5 A or above. · Ensure the aircraft is powered off before charging. It cannot be charged when it is powered on. · DO NOT charge a Flight Battery immediately after flight, because its temperature may be too high. DO NOT charge a Flight Battery until it cools down to near room temperature. · Charge the Flight Battery in the temperature range 41° to 113° F (5° to 45° C). The ideal charging temperature range is 72° to 82° F (22° to 28° C). Before carrying the Flight Battery on an airline flight, it must be discharged to 30% or lower. To discharge the Flight Battery, fly the aircraft.Checking Battery LevelPress the power button once to turn the aircraft on. Launch the Tello app and check the battery level in the app.CameraThe Tello camera captures 5 megapixel photos and 720p videos. The Tello’s Electronic Image Stabilization feature enables it to consistently capture clear images. The photos and videos can be viewed in the Tello app and copied to a folder in your mobile device.14 © 2020 Ryze Tech. All Rights Reserved.
Expansion KitOpen-Source ControllerThe open-source controller combines a 2.4/5 GHz dual frequency Wi-Fi module, Bluetooth module, and Arduino open-source platform. It is able to expand the features of pins such as UART, I2C, GPIO, PWM, and SPI. Experience DIY flight by customizing accessories through programs such as Arduino and MicroPython.6
1 5
2
34
1. I/O Expansion Ports Used to connect to the dot-matrix display & distance sensing module to add and expand features. Supports UART, I2C, PWM, and SPI.
IO2
IO5
IO4
IO27
IO26
GND
3V3
IO12
IO21
IO15
IO14
IO13
GND
5V
The actual output voltage of 5 V is 4.8 V±0.2 V and of 3 V is 3.3 V±0.1 V. The maximum output current is 800 mA. Each I/O expansion port can be mapped in the program and connected to the user’s expansion module. For example, the UART pin can be connected to a module that identifies QR codes so that the RoboMaster TT can be programmed to identify QR codes.
2. Micro USB Cable Used to connect the open-source controller to a 5V/2A USB power source or the Micro USB port of the aircraft for power supply. When connected to the Micro USB port of the aircraft, the open-source controller can be used as an expansion module. The Wi-Fi network will change to RMTT-XXXXXX when the open-source controller connects to the aircraft.
3. Switch Used to switch between direction connection mode and router mode. Direct connection mode is where the aircraft is connected to a mobile device via Wi-Fi. Router mode is where the aircraft connected to a router. Direct Connection Mode: Connect the mobile device to the Wi-Fi network of the aircraft named RMTT-XXXXXX. Router Mode: Connect the aircraft to the router using the SDK. The app cannot be used to connect to the aircraft in this mode. Toggle the switch to restart the open-source controller in router mode. Users can test programming easily by toggling the switch back and forth to reboot the open-source controller. Note that the connection mode will depend on the final position of the switch after toggling.
15 © 2020 Ryze Tech. All Rights Reserved.
ROBOMASTER TT TELLO TALENT User Manual
4. Customizable Button Press and hold the button to link via Bluetooth (when using the default firmware). Press the button twice within 0.5 s to start the motors to cool down the aircraft. Press the button twice within 0.5 s again to stop the motors (when using the default firmware). The function of the button can be customized through programming. Functions include using the button to launch programs.
5. Programmable RGB Light The function of the RGB light is set through programming. Functions include being used as part of a light display or as a prompt. The status of the RGB light are shown in the table below (when using the default firmware).
RGB Light Blinking Pattern After powering on, the light will change color in sequence and stopBlinks blueSolid blue
DescriptionsWorking normallyReady for Bluetooth connection. Press and hold the customizable to link Bluetooth remote controller connected
6. Micro USB Port Used to connect to a computer. The port can be used as a debugging port for offline programs when using Arduino or MicroPython. Used to connect to a computer to update the firmware of the open-source controller.* The default firmware is required to connect to a Bluetooth remote controller and to use the motors to cool down the aircraft. RM Assistant can be used to restore the default firmware of the open-source controller.
Dot-Matrix Display & Distance Sensing Module
The module integrates a 8×8 dot-matrix display and a distance sensing TOF module, allowing users to generate different colors and graphics through programming. The default firmware is required to use Mind+ real-time mode or the Tello EDU app to control the dot-matrix display and RGB light.16 © 2020 Ryze Tech. All Rights Reserved.
Extension Board
ROBOMASTER TT TELLO TALENT User Manual
The extension board consists of 14-pin extension port to 2×7 pin, 2.54mm dual in-line package, two reserved positions for 5/3.3V power indicators, and two reserved positions for test indicators. Users can add more sensors to expand features.SDK ModeEnter SDK Mode 1. Make sure the aircraft and the Tello EDU app are connected. 2. Make sure the aircraft and Mind+ real-time mode are connected. 3. Make sure the default firmware of the open-source controller is being used with the Bluetoothremote controller. 4. Send the “command” command in plaintext through UDP and wait for the device to reply “ok”. 5. Send the “[TELLO]” command in plaintext through the expansion kit and wait for the aircraft toreply “ok”.Exit SDK ModePower off the aircraft to exit SDK mode.Status LED DescriptionsThe descriptions below apply to the aircraft with or without the open-source controller mounted.
Status Normal
Blinking Pattern Blinks red, green, and yellow continuouslyBlinks green twice repeatedlyBlinks yellow slowly
Descriptions Powered on and performing selfdiagnostic tests Positioning with Vision Positioning System No positioning with Vision Position System
17 © 2020 Ryze Tech. All Rights Reserved.
ROBOMASTER TT TELLO TALENT User Manual
Charging SDK Mode Status Warning States
Solid blue Blinks blue slowly Blinks blue quickly Blinks purple slowlyBlinks purple quicklyBlinks yellow quicklyBlinks purple quickly Blinks red slowly Blinks red quickly Solid red
Charging complete Charging Abnormal status detected SDK connected SDK disconnected (no commands receive for more than 15 seconds) Remote controller signal lost (when not in SDK mode) Remote controller signal lost Low battery Critically low battery Critical error
18 © 2020 Ryze Tech. All Rights Reserved.
Tello AppUse this app to control the camera and other aircraft functions. The app is used for configuring the aircraft, viewing photos and videos, and copying photos and videos to folders on a mobile device. In addition, the Tello app can be used for activation and firmware update.Connect to the AircraftEnable Wi-Fi on the mobile device and select the network. The network is TELLO-XXXXXX when there is no expansion kit mounted and RMTT-XXXXXX when there is an expansion kit mounted. The live view will display on the screen of the mobile device once connection is complete.Camera View
60%
HS 3m/s H 3m
1. Auto Takeoff/Landing Tap to initiate auto takeoff. Tap to initiate auto landing. There are two auto landing modes: Tap to Land and PalmLand (Hand Landing). In Tap to Land the aircraft lands automatically. To use PalmLand place your palm under the aircraft, then tap to confirm and the aircraft will land on your palm and stop its motors.· Do not use auto takeoff from your palm, and ensure to use auto takeoff on a flat surface. · Only land the aircraft on flat surfaces. DO NOT land the aircraft over water, grass orsand. When using PalmLand, ensure your palm is right under the aircraft and keep your palm flat.2. Intelligent Flight Modes Tap to select Intelligent Flight Modes.3. Settings Tap to enter the settings screen. You can adjust flight speed, VR settings, Bluetooth joystick settings, and Wi-Fi settings here.19 © 2020 Ryze Tech. All Rights Reserved.
ROBOMASTER TT TELLO TALENT User Manual
By default the Tello does not have a Wi-Fi password. You can set a password and you can also
change the Wi-Fi SSID. (To reset the Wi-Fi SSID and password to the default settings, power
on the aircraft and then press and hold the power button for 5 seconds. The Tello will restart
automatically.)
In the More screen the beginner guide, units of measurement, photo quality, low battery warning,
and joystick settings can be configured. Tap view the aircraft firmware version.
to calibrate the IMU or center of gravity, or to
4. Battery Level 60% Displays the current battery level.
5. Wi-Fi Status Displays the Wi-Fi connection status.
6. Bluetooth Status Displays the Bluetooth connection status.7. Flight Speed 3m/s Displays the aircraft’s horizontal speed.8. Flight Altitude 3m Displays the altitude above the surface below the aircraft.
9. Playback Tap to enter the playback page and preview photos and videos as soon as they are captured.
10. Photo/Video Toggle Tap to switch between photo and video recording modes.11. Shoot / Record Button Tap / to start shooting photos or recording video.12. Virtual Joysticks Use virtual joysticks to control the aircraft. Two modes (Mode 1 and Mode 2) are available. The default mode is Mode 2.
The virtual joysticks are used to control the aircraft’s orientation (yaw), forward/ backward movement (pitch), altitude (throttle), and left/right movement (roll). The function that each virtual joystick movement performs is determined by the choice of virtual joystick mode. Two modes (Mode 1 and Mode 2) are available. The default mode is Mode 2.
In each of the two modes the Tello hovers in place at a constant orientation when both virtual joysticks are centered. Pushing a virtual joystick away from the center position performs the functions show in the figure below.
20 © 2020 Ryze Tech. All Rights Reserved.
Mode 1 Left Stick
Forward
ROBOMASTER TT TELLO TALENT User Manual
Right Stick
Up
Backward
Down
Turn Left Turn Right
Left
Right
Mode 2Left Stick Up
Right Stick
Forward
Down
Backward
Turn Left Turn Right
Left
Right
The figure below explains how to use each virtual joystick, using Mode 2 as an example.
Virtual Joysticks (Mode 2)
Remarks
Left Stick
Moving the left stick up or down changes the aircraft’s altitude. Push the stick up to ascend and down to descend. The more the stick is pushed away from the center position, the faster the aircraft will change altitude. Always push the stick gently to prevent sudden and unexpected changes in altitude.
21 © 2020 Ryze Tech. All Rights Reserved.
ROBOMASTER TT TELLO TALENT User Manual
Left Stick
Moving the left stick to the left or right controls the orientation of the aircraft. Push the stick left to rotate the aircraft counterclockwise and right to rotate the aircraft clockwise. The more the stick is pushed away from the center position, the faster the aircraft will rotate.
Right Stick
Moving the right stick up and down changes the aircraft’s pitch. Push the stick up to fly forward and down to fly backward. The more the stick is pushed away from the center position, the faster the aircraft will move.
Right Stick
Moving the right stick to the left or right changes the aircraft’s roll. Push the stick left to fly left and right to fly right. The more the stick is pushed away from the center position, the faster the aircraft will move.
· The area beyond the white circles is also responsive to control commands. · Tello is currently compatible with the customized Gamesir T1D. The virtual joysticks aredisabled when connected to a remote controller via Bluetooth.
22 © 2020 Ryze Tech. All Rights Reserved.
Program PlatformBesides the Tello EDU app, RoboMaster TT supports several computer programming software Click the links below to view manual documents and learn more about how to program. Tello SDK 3.0 Mind+ ArduinoFirmware UpdatesUpdates AircraftWhen you connect the aircraft to the Tello app you will be notified if a new firmware update is available. To start updating, connect your mobile device to the Internet and follow the on-screen instructions.· Firmware updates take around 5 minutes. · Before performing an update ensure the Flight Battery has at least 50% charge.Updates Expansion KitUpdate the open-source controller firmware to the latest version using RoboMaster Assistant. How to update firmware: a. Download and install the DJI Education Hub at http://edu.dji.com/download. b. Launch RoboMaster Assistant. c. Connect the open-source controller to the computer using a micro USB cable. Follow the instructionsto update firmware.FlightEnsure that all flights are carried out indoors or in an open area with no wind. The flight altitude is limited to 98.4 ft (30 m) and flight distance is limited to 328 ft (100 m). Perform a simple test flight the first time you fly the aircraft. Refer to the Test Flight section below.Flight Environment Requirements1. DO NOT use the aircraft in adverse weather conditions such as rain, snow, fog, wind, smog, hail, lightning, tornadoes, or hurricanes.2. Only fly at locations where you can keep the aircraft at least 33 ft (10 m) away from obstacles, people, animals, buildings, public infrastructure, trees, and bodies of water when in flight.3. DO NOT fly the aircraft on a route that has an abrupt change in the ground level (such as from inside a building to outside), otherwise the positioning function may be disrupted, impacting flight safety.4. Aircraft and battery performance is subject to environmental factors such as air density and temperature. Be very careful when flying 3,281 ft (1,000 m) or more above sea level, since battery and aircraft performance may be reduced.23 © 2020 Ryze Tech. All Rights Reserved.
ROBOMASTER TT TELLO TALENT User Manual
5. DO NOT use the aircraft near accidents, fire, explosions, floods, tsunamis, avalanches, landslides, earthquakes, dust, or sandstorms.6. To avoid interference between your smart device and other wireless equipment, turn off other wireless equipment while you are flying the aircraft.7. DO NOT fly in areas where magnetic or radio interference may occur such as close to: Wi-Fi hotspots, routers, Bluetooth devices, high voltage lines, high voltage power transmission stations, mobile base stations, or broadcasting towers. Flying in areas where interference may disrupt communication between the aircraft and the remote control device may adversely affect flight orientation and location accuracy and may potentially lead to loss of control. Interference may also lead to video downlink errors.
Compliance with RegulationsTo avoid serious injury and property damage, observe local laws and regulations during flight. Refer to the Tello Disclaimer and Safety Guidelines for details.
Test FlightPerform a simple test flight the first time you fly the aircraft: 1. Place the aircraft in a flat area with the Flight Battery facing towards you. 2. Turn on the aircraft. 3. Connect to the Wi-Fi named TELLO-xxxxxx or RMTT-xxxxxx, and then Launch the Tello app and enterthe camera view. 4. Use auto takeoff. 5. Use the virtual joysticks to control the aircraft. 6. Use auto landing. 7. Turn off the aircraft.
SpecificationsTello (Model: TLW004) Weight (Propeller Guards Included) Max Speed Max Flight Time Operating Temperature Operating FrequencyTransmitter (EIRP)Camera Max Image Size Video Recording Modes Video Format Flight Battery Capacity Voltage24 © 2020 Ryze Tech. All Rights Reserved.
87 g 17.8 mph (28.8 kph) 13 minutes (0 wind at a consistent 9 mph (15 kph)) 32° to 104° F (0° to 40° C) 2.4 to 2.4835 GHz <20 dBm (FCC) <19 dBm (CE) <19 dBm (SRRC)2592×1936 HD: 1280×720 30p MP41100 mAh 3.8 V
ROBOMASTER TT TELLO TALENT User Manual
Battery Type
LiPo
Energy
4.18 Wh
Net Weight
25±2 g
Charging Temperature Range
41° to 113° F (5° to 45° C)
Max Charging Power
10 W
Expansion Kit
Open-Source Controller
Model
RMTTOC
Operating Mode
Direct Connection Mode, Router Mode
Wi-Fi
2.4 GHz , 5.8 GHz
Transmitter (EIRP)
2.4 GHz: <18.5dBm(FCC/SRRC/MIC); <17 dBm(CE) 5.8 GHz: <15 dBm(FCC/SRRC); <13 dBm(CE)
Bluetooth
2.4 GHz
MCU
ESP32-D2WD, Dual-Core Main Frequency: 160 MHz, Calculation ability: 400 MIPS
Open-Source
Supports SDK, Arduino, Scratch and MicroPython
Expansion
14-pin expansion port (I2C, UART, SPI, GPIO, PWM, power source)
LED
Full Color LED
Dot-Matrix Display & Distance Sensing Module
Dot-Matrix LED
Red and blue LED 8×8
IIC data port, auto dot-matrix scan, adjustable 256
Dot-Matrix Driver function
global brightness, adjustable single-pixel red and
blue LED 256 brightness
Distance Sensing Module
TOF
Maximum Sensing Distance of TOF
1.2 m (indoors with white wall)
Extension Board
DIY Connection
14-pin extension port to 2×7 pin, 2.54mm dual in-line package, two reserved positions for 5V/3.3V power indicators, two reserved positions for test indicators
After-Sales InformationVisit https://www.dji.com/robomaster-tt to learn more about after-sales service policies, repair services and support.
25 © 2020 Ryze Tech. All Rights Reserved.
This content is subject to change. Download the latest version from https://www.dji.com/robomaster-ttCopyright © 2021 Ryze Tech. All Rights Reserved.
ROBOMASTER TT TELLO TALENTQuick Start Guide v1.0
EN
DisclaimerIt is not recommended for children under the age of 14 to use this product without adult supervision. Please note that in Japan the recommended age is 15 years. Adults should keep the aircraft out of the reach of children and exercise caution when operating this aircraft in the presence of children.This product incorporates various advanced control technologies. However, inappropriate use of the product could result in personal injury or property damage. Please read the materials associated with the product before your first use of the product. These documents are included in the product package and/or are available online on the SZ RYZE TECHNOLOGY CO., LTD (“Ryze Tech”) website (http://www.ryzerobotics.com).This product is a flying camera that offers easy flight when in good working order as set forth below. Visit http://www.ryzerobotics.com for the most current instructions and warnings. Users operating their aircraft in the United States should visit http:// knowbeforeyoufly.org for more information about flight safety and compliance.The information in this document affects your safety and your legal rights and responsibilities. Read this entire document carefully to ensure proper configuration before use. Failure to read and follow the instructions and warnings in this document may result in serious injury to yourself or others, damage to or loss of your Ryze Tech product, or damage to other objects in the vicinity.By using this product, you hereby signify that you have read this disclaimer carefully and that you understand and agree to abide by the terms and conditions herein. EXCEPT AS EXPRESSLY PROVIDED IN RYZE TECH AFTER-SALES SERVICE POLICIES AVAILABLE AT HTTP:// RYZEROBOTICS.COM/SERVICE, THE PRODUCT AND ALL MATERIALS, AND CONTENT AVAILABLE THROUGH THE PRODUCT ARE PROVIDED “AS IS” AND ON AN “AS AVAILABLE” BASIS, WITHOUT WARRANTY OR CONDITION OF ANY KIND, EITHER EXPRESS OR IMPLIED. RYZE TECH DISCLAIMS ALL WARRANTIES OF ANY KIND, EXCEPT AS EXPRESSLY PROVIDED IN RYZE TECH AFTERSALES SERVICE POLICIES, WHETHER EXPRESS OR IMPLIED, RELATING TO THE PRODUCT, PRODUCT ACCESSORIES, AND ALL MATERIALS,2
EN
INCLUDING: (A) ANY IMPLIED WARRANTY OF MERCHANTABILITY, FITNESS FOR A PARTICULAR PURPOSE, TITLE, QUIET ENJOYMENT, OR NONI N F R I N G E M E N T; A N D ( B ) A N Y WA R R A N T Y ARISING OUT OF COURSE OF DEALING, USAGE, OR TRADE. RYZE TECH DOES NOT WARRANT, EXCEPT AS EXPRESSLY PROVIDED IN RYZE TECH LIMITED WARRANTY, THAT THE PRODUCT, PRODUCT ACCESSORIES, OR ANY PORTION OF THE PRODUCT, OR ANY MATERIALS, WILL BE UNINTERRUPTED, SECURE, OR FREE OF ERRORS, VIRUSES, OR OTHER HARMFUL COMPONENTS, AND DOES NOT WARRANT THAT ANY OF THOSE ISSUES WILL BE CORRECTED. NO ADVICE OR INFORMATION, WHETHER ORAL OR WRITTEN, OBTAINED BY YOU FROM THE PRODUCT, PRODUCT ACCESSORIES, OR ANY MATERIALS WILL CREATE ANY WARRANTY REGARDING RYZE TECH OR THE PRODUCT THAT IS NOT EXPRESSLY STATED IN THESE TERMS. YOU ASSUME ALL RISKS FOR ANY DAMAGE THAT MAY RESULT FROM YOUR USE OF OR ACCESS TO THE PRODUCT, PRODUCT ACCESSORIES, AND ANY MATERIALS. YOU UNDERSTAND AND AGREE THAT YOU USE THE PRODUCT AT YOUR OWN DISCRETION AND RISK, AND THAT YOU ARE SOLELY RESPONSIBLE FOR ANY PERSONAL INJURY, DEATH, DAMAGE TO YOUR PROPERTY (INCLUDING YOUR COMPUTER SYSTEM OR MOBILE DEVICE OR RYZE TECH HARDWARE USED IN CONNECTION WITH THE PRODUCT) OR THIRD PARTY PROPERTY, OR THE LOSS OF DATA THAT RESULTS FROM YOUR USE OF OR INABILITY TO USE THE PRODUCT.SOME JURISDICTIONS MAY PROHIBIT A DISCLAIMER OF WARRANTIES AND YOU MAY HAVE OTHER RIGHTS THAT VARY FROM JURISDICTION TO JURISDICTION.Ryze Tech accepts no liability for damage, injury or any legal responsibility incurred directly or indirectly from the use of this product. The user shall observe safe and lawful practices including, but not limited to, those set forth in these Safety Guidelines. You shall be solely responsible for all your behaviors when flying Tello.Warnings1. Stay away from rotating propellers and motors.3
EN
2. DO NOT touch the underside of the aircraft as it may be hot.3. Never use non-Ryze Tech batteries and DO NOT short-circuit the Flight Battery.4. Important information is included on the product package and in the documentation included in the product package. Read all of this information carefully and retain the product package and documentation for future reference.5. Always use an FCC/CE (depending on location) certified USB adapter that is rated at 5 V and 1.5 A or above.6. Ensure the aircraft is powered off before charging. It cannot be charged when it is powered on.7. DO NOT charge a Flight Battery immediately after flight, because its temperature may be too high. DO NOT charge a Flight Battery until it cools down to near room temperature.8. Charge the Flight Battery in the temperature range 41° to 113° F (5° to 45° C). The ideal charging temperature range is 72° to 82° F (22° to 28° C).9. If a low battery warning appears, charge the Flight Battery until the Flight Battery level reaches between 30 and 60 % for long-time storage.10. Discharge Flight Batteries to the range 40 to 65% if they will NOT be used for 10 days or more. This can greatly extend battery life.RegulationsTo avoid serious injury and property damage, observe the following rules: 1. DO NOT operate in the vicinity of manned aircraft,regardless of altitude. (Land immediately if necessary.) 2. DO NOT fly the aircraft in or at densely populated areas including cities, sporting events, exhibitions, and performances. 3. DO NOT fly the aircraft above the relevant maximum altitude set forth in your local laws and regulations. 4. Remain well clear of and DO NOT interfere with manned aircraft operations. Be aware of and avoid other aircraft and obstacles at all times. 5. DO NOT fly the aircraft near or inside no fly zones specified by local laws and regulations. The no fly zone list includes: airports, borders between two sovereign countries or regions, and major cities/regions, and is continuously updated. DO NOT fly around sensitive infrastructure or property such as power stations, water treatment facilities, 4
EN
correctional facilities, heavily traveled roadways, government facilities, or military zones. 6. Maintain visual line of sight with your aircraft at all times and use an observer to assist if needed. 7. NEVER use the aircraft to carry illegal or dangerous goods/payloads. 8. Make sure you understand the nature/type of your flight operation (such as for recreation, for public use, or for commercial use) and have obtained corresponding approval and clearance from the related government agencies before flight. Consult with your local regulators for comprehensive definitions and specific requirements. Users operating their aircraft in the United States should first visit http://www.knowbeforeyoufly. org and take the most appropriate action for their circumstances. 9. Please note that remote-controlled aircraft may be banned from conducting commercial activities in certain territories and regions. Check and follow all local laws and regulations before flying as those rules may differ from those stated here. 10. Respect the privacy of others when using thecamera. Make sure you comply with local privacy laws, regulations, and moral standards. DO NOT conduct surveillance operations such as image capture or video recording on any person, entity, event, performance, exhibition, or property without authorization or where there is an expectation of privacy, even if the image or video is captured for personal use. 11. Please be advised that in certain areas, the recording of images and videos from events, performances, exhibitions, or commercial properties by means of a camera may contravene copyright or other legal rights, even if the image or video is shot for personal use.Flight Limit1. Fly NO higher than 33 ft (10 m) above ground level and stay away from any surrounding obstacles.2. The Vision Positioning System is only effective when the aircraft is at altitudes of 1.0 to 98.4 ft (0.3 to 30 m) and works best at altitudes of 1.0 to 19.7 ft (0.3 to 6 m).3. The performance of the Vision Positioning System is affected by the surface being flown over. The aircraft automatically changes to Attitude mode when the Vision Positioning System is unavailable. In Attitude mode the aircraft is not able to position5
EN
itself. Operate the aircraft with great caution in the following situations, which may cause the aircraft to enter Attitude mode: a. Flying at high speed below 2 ft (0.5 m). b. Flying over monochrome surfaces (e.g. pureblack, pure white, pure red, pure green). c. Flying over highly reflective surfaces. d. Flying over water or transparent surfaces. e. Flying over moving surfaces or objects. f. Flying in an area where the lighting changesfrequently or drastically. g. Flying over extremely dark (< 10 lux) or bright(> 100,000 lux) surfaces or towards bright sources of light (e.g. towards sunlight). h. Flying over surfaces without clear patterns or texture. i. Flying over surfaces with identical repeating patterns or textures (e.g. tiling). j. Flying over small and fine objects (e.g. tree branches or power lines). k. Flying at speeds of over 11 mph (18 kph) at 3.5 ft (1 m) or lower. 4. If the aircraft’s Vision Positioning system fails for 3 seconds when its flying altitude is above 20 ft (6 m), Failsafe Protection will automatically initiate landing. If the Vision Positioning system recovers during landing, Failsafe Protection will shut off and the aircraft will hover. 5. The Vision Positioning System may not be able to recognize patterns on the ground in very dark (< 100 lux) environments. DO NOT take off if there is a warning prompt in the Tello app telling you that the environment is too dark.In the Box
Aircraft ×1 (Propellers and Propeller Guards included*)
Spare Propeller ×2 (pair)
6
EN
Mission Pad ×4
Micro USB Cable ×1
Flight Battery ×1 Propeller Removal Quick Start
Tool ×1
Guide × 1
Open-Source Controller ×1
Dot-Matrix
Extension Board
Display &
×1
Distance Sensing
Module ×1
* The diagrams in this document are for reference only and may differ from the actual product.
7
EN
1. IntroductionROBOMASTERTM TT TELLOTM Talent includes the aircraft and the Expansion Kit. Tello is a small quadcopter that features a Vision Positioning System and an onboard camera. Using its Vision Positioning System and advanced flight controller, it can hover in place and is suitable for flying indoors. Advanced features like Bounce mode, 8D Flips, and EZ Shots make using Tello fun. Tello captures 5 megapixel photos and streams 720p live video to the Tello app on a mobile device. Its maximum flight time is approximately 13 minutes*.Experience DIY flight with an Expansion Kit that includes an open-source controller, dot-matrix display & distance-sensing module, and extension board, which support programming with Arduino, Scratch, MicroPython, and more.
1
2
3
4
9
5
10
8
6
7
6
11 12
1. Propellers 2. Motors 3. Aircraft Status Indicator 4. Camera 5. Power Button 6. Antennas 7. Vision Positioning System
8. Flight Battery 9. Micro USB Port 10. Propeller Guards 11. Open-Source Controller 12. Dot-Matrix Display& Distance Sensing Module
* The maximum flight time was tested in windless conditions flying at a consistent 9 mph (15 kph) and without the expansion kit mounted. This value should be taken for reference only.8
EN
2. Downloading the Tello App and Watching Tutorial VideosSearch for “Tello” on the App Store or Google Play or scan the QR code to download the app on your mobile device. To ensure flight safety, watch the tutorial videos on the official Ryze Tech website (http://www.ryzerobotics.com) before your first flight.Operating system compatibility: iOS v9.0 or later; Android v4.4 or later. Only use the Tello app for activation.3. Charging the BatteryInsert the Flight Battery into the aircraft as shown.To charge the Flight Battery connect the Micro USB port on the aircraft to a USB adapter (not provided) using a standard Micro USB cable. Charging time: Approx. 1 hour and 30 minutes.… Blinking blue slowly: charging. – Solid blue: fully charged. Always use an FCC/CE (depending on location) certified USB adapter that is rated at 5 V and 1.5 A or above. Ensure the aircraft is powered off before charging. It cannot be charged when it is turned on.9
EN
4. Preparing for Takeoff
Tello-XXXXXXOR RMTT-XXXXXX
Press the power button once to turn the aircraft on. (Press again to turn off)
Enable Wi-Fi on your mobile device and connect to the network.
With the open-source controller connected, the Wi-Fi network is RMTT-XXXXXX. The Wi-Fi network is Tello-XXXXXX without the open-source controller connected.Launch the Tello app. Connection has been established when the Aircraft Status Indicator blinks yellow slowly and the live camera view is shown on your mobile device.
5. FlightIn the Tello app: Auto Takeoff and Auto Landing
Auto Takeoff
Auto Landing
Taking Photos and Recording Videos
Tap to switch between Photo mode and Video mode.
Tap to take a photo or record video.
Use the Virtual Joysticks in the app to control the aircraft (the default control stick mode is known as Mode 2)
Left Stick Up
Right Stick Forward
Down
Backward
Turn Left Turn Right 10
Left Right
EN
6. Programming with TelloThe RoboMaster TT Tello Talent can be programmed in several ways. Use the Tello EDU app for programming when using a mobile device. Scan the QR code to download the app on your mobile device or search for “Tello EDU” on the App Store or Google Play. Visit https://www.dji.com/robomaster-tt for more information about using computer program software to program the RoboMaster TT.The Tello Edu app is compatible with iOS 10.0 (or later) or Android 4.4 (or later). Users should be confident flying a Tello before they use the Tello Edu app to learn about programming. Please note that the Tello app and Tello Edu app cannot connect to the Tello simultaneously. Exit one app before using the other.7. Using the Open-Source Controller and Dot-Matrix Display & Distance-Sensing ModuleAttach the dot-matrix display & distance-sensing module to the open-source controller and attach the opensource controller to the aircraft. Program via the Tello EDU app or computer program software for DIY flight.11
Installation Notes1. Installing the PropellersWhen mounting, ensure that the gap between the bottom of the propeller cap and the motor is no bigger than needed to insert the propeller removal tool.
EN
Mount marked propellers on the motors with marked landing gear.
Mount unmarked propellers on the motors with unmarked landing gear.
2. Detaching the PropellersInsert the propeller removal tool between the propeller cap and the motor. Be sure to hold the motor while detaching the propeller.
Always detach the propellers using the propeller removal tool. DO NOT remove the propellers by hand, or you may be seriously hurt, and may damage the motors.12
EN
3. Installing the Propeller Guards Push each propeller guard inwards to wrap it around the landing gear. Make sure it clicks into position and that the protruding parts of the landing gear securely fit into the notches on the propeller guards.4. Detaching the Propeller Guards To remove a propeller guard place your finger and thumb as shown in the figure below. With your thumb, gently apply a twisting force to the lip that protrudes from the propeller guard where it wraps around the landing gear.DO NOT use excessive force when removing propeller guards as doing so may damage the aircraft’s arms and you may get hurt.13
EN
Specifications
Aircraft
Tello (Model: TLW004)
Weight (Propeller
87 g
Guards Included)
Max Speed
17.8 mph (28.8 kph)
Max Flight Time
13 minutes (0 wind at a consistent 9 mph (15 kph))
Operating Temperature
32° to 104° F (0° to 40° C)
Operating Frequency Transmitter (EIRP)
2.4 to 2.4835 GHz 20 dBm (FCC) 19 dBm (CE) 19 dBm (SRRC)
Camera
Max Image Size
2592×1936
Video Recording Modes
HD: 1280×720 30p
Video Format
MP4
Flight Battery
Capacity
1100 mAh
Voltage
3.8 V
Battery Type
LiPo
Energy
4.18 Wh
Net Weight
25±2 g
Charging
41° to 113° F
Temperature Range (5° to 45° C)
Max Charging Power 10 W
Expansion Kit
Open-Source Controller
Model Operating ModeWi-Fi Bluetooth MCU
RMTTOCDirect Connection Mode, Router Mode2.4 GHz , 5.8 GHz2.4 GHzESP32-D2WD, Dual-Core Main Frequency: 160 MHz, Calculation ability: 400 MIPS
Open-Source Expansion
Supports SDK, Arduino, Scratch and MicroPython14-pin expansion port (I2C, UART, SPI, GPIO, PWM, power source)
LED
Full Color LED
14
EN
Dot-Matrix Display & Distance Sensing Module
Dot-Matrix LED
Red and blue LED 8×8
Dot-Matrix Driver function
IIC data port, auto dotmatrix scan, adjustable256 global brightness, adjustable single-pixel red and blue LED 256brightness
Distance Sensing Module
TOF
Maximum Sensing Distance of TOFExtension Board DIY Connection
1.2 m (indoors with white wall)14-pin extension port to 2×7 pin, 2.54mm dual in-line package, two reserved positions for 5V/3.3V power indicators, two reserved positions for test indicators
For more information, read the User Manual: https://www.dji.com/robomaster-tt This content is subject to change without prior notice.TELLO is a trademark of Ryze Tech. ROBOMASTER is a trademark of DJI. Copyright © 2020 Ryze Tech. All Rights Reserved.15
ROBOMASTER TT TELLO TALENTYCBZSS00139102
ROBOMASTER TT TELLO TALENTDisclaimer and Safety Guidelinesv1.0 2021.03
Contents
Safety at a Glance
2
Glossary
4
Before You Begin
4
Disclaimer and Warning
5
Pre-Flight Checklist
6
Individual Parts
7
Regarding Genuine and Functional Parts
7
Camera
7
Propulsion System
7
Flight Batteries
8
Tello App
10
Firmware
11
Product Care
11
Flight Condition Requirements
12
Weather Conditions and Surrounding Environment
12
Interference with Communications
12
Operating the Aircraft Responsibly
13
Flight Modes, Functions, and Warnings
14
Flight Modes
14
Low Battery
14
Vision Positioning System
14
Bounce Mode and 8D Flips
15
EZ Shots
15
Compliance with Regulations & Flight Limits
16
Regulations
16
1
Safety at a Glance
1. Environmental Considerations
· Only fly at locations that are clear of magnetic and radio interference, buildings and other obstacles.· Be very careful when flying 3,281 ft (1,000 m) or more above sea level.· Fly in good weather conditions with temperatures between 32° and 104° F (0° and 40° C).· DO NOT fly when it is windy. · Observe local laws and regulations during flight.*
ROBOMASTERTM TT TELLOTM Talent is NOT a toy and is NOT suitable for children under the age of 14 (15 in Japan). Note that Safety at a Glance only provides a quick overview of the safety tips. Make sure you read and understand the remaining sections of this Disclaimer and Safety Guidelines.
· Exercise additional caution while flying indoors because the aircraft stabilization features may
be impacted.
2. Basic Pre-Flight Checklist · Ensure the remote control device, smart device and Flight Battery are fully charged. · Ensure the Flight Battery is mounted firmly. · Ensure the propellers and propeller guards are in good condition and securely mounted and tightened. · Ensure there is nothing obstructing the motors and that the motors are functioning normally. · Check that the camera lens and Vision Positioning System sensors are clean. · Complete the Additional Pre-Flight Checklist in the Pre-Flight Checklist section below.
3. Operation · Stay away from rotating propellers and motors. · Maintain visual line of sight with your aircraft at all times and use an observer to assist if needed. · Only fly the aircraft in environments where a strong Wi-Fi connection can be maintained between the remote control device and the aircraft, without interference. · DO NOT answer incoming calls or text messages or do anything that may distract you from controlling the aircraft during flight. · DO NOT fly under the influence of alcohol or drugs. · DO NOT fly above reflective surfaces such as water or snow, as these terrains may affect the performance of the Vision Positioning System. · When a low battery warning is displayed in the Tello app, land the aircraft promptly. · When using Intelligent Flight Modes, be prepared to take control of the aircraft by tapping the on-screen stop button. · The pilot’s discretion and good judgment are required during flight. Advanced safety and flight assistance features are designed to assist aircraft operators, but do not replace operators. Environmental conditions including lighting may impact the performance of the Vision Positioning System and the Vision Positioning System is disabled in certain situations.
4. Maintenance and Upkeep · DO NOT use aged, chipped or broken propellers or propeller guards.
* Flight altitude restrictions vary by location. DO NOT fly above the relevant maximum altitude set forth in your local laws and regulations.2
· Recommended storage temperature: between 71° and 82° F (22° and 28° C). · Keep the camera lens, sensors and motors clean.5. Observe Local Laws and Regulations · DO NOT fly in the No Fly Zones. Observe local laws and regulations during flight.
Fly in open areas with no interference, and fly above surfaces with clear patterns. Do not fly over water or other reflective surfaces.
Maintain Line of Sight
Avoid flying over or near crowds, high voltage power lines, trees, bodies of water, or other obstacles. DO NOT fly near sources of strong electromagnetic radiation such as power lines, base stations, and electrical substations since radiation may affect the remote control signal.DO NOT use the aircraft in adverse weather conditions such as rain, snow, fog or, wind.Stay away from rotating propellers and motors. 3
GlossaryThe following terms are used throughout this document to indicate various levels of potential harm when operating this product and to indicate other important and useful information:NOTICE: Procedures which, if not properly followed, create a possibility of physical property damage AND little or no possibility of injury; other important and useful information.CAUTION: Procedures which, if not properly followed, create the probability of physical property damage AND a possibility of serious injury.WARNING: Procedures which, if not properly followed, create the probability of property damage, collateral damage, or serious injury OR create a high probability of serious injury.Before You BeginThe following documents have been produced to help you safely operate and make full use of your aircraft: RoboMaster TT Tello Talent Disclaimer and Safety Guidelines RoboMaster TT Tello Talent Quick Start Guide RoboMaster TT Tello Talent User ManualCheck all of the included parts listed in the Quick Start Guide and read the Disclaimer and Safety Guidelines before flight. Then prepare for your first flight by using the Quick Start Guide and watching all of the tutorial videos on the official website (https://www.dji.com/robomaster-tt). If you have questions, refer to the User Manual on the website for more comprehensive information. Make sure you fully understand the functionality of each individual part, the flight condition requirements, the key contingency warning functions/systems, and all relevant laws and regulations before each flight. If you have any questions or problems during the assembly, maintenance or use of this product, please contact SZ RYZE TECHNOLOGY CO., LTD (“Ryze Tech”) or a Ryze Tech authorized dealer.Read the entire User Manual to become familiar with the features of this product before operation. It is essential to read and follow all of the instructions and warnings in the User Manual, prior to assembly, setup or use, in order to operate the product correctly and avoid damage or serious injury. Failure to operate the product correctly can result in damage to the product or personal property and cause serious injury. This is a sophisticated product. It must be operated with caution and common sense and requires some basic mechanical ability. Failure to operate this product in a safe and responsible manner could result in injury or damage to the product or other property. This product is not intended for use by children. DO NOT use incompatible components or alter this product in any way unless otherwise allowed by relevant documents provided by Ryze Tech. These Safety Guidelines contain instructions for safety, operation and maintenance.4
Disclaimer and WarningThis product is NOT a toy and is not suitable for children under the age of 14 (15 in Japan). Adults should keep the aircraft out of the reach of children and exercise caution when operating this aircraft in the presence of children.This product incorporates various advanced control technologies. However, inappropriate use of the product could result in personal injury or property damage. Please read the materials associated with the product before your first use of the product. These documents are included in the product package and/or are available online on the official website (http://www.dji.com).This product is a flying camera that offers easy flight when in good working order as set forth below. Visit http://www.dji.com for the most current instructions and warnings. Users operating their aircraft in the United States should visit http://knowbeforeyoufly.org for more information about flight safety and compliance.The information in this document affects your safety and your legal rights and responsibilities. Read this entire document carefully to ensure proper configuration before use. Failure to read and follow the instructions and warnings in this document may result in serious injury to yourself or others, damage to or loss of your Ryze Tech product, or damage to other objects in the vicinity.By using this product, you hereby signify that you have read this disclaimer carefully and that you understand and agree to abide by the terms and conditions herein. EXCEPT AS EXPRESSLY PROVIDED IN RYZE TECH AFTER-SALES SERVICE POLICIES AVAILABLE AT HTTP://DJI.COM/ SERVICE, THE PRODUCT AND ALL MATERIALS, AND CONTENT AVAILABLE THROUGH THE PRODUCT ARE PROVIDED “AS IS” AND ON AN “AS AVAILABLE” BASIS, WITHOUT WARRANTY OR CONDITION OF ANY KIND, EITHER EXPRESS OR IMPLIED. RYZE TECH DISCLAIMS ALL WARRANTIES OF ANY KIND, EXCEPT AS EXPRESSLY PROVIDED IN THE AFTER-SALES SERVICE POLICIES, WHETHER EXPRESS OR IMPLIED, RELATING TO THE PRODUCT, PRODUCT ACCESSORIES, AND ALL MATERIALS, INCLUDING: (A) ANY IMPLIED WARRANTY OF MERCHANTABILITY, FITNESS FOR A PARTICULAR PURPOSE, TITLE, QUIET ENJOYMENT, OR NON-INFRINGEMENT; AND (B) ANY WARRANTY ARISING OUT OF COURSE OF DEALING, USAGE, OR TRADE. RYZE TECH DOES NOT WARRANT, EXCEPT AS EXPRESSLY PROVIDED IN RYZE TECH LIMITED WARRANTY, THAT THE PRODUCT, PRODUCT ACCESSORIES, OR ANY PORTION OF THE PRODUCT, OR ANY MATERIALS, WILL BE UNINTERRUPTED, SECURE, OR FREE OF ERRORS, VIRUSES, OR OTHER HARMFUL COMPONENTS, AND DOES NOT WARRANT THAT ANY OF THOSE ISSUES WILL BE CORRECTED.NO ADVICE OR INFORMATION, WHETHER ORAL OR WRITTEN, OBTAINED BY YOU FROM THE PRODUCT, PRODUCT ACCESSORIES, OR ANY MATERIALS WILL CREATE ANY WARRANTY REGARDING RYZE TECH OR THE PRODUCT THAT IS NOT EXPRESSLY STATED IN THESE TERMS. YOU ASSUME ALL RISKS FOR ANY DAMAGE THAT MAY RESULT FROM YOUR USE OF OR ACCESS TO THE PRODUCT, PRODUCT ACCESSORIES, AND ANY MATERIALS. YOU UNDERSTAND AND AGREE THAT YOU USE THE PRODUCT AT YOUR OWN DISCRETION AND RISK, AND THAT YOU ARE SOLELY RESPONSIBLE FOR ANY PERSONAL INJURY, DEATH, DAMAGE TO YOUR PROPERTY (INCLUDING YOUR COMPUTER SYSTEM OR MOBILE DEVICE OR RYZE TECH HARDWARE USED IN CONNECTION WITH THE PRODUCT) OR THIRD PARTY5
PROPERTY, OR THE LOSS OF DATA THAT RESULTS FROM YOUR USE OF OR INABILITY TO USE THE PRODUCT. SOME JURISDICTIONS MAY PROHIBIT A DISCLAIMER OF WARRANTIES AND YOU MAY HAVE OTHER RIGHTS THAT VARY FROM JURISDICTION TO JURISDICTION. Ryze Tech accepts no liability for damage, injury or any legal responsibility incurred directly or indirectly from the use of this product. The user shall observe safe and lawful practices including, but not limited to, those set forth in these Safety Guidelines. You shall be solely responsible for all your behaviors when flying Tello.Pre-Flight ChecklistBasic Pre-Flight Checklist · Ensure the remote control device, mobile device and Flight Battery are fully charged. · Ensure the Flight Battery is mounted firmly. · Ensure the propellers and propeller guards are in good condition and securely mounted andtightened. · Ensure there is nothing obstructing the motors and that the motors are functioning normally. · Check that the camera lens and Vision Positioning System sensors are clean.Additional Pre-Flight Checklist · Ensure that you are using only genuine parts and that all parts are in mint condition. · If prompted, follow the on-screen instructions to calibrate the Inertial Measurement Unit (IMU). · Ensure the Tello app and the aircraft’s firmware have been upgraded to the latest versions. · Ensure that your flight area is outside the No Fly Zones and flight conditions are suitable for flyingthe aircraft. · Ensure that your planned flight will not contravene any laws or regulations, and that you haveobtained all appropriate authorizations. REMEMBER: Understand the risks. It is solely your responsibility to comply with all laws and regulations. · Be sure that you are NOT under the influence of alcohol, drugs or any substance that may impair your cognitive abilities. · Be sure that you are familiar with the selected flight mode and understand all safety functions and warnings. · Ensure the Tello app is properly launched to assist your operation of the aircraft. WITHOUT THE FLIGHT DATA RECORDED BY THE APP, IN CERTAIN SITUATIONS (INCLUDING THE LOSS OF YOUR AIRCRAFT) RYZE TECH MAY NOT BE ABLE TO PROVIDE AFTERSALES SUPPORT TO YOU OR ASSUME LIABILITY.Ryze Tech reserves the right to update this Disclaimer and the Safety Guidelines. Please visit http://www.dji.com for the latest version. This disclaimer is made in various language versions; in the event of divergence among different versions, the English version shall prevail. 6
Individual PartsRegarding Genuine and Functional PartsTo avoid component malfunction, serious injury, and property damage, observe the following rules: 1. Use only genuine parts or parts certified by Ryze Tech. Unauthorized parts or parts fromnon-Ryze Tech certified manufacturers may cause system malfunctions and compromise safety. 2. Ensure there are no foreign objects (such as water, oil, soil, or sand) inside of the aircraft or its components. 3. Ensure the aircraft and its components including but not limited to the camera, propulsion system, and Flight Battery are all in good working order, damage-free, and functioning well. Refer to the remaining sections in this document for more details on how to ensure the functionality of these components.Camera1. Check camera settings before use to make sure you can adjust them to fit your needs. 2. Test the camera by shooting a few test images and check that it is operating correctly beforeshooting important pictures or videos. 3. Photos or videos cannot be transmitted or copied from the camera if the aircraft is powered off. 4. Be sure to power off the aircraft correctly, otherwise your camera parameters will not be savedand any recorded videos may be damaged. Note: Regardless of the reason, Ryze Tech will not be responsible for any failure of an image or video to be recorded or for any image or video having been recorded in a way that is not machine readable.Propulsion SystemTo avoid serious injury to yourself or others, which may be caused by rotating propellers or motors, observe the following rules: 1. Use the provided propellers and propeller guards only and never use any other brand, type,or model of propellers or propeller guards. 2. DO NOT use aged, chipped, or broken propellers or propeller guards. 3. Always power off the aircraft before touching the propellers. 4. Ensure the propellers and propeller guards are securely mounted and tightened to preventthem from falling off. 5. Ensure the motors are securely mounted and rotating smoothly.7
6. DO NOT attempt to modify the structure of the motors. 7. DO NOT touch or let your hands or body come in contact with the motors after flight asthey may be hot. 8. Stay away from rotating propellers and motors.To avoid possible serious injury and property damage, observe the following rules: 1. Always use the provided tool when mounting or removing propellers. Be aware of the sharpedges of the propellers. Wear gloves or take other protective measures when touching the propellers. 2. DO NOT block any of the ventilation holes on the motors. 3. DO NOT block any of the ventilation holes on the body of the aircraft. 4. Keep the motors free of dust. 5. If a motor is stuck and unable to rotate freely, land the aircraft immediately.Flight BatteriesTo avoid fire, serious injury, and property damage, observe the following safety rules and guidelines when using, charging, or storing Flight Batteries.Battery Use 1. DO NOT allow Flight Batteries to come into contact with any kind of liquid. DO NOT leave FlightBatteries out in the rain or near a source of moisture. DO NOT drop Flight Batteries into water. If the inside of a Flight Battery comes into contact with water, chemical decomposition may occur, potentially resulting in the Flight Battery catching on fire, and possibly leading to an explosion. 2. Never use non-Ryze Tech batteries. Go to http://www.dji.com to purchase new Flight Batteries. Ryze Tech takes no responsibility for any damage caused by non-Ryze Tech batteries. 3. Never use or charge swollen, leaky, or damaged Flight Batteries. If your Flight Battery is abnormal, contact Ryze Tech or a Ryze Tech authorized dealer for further assistance. 4. Flight Batteries should be used in the temperature range 32° to 104° F (0° to 40° C). Use of Flight Batteries in environments above 122° F (50° C) can lead to fire or explosion. Use of Flight Batteries below 32° F (0° C) can lead to permanent damage. Never use a Flight Battery when the temperature is too high or too low. 5. DO NOT use Flight Batteries in strong electrostatic or electromagnetic environments otherwise the battery control board may malfunction and cause a serious accident during flight. 6. Never disassemble or pierce a Flight Battery in any way or it may leak, catch fire, or explode. 7. Electrolytes in Flight Batteries are highly corrosive. If any electrolytes make contact with your skin or eyes, immediately wash the affected area with fresh running water for at least 15 minutes, and then see a doctor immediately. 8. DO NOT use a Flight Battery if it was involved in a crash or heavy impact.8
9. If a Flight Battery falls into water with the aircraft during flight, take it out immediately and put it in a safe and open area. Maintain a safe distance from it until it is completely dry. Never use it again, and dispose of it properly as described in the Battery Disposal section below.10. DO NOT heat Flight Batteries. DO NOT put Flight Batteries in a microwave oven or in a pressurized container.11. DO NOT drop, strike, impale or manually short-circuit a Flight Battery. DO NOT place heavy objects on Flight Batteries.12. Clean Flight Battery terminals with a clean, dry cloth. 13. Avoid flying the aircraft when the Flight Battery level is critically low, as this may lead topermanent battery damage. 14. Put out any Flight Battery fire using sand or a dry powder fire extinguisher.Battery Charging 1. Always use an FCC/CE (depending on location) certified USB adapter that is rated at 5 V and 1.5 Aor above. Ryze Tech takes no responsibility if a Flight Battery is charged using an unsuitable USB adapter. 2. Never leave a Flight Battery unattended during charging. DO NOT charge a Flight Battery near fire, other heat sources, or flammable materials or on flammable surfaces such as carpet or wood. 3. DO NOT charge a Flight Battery immediately after flight, because its temperature may be too high. DO NOT charge a Flight Battery until it cools down to near room temperature. Charging a Flight Battery outside of the temperature range 41° to 104° F (5° to 40° C) may lead to leakage, overheating, or battery damage. The ideal charging temperature range is 72° to 82° F (22° to 28° C). 4. Disconnect your charger when not in use. Examine your charger regularly for damage to the cord, plug, enclosure, or other parts. DO NOT clean a charger with denatured alcohol or other flammable solvents. Never use a damaged charger.Battery Storage 1. Keep Flight Batteries out of the reach of children and pets. 2. If a low battery warning appears, charge the Flight Battery until the Flight Battery level reachesbetween 30 and 60 % for long-time storage. 3. Store Flight Batteries in a cool, dry place away from direct sunlight to ensure they do notoverheat. Recommended storage temperature: between 71° and 82° F (22° and 28° C) for storage periods of more than three months. Never store in environments outside the temperature range 32° to 113° F (0° to 45° C). 4. DO NOT leave a Flight Battery near heat sources such as a furnace or heater. DO NOT leave a Flight Battery inside of a vehicle on hot days. 5. Keep Flight Batteries dry. 6. Keep Flight Batteries away from metal objects such as spectacles, watches, jewelry, and hairpins.Battery Disposal 1. Dispose of Flight Batteries in specific recycling boxes only after a complete discharge. DO NOTplace Flight Batteries in regular trash containers. Strictly follow your local regulations regarding the disposal and recycling of Flight Batteries. 2. Dispose of a Flight Battery immediately if it cannot be powered on after over-discharging.9
Travel Notice 1. Never transport a damaged battery. 2. Before carrying Flight Batteries on an airline flight, they must first be fully discharged. This can bedone by using your aircraft until the battery is depleted.Battery Use 1. Make sure the Flight Battery is fully charged before each flight. 2. When a low battery warning is displayed in the Tello app, land the aircraft promptly.Battery Charging 1. Flight Batteries are designed to stop charging when full. However it is good practice to monitorthe charging progress and disconnect the Flight Batteries when fully charged.Battery Storage 1. Discharge Flight Batteries to the range 40 to 65% if they will NOT be used for 10 days or more.This can greatly extend battery life. 2. DO NOT store a Flight Battery for an extended period after fully discharging it. Doing so may overdischarge it and cause irreparable battery cell damage. 3. Remove Flight Batteries from the aircraft when stored for an extended period.Battery Maintenance 1. Battery life may be reduced if not used for a long time. 2. Fully charge and discharge Flight Batteries at least once every 3 months to maintain batteryhealth.Tello App1. Be sure to continue flying safely if your phone or tablet computer receives an incoming call, text message, social media alert, or other alert, warning, or message. DO NOT answer incoming calls or text messages or do anything that may distract you from controlling the aircraft during flight.2. Land your aircraft immediately at a safe location if a critical warning appears.1. Be sure to fully charge your mobile device before launching the Tello App. 2. Read all prompted safety tips, warnings, and disclaimers carefully. Certain app prompts aredesigned to help you comply with relevant laws and regulations. However, they are not a substitute for being familiar with the local laws and regulations. Make sure you are familiar with all the relevant laws and regulations where you are flying. You are solely responsible for being aware of all relevant laws and regulations and flying in a way that is compliant. Make sure you: a. Read and understand the warning messages before taking off or landing, and before usingthe Intelligent Flight Modes. 10
b. Read and understand the warning messages and disclaimer before switching between flight modes, or when flying near or inside a No Fly Zone.3. Your use of the app is subject to the Tello app Terms of Use and Ryze Tech Privacy Policy. Please read them carefully in the app.FirmwareTo avoid serious injury to children and animals, observe the following rule: 1. Keep children and animals at a safe distance during any firmware upgrade, systemcalibration, or parameter setting procedure.1. Be sure to check all connections and remove the propellers from the motors before performing the firmware update.1. Always update the firmware to the latest version. 2. Firmware upgrade notifications will prompt you to proceed with an update immediately or toupdate the firmware within three days. If you choose to ignore the current firmware update, you are required to accept the prompted disclaimer. You further understand and agree that data including but not limited to a record of your choice not to update may be uploaded to and maintained on a Ryze Tech-designated server. 3. Ensure the battery level is at least 50% before starting a firmware update. DO NOT power off the aircraft during a firmware update. 4. DO NOT disconnect the aircraft from the internet during a firmware update.Product CareTo avoid serious injury to children and animals, observe the following rule: 1. Small parts are dangerous if swallowed. Keep all parts out of reach of children and animals.1. Check every part of the aircraft after any crash or violent impact. DO NOT use an aircraft that is not in good condition. If you have any problems or questions, please contact Ryze Tech or a Ryze Tech authorized dealer.2. Store the Flight Battery in a cool, dry place away from direct sunlight to ensure it does not overheat. Recommended storage temperature: between 71° and 82° F (22° and 28° C) for storage periods of more than three months. Never store in environments outside the temperature range 32° to 113° F (0° to 45° C). 11
3. DO NOT allow the camera to come into contact with, or become immersed in, water or other liquids. If it gets wet, wipe dry with a soft, absorbent cloth. Turning on an aircraft that has fallen into water may cause permanent component damage. DO NOT use substances containing alcohol, benzene, thinners, or other flammable substances to clean or maintain the camera. DO NOT store the camera in humid or dusty areas.1. DO NOT connect this product to any USB interface that is older than version 2.0. 2. Regularly check the Flight Battery level.Flight Condition RequirementsWeather Conditions and Surrounding EnvironmentThe aircraft is designed to operate in good weather conditions. To avoid collision, serious injury and property damage, observe the following rules: 1. DO NOT use the aircraft in adverse weather conditions such as rain, snow, fog, wind, smog,hail, lightning, tornadoes, or hurricanes. 2. Only fly at locations where you can keep the aircraft at least 33 ft (10 m) away fromobstacles, people, animals, buildings, public infrastructure, trees, and bodies of water when in flight. 3. DO NOT fly the aircraft on a route that has an abrupt change in the ground level (such as from inside a building to outside), otherwise the positioning function may be disrupted, impacting flight safety.1. Aircraft and battery performance is subject to environmental factors such as air density and temperature. Be very careful when flying 3,281 ft (1,000 m) or more above sea level, since battery and aircraft performance may be reduced.2. DO NOT use the aircraft near accidents, fire, explosions, floods, tsunamis, avalanches, landslides, earthquakes, dust, or sandstorms.Interference with Communications1. To avoid interference between your smart device and other wireless equipment, turn off other wireless equipment while you are flying the aircraft.12
2. DO NOT fly in areas where magnetic or radio interference may occur. These include but are not limited to: Wi-Fi hotspots, routers, Bluetooth devices, high voltage lines, high voltage power transmission stations, mobile base stations, and broadcasting towers. Flying in areas where interference may disrupt communication between the aircraft and the remote control device may adversely affect flight orientation and location accuracy and may potentially lead to loss of control. Interference may also lead to video downlink errors.Operating the Aircraft ResponsiblyTo avoid serious injury and property damage, observe the following rules: 1. DO NOT operate the aircraft if you are under the influence of anesthesia, alcohol, or drugs,or suffering from dizziness, fatigue, nausea, or any other condition, whether physical or mental, that could impair your ability to operate the aircraft safely. 2. Upon landing, power off the aircraft first, then switch off the remote control device. 3. DO NOT drop, launch, fire or otherwise project any dangerous payloads on or at any buildings, persons or animals, or which could cause personal injury or property damage. 4. Check every part of the aircraft after any crash or violent impact. DO NOT use an aircraft that is not in good condition. If you have any problems or questions, please contact Ryze Tech or a Ryze Tech authorized dealer.1. Make sure you have been sufficiently trained and have contingency plans for emergency situations and for when accidents occur.2. Make sure you have a flight plan and never fly the aircraft recklessly.1. Respect the privacy of others when using the camera. Make sure you comply with local privacy laws, regulations, and moral standards. DO NOT conduct surveillance operations such as image capture or video recording on any person, entity, event, performance, exhibition, or property without authorization or where there is an expectation of privacy, even if the image or video is captured for personal use.2. DO NOT use this product for any reason other than general personal use. DO NOT use it for any illegal or inappropriate purpose (such as spying, military operations, or unauthorized investigations).3. DO NOT use this product to defame, abuse, harass, stalk, threaten or otherwise violate the legal rights (such as the right of privacy and publicity) of others.4. DO NOT trespass onto private property of others.13
Flight Modes, Functions, and WarningsFlight ModesTo avoid serious injury and property damage, observe the following rule: 1. DO NOT switch from Standard mode to Fast mode unless you are sufficiently familiar withthe aircraft’s behavior in each flight mode.1. Standard mode (default): The aircraft utilizes the Vision Positioning System to automatically stabilize itself. The maximum flight attitude angle is 9° and the maximum flight speed is 9 mph (14.4 kph).2. Fast mode: The aircraft utilizes the Vision Positioning System to automatically stabilize itself. The maximum flight attitude angle is 25° and the maximum flight speed is 18 mph (28.8 kph).To switch from Standard mode to Fast mode users must read and agree to the disclaimers and warnings that appear in the Tello app. Make sure you understand the differences between the two flight modes. The aircraft will revert to Attitude mode when the Vision Positioning System is unavailable. In Attitude mode, the aircraft is easily affected by its surroundings, which may result in horizontal shifting. Therefore, the aircraft cannot position or auto-brake in this mode. When the aircraft enters Attitude mode, land in a safe place as soon as possible to avoid hazards. Only land the aircraft on flat surfaces. DO NOT land the aircraft over water, grass or sand. When using PalmLand, ensure your palm is right under the aircraft and keep your palm flat.Low Battery1. When battery warnings are triggered, promptly bring the aircraft back or land the aircraft to avoid losing power during flight and causing damage to the aircraft, property, animals, and people.2. When the Critical Battery Level warning appears the aircraft will start to descend automatically. You may push the throttle up to maintain the aircraft’s altitude and navigate the aircraft away from people and obstacles to a more appropriate location for landing.Vision Positioning System1. The Vision Positioning System cannot work properly over surfaces that do not have clear pattern variations. The Vision Positioning System is only effective when the aircraft is at altitudes of 0.3 to 10 m. The Vision Positioning System works best at altitudes of 0.3 to 6 m. If the aircraft is beyond this range, the Vision Positioning function may be affected, so extra caution is required.14
2. DO NOT fly over reflective surfaces such as water or snow, as these terrains may affect the performance of the Vision Positioning System.3. Note that the Vision Positioning System may not function properly when the aircraft is flying too fast (over 18 mph (28.8 kph) at 6.6 ft (2 m) or over 11 mph (18 kph) at 3.3 ft (1m)).4. Be extra cautious when in any of the following situations: a. Flying over monochrome surfaces (e.g. pure black, pure white, pure red, pure green); b. Flying over transparent surfaces; c. Flying over moving surfaces or objects; d. Flying in an area where the lighting changes frequently or drastically; e. Flying over extremely dark (< 10 lux) or bright (> 10,000 lux) surfaces; f. Flying over surfaces that strongly reflect or absorb infrared waves (e.g. mirrors); g. Flying over surfaces without clear patterns or texture; h. Flying over surfaces with identical repeating patterns or textures (e.g. tiles with same design); i. Flying over obstacles with surfaces that are too small.5. Keep the sensors clean at all times. DO NOT tamper with the sensors.Bounce Mode and 8D FlipsTo prevent serious injury or property damage, observe the following rules: 1. Ensure there is sufficient space when using these modes. Allow a radius of at least 6.6 ft (2 m)horizontally around the aircraft and allow at least 9.8 ft (3 m) above the aircraft. 2. Ensure the Vision Positioning System is working properly when using these modes. 3. In Bounce mode, ensure your arm is extended and your palm is flat. DO NOT catch the aircraftby hand. The distance between your palm and the aircraft should be at least 1 ft (30 cm). 4. When using 8D Flips, the distance between you and the aircraft should be at least 3.3 ft (1 m). 5. Watch out for potential obstacles in your surrounding area (especially on the rear, left, and rightsides of the aircraft) and stay clear of them to avoid accidents. 6. Be prepared to take control of the aircraft by pressing the stop button on the screen to exitBounce or 8D Flips in case of an emergency. 7. Be extra cautious when flying in very dark (< 300 lux) or bright (> 10,000 lux) environments.EZ ShotsTo prevent serious injury and property damage, observe the following rules: 1. Ensure there is sufficient space when using Circle: Allow a radius of at least 9.8 ft (3 m) around thepoint 6.6 ft (2 m) in front of the aircraft nose, and at least 9.8 ft (3 m) above and below the aircraft. 2. Ensure there is sufficient space when using Up & Away: Allow at least 19.7 ft (6 m) behind and 3.3ft (1 m) above the aircraft. 3. Ensure there is sufficient space when using 360: Allow at least 1.6 ft (0.5 m) around the aircraft inall directions. 15
4. Ensure the Vision Positioning System is working properly when using EZ Shots. 5. Watch out for potential obstacles in your surrounding area (especially on the rear, left, and rightsides of the aircraft) and stay clear of them to avoid accidents. 6. Be prepared to take control of the aircraft by pressing the stop button on the screen to exit incase of an emergency. 7. Be extra cautious when flying in very dark (< 300 lux) or bright (> 10,000 lux) environments.Compliance with Regulations & Flight LimitsRegulationsTo avoid serious injury and property damage, observe the following rules: 1. DO NOT operate in the vicinity of manned aircraft, regardless of altitude. (Land immediatelyif necessary.) 2. DO NOT fly the aircraft in or at densely populated areas including cities, sporting events,exhibitions, and performances. 3. DO NOT fly the aircraft above the relevant maximum altitude set forth in your local laws andregulations. 4. Remain well clear of and DO NOT interfere with manned aircraft operations. Be aware ofand avoid other aircraft and obstacles at all times.To avoid serious injury and property damage, observe the following rules: 1. DO NOT fly the aircraft near or inside no fly zones specified by local laws and regulations. Theno fly zone list includes: airports, borders between two sovereign countries or regions, and major cities/regions, and is continuously updated. DO NOT fly around sensitive infrastructure or property such as power stations, water treatment facilities, correctional facilities, heavily traveled roadways, government facilities, or military zones. 2. Maintain visual line of sight with your aircraft at all times and use an observer to assist if needed. 3. NEVER use the aircraft to carry illegal or dangerous goods/payloads.1. Make sure you understand the nature/type of your flight operation (such as for recreation, for public use, or for commercial use) and have obtained corresponding approval and clearance from the related government agencies before flight. Consult with your local regulators for comprehensive definitions and specific requirements. Users operating their aircraft in the United States should first visit http://www.knowbeforeyoufly.org and take the most appropriate action for their circumstances.2. Please note that remote-controlled aircraft may be banned from conducting commercial activities in certain territories and regions. Check and follow all local laws and regulations before flying as those rules may differ from those stated here.16
3. Respect the privacy of others when using the camera. Make sure you comply with local privacy laws, regulations, and moral standards. DO NOT conduct surveillance operations such as image capture or video recording on any person, entity, event, performance, exhibition, or property without authorization or where there is an expectation of privacy, even if the image or video is captured for personal use.4. Please be advised that in certain areas, the recording of images and videos from events, performances, exhibitions, or commercial properties by means of a camera may contravene copyright or other legal rights, even if the image or video is shot for personal use.Altitude Limit 1. Fly NO higher than 33 ft (10 m) above ground level and stay away from any surroundingobstacles.17
This content is subject to change.Download the latest version from https://www.dji.com/robomaster-ttTELLO is a trademark of Ryze Tech. Copyright © Ryze Tech All Rights Reserved.
ROBOMASTER TTMission Pad and Flight Map User GuideV1.0 2021.04
IntroductionMission pads and flight maps are accessories used for programming the RoboMaster TT (Tello Talent): The vision sensor of the drone detects the IDs of different mission pads and returns the relevant threedimensional coordinates in order to execute the corresponding programming commands. TT comes standard with four mission pads with different patterns on the front and back, for a total of eight IDs. The patterns on mission pad consist of three parts: a small rocket, the mission pad ID, and planets.Small rocketMission pad IDPlanets
Small rocket: This represents the positive direction of the x-axis in the mission pad coordinate system. Mission pad ID: The pads are numbered 1-8, allowing users to distinguish between different mission pads. Planets: TT recognizes the ID of the mission pad by detecting the arrangement of the planets and obtains the coordinate values in the coordinate system of the mission pad.TT supports 3×3 m and 5×5 m flight maps, which can be regarded as large mission pads used in the same way with the flight maps, TT can perform single-drone fixed-point flight and multi-drone formation flight. The pattern of the flight map is composed of DJI Logo, decorative pattern, and planets.
Decorative patternSmall planets DJI Logo
Decorative pattern Small planets DJI Logo
DJI logo: This represents the positive direction of the x-axis in the mission pad coordinate system. Decorative pattern: For decoration. Planets: TT recognizes the ID of the fight map by detecting the arrangement of the planets and obtains the coordinate values in the coordinate system of the flight map. Download and print the source files of the flight maps or purchase them from a dealer. Note that the maps must be printed on matte, textured, rough, and non-reflective material so they can be recognized by the vision sensor of the drone. Download the source files of flight maps at: https://www.dji.com/robomaster-tt/downloads2 © 2021 Ryze Tech. All Rights Reserved.
About the Mission Pad Coordinate SystemThe mission pad pattern contains a three-dimensional coordinate system, where the origin is at the center and the mission pad is a plane described by an x-axis and y-axis. Each mission pad provides an independent relative coordinate system. The coordinate systems of different mission pads do not affect each other, so they can be combined and placed as required.
Z
Y
X
OperationsThe mission pads only work with TT or Tello EDU drones that support SDK 2.0 or later versions. 1. Mission pad placementPlace the mission pad on a level surface and adjust the orientation of the rocket as needed. 2. Enable TT mission pad detection· Place TT in the center of the mission pad and enter the SDK mode (refer to the RoboMaster TT SDK instructions for details).· After entering SDK mode, enable the mission pad detection function of TT with the “mon” command.· Enable forward or downward-looking mission pad detection with the “mdirection x” command as needed.3. Have TT recognize the mission pad Command the TT to take off and hover. Instruct Tello to recognize the mission pad using the mid parameter in the SDK and perform corresponding flight actions based on the coordinates and ID information.
Command Descriptions
The following commands are used for mission pads.
Command mon moff
DescriptionEnable mission pad detection Forward and downward-looking detection isenabled by default Disable mission pad detection
Possible response ok / error
3 © 2021 Ryze Tech. All Rights Reserved.
mdirection x go x y z speed mid
X=0/1/2 0 Enable downward-looking detection1 Enable forward-looking detection 2 Enable both forward and downward-lookingdetection* Before using this command, you must enable the detection function with the mon command.* When either forward-looking or downwardlooking detection is enabled alone, the detectionfrequency is 20 Hz. If both enabled, detection will be performed alternatively, with a frequencyof 10 Hz in each directionFly straight to the (x, y, z) coordinate point of the mission pad with the set ID at the set speed (m/s)x: -500 – 500 y: -500 – 500 z: -500 – 500 speed: 10-100 (cm/s) x, y, and z cannot be between -20 and 20 at thesame time
ok / errorok/error + Error message
mid: m1/m2…m7/m8/m-1/m-2 m1/m2…m7/m8: Correspond to the ID of the mission pad. m-1: TT picks a detected mission pad at random. m-2: TT detects the mission pad closest to its center.
Example: go 100 100 100 60 m1Description: TT detects the mission pad with ID 1 with the enabled mission pad detection function. If recognition succeeds, it will fly straight to the coordinate point (100, 100, 100) in the mission pad coordinate system at a speed of 60 cm/s. If recognition fails, it will hover in the air, return an error, and wait for the next command.
Commandcurve x1 y1 z1 x2 y2 z2 speed m(id)
DescriptionThe drone flies in an arc at the set speed (cm/s), passing throughpoint (X1,y1,z1) to arrive at point (x2,y2,z2) If the arc radius is not within 0.5-10 meters, acorresponding reminder is returned. x1, x2: -500 – 500 y1, y2: -500 – 500 z1, z2: -500 – 500 speed: 10-60x, y, and z cannot be between -20 and 20 at the same time(x2,y2,z2) can be outside the recognizable range of the coordinate system
Possible responseok/error + Error message
4 © 2021 Ryze Tech. All Rights Reserved.
Example: curve 0 0 100 100 100 100 40 m2Description: TT detects the mission pad with ID 2 with the enabled mission pad detection function. If recognition succeeds, the drone will fly to the coordinate point (0, 0, 100) and then to the coordinate point (100, 100, 100) in the mission pad coordinate system along an arc at a speed of 40 cm/s. If recognition fails, it will hover, return “Error. Not valid marker”, and wait for the next command.
* The arc is the short arc of the only circle formed by the current position of the drone, (0, 0, 100) and (100, 100, 100). If the three points are on a straight line or the radius of the resulting circle is not within the range of 0.5 m – 10 m, an error is returned.
Commandjump x y z speed yaw m(id1) m(id2)
DescriptionTello flies to point (x,y,z) of the mid1 coordinate system and hovers, recognizes the mid2 mission pad, and rotates to the set yaw value at position(0,0,z) in the mid2 coordinate system
Possible responseok/error + Error message
Example: jump 100 100 100 40 90 m1 m2Description: TT detects the mission pad with ID 1 with the enabled mission pad detection function. If recognition succeeds, TT will fly to (100, 100, 100) in the mission pad coordinate system at the speed of 40 m/s, hover, and attempt to recognize the mission pad with an ID of 2. If this mission pad is recognized, the drone will rotate to a position 90° relative to the x-axis in the coordinate system of the ID 2 pad. If recognition fails in either recognition process, the drone will hover and return “Error. Not valid marker”.
TELLO StatusWhen the host computer sends “command” to Tello UDP port 8889 to enter the SDK mode, Tello will send Tello status information to UDP port 8890 of the host computer. The data is a string, and the content is as follows: “mid:%d;x:%d;y:%d;z:%d;mpry:%d,%d,%d;pitch:%d;roll:%d;yaw:%d;vgx:%d;vgy%d;vgz:% d;temp l:%d;temph:%d;tof:%d;h:%d;bat:%d;baro:%f;rn”
Description· Mid: For the detected ID of the mission pad, -2 will be returned if the mission pad detection function is not enabled, and -1 if the function is enabled but no pad is detected.· x: The x-axis coordinate of the drone relative to the detected mission pad (in centimeters). -200 will be returned if the mission pad detection function is not enabled, and -100 if no pad is detected.· y: The y-axis coordinate of the drone relative to the detected mission pad (in centimeters). -200 will be returned if the mission pad detection function is not enabled, and -100 if no pad is detected.· z: The z-axis coordinate of the drone relative to the detected mission pad (in centimeters). -200 will be returned if the mission pad detection function is not enabled, and -100 if no pad is detected.· mpry: The pitch, yaw, and roll angles and degrees of the drone in the mission pad. If the mission pad is not detected, 0 will be returned.5 © 2021 Ryze Tech. All Rights Reserved.
· pitch: Pitch angle (in degrees) · roll: Roll angle (in degrees) · yaw: Yaw angle (in degrees) · vgx: X-axis speed (dm/s) · vgy: Y-axis speed (dm/s) · vgz: Z-axis speed (dm/s) · templ: The lowest temperature of the main board (°C) · temph: The highest temperature of the main board (°C) · tof: ToF distance (cm) · h: Height relative to take-off point (cm) · bat: Percentage of current remaining battery capacity · baro: Height detected by barometer (m) · time: Motor running time (s) · agx: X-axis acceleration (cm/s2) · agy: Y-axis acceleration (cm/s2) · agz: Z-axis acceleration (cm/s2)
Effective Mission Pad Recognition RangeRecognizable height range: 0.3 – 1.2 m Recognizable range at 0.3 m: 0.4 m×0.4 m Recognizable range at 1.2 m: 1 m×1 m
1 m
1 m
1.2 m
0.4 m 0.4 m
Detectable range0.3 m 0 m
If the mission pad is outside of TT’s recognition area, TT may not be able to detect the mission pad, and mid commands will be invalid. We recommend you place the mission pad on a clear textured surface. Avoid placing it on pure black or pure white backgrounds, otherwise TT may not be able to recognize the mission pad. When using the mission pad, ensure that the ambient light is moderate. Too little or too much light will affect the recognition of the mission pad. When the forward-looking camera is used to detect the mission pad, the mission pad commands mentioned above cannot be used.6 © 2021 Ryze Tech. All Rights Reserved.
Flight Map Coordinate SystemThe flight map pattern contains a three-dimensional coordinate system, where the origin is at the center and the flight map is a plane described by an x-axis and y-axis.YXOperationsThe flight maps only work with TT or Tello EDU drones that support SDK 3.0 or later versions. 1. Flight map placementLay the flight map on a level surface and adjust the orientation of the DJI logo as needed. 2. Enable TT mission pad detection· Place TT in the center of the flight map and enter the SDK mode (refer to the Tello SDK instructions for details).· After entering SDK mode, enable the mission pad detection function of TT with the “mon” command. · Enable forward or downward-looking mission pad detection with the “mdirection x” commandas needed. 3. Have TT recognize the flight mapCommand the TT to take off and hover. Instruct Tello to recognize the flight map using the mid parameter in the SDK and perform corresponding flight actions based on the coordinates and ID information.Command DescriptionsThe flight map commands are the same as those of the mission pad. Note that the ID of the flight map is 12.Effective flight map recognition rangeRecognizable height range: 0.9 2.0 m Recognizable horizontal range: The effective programming range is 2.8 m×2.8 mWhen the flight map is used, the instructions for using mission pads must also be followed. Do not place small mission pads and other obstructions directly on the flight map to avoid interference with flight map recognition by the downward-looking camera. During formation flight, do not have one drone to fly directly under another drone, as this may block the recognition of the flight map. When planning the formation flight path, you need to appropriately plan the routes of each drone to avoid collisions, which may cause explosions.7 © 2021 Ryze Tech. All Rights Reserved.
This content is subject to change. Download the latest version from https://www.dji.com/robomaster-tt/downloadsCopyright © 2021 Ryze Tech. All Rights Reserved.
ROBOMASTER TTSDK 3.0 User GuideV1.0 2021.04
OverviewThe TT SDK connects to drones via Wi-Fi UDP protocol, allowing users to control drones through text commands. After installing the RoboMaster SDK, users can control the TT product, including the open-source TT controller and the drone itself. For specific instructions, visit the following website: https://robomaster-dev.readthedocs.io/latest/Safety FunctionAfter Tello executes the current command, if no command input is received (other than the [TELLO] battery?” command sent by the open-source controller for the battery status) within 15s, it will automatically land.Resetting Wi-FiIn the power-on state, long-press the power button for 5s, during which, the drone will reboot after the status indicator goes out. When the status indicator quickly flashes yellow, the SSID and password of the Wi-Fi network will be reset to their factory default settings, with no password required by default.ArchitectureUsers can use a Wi-Fi network to connect the Tello drone to a PC, Mac, or mobile device.Sending Commands and Receiving ResponsesTello IP: 192.168.10.1 UDP PORT: 8889 << – – >> PC / Mac / Mobile Remark 1: Set up a UDP client on a PC, Mac, or mobile device to send commands to Tello UDPport 8889 and receive responses. Remark 2: Before sending any other commands, send the “command” command to Tello UDP port8889 to launch Tello’s SDK mode.Receive Tello StateTello IP: 192.168.10.1 – >> PC / Mac / Mobile UDP Server: 0.0.0.0 UDP PORT:8890 Remark 3: Complete the operations in Remark 1 and Remark 2 before proceeding. Set up a UDPserver on the PC, Mac, or mobile device to receive messages from IP 0.0.0.0 via UDP port 8890. * For the detailed status information, see 5. Tello Status.Receiving Tello Video StreamsTello IP: 192.168.10.1 – >> PC / Mac / Mobile UDP Server: 0.0.0.0 UDP PORT:11111 Remark 4: Set up a UDP server on the PC, Mac, or mobile device to receive messages from IP 0.0.0.0via UDP port 11111. Remark 5: After performing the operations in Remark 1 and Remark 2, send the “streamon”command to Tello UDP port 8889 to start receiving Tello video streams.2 © 2021 Ryze Tech. All Rights Reserved.
Tello Command Types and ResultsThe SDK commands received by Tello can be grouped into three basic types.Control command (xxx) Tello returns “ok” if the command was executed successfully. Tello returns “error” or a result code if the command failed.Setting command (xx a) Setting command (xx a) will attempt to set a new sub-parameter value (a). Tello returns “ok” if the command was executed successfully. Tello returns “error” or a result code if the command failed.Read command (xx?) Read the real-time sub-parameter value.
UDP->Tello Commands
Control Commands
Command commandtakeoff landstreamon streamoff emergencyup xdown xleft xright xforward xback xcw xccw x motoron motoroff throwfly
Description Enter SDK command mode.Auto take off Auto landing Turn on the video stream. Turn off the video stream. Stop the motor from running. Fly upward by x cm. x = 20-500 Fly downward by x cm. x = 20-500 Fly leftward by x cm. x = 20-500 Fly rightward by x cm. x = 20-500 ok/error + error status Fly forward by x cm. x = 20-500 Fly backward by x cm. x = 20-500 Rotate clockwise by x°.x = 1-360 Rotate counterclockwise by x°.x = 1-360 Enter Motor-On mode (*Note 1).Exit Motor-On mode. Throw to launch. Throw the drone horizontally within5s of sending the command.
Possible Response ok / error / unactiveok / errorok/error + error statusok / error
3 © 2021 Ryze Tech. All Rights Reserved.
Roll in the x direction.
l = (left)
flip x
r =(right)
f = (forward)
b = (back)
Fly to the coordinates (x,y,z) at the set speed (cm/s).
x: -500 – 500
y: -500 – 500
go x y z speed
z: -500 – 500
speed: 10-100 (cm/s)
x, y, and z cannot be between -20 and 20 at the same
time
stop
Stop moving and hover immediately.
Fly in a curve from (x1,y1,z1) to (x2,y2,z2) at the set
speed (cm/s).
If the radius of the curve is not within 0.5-10 meters,
the corresponding reminder will be returned.
curve x1 y1 z1 x2 y2
x1, x2: -500 – 500
z2 speed
y1, y2: -500 – 500
z1, z2: -500 – 500
speed: 10-60
x, y, and z cannot be between -20 and 20 at the same
time
Fly to the coordinate point (x, y, z) in the coordinate
system of the mission pad with the specified ID at the
set speed (m/s)(*Note 2).
x: -500 – 500
go x y z speed mid
y: -500 – 500
z: 0 – 500
speed: 10-100 (cm/s)
x, y, and z cannot be between -20 and 20 at the same
time
Fly in a curve from point (x1,y1,z1) to point (x2,y2,z2)
in the coordinate system of the mission pad with the
set mid at the set speed (cm/s).
If the radius of the curve is not within 0.5-10 meters,
curve x1 y1 z1 x2 y2 z2 speed mid
the corresponding reminder will be returned. x1, x2: -500 – 500 y1, y2: -500 – 500
z1, z2: 0 – 500
speed: 10-60
x, y, and z cannot be between -20 and 20 at the same
time
Tello flies to the point (x,y,z) in the mid1 coordinate
jump x y z speed yaw system and hovers. Then, it identifies the mission pad
mid1 mid2
of mid2 and rotates to the position (0,0,z) in the mid2
coordinate system to set the yaw value (z>0).
reboot
Reboot the drone.
ok / error ok/error + errorstatus ok / errorok/error + error statusNo response (success)/error
4 © 2021 Ryze Tech. All Rights Reserved.
Setting Commands
Command speed x rc a b c dwifi ssid pass mon moffmdirection xap ssid pass wifisetchannel xxxport info vedio setfps fps
Description
Possible Response
Set the current speed to x cm/s. x = 10-100
ok / error
Set the lever force values for the four channels of the
remote control.
a: roll (-100 to 100) b: pitch (-100 to 100)
No response
c: throttle (-100 to 100)
d: yaw (-100 to 100)
Change the Tello Wi-Fi password.
ssid: The new Wi-Fi account
pass: The new Wi-Fi password
OK, drone will
If an open-source controller is connected, ssid adds
reboot in 3s
the RMTT- prefix by default. Otherwise, it adds the
TELLO- prefix.
Enables mission pad.
By default, downward detection is enabled.
Disables mission pad detection.
X=0/1/2
0: downward detection enabled.
1: forward detection enabled.
2: both forward and downward detection enabled.
*Before use, you must use the mon command to
ok / error
enable the detection function. Downward detection is
enabled by default.
*When either forward-looking or downward-looking
detection is enabled alone, the detection frequency
is 20Hz. If both enabled, detection will be performed
alternatively, with a frequency of 10Hz in each
direction
Switch Tello to Station mode and connect to the AP. ssid: the Wi-Fi account to connect to pass: the Wi-Fi password
OK, drone will reboot in 3s
Set the -WiFi channel of the open-source controller.
xxx indicates the channel to be set. Note: To clear
the channel settings, you need to clear the Wi-Fi
information. Then, set a channel that complies with
local policies and regulations.
(Only applies to the open-source controller)
Set the ports for pushing status information and video streams. Here, info is the port for pushing status
ok / error
information, and vedio is the port for pushing video
information. The range of ports is 1025 to 65535.
Set the video stream frame rate. The fps parameter
specifies the frame rate, whose value can be “high”,
“middle”, or “low”, indicating 30fps, 15fps, and 5fps,
respectively.
5 © 2021 Ryze Tech. All Rights Reserved.
setbitrate bitratesetresolution resolution
Set the video stream bit rate. The bitrate parameter specifies the bit rate, with a value range is 0 to 5, indicating auto, 1Mbps, 2MBps, 3Mbps, 4Mbps, and5Mbps, respectively. Set the video stream resolution. The resolution parameter specifies the resolution, whose value can be “high” or “low”, indicating 720P and 480P,respectively.
ok / error
Read Commands
Command speed? battery? time? wifi? sdk? sn?hardware? wifiversion?ap?ssid?multiwifi ssid pass
Description
Possible Response
Get the current set speed (cm/s).
x x = (10-100)
Get the percentage (%) indicating the current battery
x
level.
x = (10-100)
Get the motor running time (s).
x
Get the Wi-Fi SNR.
SNR
Get the Tello SDK version number.
xx(>=20)
Get the Tello SN.
Production SN
Get whether TT is connected to an open-source
controller. If yes, it returns RMTT; if not, it returns
TELLO/RMTT
TELLO.
Query the -WiFi version of the open-source controller. (Only applies to the open-source controller)
wifivx.x.x.x
Get the name and password of the current router to be connected. (Only applies to the open-sourcecontroller)
Name and password of the router to be connected
In STA mode:
factory default SSID;
Get the current SSID of the drone. (Only applies to the open-source controller)
in AP mode: userdefined SSID and
password
Set the SSID and password of the open-source
controller. This feature supports connection to multiple
ok / error
devices as a router.
Open-source Controller->Tello CommandsTo program the open-source controller ESP32, sending “[TELLO] (space)”+ UDP->Tello command through a serial port can achieve the same effect as UDP->Tello command description. Note that all commands that the open-source controller ESP32 receives from TELLO contain the “ETT (space)” prefix and “rn” (line break) suffix.For example: Instruct the drone to take off via open-source controller ESP32. ESP32->Tello: “[TELLO] takeoff” Tello->ESP32: “ETT okrn”
6 © 2021 Ryze Tech. All Rights Reserved.
UDP->Open-source controller ESP32
*Only factory firmware is supported. To reset the factory firmware, see the User Manual.
Command
Description
Possible Response
Light up the top LED in the specified color. The r,
g, and b variables indicate the red, green, and blue
EXT led r g b
channels, respectively. r: 0-255
g: 0-255
b: 0-255 The top LED displays the pulse effect according to the
led ok/error
max pulse brightness (r, g, b) and pulse frequency t.
EXT led br t r g b
The cycle from dimmest to brightest to dimmest again is counted as one pulse.
r, g, b: 0~255
t: 0.1-2.5Hz
The top LED flashes alternately between color 1 (r1,
EXT led bl t a1 b1 c1 a2 b2 c2
g1, b1) and color (r2, g2, b2) according to the flash frequency t.a1 b1 c1 a2 b2 c2: 0~255
t: 0.1-10Hz
Light up the dot-matrix display with the specified
EXT mled g xxxxx
pattern.
xxxx: (*Note 3)
The dot-matrix display indicates the direction of
movement as a string.
EXT mled l/r/u/d r/b/ p t xxxx
l/r/u/d indicates left/right/up/down movement. r/b/p indicates the display color the string.t: 0.1-2.5Hz, indicating the frame rate of the image.
xxxx indicates the string to be displayed, which
cannot exceed 70 characters. The dot-matrix display indicates the direction of
mled ok/error
movement as an image.
EXT mled l/r/u/d g t
l/r/u/d indicates left/right/up/down movement.
xxxx
r/b/p indicates the display color the string.
t: 0.1-2.5Hz, indicating the frame rate of the image.
xxxx: (*Note 3)
Display static ASCII character or preset pattern.
EXT mled s r/b/p xxxx
r/b/p indicates the display color of the string.
xxxxx can only be “heart” or an ASCII character.
Set the dot-matrix display boot animation. The pattern
EXT mled sg xxxx
set will be displayed after every boot.
xxxx: (*Note 3)
EXT mled sc
Clear the set boot animation.
EXT mled sl n
Set the dot-matrix display brightness. n: 0~255
7 © 2021 Ryze Tech. All Rights Reserved.
EXT tof? EXT version?
Read the tof value.Read the firmware version of the open-source controller ESP32.
tof xxxx The unit of xxx is mm. It returns 8192 if the detection range is exceeded.esp32vx.x.x.x
Note 1: The Motor-On mode is a new low-speed rotation state of TT propellers. Entering Motor-On mode indicates that the TT is ready for takeoff. At this time, the TT heat dissipation feature can be used to avoid shutdown caused by excessive temperatures. You can execute the “motoron” command to enable Motor-On mode only when the drone is in static standby status. After the drone takes off, it automatically exits Motor-On mode.Note 2: m1-m8: the mission pad ID on the corresponding mission pad. m-1: the first mission pad identified by Tello’s internal algorithm m-2: the mission pad nearest to TelloNote 3: xxxx indicates a string consisting only of ‘r’, ‘b’, ‘p’, and ‘0’. ‘r’, ‘b’, ‘p’, and ‘0’ indicate red, blue, purple, and off, respectively. The max string length is 64. For example: rrrbb0ppp indicates that lights 0 to 3 are red, lights 4 to 5 are blue, light 6 is off, and lights 7 to 9 are purple. If the length is less than 64, the unspecified LEDs will be off.
Tello StateData type: StringExample”mid:%d;x:%d;y:%d;z:%d;mpry:%d,%d,%d;pitch:%d;roll:%d;yaw:%d;vgx:%d;vgy%d;v gz:% d;templ:%d;temph:%d;tof:%d;h:%d;bat:%d;baro:%f;rn”Description mid: the detected mission pad ID. If the mission pad detection function is not enabled, -2 is returned. If the detection function is enabled but no mission pad is detected, -1 is returned. x: the x-axis coordinate of the drone relative to the detected mission pad, in centimeters If the mission pad detection function is not enabled, -200 is returned. If the detection function is enabled but no mission pad is detected, -100 is returned. y: the y-axis coordinate of the drone relative to the detected mission pad, in centimeters If the mission pad detection function is not enabled, -200 is returned. If the detection function is enabled but no mission pad is detected, -100 is returned.
8 © 2021 Ryze Tech. All Rights Reserved.
z: the z-axis coordinate of the drone relative to the detected mission pad, in centimeters If the mission pad detection function is not enabled, -200 is returned. If the detection function is enabled but no mission pad is detected, -100 is returned.mpry: Pitch, yaw and roll angles (in degrees) of the drone in the mission pad. If no mission pad is detected, 0 is returned.pitch: Pitch angle (in degrees) roll: Roll angle (in degrees) yaw: Yaw (in degrees) vgx: X-axis speed (dm/s) vgy: Y-axis speed (dm/s) vgz: Z-axis speed (dm/s) templ: The minimum temperature of the main board (°C) temph: The maximum temperature of the main board (°C) tof: ToF distance (cm) h: Height relative to take-off point (cm) bat: Percentage of current remaining battery capacity baro: Height detected by barometer (m) time: Motor running time (s) agx: X-axis acceleration (cm/s2) agy: Y-axis acceleration (cm/s2) agz: X-axis acceleration (cm/s2)Mid Command RestrictionsCommands involving mid need to be used together with mission pads, and the go, curve, and jump commands can be used only when downward camera recognition is enabled. These commands include: mon moff mdirection x go x y z speed mid curve x1 y1 z1 x2 y2 z2 speed mid jump x y z speed yaw mid1 mid2 Mission pad instructions for use can be downloaded from the official website.9 © 2021 Ryze Tech. All Rights Reserved.
 report this ad
This content is subject to change. Download the latest version from www.dji.com/robomaster-tt/downloadsCopyright © 2021 Ryze Tech. All Rights Reserved.
References
[xyz-ips snippet=”download-snippet”]