
dji Flight

Disclaimer
Read this disclaimer and the Privacy Policy and User Agreement in OJI Flight Simulator (hereinafter referred to as “product”) carefully before using. By using this product, you acknowledge that you have read in full, and agreed to this disclaimer, the Privacy Policy and User Agreement. Please install and use this product in strict accordance with the User Manual. SZ OJI TECHNOLOGY CO., LTD. and its affiliated companies assume no liability for damage(s) or injuries incurred directly or indirectly from using this product improperly.
DJI™ is a trademark of SZ OJI TECHNOLOGY CO., LTD. (abbreviated as “DJI”) and its affiliated companies. Names of products, brands, etc., appearing in this manual are trademarks or registered trademarks of their respective owner companies. This product and manual are copyrighted by DJI with all rights reserved. No part of this product or manual shall be reproduced in any form without the prior written consent of or authorization from DJI.
Product Profile
Introduction
The OJI Flight Simulator is a professional pilot training software for the enterprise. Adapting DJI’s leading flight control technology for simulation to simulate the aircraft models and scenarios, the Flight Simulator recreates the natural flying experience and provides enterprise users with a complete training solution, including basic skills training, free flight, and application training. The Flight Simulator is Windows-based, and is compatible with many DJI remote controllers*. It is also available to operate in the software with the keyboard.
|
Versions
Currently, the Flight Simulator has three versions. Free Trial version, Enterprise version, and Energy version. Details on how to access the three versions and the functions included (modules and aircraft) will be explained below.
Free Trial VersionHow to AccessVisit the product page on the official DJI website to download the installation file. Refer to the following text for installation and launching.
* Support for more DJI remote controllers will be available as testing and development continues. Visit the DJI Flight Simulator product page on dji.com for the most up-to-date list. http://www.dji.com/simulator
Functions
- ModulesFree Flight Module: Includes Free Flight-City, Free Flight-Island, and Free Flight-Hangar.Entertainment Module: Includes Time Trial and Tunnel Run.
- Aircraft SupportedMavic 2 Pro, Mavic 2 Zoom, Mavic Air, Mavic Pro, Spark, Phantom 4 Pro, and Inspire 1 Pro.
Enterprise Version / Energy VersionHow to Access
Visit the product page on the official DJI website and input your information at the bottom, and then wait for a DJI authorized dealer to contact with you. You will receive an activation code after successful purchase. Refer to the following text for installation and launching.
Functions
- ModulesSkills Training Module: Includes Tutorials, Hovering Test, Fly Track Test, UTC Pylon Inspection TestProcess, and OJI Internal Aircraft Skill Test Process.Free Flight Module: Includes Free Flight-City, Free Flight-Island, Free Flight-Hangar, Free Flight Mountain, and Free Flight-Forest.Entertainment Module: Includes Time Trial and Tunnel Run.Application Training Module: Enterprise version includes Search and Rescue only. Energy version includes Power Line Inspection, and Search and Rescue.
- Aircraft SupportedMavic 2 Pro, Mavic 2 Enterprise, Mavic 2 Zoom, Mavic Air, Mavic Pro, Spark, Phantom 4 Pro, and Inspire 1 Pro, Inspire 2, Matrice 210 RTK.
Instructions on Installation
System Requirements
A computer with a Windows 10 operating system is required to run the Flight Simulator. Your computer should meet certain hardware requirements for optimal use of the functions in the Flight Simulator.
| Hardware | Hardware Requirements | Recommendations | Optimum |
| CPU | G4560 | i5-6400 | I7-7700 |
| GPU | GeForce GTX 1050 Ti | GeForce GTX 1060 or 1070 | GeForce GTX 1080 Ti |
| VRAM | 4GB | 6GB or 8GB | 11GB |
| RAM | 16GB | 16GB | 32GB |
| HOD | 80GB Free | SSD+B0GB Free | SSD+B0GB Free |
Instructions
- Visit the product page on the official DJI website to download the .exe file of the Launcher.
- Run the .exe file, and install the Launcher and drivers accordingly.
- Launch the Launcher and log in with your DJI account or register for a new account.
- After logging in, Enterprise version or Energy version users can enter the activation code they received when purchasing, to finish activation.Click Free Trial to select the Free Trial version.
- Now, the Installation page should show up. To the right of the INSTALL button, click to change the installation location. Click INSTALL and the Flight Simulator installation package download and installation will start automatically
 The installation package is large. Make sure there is enough space in the disk chosen.
- Updates will be prompted on this page when they become available. Click the corresponding button to update.
- Installation is complete. Click START to enter the Flight Simulator.Before entering it, users can configure settings and view information. Refer to the Interface section below for details.
- The instructions above apply to first-time use only. After installation, users can launch the Launcher and click START.
 The installation package is large. Make sure there is enough space in the disk chosen.
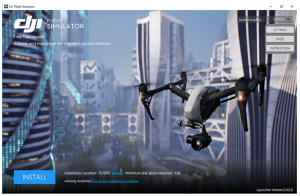
Connect the Remote Controller
Connect the DJI remote controller to the computer using a Micro USS cable. Power on the remote controller and it will be ready for use in the Flight Simulator.
Login Screen
This is the page that the Launcher leads to. Log in/out, configure settings, and view FAQ and instructions on this page with a mouse.
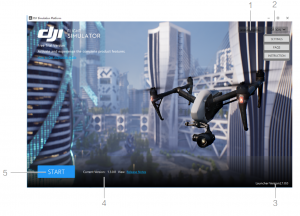
- Log In/OutClick to log in with a OJI account or log out of the current account.
- OptionClick to show the drop-down menu for settings, FAQ and operation instructions.Settings: language, video quality, resolution I display mode and stick mode.FAQs: Click to view frequently asked questions.Instruction: Click to view instructions for the remote controller and keyboard, as well as aircraft control in different stick modes. It is recommended to go through these instructions to ensure the best experience.
- Launcher VersionShows the version of the Launcher in use.
- Flight Simulator VersionShows the version of the Flight Simulator in use and the link to release notes.There will be a prompt when a new version becomes available.
- STARTClick to enter the Main Screen of the Flight Simulator.
Main Screen
Only the remote controller and keyboard can be used in the Main Screen and its sub-screens. A mouse can be used only in some specific scenarios.
| Action | Remote Controller Commands | Keyboard Commands |
| Switch between options | Push the left stick up/down/left/right | W/S/ ND |
| Confirm | C2 Button | Enter |
| Back | C 1 Button | Backspace |
- Modules
- Modules
- Modules
- ModulesSkills Training, Free Flight, Entertainment and Application Training. Enter the module and select an aircraft model. Refer to the following sections for details on each module.
- GalleryView the photos captured and videos recorded during the simulated flight.
- SettingsEnter the menu for general settings, remote controller and keyboard, and advanced settings.General Settings: languages, video quality, resolution, screen settings, maximum frame rate, sound effects and background music volume.Remote Controller and Keyboard: To view instructions for the remote controller and keyboard and the aircraft control methods in different stick modes.Advanced Settings: EXP settings, sensitivity, and gain values.
- AboutView terms and conditions, and information on the team behind the Flight Simulator.
- ExitClose the software.
- CommandsPossible commands based on the control tool in use (remote controller or keyboard)
Aircraft Models
Select an aircraft to use in training modules.

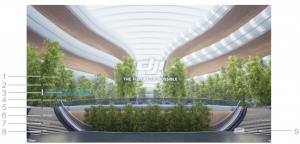
Display
The lower left section shows the basic features of the aircraft, the upper right section shows the specifications, and the bottom section shows the commands available. Use the remote controller or keyboard to switch between different sections and POVs.
Commands
| Action | Remote Controller Commands | Keyboard Commands |
| Switch between options | Push the left stick up/down/left/right | A/D |
| View features | Push the left st ick up/down | W/S |
| Adjust POV | Push the right stick in any direction | 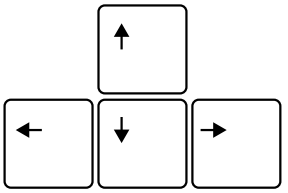 |
| Switch between accessories* | Push the right stick in any direction | Space |
* For the Mavic 2 Enterprise only. There are three accessories: Spotlight, Beacon, and Speaker.
Remote Controller and Keyboard Commands
Use the remote controller or keyboard to operate the aircraft or change settings in the modules. See detailed instructions below. These instructions can also be viewed in the Login Screen (Option > Instruction) or the Main Screen (Settings> Remote Controller and Keyboard)
DJI Lightbridge Remote Controller
The DJI Lightbridge remote controller model will be used in the Flight Simulator when connecting one of these remote controllers: Phantom 4 Advanced, Phantom 4 Pro, Phantom 4 Pro V2.0, Matrice 600, Matrice 600 Pro, and Lightbridge 2.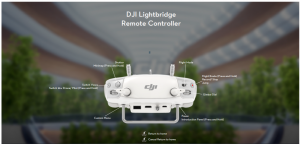
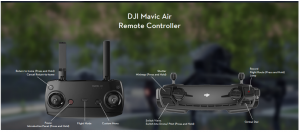
DJI Mavic Air Remote Controller
DJI Smart Controller

Keyboard

Control Stick
Mode 1
Mode 2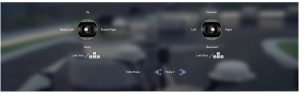
Mode 3
Training Modules
This section introduces all the modules and their corresponding modes and levels. More actions are available in some specific scenarios or with specific aircraft. Refer to the Additional Functions section for details.
Skills Training Module
Select Skills Training in the Main Screen, and then select an aircraft to select a training. Skills Training includes Tutorials, Hovering Test, Fly Track Test, UTC Pylon Inspection Test Process, and DJI Internal Aircraft Skill Test Process. See details below.
TutorialsLearn the basics of piloting an aircraft.There are three levels: Basic Flight Skills, Shooting Skills, and Flight Mode.
Hovering TestThe hovering test provides a series of virtual testing conditions to assist you in testing and improving the hovering skills.There are seven levels: Single Target, Multiple Targets, Fixed Orientation Hovering, Four Directions Hovering, Single Target with Wind, Multiple Targets with Wind, and Four Directions Hovering with Wind.The difficulty gradually increases with each level, also incorporating the effect of wind.
Fly Track TestThis test is to check your control skills over the aircraft. You will be required to fly along the designated route in A-mode.There are eight levels: Square Track(Overhead View), Square Track, Rectangle Track(Overhead View), Rectangle Track, Ring Track(Overhead View), Ring Track, Double Ring Track(Overhead View), and Double Ring Track. The difficulty gradually increases with each level. The system will display the aircraft’s actual flight route and compare it with the pre-set, standard flight route to calculate a score. In this exercise, users have to overcome parallax, which also exists in real flight
UTC Pylon Inspection Test ProcessA series of scenarios designed for UTC pylon inspection test.There are six levels: Preparation, Route Test, Hovering Test, Multi-dimensional Operation Test, BVR Operation Test, and End of Operation.
DJI Internal Aircraft Skill Test ProcessA series of scenarios designed for DJI internal aircraft skill test.There are five levels: Preparation, Takeoff and Landing Test, Rectangle Track Test, Ring Track Test, Hovering Test, and End of Operation.
Free Flight Module
Select Free Flight in the Main Screen, and then select an aircraft to select a scenario. Free Flight includes Free Flight-City, Free Flight-Island, Free Flight-Hangar, Free Flight-Mountain, and Free Flight-Forest. See details below.
Free Flight-CityFly in the city without limitation.Take off from five unique locations in the five levels. Tutorials can be found in Level 1.
Free Flight-IslandEnjoy the beautiful scenery of the island.Take off from four unique locations in the four levels. Tutorials can be found in Level 1.
Free Flight-HangarExperience and practice in the hangar location.There is only one level. A tutorial can be found at the beginning.
Free Flight-MountainFly in mountain ranges to enjoy the stunning scenery.There are three levels. Tutorials can be found in Level 1.
Free Flight-ForestFly in a lush green forest.There are three levels. Tutorials can be found in Level 1.
Entertainment Module
Select Entertainment in the Main Screen, and then select an aircraft to select a mode. Entertainment includes Time Trial and Tunnel Run. See details below.
Time TrialFly along designated flight paths and fly through every check point. Complete the course as fast as possible to score the most points.There are three levels with increasing difficulty.
Tunnel RunPass through energy rings to get points and gain more time. Fly faster to rank higher.There is only one level.
Application Training Module
Select Application Training in the Main Screen, and then select an aircraft to select a training scenario.Application Training includes Power Line Inspection and Search and Rescue. See details below.
Power Line InspectionSimulate a power line inspection.There are two levels: Getting to Know the Pylon, and Inspection Practice.
Search and RescueUnderstand and practice searching process in this forest location, and get prepared for the real SAR mission.There is only one part: Searching for a male hiker lost in the forest.
Additional Functions
More actions are available in some specific scenarios or with specific aircraft. Unless otherwise specified, the descriptions below apply to all the modules.
Switch POVs
In Free Flight or Application Training modules, there are five POVs: Drone Follow View, Drone FPV, Pilot FPV, Remote Control View, and 3rd Person View. In tests, only some views are available to simulate the real tests.
Drone Follow ViewThe video camera of the Flight Simulator is behind the aircraft to follow its movements. Users cannot adjust the heading of the video camera.Object controlled: AircraftTarget in view: AircraftSwitch to this POV: Press the button on the upper right corner of the remote controller or the C key on the keyboard.
Drone FPVDrone FPV is what the aircraft camera sees. Real-time footage from the aircraft camera is displayed along with the app screen. The app screen is a near-duplicate of DJI applications such as DJI GO 4.Users can view the status display on the screen, the only adjustable settings are camera settings. Refer to the corresponding aircraft user manual for app display descriptions.Object controlled: AircraftSource of the view: AircraftSwitch to this POV: Press the button on the upper right corner of the remote controller or the C key on the keyboard.
Pilot FPVPilot FPV is the pilot’s perspective looking at the aircraft. It is similar to the perspective when operating the aircraft in the real world.Object controlled: AircraftSource of the view: PilotTarget in view: AircraftSwitch to this POV: Press the button on the upper right corner of the remote controller or the C key on the keyboard.
Remote Control ViewRemote Control View is the view looking at the handheld remote controller from the pilot’s perspective.Object controlled: AircraftSource of the view: PilotTarget in view: Remote ControllerSwitch to this POV: Press the button on the upper right corner of the remote controller or the C key on the keyboard.In this POV, the display is the mobile device with the app screen on it. The app screen is a near duplicate of DJI applications such as DJI GO 4. Users can view the status display on the screen, the only adjustable settings are camera settings. Refer to the corresponding aircraft user manual for app display descriptions.
3rd Person View3rd Person View looks at the pilot from the 3rd person’s perspective.Object controlled: Pilot Source of the view: The 3rd person Target in view: PilotSwitch to this POV: Press and hold the button on the upper right corner of the remote controller, or press J key on the keyboard.In this POV, the pilot is being controlled. Users can control his position to simulate a change in the pilot’s movement in real life.
| Action | Remote Controller Commands | Keyboard Commands |
| Forward | Push left stick up | W |
| Backward | Push left stick down | S |
| Left | Push left stick left | A |
| Right | Push left stick right | D |
| Jump | Video Recording button | Space |
Custom Settings
The Free Flight module allows users to set custom parameters to gain feedback and train more efficiently. Here are the instructions:
- In any level in the Free Flight module, press the C2 button on the remote controller or the Enter key on the keyboard, and the custom settings menu will appear on the right screen.
- Use the mouse to adjust parameters for control, difficulty, and environment.
- Click Reset to reset all the parameters to default settings. Click Save to save the current settings.
Camera Settings
In Drone FPV or Remote Control View, use the mouse to click ![]() on the right screen of the app to enter the camera settings menu to show or hide the grid.
on the right screen of the app to enter the camera settings menu to show or hide the grid.
Using the Zenmuse Z30 Payload
The Zenmuse Z30 features 30x optical zoom and 6x digital zoom. When using the Matrice 210 RTK aircraft in Drone FPV or Remote Control View, use the mouse to zoom in.
TapZoom
Left click in the blue dotted area on the center of the screen and an icon will show up along with the image 3x zoomed-in. Click again to zoom in further. Each click zooms 3x. Clicks outside of the dotted area will not zoom.If the aircraft position is changed manually during TapZoom, the image will go back to the original magnification.
Manual Zoom
Click the Zoom icon in the upper right corner to pull out the menu. Click T to zoom in. Click W to zoom out. The magnification is shown on the T/W bar. Click R to reset the magnification to 1x.
Pause Mission
In any module, press the C1 button on the remote controller or the P key on the keyboard to pause the mission and enter the Pause screen. Select an option from the menu.Continue: go back to the level and continue.Restart: restart the same level.Select Level: go to the level selection page to select level.Return to Main Menu: go back to the Main Screen.Gallery, Settings: The same as the one in the Main Screen.
Aircraft Functions
Flight ModesThere are three flight modes in the Flight Simulator, P-mode, A-mode, and S mode. Use the Flight Mode toggle on the remote controller or the V key on the keyboard to switch between the modes.P-mode (Positioning): The aircraft uses GNSS or Vision Positioning System for positioning. It allows the aircraft to hover precisely and brake automatically.A-mode (Attitude): Neither the GNSS nor Vision Positioning System is used for positioning. The aircraft can only maintain attitude. It is significantly more difficult to control the aircraft in this mode.S-mode (Sport): The aircraft uses GNSS or Vision Positioning System for positioning. It allows the aircraft to hover precisely and brake automatically. The aircraft flies at a high speed. Operate with caution.
Collision FeedbackThe aircraft will crash in the simulation when it collides with objects such as buildings and trees. Two kinds of feedback will be given: the aircraft location will be reset or the mission fails. Users can continue the mission after the reset or restart after failing.
Return to Home (RTH)There three types of RTH: Smart RTH, Low Battery RTH, and Failsafe RTH.
Smart RTHEnter RTH: Press and hold the RTH button on the remote controller or press the O key on the keyboard and then confirm to enter RTH. The aircraft will automatically return to the takeoff point. Aircraft controlis unavailable during RTH.Cancel RTH: Press the RTH button on the remote controller or the O key on the keyboard and then confirm to cancel RTH. The aircraft will hover in place, and the user will regain control.
Low Battery RTHEnter RTH: Low Battery RTH is triggered when the battery is depleted to a point that may affect the safe return of the aircraft. The aircraft will automatically return to the takeoff point. Aircraft control is unavailable during RTH.Cancel RTH: Press the RTH button on the remote controller or the O key on the keyboard and then confirm to cancel RTH. The aircraft will hover in place, and the user will regain control.After cancelling Low Battery RTH, the aircraft will land automatically when the battery level drops to 10%.
Failsafe RTHEnter RTH: Failsafe RTH will be automatically activated if the remote controller signal is lost. The aircraft will automatically return to the takeoff point.Cancel RTH: During Failsafe RTH, if the lost remote controller signal is found, press the RTH button on the remote controller or the O key on the keyboard and then confirm to cancel RTH. The aircraft will hover in place, and the user will regain control.
Image Capture and Video RecordingIn Drone FPV or Remote Control View, use the remote controller or keyboard to take photos and record videos. View the photos and videos in Gallery in the Main Screen or Pause View.
| Action | Remote Controller Commands | Keyboard Commands |
| Take photograph | Shutter button | H |
| Start/stop recording video | Video Recording button | L |
Flight Altitude LimitFlight altitude limit restricts the aircraft altitude. The aircraft cannot ascend after reaching the maximum flight altitude (500 meters). All controls will function normally once the aircraft returns to altitudes below the limit.
Signal Interference
In some scenarios, there will be random interferences that may impact the imaging or the controls. This is designed to help users train their emergency response abilities. The image display might be blurred or go dark completely. There might also be a latency in the control latency or signal interruption.
Display
MinimapIn the Drone Follow View or Pilot FPV, the thumbnail of the location of the drone will show up as a Minimap at the lower right corner of the screen. The Minimap can be used in all the scenarios except in the Tutorials mode in the Skills Training module and in the Entertainment module.Press and hold the Shutter button on the remote controller or press the M key on the keyboard to open or close the Minimap display. The takeoff point and flight path will be shown in the Minimap.
Flight RouteThis function lets users to see the flight route in the air.Press and hold the Video Recording button on the remote controller or the Space key on the keyboard to show or hide the flight route.
DJI Supporthttp://www.dji.com/support
This content is subject to change.Download the latest version fromhttp://www.dji.com/simulatorIf you have any questions about this document, please contact DJIby sending a message to [email protected].DJI is a trademark of DJI.Copyright © 2020 DJI All Rights Reserved.
References
[xyz-ips snippet=”download-snippet”]