![]()
DJI FORCE PROUser Guidev1.0 2020.04

Disclaimer and Warning
Congratulations on purchasing your new DJI OSMO™ product. The information in this document affects your safety and your legal rights and responsibilities. Read this entire document carefully to ensure proper configuration before use. Failure to read and follow instructions and warnings in this document may result in serious injury to yourself or others, damage to your DJI OSMO product, or damage to other objects in the vicinity. This document and all other collateral documents are subject to change at the sole discretion of DJI OSMO.By using this product, you hereby signify that you have read this disclaimer and warning carefully and that you understand and agree to abide by the terms and conditions herein. You agree that you are solely responsible for your own conduct while using this product, and for any consequences thereof. You agree to use this product only for purposes that are proper and in accordance with all applicable laws, rules, and regulations, and all terms, precautions, practices, policies, and guidelines DJI OSMO has made and may make available.DJI OSMO accepts no liability for damage, injury, or any legal responsibility incurred directly or indirectly from the use of this product. The user shall observe safe and lawful practices including, but not limited to, those set forth in this document.Notwithstanding above, your statutory rights under applicable national legislation are not affected by this disclaimer.
OSMO is a trademark of SZ DJI OSMO TECHNOLOGY CO., LTD. (abbreviated as “DJI OSMO”) and its affiliated companies. Names of products, brands, etc., appearing in this document are trademarks or registered trademarks of their respective owner companies. This product and document are copyrighted by DJI OSMO with all rights reserved. No part of this product or document shall be reproduced in any form without prior written consent of or authorization from DJI OSMO.
In the Box
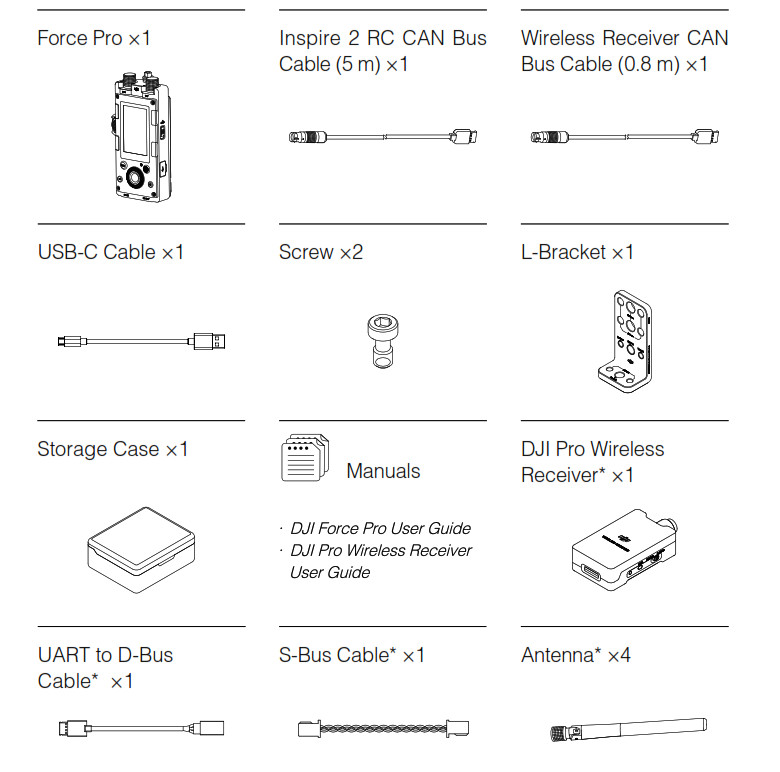
* Items are included in the DJI Pro Wireless Receiver’s package.
![]() · DO NOT mix up the Inspire 2 RC CAN Bus cable and Wireless Receiver CAN-Bus cable, otherwise, it may damage the device.· The storage case can be placed in the Ronin 2 ‘s Water Tight Protective Case.
· DO NOT mix up the Inspire 2 RC CAN Bus cable and Wireless Receiver CAN-Bus cable, otherwise, it may damage the device.· The storage case can be placed in the Ronin 2 ‘s Water Tight Protective Case.
Introduction
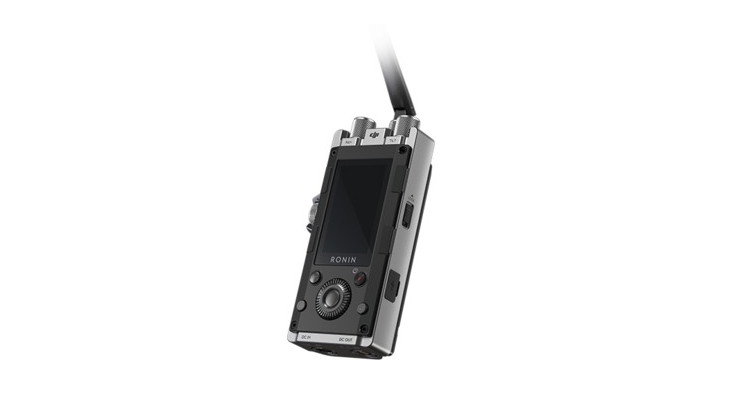
Employing industry-leading communication technologies and control algorithms, the DJI Force Pro is a camera movement control system that allows operators to control gimbals remotely with high accuracy. By precisely synchronizing operator movement with camera movement, the Force Pro allows operators to masterfully capture complicated shots more intuitively than ever.Used with the DJI wireless receiver, Force Pro’s dual-frequency 2.4 GHz and 5.8 GHz wireless transmission system delivers a control distance of up to 3 km (unobstructed and free of interference). It also supports a wired connection, which eliminates interference with other equipment on a film set.
The screen and dedicated buttons make it easy to set up parameters on the Force Pro and gimbal. Featuring a 4730 mAh battery that offers up to 5 hours of continuous operation, the Force Pro has enough power for an entire shoot.The Force Pro is currently compatible with RONINTM 2 and Ronin-S, with support for more devices coming soon. It can be mounted on a tripod or used handheld with the adapter.
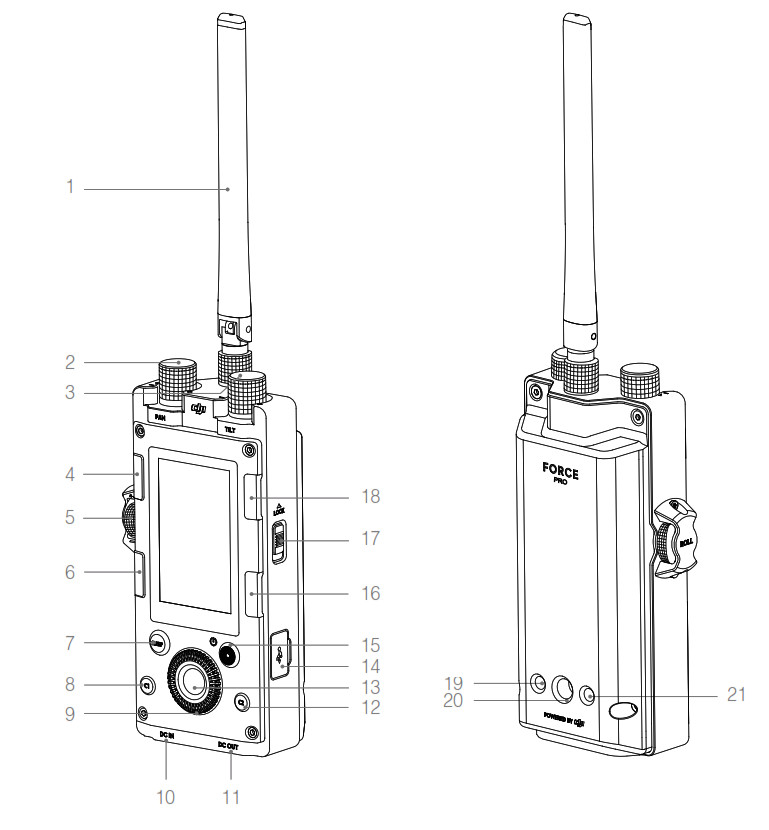
- AntennaRelays control signals. Do not obstruct the antenna.
- Pan Axis Speed Control KnobTurn this to adjust the maximum speed of the pan axis. Set the value to 65 for a 1:1 movement ratio between the gimbal and Force Pro.
- Tilt Axis Speed Control KnobTurn this to adjust the maximum speed of the tilt axis. Set the value to 65 for a 1:1 movement ratio between the gimbal and Force Pro.
- Mounting ModePress this button to select a gimbal mounting mode.
- Roll Axis Speed Control KnobTurn this to adjust the maximum speed of the roll axis. Set the value to 65 for a 1:1 movement ratio between the gimbal and Force Pro.
- Back ButtonPress once to return to the previous menu.
- Sleep ButtonPress and hold the button to enable and disable gimbal sleep mode. The Force Pro is unable to control the gimbal while in sleep mode.
- C1 ButtonCustomizable button.
- Jog WheelRotate to select options.
- DC IN PortSupports 9-26 V DC input with communication functionality. The DJI Force Pro can be powered by other power sources through this port.
- DC OUT PortSupports 5 V DC output with communication functionality.
- C2 ButtonCustomizable button.
- OK, ButtonPress once to confirm an option.
- USB-C PortFor charging and updating the firmware of the Force Pro.
- Power/Record ButtonPress to turn on/off the Force Pro (press and hold for eight seconds to turn it off mandatorily). Press once to check the battery level when powered off. Press once to start/stop recording video when powered on.
- Toggle ButtonPress once to toggle between the submenus.
- Lock ButtonLock the Force Pro to avoid accidental operation.
- Follow Mode ButtonSelects Follow mode.
- Mounting Hole 11/4″-20 thread with a 10 mm depth.
- Mounting Hole 23/8″-16 thread with a 10 mm depth.
- Mounting Hole 31/4″-20 thread with a 10 mm depth.
Installation
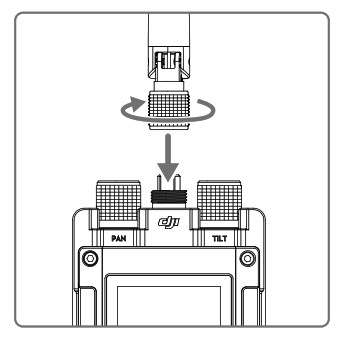
Attach the antenna to the Force Pro and then tighten the securing knob.
The Force Pro can be used handheld or mounted on a tripod with the provided adapter. First, attach the adapter using the provided screws and tighten it.
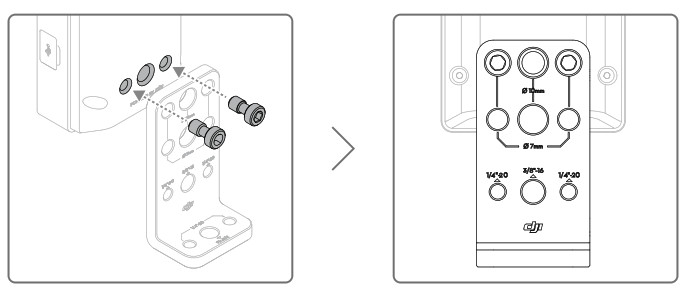
Then attach the Force Pro to the handle as shown. A Ronin 2 monitor adapter (sold separately) is needed during installation.
 Mounting the DJI Force Pro on a tripod.
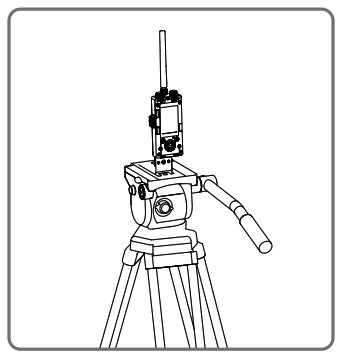
![]() Keep the DJI Force Pro and its antenna vertical during usage to obtain the optimal performance.
Keep the DJI Force Pro and its antenna vertical during usage to obtain the optimal performance.
The Force Pro must be used with a DJI Pro wireless receiver, please refer to the DJI Pro Wireless Receiver User Guide for details.
Activation
Press and hold the power button to turn on the Force Pro. Activation is required when using it for the first time.Download the DJI Pro Assistant for Ronin software, and then connect the Force Pro to your computer. Launch DJI Pro Assistant for Ronin and follow the onscreen instructions to activate your Force Pro.
Linking
The Force Pro supports both wireless and wired connections. Linking is required when using a wireless connection:
- Go to the gimbal settings page on the Force Pro and go to “Settings->General-> Linking;”
- Press and hold the link button on the DJI Pro Wireless Receiver for two seconds to initiate the linking procedure.
Using the DJI Pro Wireless Receiver is recommended for optimal performance.You can also connect a Force Pro to Ronin 2 using Ronin 2’s linking procedures.For the wired connection, connect the DC OUT port on the Force Pro to Ronin 2 using Ronin 2 CAN Bus Control Cable (30 m, sold separately).
Settings
These settings are based on using the Force Pro with Ronin 2.
Main UI Settings
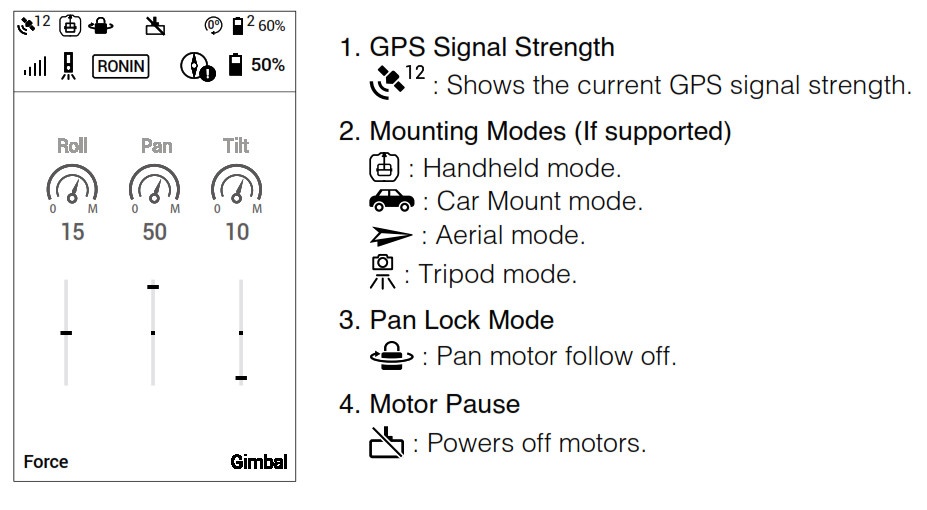
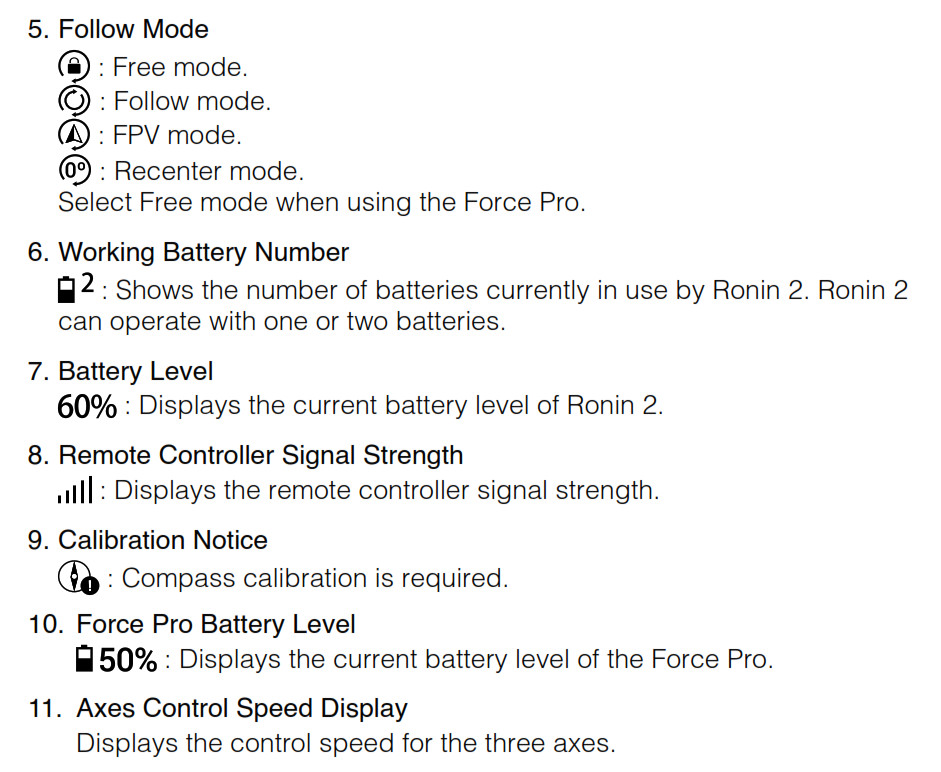
Force Pro Settings
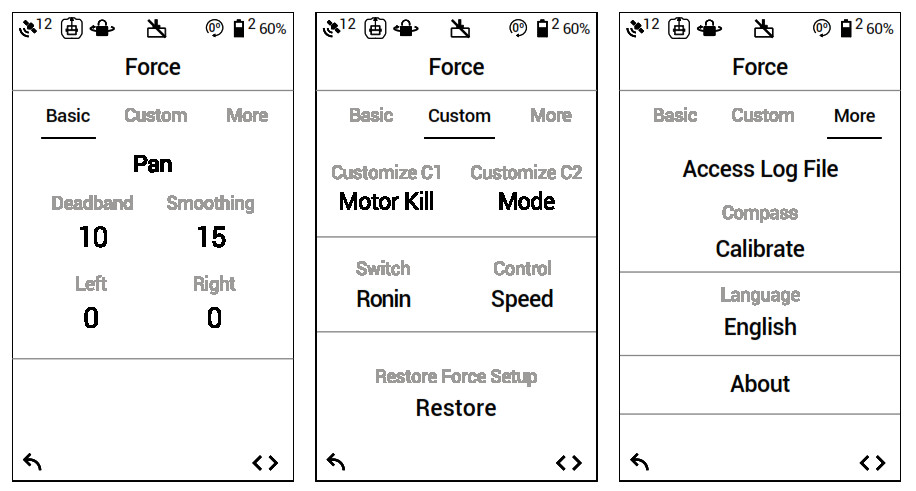
BasicThe Deadband, Smoothing, and Endpoints settings for the pan, roll, and tilt axes can be independently adjusted. The default endpoint settings for pan axis are set to 180°, which means there is no endpoint for the pan axis, allowing it to rotate 360° continuously.
CustomCustomized functions for the C1 and C2 buttons: Includes Pause, Recenter, Ronin 2 Pause, and Control mode options.
Control Mode: Includes Speed and Position Control modes.In Speed mode, turn the Speed Control knob to adjust the movement ratio between the gimbal and Force Pro. Increase the Smoothing to make the gimbal’s translated movement smoother and slower. Adjust the Deadband to adjust the gimbal’s response sensitivity.
In Position mode, the movement ratio between the gimbal and Force Pro remains 1:1. Turn the Speed Control knob to adjust the gimbal’s response sensitivity. In Position mode, the Speed Control knob is the only factor that will affect the gimbal movement.
Restore force setup: Restores the Force Pro to its default settings.
MoreAccess log file: Internal storage is built into the Force Pro for recording data. If the gimbal is acting abnormally, contact DJI Support. If the provided solutions are not successful, DJI Support will request log files for further analysis. Access log files only when instructed to do so by a DJI support specialist.
Compass Calibration: If errors occur with the compass, select “Calibrate” and then follow the onscreen instructions to calibrate the compass.Language: Languages can be switched between English and Chinese.About: Displays the SN number and the firmware version of your Force Pro.
Gimbal Settings
Motor
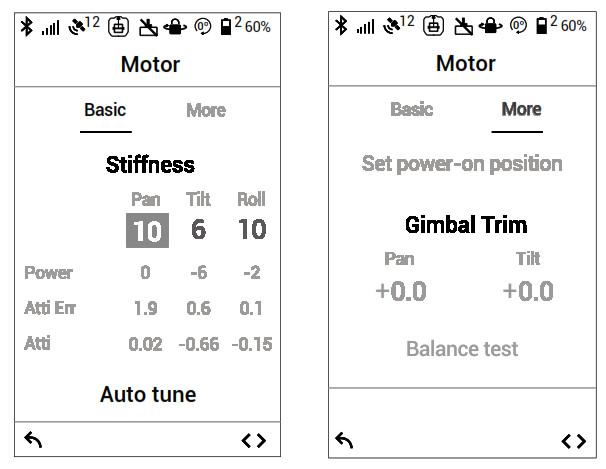
Basic: The Autotune, Stiffness, Strength, Filter, and Control values for the tilt, roll, and pan axes can be set independently. Refer to the Ronin 2 user manual for details.More: Set power-on position, fine-tune the pan or tilt axis, and test the balance for three axes.
SmoothTrack
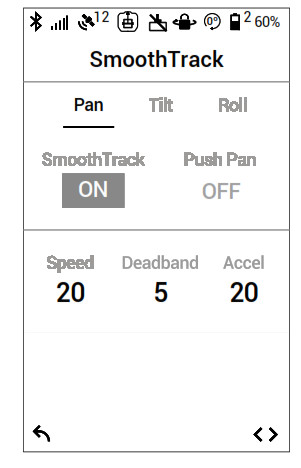
Settings for the pan, roll, and tilt axes can be set independently.
Monitor
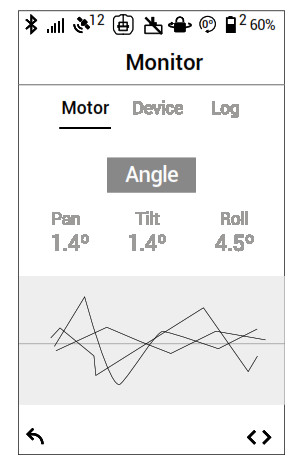
Motor: Displays the power, angle, and temperature of the motors.Device: Displays the connection status with other devices.Log: Displays any abnormal status information of the gimbal.
System Settings
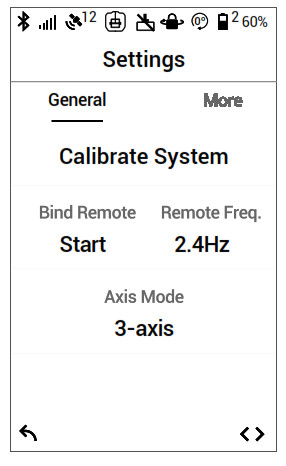
General: Includes the Calibrate System, Binding, operating Wi-Fi frequencies, and gimbal working modes.Profile: Custom motor configurations can be saved or reset to default settings.Camera PageControl camera recording and various other supported settings when a camera control cable is attached.
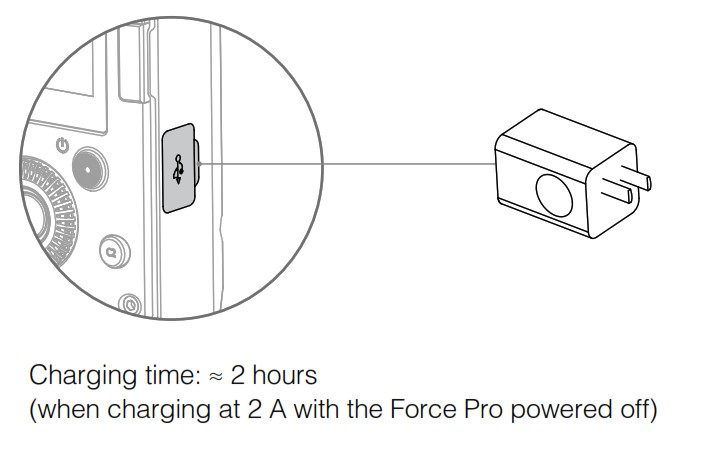
Charging
Use the provided USB-C cable to charge the Force Pro using a USB charger (not provided).Connect the DC IN port during usage to power the Force Pro.Connect the DC OUT port to use the Force Pro to power the connected device.
 Updating Firmware
 Updating Firmware
Connect the USB-C port on the Force Pro and the DJI Pro Assistant for Ronin and follow the onscreen instructions to update the firmware.
Specifications
| Power Consumption | 3 W |
| Voltage | 3.85 V |
| Battery Capacity/Energy | 4730 mAh/18.21 Wh |
| Operating Temperature | -4° to 104° F (-20° to 40° C) |
| Charging Temperature | 32° to 95° F (0° to 35° C) |
| Operating Time | 5 hours |
| Charging Current | 2 A |
| Charging Time | 2 hours |
| DC IN | 9-26 V |
| DC OUT | 5 V/1 A |
![]() Currently, the Force Pro can be used to control the three axes movements of the Ronin-S and set the parameters of SmoothTrack and motor. Other features are not available.
Currently, the Force Pro can be used to control the three axes movements of the Ronin-S and set the parameters of SmoothTrack and motor. Other features are not available.
This content is subject to change.Download the latest version from https://www.dji.com/force-pro
RONIN is a trademark of DJI OSMO.Copyright © 2020 DJI OSMO All Rights Reserved.
Compliance Information
FCC Compliance NoticeThis device complies with Part 15 of the FCC Rules. Operation is subject to the following two conditions: (1) This device may not cause harmful interference, and (2) This device must accept any interference received, including interference that may cause undesired operation.
Any changes or modifications not expressly approved by the party responsible for compliance could void the user’s authority to operate the equipment.
This equipment has been tested and found to comply with the limits for a Class B digital device, pursuant to part 15 of the FCC Rules. These limits are designed to provide reasonable protection against harmful interference in a residential installation. This equipment generates, uses, and can radiate radio frequency energy and, if not installed and used in accordance with the instructions, may cause harmful interference to radio communications. However, there is no guarantee that interference will not occur in a particular installation. If this equipment does cause harmful interference to radio or television reception, which can be determined by turning the equipment off and on, the user is encouraged to try to correct the interference by one or more of the following measures:— Reorient or relocate the receiving antenna.— Increase the separation between the equipment and receiver.— Connect the equipment into an outlet on a circuit different from that to which the receiver is connected.— Consult the dealer or an experienced radio/TV technician for help.
RF Exposure InformationThis equipment complies with FCC radiation exposure limits set forth for an uncontrolled environment. In order to avoid the possibility of exceeding the FCC radio frequency exposure limits, this transmitter must not be co-located or operating in conjunction with any other antenna or transmitter.
IC RSS WarningThis device complies with Industry Canada licence-exempt RSS standard (s). Operation is subject to the following two conditions: (1) this device may not cause interference, and (2) this device must accept any interference, including interference that may cause undesired operation of the device.
IC Radiation Exposure Statement:This equipment complies with IC RF radiation exposure limits set forth for an uncontrolled environment. This transmitter must not be co-located or operating in conjunction with any other antenna or transmitter. Any changes or modifications not expressly approved by the party responsible for compliance could void the user’s authority to operate the equipment.
EU Compliance Statement: SZ DJI Osmo Technology Co., Ltd. hereby declares that this device is in compliance with the essential requirements and other relevant provisions of the Directive 2014/53/EU.
A copy of the EU Declaration of Conformity is available online at www.dji.com/eurocomplianceEU contact address: DJI GmbH, Industriestrasse 12, 97618, Niederlauer, Germany
EU-verklaring van overeenstemming: SZ DJI Osmo Technology Co., Ltd. verklaart hierbij dat dit apparaat voldoet aan de essentiële vereisten en andere relevante bepalingen van Richtlijn 2014/53/EU.De EU-verklaring van overeenstemming is online beschikbaar op www.dji.com/eurocomplianceContactadres EU: DJI GmbH, Industriestrasse 12, 97618, Niederlauer, Germany
CAUTION: RISK OF EXPLOSION IF BATTERY IS REPLACED BY AN INCORRECT TYPE. DISPOSE OF USED BATTERIES ACCORDING TO THE INSTRUCTIONSEnvironmentally-friendly disposalOld electrical appliances must not be disposed of together with the residual waste, but have to be disposed of separately. The disposal at the communal collecting point via private persons is for free. The owner of old appliances is responsible to bring the appliances to these collecting points or to similar collection points. With this little personal effort, you contribute to recycling valuable raw materials and the treatment of toxic substances.Thailand Warning message.
DJI Support DJIhttp://www.dji.com/support
If you have any questions about this document, please contact DJI by sending a message to [email protected]. [email protected]YC.BZ.SS000625.02
Printed in China.
[xyz-ips snippet=”download-snippet”]