
User Guide
![]()

DJI High Precision GNSS Mobile Station
Disclaimer
Thank you for purchasing D-RTKTM 2 High Precision GNSS Mobile Station (hereinafter referred to as the “Product”). Read this disclaimer carefully before using this Product. By using this Product, you hereby agree to this disclaimer and signify that you have read it fully. Please use this Product in strict accordance with the manual and be sure to pay attention to the Warnings. SZ DJI TECHNOLOGY CO., LTD., and its affiliated companies assume no liability for damage(s) or injuries incurred directly or indirectly from using, installing or refitting this Product improperly, including but not limited to using nondesignated accessories.
DJITM is a trademark of SZ DJI TECHNOLOGY CO., LTD. (abbreviated as “DJI”) and its affiliated companies. Names of products, brands, etc., appearing in this manual are trademarks or registered trademarks of their respective owner companies. This Product and manual are copyrighted by DJI with all rights reserved. No part of this Product or manual shall be reproduced in any form without the prior written consent or authorization of DJI.
This disclaimer is produced in various languages. In the event of divergence among different versions, the Chinese version shall prevail when the Product in question is purchased in China, and the English version shall prevail when the Product in question is purchased in any other region.
Warnings
- To maximize the lifespan of the battery, remove the Intelligent Battery from the D-RTK 2 Mobile Station when not in use.
- Only use the D-RTK 2 in the corresponding frequency band and in accordance with local laws and regulations.
- DO NOT bend or fold the cables excessively.
- Ensure that the D-RTK 2 Mobile Station is perfectly level when mounted and placed.
- Only operate in an open environment free from radio interference. Turn off nearby devices using the same frequencies as the D-RTK 2 Mobile Station (e.g. radio transceivers).
- Ensure that the antennas of all the devices used are unobstructed when in use.
- Only use genuine DJI parts or parts certified by DJI. Unauthorized parts or parts from non-DJIcertified manufacturers may cause the system to malfunction and compromise safety.
- Ensure that the D-RTK 2 Mobile Station and its components are free from contamination (e.g. water, oil, soil and sand).
- DO NOT attempt to disassemble any part of the D-RTK 2 Mobile Station that has already been mounted prior to shipping.
- Handle the sharp ends of the extension rod and tripod with caution.
- Take necessary measures to protect the D-RTK 2 Mobile Station and batteries from water in rain, snow, and/or thunderstorms. Operate with caution in severe weather conditions.
Introduction
The D-RTK 2 High Precision GNSS Mobile Station is a high-precision satellite signal receiver that supports four global satellite navigation systems: GPS, BEIDOU, GLONASS, and Galileo with 11-band satellite signal* reception. Its built-in OCUSYNCTM, LAN, and 4G data transmission links ensure uninterrupted, stable data transmission under a variety of application scenarios. The D-RTK 2 Mobile Station can be used as an RTK mobile base station to achieve centimeter-level positioning accuracy of an aircraft equipped with a DJI RTK positioning system (such as Agras T20, T16, MG-1P RTK, Phantom 4 RTK, P4 Multispectral, MATRICETM 300 RTK, or Matrice 210 RTK V2). Its functions are uncompromised even in environments with strong magnetic interference, for example, near high-voltage power lines or metal structures. The D-RTK 2 Mobile Station can also be used as a handheld mapping device to achieve enhanced precision in point positioning during surveying and mapping, or lofting and other engineering applications. In addition, the D-RTK 2 Mobile Station can be used as a stationary RTK base station to quickly build network RTK services**.
* Refer to the Specifications for details.** Supported later. DJI only provides technical services, users must comply with the local laws, regulations and requirements for building network RTK services.
In the Box
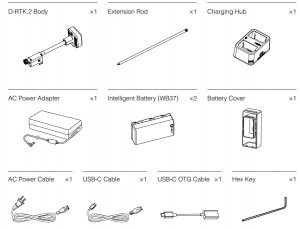
Optional Items
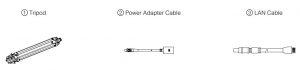
- When using the D-RTK 2 Mobile Station as a mobile base station, use the Tripod to support the D-RTK 2 body.
- When using the D-RTK 2 Mobile Station as a stationary base station, use the Power Adapter Cable and AC Power Adapter to connect to the AC power for long-term power supply.
- When using the D-RTK 2 Mobile Station as a stationary base station, use the LAN Cable to access the cloud server.
Overview

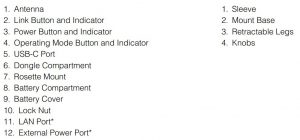
Equipped with a protective cover that can be stored when the unit is in use. When not in use, cover the ports to protect the unit from moisture and dust.
The illustrations in this document may be slightly different from the actual product. Please refer to the actual one.
Preparation
Charging the Battery
Press the battery level button once to check the battery level. Fully charge the batteries before first time use.
- Place the battery into the charging hub, connect the AC power adapter to the Charging Hub, and then connect the AC power adapter to a power outlet (100–240V, 50/60Hz).
- The charging hub will intelligently charge batteries in sequence according to battery power levels from high to low.
- The Status LED blinks green when charging and turns solid green when fully charged. The buzzer will begin beeping when charging is complete. Remove the battery or turn off the buzzer to stop it.

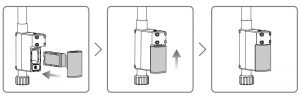
Mounting the Battery
Powering the D-RTK 2 Mobile Station On/Off
Press and hold the power button to power on/off the D-RTK 2 Mobile Station.

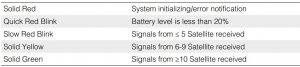
Power Indicator Descriptions
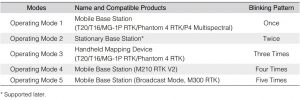
Operating Modes
The D-RTK 2 Mobile Station provides five operating modes to use with different products. Follow the instructions below to switch between modes.
- Press and hold the Operating Mode button for two seconds. The indicator will turn from green to yellow to indicate that the device has entered mode switch status.
- Press the Operating Mode button once to switch modes. Wait two seconds for the device to enter the corresponding mode. The indicator will turn from yellow to green. Operating modes are indicated by the blinking pattern of the indicator. Refer to the table below.
- The device will remain in the original mode if there is no further operation within two seconds of entering the mode switch status.
How to Use the D-RTK 2 Mobile Station
The operations are similar when using the D-RTK 2 Mobile Station with different products. Unless otherwise specified, the descriptions below are compatible with all the products working in the corresponding mode.
Connecting to the Remote Controller or Aircraft
Connection MethodThe connection method vary depending on the operating mode. See the instructions below.
Operating Mode 1Using with Agras or Phantom 4 RTK AircraftThe D-RTK 2 Mobile Station must be linked to the remote controller in the app. The followingdescriptions use the DJI Agras app as an example.
- Power on the D-RTK 2 Mobile Station, wait until system initialization is completed, and enter Operating Mode 1.
- Power on the remote controller and make sure that the app is launched.
- In the app, go to Operation View >
 > RTK to enable aircraft RTK function. Select the RTK signal source to D-RTK 2 Mobile Station. Then, tap Linking at the bottom. The remote controller status indicator will blink blue and a beeping sound from the remote controller will indicate that the remote controller is being linked.
 - Press the Link button on the D-RTK 2 Mobile Station and the link indicator will blink red and green alternately, indicating that the D-RTK 2 Mobile Station is being linked.
- The linking is successful when the indicator light on the remote controller becomes solid green. The D-RTK 2 link indicator shows the current working status. Refer to the table below for the details.
- The remote controller and aircraft must be relinked after the remote controller is linked with the D-RTK 2 Mobile Station. There are three ways that this can be done:• After linking the remote controller with the D-RTK 2 Mobile Station, tap Link with Aircraft in the popup window to link it with the aircraft. Then press the Link button on the aircraft to finish linking.• On the RTK Settings page, tap the ? button next to the prompt indicating the aircraft has been disconnected, and then tap Link with Aircraft in the pop-up window to link it with the aircraft.• Link the remote controller with the aircraft on the RC Settings page. When finished, go to the RTK Settings page and tap Try to Reconnect next to the D-RTK 2 Status to reconnect to D-RTK 2. The D-RTK 2 status must indicate Connection Success for the RTK functions to work.
Using with P4 Multispectral Aircraft
- Power on the D-RTK 2 Mobile Station, wait until system initialization is completed, and enter Operating Mode 1.
- Power on the remote controller and make sure that the DJI GS Pro app is launched.
- Go to Mission Page in DJI GS Pro, tap the icon or RTK on top of the screen to go to the RTK settings menu, and then select D-RTK 2 as the RTK signal source. Enable the aircraft RTK at the bottom of the menu to ensure the aircraft has access to RTK data.
- Tap Link. The remote controller will start beeping. Then press the link button on the mobile station.
- The linking is successful when the indicator light on the remote controller becomes solid green. The D-RTK 2 link indicator shows the current working status. Refer to the table below for details.
Note:
- When the D-RTK 2 Mobile Station has been connected to the remote controller and the aircraft is being controlled by the remote controller, the D-RTK 2 Mobile Station cannot be linked with other remote controllers. If required, link after the aircraft lands and the motors stop.
- One D-RTK 2 Mobile Station can link with up to five remote controllers.
Operating Mode 3The D-RTK 2 Mobile Station must be linked to the remote controller.
- Power on the D-RTK 2 Mobile Station, wait until system initialization is completed, and enter Operating Mode 3.
- Power on the remote controller. Go to Remote Controller Settings in the app, and tap Linking. The status LED blinks blue and the remote controller will beep twice repeatedly, indicating that the remote controller is ready to link.
- Press the Link button on the D-RTK 2 Mobile Station and the link indicator will blink red and green alternately, indicating that the D-RTK 2 Mobile Station is being linked.
- The linking is successful when the indicator light on the remote controller becomes solid green. The D-RTK 2 link indicator shows the current working status. Refer to the table below for details.
Operating Mode 4The D-RTK 2 Mobile Station must be linked to the M210 RTK V2 aircraft.
- Power on the M210 RTK V2 aircraft and make sure that it is linked to the remote controller.
- Press the Link button on the D-RTK 2 Mobile Station and the link indicator will blink red and green alternately, indicating that the D-RTK 2 Mobile Station is being linked.
- Press the Link button on the aircraft.
- Wait for a few seconds. The linking is successful when the indicator lights on both the aircraft and mobile station become solid green.
Operating Mode 5When using with the M300 RTK, the remote controller must join the broadcast network of the D-RTK 2 Mobile Station.
- Power on the D-RTK 2 Mobile Station, wait until system initialization is completed, and enter Operating Mode 5.
- Power on the remote controller. Go to RTK Settings in the DJI Pilot app, and set the RTK signal source to D-RTK 2 Mobile Station.
- Tap > on the right of the D-RTK 2 Mobile Station status display and a search will start automatically. Select the desired RTK base station in the search results and wait for a successful connection.
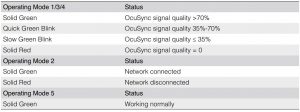
Link Indicator DescriptionsWhen the linking process starts, the indicator blinks red and green alternately.When the linking process is finished, the indicator blinking patterns are as shown below.
ActivationMake sure to activate the D-RTK 2 Mobile Station before first-time use. Activation can be done in the app or in the DJI ASSISTANTTM 2 software. The following descriptions use the app for example.
Using with Agras or Phantom 4 RTK Aircraft
- Power on the D-RTK 2 Mobile Station.
- Power on the remote controller and make sure that the app is launched.
- In the app, go to RTK Settings to enable the aircraft RTK function. Select the RTK signal source to D-RTK 2 Mobile Station. When connecting for the first-time, a prompt for activation will appear. Follow the on-screen steps for activation.
Using with M300 RTK or M210 RTK V2 AircraftPower on the mobile station, and make sure that it is linked to the aircraft or remote controller. Launch the DJI Pilot app and follow the on-screen steps for activation.
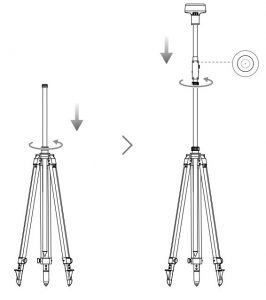
SetupWhen used as a mobile base station, choose an open area to set up the D-RTK 2 Mobile Station. Mark the location and align the center of the tripod with the mark to ensure that the D-RTK 2 Mobile Station can be replaced at the same location.
- Unfold the tripod, stretch the three retractable legs to the desired length, and then tighten each of the three knobs. Ensure that the bubble of the bubble level on the mount base is located within the black circle (viewed from the top of the bubble level vertically) while keeping the tripod secure.
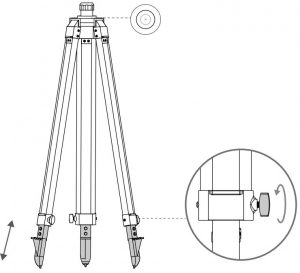
2. Insert the extension rod into the tripod and tighten the sleeve on the tripod. Then attach the D-RTK 2 body onto the extension rod and tighten the lock nut on the D-RTK 2 body. Ensure that the bubble of the bubble level on the D-RTK 2 is located within the black circle (viewed from the top of the bubble level vertically).
 Caution
- DO NOT change the position or angle of the tripod or the D-RTK 2 Mobile Station after the tripod has been leveled, or else it should be readjusted.
- The setup environment requires a wild field of vision. Ensure that there are no obstructions(trees, buildings) within the zone more than a 15° angel above the horizontal plane of theD-RTK 2 antenna to prevent the GNSS signals from being absorbed or blocked.
- The setup location should be at least 200 m away from high-power radio emission sources(such as television stations, microwave stations, etc.) and at least 50 m away from highvoltage transmission lines to avoid electromagnetic interference to GNSS signals.
- The setup location should be away from large-area waters or objects that strongly interferewith satellite signal reception to reduce multipath effects.
UsageThe available operating modes vary depending on the products used with the D-RTK 2 Mobile Station. Select the corresponding operating mode according to the product in use and follow the instructions below.
InstructionsOperating Mode 1/4
- Lift the extension rod in the tripod to adjust the D-RTK 2 Mobile Station to the desired height and tighten the sleeve.
- Power on the D-RTK 2 Mobile Station, wait until system initialization is completed, and enter Operating Mode 1 or 4.
- Power on the remote controller and aircraft and make sure that the app is launched.
- In the app, go to RTK Settings to enable aircraft RTK function. Set the RTK signal source to D-RTK 2 Mobile Station and view the Status display to check the connection. When using a P4 Multispectral aircraft, tap Connect to establish a connection with the base station.
- Wait for the system to start searching for satellites. Start the motors when the RTK icon displays FIX or the status of both the aircraft’s orientation and positioning in the status table in RTK settings show FIX
Note
During flight, if the D-RTK 2 Mobile Station is moved or it is powered off, the aircraft RTK willswitch to GNSS mode and will not enter the RTK FIX status again. Restart the D-RTK 2 Mobile Station after flight and wait for it to enter the RTK FIX status.
Operating Mode 3
- Power on the D-RTK 2 Mobile Station, wait until system initialization is completed, and enter Operating Mode 3.
- Power on the remote controller and make sure that the app is launched. Check the home screen to make sure the handheld mapping device is connected.
- In RTK Settings, select the RTK signal source for the handheld mapping device. Make sure that the D-RTK 2 Mobile Station used as a handheld mapping device is connected to another D-RTK 2 Mobile Station used as a base station or a Network RTK server.
- Set the planning method to handheld RTK for operation planning.
Operating Mode 5
- Power on the D-RTK 2 Mobile Station, wait until system initialization is completed, and enter Operating Mode 5.
- Make sure that the remote controller is connected to the broadcast network of the D-RTK 2 Mobile Station.
- Wait for the system to start searching for satellites. Start the motors when the status of both the aircraft’s orientation and positioning in the status table in RTK settings show FIX.
Advanced SettingsOperating Mode 1/3/4
- Go to the bottom of RTK Settings and tap Advanced Settings.
- The settings vary depending on the product used with the D-RTK 2 Mobile Station. Settings include managing the list of linked remote controllers and viewing and editing the device name.
- Input measured coordinates and altitude* to set them to the D-RTK 2 Mobile Station when using as a base station.
Operating Mode 5
- Go to the bottom of RTK Settings and tap Advanced Settings. Input the administrator password to enter configuration.
- Edit the name of the mobile station and change the password.
- Input measured coordinates and altitude* to set them to the D-RTK 2 Mobile Station when using as a base station.
- The password can be reset by following the instructions below. Press and hold the Link button on the mobile station for three seconds, and then press the Operating Mode button once. The Operating Mode Indicator turns from red to green, indicating that the password has been reset successfully.
* If coordinates input into the app are more than 50 m (for Operating Mode 1) or 15 m (for Operating Mode 4 or 5) away from the actual coordinates of the D-RTK 2 Mobile Station, they will not be imported.
If the D-RTK 2 Mobile Station is restarted after input coordinates are successfully set, these coordinates will be used only if the difference between the actual coordinates and the set coordinates is less than 5 m. Otherwise, the actual positioning coordinates will be used.
Appendix
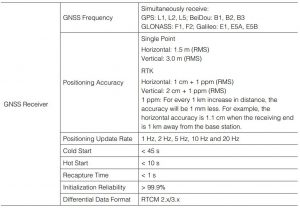
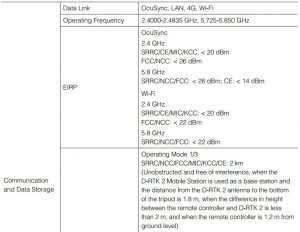
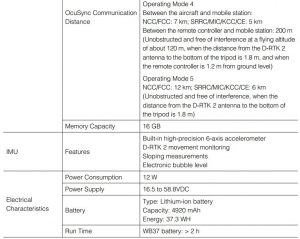
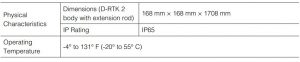
Specifications
Updating the FirmwareUpdate the D-RTK 2 firmware in the DJI Assistant 2 software or the app*. The following instructions use the DJI Assistant 2 software for example.
- Turn on the D-RTK 2 Mobile Station.
- Connect the D-RTK 2 Mobile Station to the computer via the USB-C cable.
- Launch DJI Assistant 2 and login with a DJI account.
- Click D-RTK 2 and then click the firmware update tag.
- Select the desired firmware version.
- DJI Assistant 2 will download and update the firmware automatically.
* An app version that supports firmware update is required.
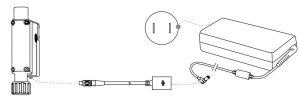
Accessories UsagePower Adapter CableConnect the Power Adapter Cable to the external power port, then connect the Power Adapter to a power outlet (100-240V, 50/60Hz) with the AC power cable.
LAN CableUse the LAN cable to access the public network
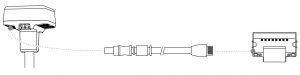
Be sure to comply with local laws and regulations when transmitting satellite positioninginformation on a public network.
This content is subject to change.Download the latest version fromhttp://www.dji.com/d-rtk-2
Compliance Information
FCC Compliance Notice
This device complies with Part 15 of the FCC Rules. Operation is subject to the following two conditions: (1) This device may not cause harmful interference, and (2) This device must accept any interference received, including interference that may cause undesired operation.
Any changes or modifications not expressly approved by the party responsible for compliance could void the user’s authority to operate the equipment.
This equipment has been tested and found to comply with the limits for a Class B digital device, pursuant to part 15 of the FCC Rules. These limits are designed to provide reasonable protection against harmful interference in a residential installation. This equipment generates, uses and can radiate radio frequency energy and, if not installed and used in accordance with the instructions, may cause harmful interference to radio communications. However, there is no guarantee that interference will not occur in a particular installation. If this equipment does cause harmfulinterference to radio or television reception, which can be determined by turning the equipment off and on, the user is encouraged to try to correct the interference by one or more of the following measures:
- Reorient or relocate the receiving antenna.
- Increase the separation between the equipment and receiver.
- Connect the equipment into an outlet on a circuit different from that to which the receiver is connected.
- Consult the dealer or an experienced radio/TV technician for help.
RF Exposure InformationThis equipment complies with FCC radiation exposure limits set forth for an uncontrolled environment. In order to avoid the possibility of exceeding the FCC radio frequency exposure limits, human proximity to the antenna shall not be less than 20cm during normal operation.
ISED WarningThis device contains licence-exempt transmitter(s)/receiver(s) that comply with Innovation, Science and Economic Development Canada’s licence-exempt RSS(s). Operation is subject to the following two conditions: (1)This device may not cause interference.(2)This device must accept any interference, including interference that may cause undesired operation of the device.
This equipment complies with RSS‐102 radiation exposure limits set forth for an uncontrolled environment. This equipment should be installed and operated with minimum distance 20cm between the radiator and your body. This transmitter must not be co-located or operating in conjunction with any other antenna or transmitter.
EU Compliance Statement: SZ DJI TECHNOLOGY CO., LTD. hereby declares that this device is in compliance with the essential requirements and other relevant provisions of the Directive 2014/53/EU. A copy of the EU Declaration of Conformity is available online at www.dji.com/euro-compliance EU contact address: DJI GmbH, Industriestrasse 12, 97618, Niederlauer, Germany

CAUTION: RISK OF EXPLOSION IF BATTERY IS REPLACED BY AN INCORRECT TYPE. DISPOSE OF USED BATTERIES ACCORDING TO THE INSTRUCTIONS
Environmentally friendly disposalOld electrical appliances must not be disposed of together with the residual waste, but have to be disposed of separately. The disposal at the communal collecting point via private persons is for free. The owner of old appliances is responsible to bring the appliances to these collecting points or to similar collection points. With this little personal effort, you contribute to recycle valuable raw materials and the treatment of toxic substances.
D-RTK is a trademark of DJI.Copyright © 2020 DJI All Rights Reserved.
If you have any questions about this document, please contactDJI by sending a message to
DJI High Precision GNSS Mobile Station User Guide – DJI High Precision GNSS Mobile Station User Guide –
Questions about your Manual? Post in the comments!
[xyz-ips snippet=”download-snippet”]