
MATRICE 600 PROUser Manual
Remote Controller Operations
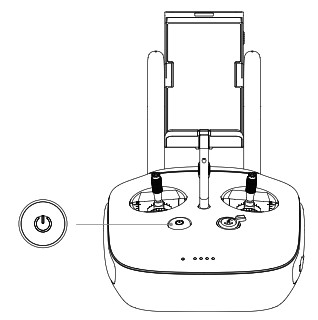
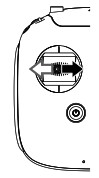
Powering On and Off the Remote ControllerThe Matrice 600 Pro remote controller is powered by a 2S rechargeable battery with a capacity of 6000mAh. The battery level is indicated by the Battery Level LEDs on the front panel. Follow the steps below to power on your remote controller:
- When powered off, press the Power Button once and the Battery Level LEDs will display the current battery level.
- Then, press and hold the Power Button to power on the remote controller.
- The remote controller will beep when it powers on. The Status LED will blink red (slave remote controller blinks solid purple) rapidly, indicating that the remote controller is linking to the aircraft. The Status LED will show a solid green light (slave remote controller shows a solid cyan light) when linking is completed.
- Repeat step 2 to power off the remote controller after finish using it.

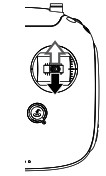
Charging Remote ControllerCharge the remote controller via supplied charger.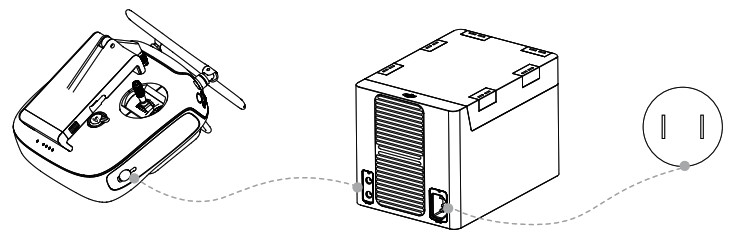 Controlling the CameraShoot videos or images and adjust camera settings via the Shutter Button, Camera Settings Dial, Playback Button and Video Recording Button on the remote controller when using a Zenmuse X3, X5 series or XT gimbal and camera.
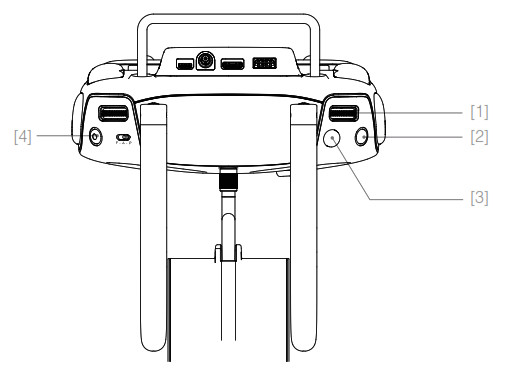 [1] Camera SettingsDial Turn the dial to quickly adjust camera settings such as ISO and shutter speed without letting go of the remote controller. Move the dial button to left or right to view the pictures or videos in playback mode.[2] Playback ButtonPress to view images or videos that have already been captured.[3] Shutter ButtonPress to take a photo. If burst mode is activated, multiple photos will be taken with a single press.[4] Recoding ButtonPress once to start recording video, then press again to stop recording.
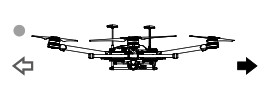
Controlling the AircraftThis section explains how to use the various features of the remote controller. Mode 2 (throttle stick on the left) is set by default.
| Remote Controller | Aircraft ( indicates nose direction) | Function |
 |
 |
Moving the Left Stick up/down changes the aircraft’s elevation. Push it up to ascend and down to descend.Use this stick to take off when the motors are spinning at idle speed. The aircraft will hover in place if the Left Stick is released. |
 |
 |
Moving the Left Stick left/right changes the heading of the aircraft. Push it left to rotate the aircraft counter clock-wise, and right to rotate the aircraft clockwise. |
 |
 |
Moving the Right Stick up/down changes the aircraft’s forward and backward pitch. Push it up to fly forwards and down to fly backwards.Push the Right Stick further for a larger pitch angle and faster flight. |
 |
 |
Moving the Right Stick left/right changes the aircraft’s left and right pitch. Push it left to fly left and right to fly right.Push the Right Stick further for a larger pitch angle and faster flight. |
 |
 |
Turn the Gimbal Dial to control the pitch or pan movement of the gimbal. The Gimbal Dial controls the pitch by default. You can set the back left or back right button to allow the Gimbal Dial to control the pan movement by using the DJI GO app. |
![]() Always push the control sticks gently to prevent sudden and unexpected movement of the aircraft.
Always push the control sticks gently to prevent sudden and unexpected movement of the aircraft.
Flight Mode SwitchToggle the switch to select the desired flight mode. You may choose between P-mode, A-mode and F-mode.
| Figure | Flight Mode |
|
P |
P-mode |
|
A |
A-mode |
|
F |
F-mode |

P-mode (Positioning): P-mode works best when GPS signal is strong. There are several states in P-mode which are automatically selected by the Matrice 600 Pro depending on GPS signal strength: P-GPS: GPS is available. The aircraft uses GPS for positioning. P-ATTI: GPS is not available. The aircraft only uses its barometer for maintaining altitude.A-mode (Attitude): GPS is not used for positioning. The aircraft only uses its barometer to maintain altitude. If it is still receiving a GPS signal, the aircraft will automatically Return-to-Home if the remote controller signal is lost, and if the Home Point was recorded successfully.F-mode (Function): Intelligent Flight Mode and API Control are supported in this mode. Refer to the Intelligent Flight Modes (p. 47) section in the Appendix and SDK in DJI Assistant 2 (p. 30) for more information.The flight mode is locked in P-mode by default. To enable other flight modes, go to the DJI GO app > Camera View >![]() > Enable Multiple Flight Mode.Landing Gear Control SwitchThis switch has two positions. Toggle the switch up or down to raise or lower the landing gear.
> Enable Multiple Flight Mode.Landing Gear Control SwitchThis switch has two positions. Toggle the switch up or down to raise or lower the landing gear.
- Raise: Raise the landing gear to its upper most position. The landing gear will automatically raise when the aircraft reaches an altitude of 1.2 m for the first time.
- Lower: The landing gear will lower to its lowest position for landing. The landing gear will automatically lower if Auto-Landing is enabled in the DJI GO app or when the aircraft is landing automatically as part of the RTH procedure.
![]() By default, the landing gear will not raise or lower if you toggle the control switch when the aircraft is on the ground. Go to the DJI GO app > Camera View >
By default, the landing gear will not raise or lower if you toggle the control switch when the aircraft is on the ground. Go to the DJI GO app > Camera View >![]() > Advanced Settings > Disable Landing Gear Auto-Lock, and then the landing gear will raise or lower if you toggle the control switch when the aircraft is on the ground. Ensure that the switch is in the lower position when enabling this feature. The feature will be disabled after raising and lowering the landing gear once. Enable it in the DJI GO app if you want to raise or lower the landing gear again.
> Advanced Settings > Disable Landing Gear Auto-Lock, and then the landing gear will raise or lower if you toggle the control switch when the aircraft is on the ground. Ensure that the switch is in the lower position when enabling this feature. The feature will be disabled after raising and lowering the landing gear once. Enable it in the DJI GO app if you want to raise or lower the landing gear again.
![]() Auto-raise and auto-lower features of the landing gear can be set in the DJI GO app. Go to the DJI GO app > Camera View >
Auto-raise and auto-lower features of the landing gear can be set in the DJI GO app. Go to the DJI GO app > Camera View >![]() > Advanced Settings > Self-Adaptive Landing Gear.
> Advanced Settings > Self-Adaptive Landing Gear.
RTH ButtonPress and hold this button to start the Return-to-Home (RTH) procedure. The LED around the RTH Button will blink white to indicate the aircraft is entering RTH mode. The aircraft will then return to the last recorded Home Point. Press this button again to cancel the RTH procedure and regain control of the aircraft.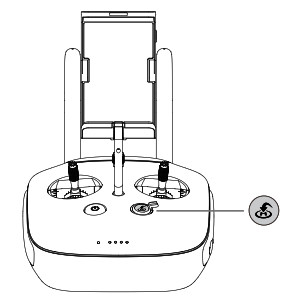 Connecting Mobile Device
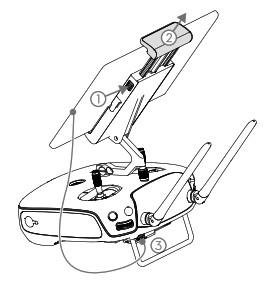
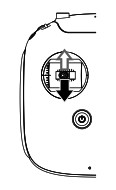
- Press the button on the side of the Mobile Device Holder to release the clamp.
- Place your mobile device inside the clamp and adjust it to secure your mobile device.
- Connect your mobile device to the remote controller via a USB cable.
Optimal Transmission RangeThe signal transmission between the aircraft and the remote controller performs best when the aircraft is within the optimal transmission range. Open up the antennas on the remote controller to optimize transmission range. Ideally, the flat surface of the antenna should be facing the aircraft. If the signal is weak, fly the aircraft closer to you.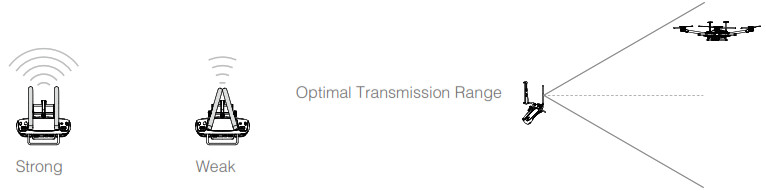
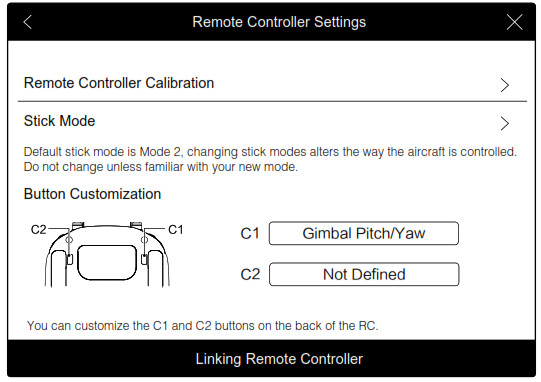
Dual Remote Controllers ModeMore than one remote controller can be connected to the same aircraft in the Dual Remote Controllers mode. When using a DJI gimbal in the Dual Remote Controllers mode, the Master remote controller controls the movement of the aircraft, while the Slave remote controller controls the movement of the gimbal. When multiple Slave remote controllers (max 3) are connected to the aircraft, only the first connected Slave remote controller is able to control the gimbal. The remaining Slave remote controllers can view the live feed video from the aircraft and set the camera parameters, but cannot control the gimbal.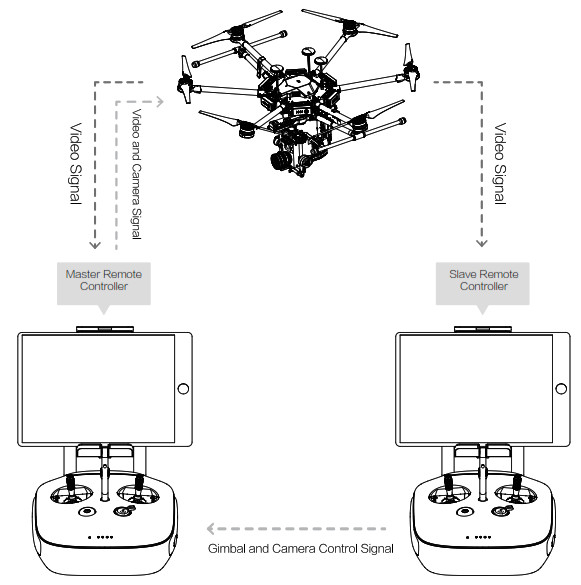
![]() Use the gimbal dial on the remote controller to tilt the camera in the Single Remote Controller mode. In Dual Remote Controllers mode, use the Slave remote controller to tilt, pan or roll the camera.
Use the gimbal dial on the remote controller to tilt the camera in the Single Remote Controller mode. In Dual Remote Controllers mode, use the Slave remote controller to tilt, pan or roll the camera.
Setting Up Dual Remote Controllers ModeThe Dual Remote Controllers mode is disabled by default. Users must enable this feature on the Master Remote Controller through the DJI GO app. Follow the steps below for setup:
Master Remote Controller:
- Connect the remote controller to your mobile device and launch the DJI GO app.
- Go to the Camera View, and tap to enter the remote controller settings window.
- Select Master in the Set Remote Controller Status section to set the remote controller as the Master remote controller.
- Enter the connection password for the Slave remote controller.

Slave Remote Controller:
- Select Slave in the Set Remote Controller Status section to set the remote controller as the Slave remote controller.
- Tap Search for Master Controller to register the Master remote controller.
- Select the name of the remote controller from the Master RC List and input the connection password to connect to the desired Master remote controller. The remote controller cannot link to the aircraft or control aircraft movement if it is set to Slave. Set the remote controller as Master in the DJI GO app if you want to link the remote controller to the aircraft.


Remote Controller LEDs
The Status LED reflects connection status between the remote controller and the aircraft. The RTH Status LED indicates the Return-to-Home status of the aircraft. See the table below for details on these indicators.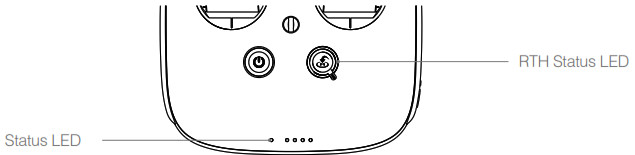
| Status LED | Alarm | Remote Controller Status |
| The remote controller is set as Master but is not connected to the aircraft. | ||
| The remote controller is set as Master and connected to the aircraft. | ||
| 2 beeps | The remote controller is set as Slave but is not connected to the aircraft. | |
| 2 beeps and chime | The remote controller is set as Slave and connected to the aircraft. | |
| 1 slow beep repeating | Remote controller error. Refer to the DJI GO app for details. | |
| RTH Status LED | Sound | Aircraft Status |
| RTH procedure begins. | ||
| 1 beep repeating | Sending RTH command to the aircraft. | |
| 2 beeps repeating | Aircraft RTH in progress. |
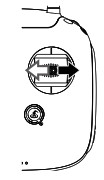
Linking the Remote Controller
The remote controller is linked to your aircraft by default. Linking is only required when a new remote controller is used for the first time. Follow these steps to link a new remote controller:
- Power on the remote controller and connect it to your mobile device. Then power on the aircraft.
- Go to the DJI GO app > Camera View > > Remote Controller Settings > Linking Remote Controller.
- The remote controller Status LED will blink blue and beep to indicate that the remote controller is ready to be linked.
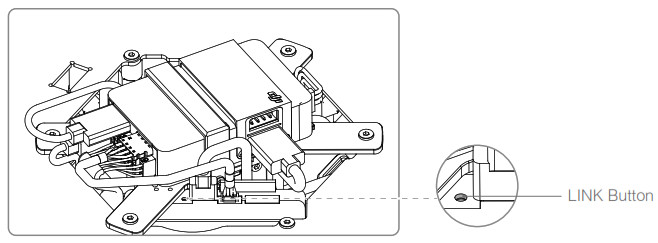
- Press the LINK Button on the Lightbridge 2 Air System (shown in the figure below) to begin linking. The remote controller Status LED will glow solid green if linking is successful.
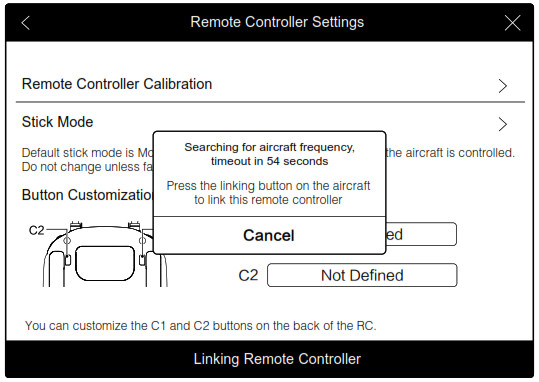
- The remote controller cannot link to the aircraft or control aircraft movement if it is set to Slave. Set the remote controller as Master in the DJI GO app if you want to link the remote controller to the aircraft.
- The remote controller will disconnect from the linked aircraft if another remote controller attempts to link to the same aircraft.
Return-to-Home (RTH)
Profile
|
|
GPS | Description |
| Home Point | The default Home Point is the first location where your aircraft received strong GPS signals (i.e. the white GPS icon is followed by at least four white bars |
The Return-to-Home (RTH) function brings the aircraft back to the last recorded Home Point. There are three events that will trigger RTH procedure: Smart RTH, Low Battery RTH and Failsafe RTH.
Smart RTH
Use the RTH button on the remote controller (see RTH Button on p. 20 for more details) or the RTH button in the DJI GO app when GPS is available to enable Smart RTH. With Smart RTH, you may control the aircraft’s orientation to avoid collision when it is returning to the Home Point. Press and hold the Smart RTH button to start the RTH procedure, then press the Smart RTH button again to exit Smart RTH and regain control of the aircraft.
Low Battery RTH
Low Battery RTH is triggered when the DJI Intelligent Flight Battery is depleted to a point which may affect the safe return of the aircraft. Users are advised to fly back or land the aircraft immediately when these warnings are shown. The DJI GO app will advise users to return the aircraft to the Home Point when the low battery warning is triggered. The aircraft will automatically return to the Home Point if no action is taken after 10 seconds. User can cancel the RTH procedure by pressing on the RTH button once. The thresholds for these warnings are automatically determined based on the current aircraft altitude and its distance from the Home Point. The aircraft will land automatically (cannot be canceled) if the current battery level can only support the aircraft to land to the ground from its current position. Users can use the remote controller to control the aircraft’s movement during the landing process. The figure below describes the behavior of the Battery Level Indicator during different stages of events.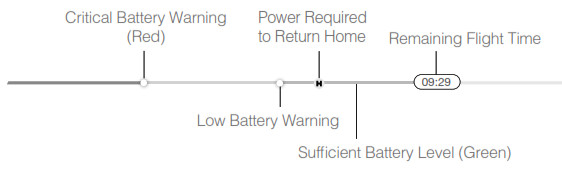
| Battery Level | Description | Aircraft Status Indicator | DJI GO App | Flight Instructions |
| Low Battery
Warning |
The battery level is
low. Please land the aircraft. |
Aircraft Status
Indicator blinking RED slowly. |
Tap Go-Home to make the aircraft return to Home Point and land automatically, or Cancel to resume normal flight. If no action is taken, the aircraft will automatically return to the Home Point and land after 10 seconds. | Fly the aircraft back and land it as soon as possible, then stop the motors and replace the battery. |
| Critical Battery Warning | The aircraft must land immediately. | Aircraft Status Indicator blinking RED rapidly. | The DJI GO app screen will flash red and the aircraft will begin to descend. | The aircraft will begin to descend and land automatically. |
| Remaining Flight Time | Estimated remaining flight time based on
the current battery level. |
N/A | N/A | N/A |
![]()
- When the critically low battery level warning is triggered and the aircraft is descending to land automatically, you may push the throttle stick upwards to hover the aircraft and navigate it to a more appropriate location for landing.
- Color zones and markers on the battery level indicator reflect the estimated remaining flight time and are adjusted automatically, according to the aircraft’s current status.
Failsafe RTH
Failsafe RTH is activated automatically if the remote controller signal (including video relay signal) is lost for more than 3 seconds provided that the Home Point has been successfully recorded and the compass is working normally. The operator can interrupt the Return-to-Home procedure and regain control over the aircraft if the remote controller signal is recovered.Failsafe Illustration 
RTH Safety Notices
 |
The aircraft cannot avoid obstruction during RTH, therefore it is important to set a reasonable RTH altitude before each flight. Go to the DJI GO app > Camera View > |
 |
If the aircraft is flying under 20 meters (65 feet) and RTH (including Smart RTH, Low Battery RTH and Failsafe RTH) is triggered, the aircraft will first 20m automatically ascend to 20 meters (65 feet) from the current altitude and you cannot control the aircraft during ascending. In Smart RTH, you can exit RTH to cancel the ascending by pressing the RTH button once. |
 |
The aircraft automatically descends and lands if RTH is triggered when the aircraft flies within a 65 feet (20 meter) radius of the Home Point. |
 |
Aircraft cannot return to the Home Point when GPS signal is weak ( |
 |
The aircraft will stop ascending and immediately return to the Home Point if you move the throttle stick during Failsafe RTH. |
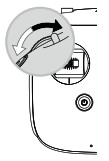
Updating the Home Point
You can update the Home Point in the DJI GO app during flight. There are two options for setting the Home Point:
- Set the aircraft’s current coordinates as the Home Point.
- Set the remote controller’s current coordinates as the Home Point.
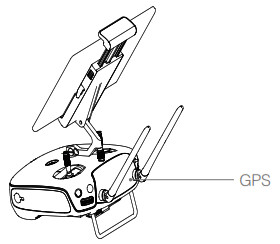
![]() Ensure the space above the GPS module (shown in the figure) is not obstructed when updating the Home Point.
Ensure the space above the GPS module (shown in the figure) is not obstructed when updating the Home Point.
Follow the instructions below to update the Home Point:
- Connect your mobile device to the remote controller and go to the DJI GO app > Camera View > .
- Tap to set the remote controller’s current coordinates as the Home Point; tap to set the aircraft’s current coordinates as the Home Point.
- The Aircraft Status Indicator will blink green to indicate that the new Home Point has been set successfully.
A3 Pro Redundancy SystemThe Matrice 600 Pro’s A3 Pro flight control system is an upgraded version of the A3, which enhances flight safety. The A3 includes a flight controller, GPS-Compass Pro and a PMU (Power Management Unit). With two additional IMU Pro and GPS-Compass Pro modules, the A3 Pro provides triple-modular redundancy, improving the system’s anti-risk performance.
Mounting Positions
Ensure that the settings of all the IMU Pro modules and GPS-Compass Pro modules are correct before each flight. Identify the module according to the number of times the module’s LED blinks (e.g. If a GPS blinks once, it is “GPS1”). Then enter each module’s corresponding mounting position into the appropriate fields in DJI Assistant 2. The default mounting positions are shown as below: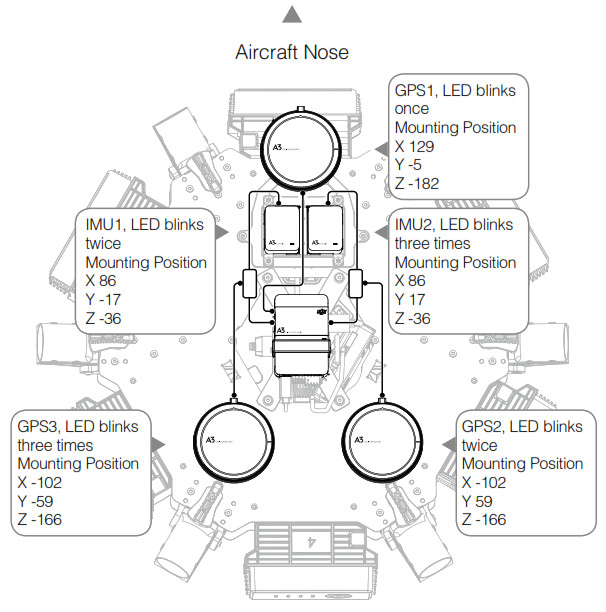
System Status
System status is indicated by LEDs on the GPS-Compass Pro, IMU Pro and Flight Controller modules.
| LED Indicator | Status |
| The module is functioning normally and working as a part of the system when the LED is blinking green. | |
| The module is functioning abnormally when the LED is blinking red. | |
| The module is functioning normally but not working as a part of the system when the LED is blinking blue. |
DJI Assistant 2![]() When using your Matrice 600 Pro for the first time, activate it in the DJI Assistant 2 software.
When using your Matrice 600 Pro for the first time, activate it in the DJI Assistant 2 software.
Installation and Launching
- Download the DJI Assistant 2 installation file from the official DJI website: http://www.dji.com/matrice600-pro/info#downloads
- Complete the installation for the DJI Assistant 2 software.
- Launch the DJI Assistant 2 software.
Using the DJI Assistant 2
- Ensure that all the six Intelligent Flight Batteries are fully charged and then install them.
- Power on the remote controller, and then turn on one of the Intelligent Flight Batteries in the aircraft. If other batteries are not triggered automatically, connect your mobile device to the remote controller and go to the DJI GO app for information.
- Connect the Micro USB port (at the bottom of the Aircraft Status Indicator) of the Matrice 600 Pro to the computer with a Micro USB cable. Do not disconnect the cable until configuration is finished.
- When a connection is established, the software will display the connected devices: “M600 Pro” and “Lightbridge 2”. Click the corresponding device to configure settings. If the software doesn’t display both of the connected devices, check the USB connection between the aircraft and the computer, and the driver on your computer.
M600 ProActivating the AircraftWhen using your Matrice 600 Pro for the first time, click on the “M600 Pro” icon and you will be prompted to activate the aircraft on your computer. Follow the steps on-screen to activate the aircraft.
Basic SettingsModular Redundancy System Identify the module according to the number of times the module’s LED blinks (e.g. If a GPS blinks once, it is “GPS1”). Then enter each module’s corresponding mounting position into the appropriate fields. Ensure that the values are correct, or else the aircraft’s positioning will be off.
DJI DeviceIf using the D-RTK GNSS, enter the antenna mounting positions into the appropriate fields.
SDKEnable API ControlIf you are using the DJI SDK, select Enable API Control to allow the flight control system to communicate with external devices such as an on-board computer. The external device will be able to control the aircraft only if the Flight Mode Switch on the remote controller is toggled to F-mode. For information on setting the API parameters, read the related documents and manuals on the DJI SDK page of the DJI Developer website (https://developer.dji.com).
![]()
- API Control and the Intelligent Flight Modes cannot be used at the same time. If you are using Intelligent Flight Mode, finish the current intelligent flight mission and toggle the Flight Mode Switch to F-mode again to use API Control.
- API Control is automatically disabled after firmware updates. Re-enable this option if necessary.
Ground Station StatusIf Ground Station Status is enabled, the data from the flight control system to external devices will include information on the Ground Station mission.
Battery ManagerView the battery information on this page.
Firmware UpdateCheck the current firmware version of the aircraft and ensure the installed firmware is up-to-date. If not, login with your DJI account and click the Upgrade button.
![]()
- Ensure that your computer has internet access, or else you cannot get the latest firmware.
- Ensure that the Intelligent Flight Batteries have enough power supply.
- The aircraft settings may be reset after firmware upgrade. Check the settings.
SimulatorUse the simulator for flight training according to the tips in the software.
Lightbridge 2Firmware UpdateCheck the current firmware version of the Lightbridge 2 Air System and ensure the installed firmware is up-to-date. If not, login with your DJI account and click the Upgrade button.
![]()
- Ensure that your computer has internet access, or else you cannot get the latest firmware.
- Ensure that the Intelligent Flight Batteries have enough power supply.
- Both the Lightbridge 2 Air System and the remote controller firmware must be up-to-date, or else they will not link.
- Update the remote controller firmware via the DJI GO app. Refer to Upgrading the Firmware (p. 48) for details.
- Restart the aircraft after upgrading the aircraft and Lightbridge 2 Air System firmware.
References
[xyz-ips snippet=”download-snippet”]