
DJI MG Series Spreading System User Guide
Disclaimer
Carefully read this entire document and all safe and lawful practices provided by DJITM before using this product for the first time. Failure to read and follow instructions and warnings may result in serious injury to yourself or others, damage to your DJI product, or damage to other objects in the vicinity. By using this product, you hereby signify that you have read this disclaimer carefully and that you understand and agree to abide by all terms and conditions of this document and all relevant documents of this product. You agree to use this product only for purposes that are proper. You agree that you are solely responsible for your own conduct while using this product, and for any consequences thereof. DJI accepts no liability for damage, injury, or any legal responsibility incurred directly or indirectly from the use of this product.
DJI is a trademark of SZ DJI TECHNOLOGY CO., LTD. and its affiliated companies. Names of products, brands, etc., appearing in this document are trademarks or registered trademarks of their respective owner companies. This product and document are copyrighted by DJI with all rights reserved. No part of this product or document shall be reproduced in any form without the prior written consent of or authorization from DJI.
This disclaimer is available in various languages. In the event of divergence among different versions, the English version shall prevail. The final interpretation of this document and all related documents of this product belongs to DJI. This content is subject to change without prior notice. For up to date product information, visit http://www.dji.com and click on the product page for this product.
Warnings
- The MG Series Spreading System (abbreviated as Spreading System) is only compatible with the DJI AGRASTM MG series aircraft, and the firmware of the aircraft must be the correct version for supporting the Spreading System. Refer to the Specifications section for more information about compatible aircraft. DO NOT use it with other products or for purposes other than agriculture.
- The Spreading System is compatible with dry materials of a diameter between 0.5 – 5 mm. DO NOT use with other materials. Use with other materials will adversely affect operating results and may damage the Spreading System. All materials must be used in strict accordance with the instructions for those materials.
- Internal spread tank load must not exceed 10 kg.
- Use of a threadlocker is required during the installation process. Make sure that the threadlocker is totally dry and solid before flight.
- Make sure that the hopper gate and spinner disk function normally before each use.
- Operate with caution to avoid injury caused by mechanical parts.
- When spreading is in progress, maintain a safe distance from the Spreading System to avoid injury.
- If spreading while a radar module is mounted, the minimum detection range of the radar module will be increased from 1.5 m to 5 m due to obstruction from the materials being spread and the radar module may incorrectly detect obstacles. Note that the aircraft cannot sense obstacles that are not within the detection range. The detection performance of the radar module will also decrease. Fly with caution. Refer to the disclaimer and safety guidelines of the corresponding aircraft you are operating or the user guide of the radar module for more information on the radar module.
- DO NOT use liquids to rinse the Spreading System. It is recommended to use dry compressed air as a cleaning agent.
Introduction
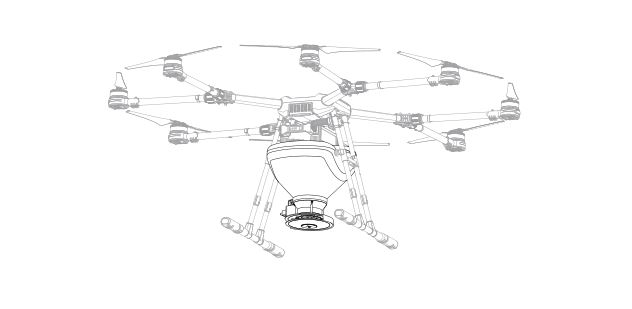
The MG Series Spreading System is compatible with Agras MG series aircraft and offers efficient, reliable, and stable spreading operations. The material delivery system is precisely controlled by the built-in stirring device and hopper gate, which can prevent material blockages and improve operating accuracy and reliability.
Use the app compatible with your aircraft to set parameters such as the hopper outlet size and spinner disk rotating speed. These parameters can be adjusted to meet different requirements. The app provides warning prompts for an empty tank as well as for abnormalities in the rotating speed, temperature, and hopper outlet size. These prompts help ensure system safety.
The Spreading System has two versions, 1.0 and 2.0. They each have a different structure for the spinner disk. Compared with the Spreading System 1.0, the Spreading System 2.0 has a higher material delivery rate and can spread materials 360° around the aircraft. Unless otherwise specified, the descriptions in this document use the Spreading System 1.0 as an example.
In the Box
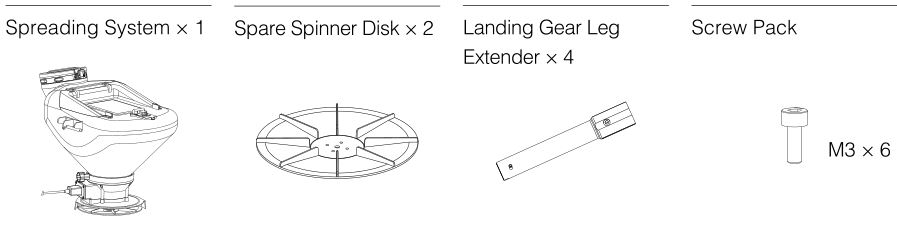
Users have the option to purchase a fender with a screw pack to use with the Spreading System 2.0.
Overview
Installation
A hex key for M3 screws is required for installation.
- Mount landing gear leg extenders when using with an Agras MG-1S aircraft.
- a. Remove the eight M3×6 screws in the lower section of the two landing gear legs and remove the two landing skids.
- b. Mount the four landing gear leg extenders to the original landing gear legs. Make sure to align the screw holes before inserting and tightening the eight M3×6 screws.
- c. Remount the two landing skids using the eight M3×6 screws.

- For the Spreading System 2.0, there is the option to mount the fender to the spreader. If mounted, the fender will prevent materials from being spread to the rear of the aircraft.
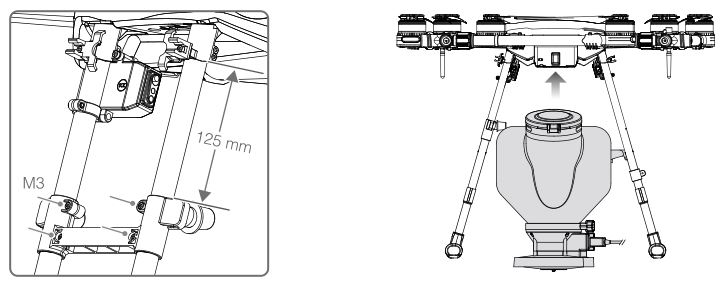
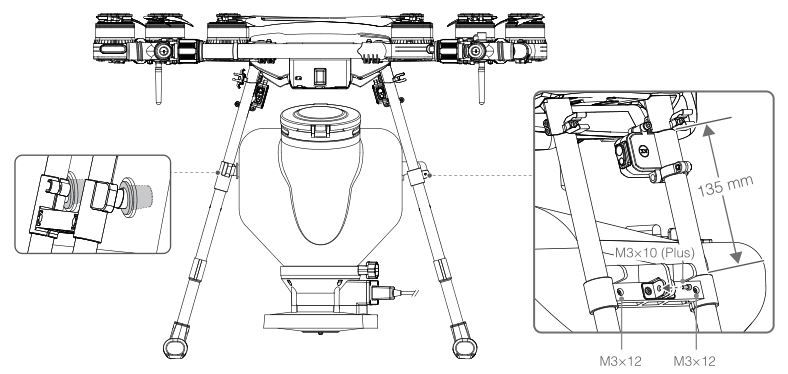
- Mount the Spreading System to the aircraft.
- a. Loosen the four M3 screws on fixing bracket on the left landing gear leg. Next, slide the fixing bracket to a position 125 mm below the landing gear mounting base as shown below and tighten the four screws.
- b. Lift the spread tank with the mouth of the tank facing towards the rear of the aircraft.
- c. Insert the plugs on the left landing gear leg into the mounting holes on the spread tank.
- d. Slide the fixing bracket on the right landing gear leg to a position 135 mm below the landing gear mounting base as shown below, and align the screw holes on the fixing bracket with the fin on the right side of the spread tank. Tighten the two M3×12 screws, and insert and tighten one M3×10 (Plus) screw.
- e. Connect the cable to the Reserved Expansion Port 2 (7-pin) on the bottom of the aircraft body.

Usage
- Open the cover of the spread tank as shown, add compatible materials, and close the cover.
- Power on the remote controller, and then power on the aircraft.
- Enter Operation View in the app.
- To set the hopper outlet size, spinner disk rotating speed, and flying speed, tap the Spreading Settings button 89% , which is located towards the top of the interface. Adjust the settings so that they are suitable for the materials you are using and test to make sure the performance is as expected.
- For the Spreading System 1.0, when measuring between 7.5 to 9 kg/ha of materials spread, it is recommended to:
- Adjust the hopper outlet size so that the material delivery rate is 1 kg/min.
- Adjust the spinner disk rotating speed so that the spreading range is 4 to 6 meters.
- Set the flying speed to 4 m/s (flying speed setting is unavailable in Manual Operation Mode).
- For the Spreading System 2.0, when measuring 45 kg/ha of materials spread, it is recommended to:
- Adjust the hopper outlet size so that the material delivery rate is 8 kg/min.
- Adjust the spinner disk rotating speed so that the spreading range is 5 to 7 meters.
- Set the flying speed to 5 m/s (flying speed setting is unavailable in Manual Operation Mode).
- For the Spreading System 1.0, when measuring between 7.5 to 9 kg/ha of materials spread, it is recommended to:
- Enter the operation mode required for spreading. The operations of the Spreading System vary depending on the operation mode.
Route Operation Mode
After starting an operation, the aircraft ascends to an altitude of 4 meters and the spinner disk spins. When the aircraft reaches the route starting point, the hopper gate opens according to the set value and the aircraft flies along the route and spreads material automatically. Spreading cannot be started or stopped manually.
The operation resumption function can be used during operation. Once the operation is paused, the hopper gate closes automatically to stop spreading while the spinner disk is still spinning. After operation is resumed, the aircraft returns to the breakpoint or projection point and continues spreading.
A-B Route Operation Mode
After the aircraft enters A-B Route Operation Mode, the spinner disk spins. When the aircraft reaches the first turning point, the hopper gate opens according to the set value and the aircraft flies along the route and spreads material automatically. Spreading cannot be started or stopped manually.
The operation resumption function can be used during operation. Once the operation is paused, the hopper gate closes automatically to stop spreading while the spinner disk is still spinning. After operation is resumed, the aircraft returns to the breakpoint or projection point and continues spreading.
Manual Plus Operation Mode
Switch to M+ after the aircraft takes off. Press the Spray button to start the spinner disk. The hopper gate opens according to the set value and the aircraft spreads material automatically once it has begun flying.
Manual Operation Mode
Switch to M after the aircraft takes off. Use the Spray button on the remote controller to start or stop spreading.
In all operation modes except Manual Operation Mode:
- When the aircraft flies forward or backward, the hopper gate opens automatically to start spreading.
- When the aircraft flies left or right, the hopper gate closes automatically to stop spreading while the spinner disk continues to spin.
Spreading System Calibration
When to Calibrate
The Spreading System has been calibrated before delivery. There is no need to calibrate it before using for the first time. Calibration is required in any of the following cases:
- The hopper gate cannot fully open or close.
- The material delivery rate is different from the desired value.
- The app incorrectly displays empty tank warnings.
Calibration ProcedureIn the app, enter Operation View. Tap at the top of the screen, then tap Calibration in Spreading System Settings. Wait until the app indicates calibration is complete. If calibration fails, try again.
Maintenance
- Clean the residue inside the spread tank and spreader regularly. It is recommended to use dry compressed air and a clean, soft dry cloth. DO NOT rinse with liquids.
- The spinner disk is a consumable part. If obvious signs of wear are noticeable, follow the steps below to replace the spinner disk.
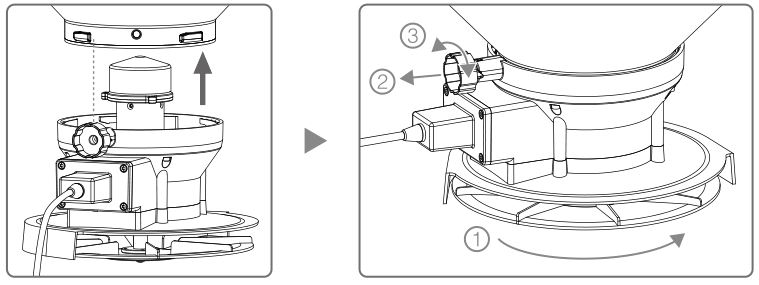
- a. Make sure that the aircraft is powered off, and then unplug the Spreading System cable.
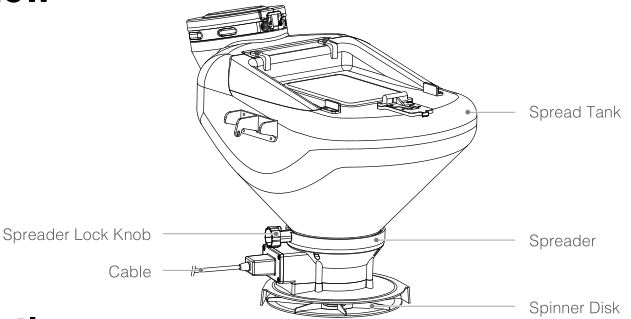
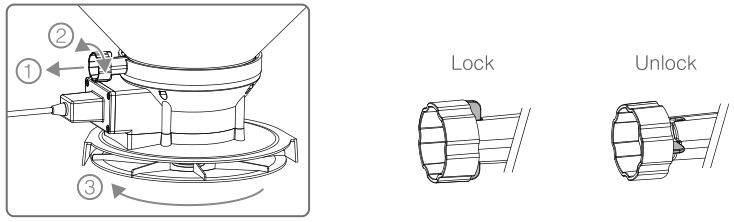
- b. To unlock the spreader, pull the spreader lock knob out, rotate it 90°, and release. Then rotate the spreader to detach it.
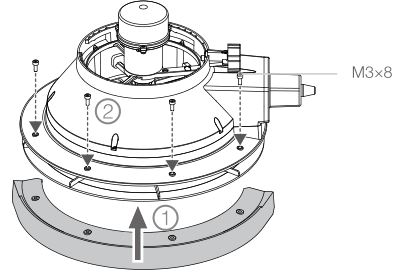
- c. Remove the nut, washer, four M3×8 screws, and spinner disk at the bottom of the spreader. Mount a new spinner disk and secure it using the washers, M3×8 screws, and nut.
- d. Check the spreader lock knob is in an unlocked position. Insert the spreader with the knob located to the left of the circular indentation on the spread tank.
- e. Rotate the spreader to mount it to the spread tank. To lock the spreader, pull the spreader lock knob out, rotate it 90°, and release. Make sure that the spreader is locked in position.

![]() Operate with caution to avoid injury caused by mechanical parts.
Operate with caution to avoid injury caused by mechanical parts.
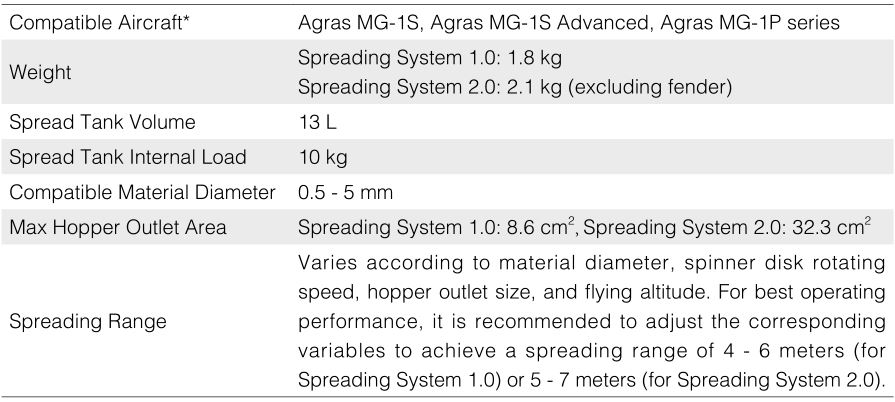
Specifications
* The firmware of the aircraft must be the correct version for supporting the Spreading System. Check the release notes of the corresponding aircraft on the official DJI website.
Compliance Information
FCC Compliance NoticeThis device complies with Part 15 of the FCC Rules. Operation is subject to the following two conditions: (1) This device may not cause harmful interference, and (2) This device must accept any interference received, including interference that may cause undesired operation.Any changes or modifications not expressly approved by the party responsible for compliance could void the user’s authority to operate the equipment.

EU Compliance Statement: SZ DJI TECHNOLOGY CO., LTD. hereby declares that this device is in compliance with the essential requirements and other relevant provisions of the Directive 2014/30/EU. A copy of the EU Declaration of Conformity is available online at www.dji.com/eurocompliance EU contact address: DJI GmbH, Industriestrasse 12, 97618, Niederlauer, Germany
Environmentally friendly disposal Old electrical appliances must not be disposed of together with the residual waste, but have to be disposed of separately. The disposal at the communal collecting point via private persons is for free. The owner of old appliances is responsible to bring the appliances to these collecting points or to similar collection points. With this little personal effort, you contribute to recycle valuable raw materials and the treatment of toxic substances.
IC ComplianceThis device complies with ICES-003 standard. Operation is subject to the following two conditions: (1) this device may not cause interference, and (2) this device must accept any interference, including interference that may cause undesired operation of the device.
CAN ICES-3(B)/NMB-3(B)
DJI Support http://www.dji.com/support
The content is subject to change without prior notice.Download the latest version from http://www.dji.com/mg-1pAGRAS and are trademarks of DJI.Copyright © 2020 DJI All Rights Reserved.

http://weixin.qq.com/r/jjqCms-EDZJyrYv592_c
Printed in China.

References
[xyz-ips snippet=”download-snippet”]