DJI RONIN 3D Focus System User Guide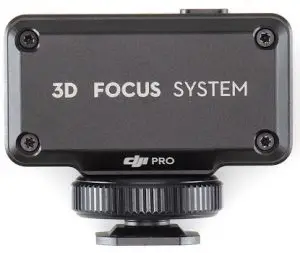
Disclaimer and Warning
Congratulations on purchasing your new DJI OSMOTM product. Please read this entire document and all safe and lawful practices DJI OSMO provided carefully before use. Failure to read and follow instructions and warnings may result in serious injury to yourself or others, damage to your DJI OSMO product, or damage to other objects in the vicinity. By using this product, you hereby signify that you have read this document carefully and that you understand and agree to abide by all terms and conditions of this document and all relevant documents of this product. You agree to use this product only for purposes that are proper. You agree that you are solely responsible for your own conduct while using this product, and for any consequences thereof. DJI OSMO accepts no liability for damage, injury or any legal responsibility incurred directly or indirectly from the use of this product.
RONIN is a trademark of SZ DJI OSMO TECHNOLOGY CO., LTD. (abbreviated as “DJI OSMO”) and its affiliated companies. Names of products, brands, etc., appearing in this document are trademarks or registered trademarks of their respective owner companies. This product and document are copyrighted by DJI OSMO with all rights reserved. No part of this product or document shall be reproduced in any form without the prior written consent or authorization of DJI OSMO.
This document and all other collateral documents are subject to change at the sole discretion of DJI OSMO. For up to date product information, visit http://www.dji.com and click on the product page for this product.
This document is available in various languages. In the event of divergence among different versions, the English version shall prevail.
Introduction
The DJI RONINTM 3D Focus System can be installed onto the camera or camera cage to assist manual lens focus. The 3D Focus System can only be used to focus on subjects in the center of the camera view. It is not recommended to set the focal length of the lens to longer than 85 mm when using the 3D Focus System.
Overview
- Status Indicator
- AF/MF Switch Button
- USB-C Port
- 1/4”-20 Thread to Cold Shoe Adapter
- Thumb Screw
- Mounting Base
- Lock Wheel
- Infrared Distance Sensor (TOF)
- USB-C Cable
Installation and Connection
Installing on Camera Cold Shoe (Figure A)
- Remove the 1/4”-20 thread to cold shoe adapter.
- Install the 3D Focus System on the cold shoe of the camera and rotate the lock wheel to fix firmly.
- Use two USB-C cables to connect the 3D Focus System to the USB-C port and focus motor of the gimbal.


![]() DO NOT directly insert third-party cables or devices into either USB-C ports of the 3D Focus System. Otherwise, the 3D Focus System or third-party devices may be damaged by the power supply.
DO NOT directly insert third-party cables or devices into either USB-C ports of the 3D Focus System. Otherwise, the 3D Focus System or third-party devices may be damaged by the power supply.
Installing on Camera Cage (Figure B)
- Use a 1/4”-20 thread to cold shoe adapter to install the 3D Focus System onto the camera cage and rotate the thumb screw to fix firmly.
- Use two USB-C cables to connect the 3D Focus System to the USB-C port and focus motor of the gimbal.
Using the 3D Focus System
A focus motor is required in order to use the 3D Focus System.
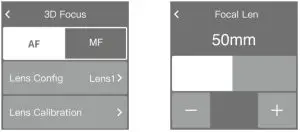
Calibration
The 3D Focus System must be calibrated before using for the first time. Follow the steps below to calibrate. A person or large object must be placed in the center of the camera view in order to calibrate.
- Power on the DJI RS 2 gimbal, swipe up on the touchscreen, tap Dial Functions, and Focus Motor.
- Return to the home screen, swipe left, tap Create, swipe up, and tap 3D Focus .
- Tap Lens Calibration. Perform Focus Motor Calibration by following the prompts and select the focal length.
- Focus the 3D Focus Sytem on a person or large object in the center of the camera view that is approx. 1 m away. Keep the camera stable and DO NOT move the gimbal until the progress bar is completely green. Adjust the front dial until the subject is in focus and tap Confirm.
- Repeat the previous step with a person or large object that is approx. 4 m away.
- The 3D Focus System must be recalibrated if the lens is replaced.
- It is recommended to focus on a person during calibration.
Lens Configuration
Lens configuration can be used to store up to three sets of calibrated lens parameters.Once stored, users can select parameters directly by tapping Lens Configuration.
Usage
If the camera lens is replaced, the focus motor must be recalibrated the next time the 3D Focus System is powered on. To calibrate the focus motor, either double tap the AF/MF Switch button or follow the prompts to calibrate the focus motor after selecting the lens in Lens Configuration.
 report this ad
To switch between AF and MF, press the AF/MF Switch button once or switch between AF and MF on the touchscreen. Once in AF, the 3D Focus System will be active and the status indicator turns solid green.
- DO NOT hot plug and unplug the 3D Focus System. Otherwise, the parameters will be lost and the focus motor will need to be calibrated again.
- Only manual focus lenses with a mechanical limit are supported.
- DO NOT use corrosive organic solvents such as alcohol to wipe the lens of the 3D Focus System.
- Make sure the infrared distance sensor (TOF) is not blocked by the hood or filter of the camera. Otherwise, the auto focus of the 3D Focus will be inaccurate.
Status Indicator Description
| Status Indicator | Description |
| Solid green | The 3D Focus System is working in AF |
| Solid yellow | The 3D Focus System is calibrated and working in MF |
| Solid red | The 3D Focus System needs calibrating |
Specifications
| Model | DF01 |
| Weight | 54.8 g |
References
[xyz-ips snippet=”download-snippet”]