
DJI Smart Controller Enterprise
User Guide
Please read this entire document and all safe and lawful practice DJITM provided carefully, and visit the DJI official website (http://www.dji.com) to download the full version of the User Manual and carefully read all instructions and warnings therein before use. Failure to read and follow instructions and warnings or lack of strong awareness of safety during the operation may result in serious injury to yourself or others, damage to your DJI product, or damage to other objects in the vicinity. By using this product, you hereby signify that you have read this disclaimer and warning carefully and that you understand and agree to abide by the terms and conditions herein. You agree that you are solely responsible for your own conduct while using this product, and for any consequences thereof. You agree to use this product only for legitimate purposes. DJI accepts no liability for damage, injury or any legal responsibility incurred directly or indirectly from the use of this product.DJI is a trademark of SZ DJI TECHNOLOGY CO., LTD. (abbreviated as “DJI”) and its affiliated companies. Names of products, brands, etc., appearing in this document are trademarks or registered trademarks of their respective owner companies. This product and document are copyrighted by DJI with all rights reserved. No part of this product or document shall be reproduced in any form without the prior written consent or authorization of DJI.This document and all other collateral documents are subject to change at the sole discretion of DJI. For up to date product information, visit http://www.dji.com and click on the product page for this product.This disclaimer is available in various languages. In the event of divergence among different versions, the English version shall prevail.
Always stay alert when using the DJI Smart Controller Enterprise (hereinafter referred as “Smart Controller”) to control an Unmanned Aerial Vehicle (UAV). Carelessness may result in serious harm to yourself and others. Always download and read the Disclaimer and Safety Guidelines of the aircraft and the detailed User Manual before usage.
- Fully charge the Smart Controller before each flight.
- If the Smart Controller is turned on and the touch screen is off for five minutes, an alert sound will be triggered. Ten seconds after the alert sound, the Smart Controller will automatically power off. Move the sticks or perform some other action to cancel the alert.
- Ensure the antennas are unfolded and adjusted to the proper position to achieve the optimal transmission quality.
- Contact DJI support to repair or replace the antennas if they are damaged. Damaged antennas will greatly decrease performance.
- Link the Smart Controller and the aircraft again if you change the aircraft.
- Ensure to power off the aircraft before the Smart Controller.
- Fully charge the Smart Controller every three months.
- Immediately charge the Smart Controller when its power level decreases to 10% to prevent the Smart Controller from damage due to over discharge for an extended period. Discharge the Smart Controller to a power level between 40% and 60% if stored for an extended period.
- DO NOT cover the air vent on the Smart Controller. Otherwise, the Smart Controller may become too hot, which could affect its performance.
- DO NOT disassemble the Smart Controller without the assistance of a DJI authorized dealer. Always contact DJI or a DJI authorized dealer to replace the Smart Controller’s components.
- DO NOT block the Smart Controller’s built-in GPS. In cases where the DJI Smart Controller Enterprise Screen Mounting Bracket (hereinafter referred as “Mounting Bracket”) is installed, remove it and try again if GPS signal is poor.
- To avoid wear and tear of the Stick Covers, DO NOT disassemble the sticks on a frequent basis.
The DJI Smart Controller Enterprise (hereinafter referred to as “Smart Controller”) features OCUSYNCTM Enterprise technology, capable of controlling aircraft that supports this technology, and providing a live HD view from the aircraft’s camera. It can transmit image data at distances of up to 9.32 mi (15 km) and comes with a number of aircraft and gimbal controls as well as some customizable buttons. (1)The built-in 5.5-inch high brightness 1000 cd/m² screen has a resolution of 1920×1080 pixels, featuring an Android system with multiple functions such as Bluetooth and GNSS. In addition to supporting Wi-Fi connectivity, it is also compatible with other mobile devices for more flexible usage.The Smart Controller has a maximum working time of 2.5 hours with the built-in battery. When using the WB37 Intelligent Battery, the maximum working time can be extended to 4.5 hours.(2)
- The Smart Controller can reach its maximum transmission distance (FCC) in an unobstructed area with no electromagnetic interference at an altitude of about 400 feet (120 meters). The actual maximum transmission distance may be less than the distance mentioned above due to interference in the operating environment, and the actual value will fluctuate according to the strength of interference. To comply with local regulations, the 5.8 GHz frequency is not available in some countries and regions.
- Maximum run time is estimated in a lab environment at room temperature, for reference only. When the Smart Controller is powering other devices, the run time will be diminished.
 DJI Smart Controller Enterprise User GuideWB37 Intelligent Battery Safety Guidelines
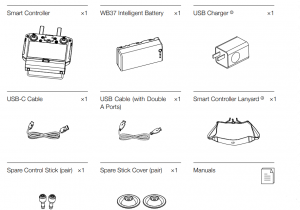
- The type and quantity vary depending on the region.
- The illustrations in this manual may vary from the actual product.
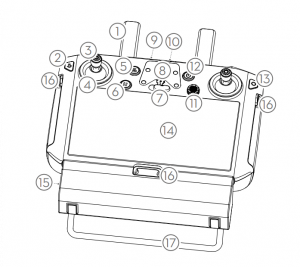
- Antennas
- Back Button / Function Button
- Control Sticks
- Stick Covers
- RTH Button
- Flight Pause Button
- Flight Mode Switch
- Position for Mounting Bracket (with built-in GPS module under it)
- Status LED
- Battery Level LEDs
- 5D Button
- Power Button
- Confirm Button / Customizable Button C3
- Touch Screen

- Charging Port (USB-C)
- Lanyard Hooks
- Handle
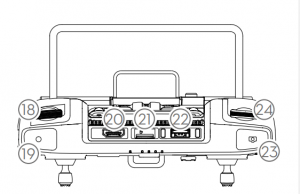
- Gimbal Pitch Control Dial
- Record Button
- HDMI Port
- microSD Card Slot
- USB-A Port
- Focus / Shutter Button
- Gimbal Pan Control Dial
- Air Vent
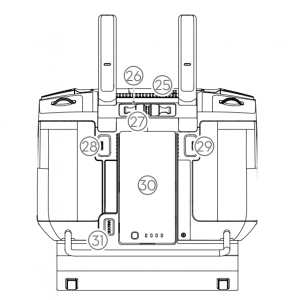
- Sticks Storage Slot
- Spare Sticks
- Customizable Button C2
- Customizable Button C1
- WB37 Intelligent Battery
- Battery Release Button
It takes roughly 2 hours and 15 minutes to fully charge the Smart Controller using the standard USB charger.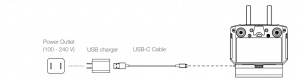
- Please use the official USB charger to charge the Smart Controller. When a standard USB charger is not available, it is recommended to use an FCC / CE certified USB charger rated 12 V / 2 A.
- Please recharge the battery at least every three months to prevent over discharging – the battery will deplete when stored for an extended period.
 Please use the official USB charger to charge the Smart Controller. When a standard USB charger is not available, it is recommended to use an FCC / CE certified USB charger rated 12 V / 2 A.
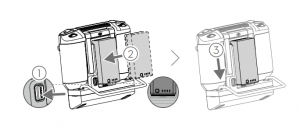
- Press and hold the battery release button.
- Insert the Intelligent Battery into the battery compartment. Make sure the bottom of the battery is aligned to the marking line in the compartment.
- Push the battery to the bottom.
- To remove the Intelligent Battery, press and hold the battery release button, then push the battery upward.
- Refer to the BS60 Intelligent Battery Station User Guide for Intelligent Battery charging details.
 To remove the Intelligent Battery, press and hold the battery release button, then push the battery upward.
- Only use a DJI-approved dongle.
- The dongle and SIM card enable the Smart Controller to access 4G network. Make sure to deploy these correctly, otherwise, network access will not be available.
- The dongle and SIM card are excluded.
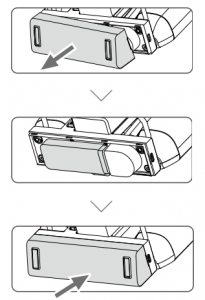 Remove the dongle compartment cover.
Insert the dongle into the USB port with the SIM card inserted into the dongle.
Reattach the cover firmly.
Check the internal battery level according to the Battery Level LEDs. Press the power button once to check it while turned off.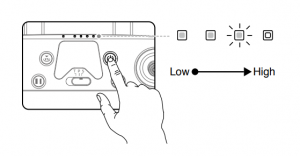 Press the power button once, press again and hold for a few seconds to turn on/off the Smart Controller.
- Please refer to the user manual for more details about checking the internal and external battery levels.
- When using external WB37 Intelligent Battery, it is still necessary to make sure that the internal battery has some power. Otherwise, the Smart Controller cannot be turned on.
Lift the antennas and adjust them. The strength of the Smart Controller signal is affected by the position of the antennas. When the angle between the antennas and the back of the Smart Controller is 80° or 180°, the connection between the Smart Controller and aircraft can reach its optimal performance.
Optimal Transmission ZoneTry to keep the aircraft inside the optimal transmission zone. If the signal is weak, adjust the antennas or fly the aircraft closer.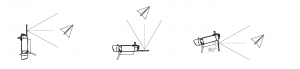
- Avoid using wireless devices that use the same frequency bands as the Smart Controller.
- In real operation, the DJI Pilot app will issue a prompt to warn that the transmission signal is weak, and please adjust the antennas to ensure that the aircraft is back to the optimal transmission range.
When the Smart Controller is purchased together with an aircraft as a combo, it is already linked to the aircraft. If not, please follow the steps below to link the Smart Controller and the aircraft after successful activation.
- Turn on the Smart Controller and the aircraft.
- Press down the customizable buttons C1, C2, and the record button simultaneously. The status LED will blink blue and the Smart Controller will sound a double beep to indicate that linking starts.
- Press and hold the aircraft’s power button for at least five seconds to link the aircraft and the Smart Controller. The Smart Controller’s status LED will be solid green if linking is successful.
- Please refer to the user manual for more details about linking the Smart Controller to the aircraft. To download the manual, please visit https://www.dji.com/matrice-300.
Before taking off, make sure the Aircraft Status Bar in the DJI Pilot app displays “Ready to Go (GPS)” or “Ready to Go (RTK)”.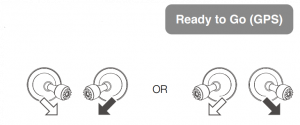
Manual Takeoff/Landing
Combination Stick Command to start/stop the motors.
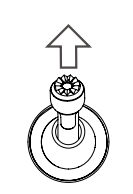
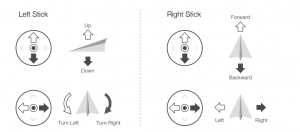
Slowly push the left stick up to take off. (Mode 2)
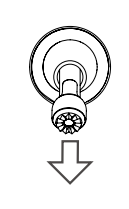
Slowly push the left stick down until the aircraft lands. Hold for a few seconds to stop the motors.
The default flight control is known as Mode 2. The left stick controls the aircraft’s altitude and heading, while the right stick controls its forward, backward, and left and right movements.
- The motors can only be stopped mid-flight when the flight controller detects a critical error. Use with caution.
- Be sure the Smart Controller is linked to the aircraft.
- Refer to the user manual for more Smart Controller usage details (e.g. dual Smart Controller operations).
|
|
| Operation Frequency Range | 2.400-2.4835 GHz; 5.725-5.850 GHz 0 |
| Max Transmission Distance (Unobstructed, free of interference) | NCC / FCC: 15 kmCE / MIC: 8 kmSRRC: 8 km |
| Transmitter Power (EIRP) | 2.400-2.4835 GHz:29.5 dBm (FCC); 18.5 dBm (CE) ; 18.5 dBm (SRRC); 18.5 dBm (MIC)5.725-5.850 GHz: 28.5 dBm (FCC); 12.5 dBm (CE); 20.5 dBm (SRRC) |
|
|
| Protocol | Wi-Fi Direct, Wi-Fi Display, 802.11a/g/n/ac, Wi-Fi with 2×2 MIMO is supported |
| Operation Frequency Range | 2.400-2.4835 GHz; 5.150-5.250 GHz ; 5.725-5.850 GHz |
| Transmitter Power (EIRP) | 2.400-2.4835 GHz:20.5 dBm (FCC); 18.5 dBm (CE); 18.5 dBm (SRRC); 20.5 dBm (MIC)5.150-5.250 GHz:14 dBm (FCC); 14 dBm (CE); 14 dBm (SRRC); 14 dBm (MIC)5.725-5.850 GHz: 18 dBm (FCC); 12 dBm (CE); 18 dBm (SRRC) |
|
|
| Protocol | Bluetooth 4.2 |
| Operation Frequency Range | 2.400-2.4835 GHz |
| Transmitter Power (EIRP) | 4 dBm (FCC); 4 dBm (CE); 4 dBm (SRRC); 4 dBm (MIC) |
|
|
| External Battery | Name: WB37 Intelligent BatteryCapacity: 4920 mAh; Voltage: 7.6 VExternal Battery Battery Type: LiPo; Energy: 37.39 WhCharge Time (Using BS60 Intelligent Battery Station): 70 min (15° to 45° C): 130 min (0° to 15° C) |
| Built-in Battery | Battery Type: 18650 Li-ion (5000 mAh @ 7.2 ACharge Type : Supports USB charger rated 12 V / 2 ARated Power: 17 W ®Charge Time: 2 hours and 15 minutes (Using a USB charger rated 12 V / 2 A) |
| Working Time | Built-in Battery: Approx. 2.5 hoursBuilt-in Battery + External Battery: Approx. 4.5 hours |
| Storage Capacity | ROM 32GB + RAM 4GB |
| Video Output Port | HDMI Port |
| Power Supply Voltage / Current (USB-A port) | 5 V/1.5 A |
| Operation Temperature Range | 20° to 40° C (-4° to 104° F) |
| Storage Temperature Range | Less than one month: -30° to 60° C (-22° to 140° F)One month to three months: -30° to 45° C (-22° to 113° F)Three months to six months: -30° to 35° C (-22° to 95° F)More than six months: -30° to 25° C (-22° to 77° F) |
| Charging Temperature Range | 5° to 40° C (41° to 104° F) |
| Supported Aircraft Models © | Matrice 300 RTK |
| GNSS | GPS+GLONASS |
| Weight | External Battery excluded: Approx. 885 gExternal Battery included: Approx. 1054 g |
| Dimensions (Antennas folded) | 178×164 x108 mm |
| Model | RM500-ENT |
- Local regulations in some countries prohibit the use of the 5.8 GHz and 5.2 GHz frequencies and in some regions the 5.2 GHz frequency band is only allowed for indoor use.
- The Smart Controller will supply power for the mobile device installed, which may affect the above-mentioned specifications.
- The Smart Controller will support more DJI aircraft in future. Please visit the official website for the latest information.
[xyz-ips snippet=”download-snippet”]