DJO DONJOY OA Fullforce Knee Brace Instructions


 BEFORE USING THE DEVICE, PLEASE READ THE FOLLOWING INSTRUCTIONS COMPLETELY AND CAREFULLY. CORRECT APPLICATION IS VITAL TO THE PROPER FUNCTIONING OF THE DEVICE.
INTENDED USER PROFILE: The intended user should be a licensed medical professional, the patient or the patient’s caregiver. The user should be able to read, understand and be physically capable of performing the directions, warnings and cautions in the information for use.
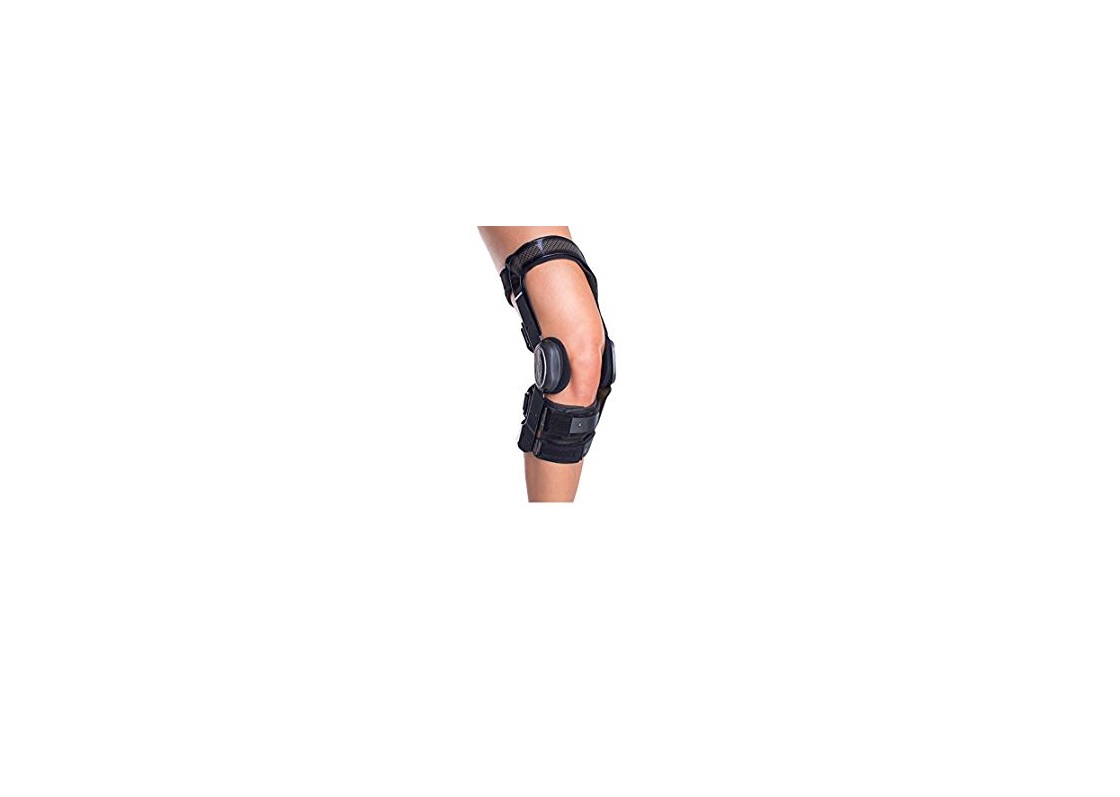
INDICATIONS: The DonJoy OA FullForce Knee Brace is designed to provide support to the knee. It may be suitable for those suffering from unit-compartmental knee osteoarthritis. Soft-good/ semi-rigid designed to restrict motion through elastic or semi-rigid construction.
CONTRAINDICATIONS: None
APPLICATION INSTRUCTIONS:
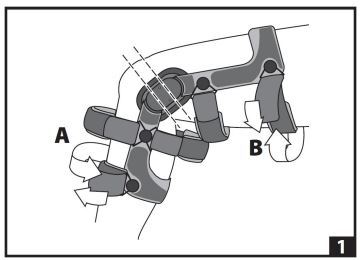
- While sitting on the edge of a chair, step through the brace. Flexing the knee to 45°, position the brace as shown in figure 1, centering the hinge about 1″ (2.54 cm) above the top of the kneecap and slightly past midline of the leg. Make sure the brace is not twisted on the leg. Secure the bottom calf strap first (A), then the top thigh strap (B).
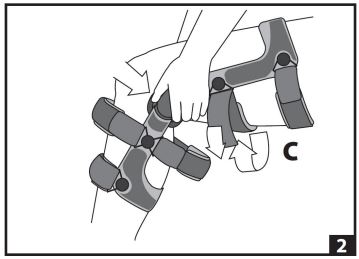
- Keeping the knee bent at 45 degrees, push both condyles (hinges) toward the back of the leg, as shown in figure 2. To maintain the position of the hinges, secure lower thigh strap (C) on the back of the leg.
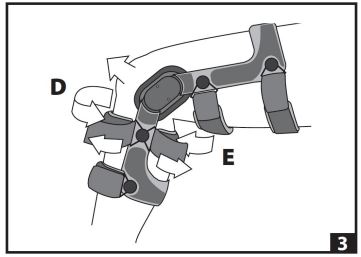
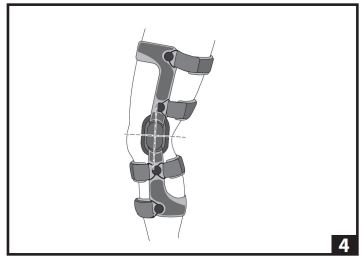
- Draw the hinges forward slightly before fastening the front tibial (shin) strap (D). Do not pull the hinges beyond midline of the leg. Secure the upper calf strap (E). Be careful not to pull this strap too tight and risk circulation problems.
- When all strapping is complete, the hinge should center just above the top of the kneecap and slightly behind midline. To ensure that no slippage occurs during activity, it is recommended to do a few knee bends or walk for a few minutes, then re-tighten the straps.
INSTRUCTIONS FOR ADJUSTABLE LOADING HINGEYour brace frame has a base corrective load built into it. You may “fine tune” your base load by doing the following: Turn the adjustment screws clockwise using the enclosed Allen wrench tool. You may vary the front and back screw adjustment depending on its interface with the knee and comfort of load. DO NOT turn any 1 screw more than 4 revolutions without toggling back to the other adjustable screw. Becareful not to bind the adjustment mechanism. Do not exceed 10 full revolutions or the pad may become dislodged. If this occurs, reverse the process. Always load brace according to your comfort and activity level.NOTE: Even if you don’t feel immediate relief, it doesn’t mean the brace isn’t working. It can take several weeks for soft tissue in the knee to adjust to the increased load provided by the brace.
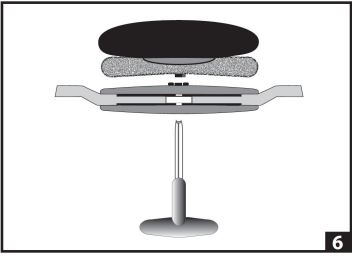
INSTRUCTIONS FOR CHANGEABLE STOPSStandard Hinge – Your brace comes with 10° extension stops installed. To change the installed stops, first completely remove the screw as shown. Then remove the stops. Insert the new stops, align with the holes in the hinge plate, then reinsert the screw. Using a Phillips head screwdriver, ensure that the screws are seated in the recess and completely tightened. (Fig. 5)Adjustable Hinge – To change your stops on the adjustable loading hinge, you must first remove the adjustable loading condyle from the hinge by toggling back and forth turning the screws clockwise until the pad is removed. Remove the stop and insert the new stop. To replace the telescoping pad, align the screws with the holes of the hinge plate. While holding it firmly, use the Allen wrench to turn counterclockwise until the threads engage. Toggle back and forth between screws until the pad is returned to its original position. (Fig. 6) Both medial and lateral stops must be identical in degree.Extension Stops: 0°, 10°, 20°, 30°, and 40°.Flexion Stops: 0°, 45°, 60°, 75°, and 90° (no flexion stops are installed upon shipment)
USE AND CARE
- If during activity, re-tightening is necessary, re-tighten all straps following steps in the application instructions.
- All straps and pads may be trimmed to fit individual variations in limb circumference.
- The brace may be used in fresh or salt water. Following use in water activities, drain thoroughly and rinse with clean, fresh water and then air dry.
- Hand wash your liners and condyle pads in cold water with mild detergent. AIR DRY ONLY, DO NOT HEAT DRY LINERS OR PADS.
- The hinge mechanism requires little maintenance in normal use. However, you may apply a dry lubricant such as a Teflon™ spray to the internal mechanism of the hinge. Dry lubrication is recommended following use in water.
- Periodically inspect hinge screws for tightness and retighten as needed.
WARNINGS AND PRECAUTIONS:
- This product is to be prescribed and fitted by a qualified healthcare professional.
- The frequency, duration of use and directions for use should be determined by your prescribing healthcare professional.
- ROM settings should not be changed without supervision of a medical professional.
- If discomfort, pain, swelling, changes in sensation or other unusual reactions occur while using this product, you should contact your doctor immediately.
- If you develop an allergic reaction and/or experience itchy, red skin after coming into contact with any part of this device, please stop using it and contact your healthcare professional immediately.
- Do not use over open wounds.
- Do not use the device if it is damaged and/or the packaging has been opened.
NOTE: Contact manufacturer and competent authority in case of a serious incident arising due to usage of this device.
 NOT MADE WITH NATURAL RUBBER LATEX.
NOTICE: WHILE EVERY EFFORT HAS BEEN MADE IN STATE-OF-THE-ART TECHNIQUES TO OBTAIN THE MAXIMUM COMPATIBILITY OF FUNCTION, STRENGTH, DURABILITY AND COMFORT, THERE IS NO GUARANTEE THAT INJURY WILL BE PREVENTED THROUGH THE USE OF THIS PRODUCT.
![]()
![]()
MDSS GmbHSchiffgraben 4130175 Hannover, Germany
DJO, LLC1430 Decision StreetVista CA 92081-8553 • USA.
©2021 DJO, LLC 13-7456 REV B 2021-01-28
[xyz-ips snippet=”download-snippet”]