
User Manual
![]()
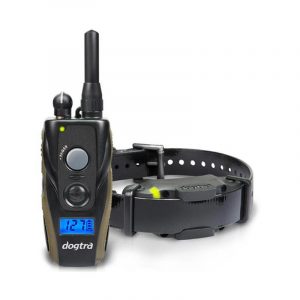
dogtra Portable Remote Controlled Dog Training Collars
Please read this manual before operating your system, and keep it for future reference.
Product Safety and Health Statements
Proper e-collar useDogtra e-collars are intended for the sole purpose of behavior modification of dogs. They are NOT intended for use on humans or use on other animals. Dogtra Company does not assume any liability for the improper use of an Dogtra e-collar.
Aggressive dogsDogtra highly recommends consulting a dog training professional that specializes in dog aggression when using an e-collar to correct dogs that are aggressive towards other dogs, animals or people.
Interference with other electronic devicesDogtra’s industry-leading technology filtering system ensures minimal interference with other electronic devices (garage door openers, mobile phones, etc.). Our digital microprocessor offers thousands of unique codes to eliminate frequency match-up with other Dogtra e-collars. Dogtra recommends consulting your physician if you are going to use the e-collar and you have any type of medical devices.
Inadvertent activationIf the Pulsating Nick button is held down for 5 seconds or more, the unit will automatically shut down. It reactivates when the button is released and depressed again.
Proper fit of the Receiver/CollarA loose fit can allow the receiver/collar to move around on the dog’s neck. When this happens, the contact points may rub the skin and cause irritation. If the unit is too loose, the contact points will not make proper contact and your dog will not receive consistent stimulation.
Duration your dog can wear the unitLeaving the receiver/collar in the same location on the dog’s neck for an extended period of time can cause skin irritation. If the dog is to wear the e-collar for long periods, occasionally reposition the receiver/collar so that the contact points are moved to a different location on the dog’s neck. Make sure you check for skin irritation each time you use the unit. If your dog exhibits signs of skin irritation, consult with a veterinarian.
Reaction to the stimulationEvery dog has a different tolerance and reaction to the stimulation. Please look at your dog’s reaction to find just the right level of stimulation. The stimulation level may vary depending on the situation and level of distractions. Normally a distracted dog (chasing another dog, person, squirrel, etc.) will require a higher level of stimulation to control compared to when there is no distraction.
At a Glance
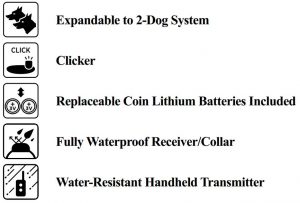
Included in Package

Optional AccessoriesTo purchase optional accessories, please visit www.dogtra.com or call our customer service at 1-888-811-9111.
![]() WARNING
WARNING
Keep batteries away from small children. If a child swallows a battery, please consult a physician or your local poison control immediately.
Main Features of the iQ CLiQ
Overview
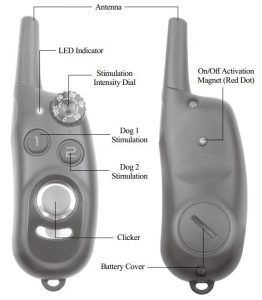
iQ CLiQHandheld Transmitter

iQ CLiQReceiver/Collar
Understanding your Training System
1. How to Turn the Unit On and Off
To activate the receiver/collar, place the red dot on the back of the handheld transmitter to the red dot on the receiver/collar. Hold the two red dots together for a moment until the LED light on the receiver/collar comes on.
To deactivate the unit, repeat the same procedure, holding the two red dots together momentarily. The LED light will turn red for a brief moment indicating that the receiver/collar is now shut off.
The handheld transmitter does not have an on/off switch, and it will only activate when the buttons are pressed.
2. How the Buttons WorkStimulation is sent to the receiver/collar by pressing one of the buttons on the handheld transmitter.
The number on the button controls the corresponding receiver/ collar.

Button 1 – Dog 1 Stimulation ButtonWhen the Dog 1 Stimulation Button is pressed, the corresponding receiver/collar will receive a momentary burst of stimulation. Holding down this button will send a pulsating stimulation for up to 5 seconds. The stimulation will automatically shut off when the button is pressed for more than 5 seconds.
Button 2 – Dog 2 Stimulation ButtonWhen the iQ CLiQ has been expanded to a 2-dog system, the Dog 2 Stimulation Button will send a momentary burst of stimulation to the corresponding receiver/collar. Holding down the stimulation button will send a pulsating stimulation for up to 5 seconds. The stimulation will automatically shut off when the button is pressed for more than 5 seconds.
When a button is pressed, the LED will illuminate on the handheld transmitter and the corresponding receiver/collar.
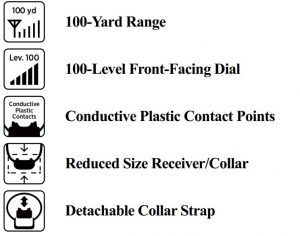
3. How to Fit the Receiver/Collar on the DogThe collar should be fitted so that the Conductive Plastic Contact Points press firmly against the dog’s skin. When properly fitted, you should be able to fit a finger or two snugly in between the contact points and your dog’s skin. When properly fitted, the receiver/collar should not move on the dog. The best location for the receiver/collar box is off to either side of the dog’s windpipe.
A loose fit can allow the receiver/collar to move around on the dog’s neck. When this happens, the contact points may rub the skin and cause irritation. If the collar is too tight, the dog may have difficulty breathing.

4. Finding the Right Stimulation Level
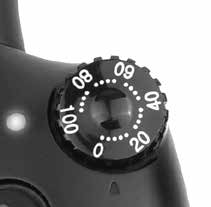
Stimulation level is controlled by the stimulation intensity dial: (0) being the lowest level and (100) being the highest level. Setting adjustment depends on your dog’s temperament and threshold for stimulation. Always start at the lowest level and work your way up. An appropriate level is when the dog responds to the stimulation with a mild negative reaction such as jerking or tensing of the neck muscles. When the dog’s attitude changes, especially during times of increased excitement or distraction, you may need to adjust the intensity level upwards.
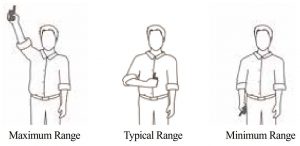
5. Maximizing the DistanceThe iQ CLiQ has a 100-yard range. Depending on the way you hold your handheld transmitter, the range may vary. Hold the handheld transmitter away from your body to get the greatest range. Avoid touching the antenna as the range may substantially decrease.
6. Checking the Status Using the LED Indicator

When the receiver/collar is on and ready to operate, the LED flashes every 4 seconds. The LED will glow steadily on both the handheld transmitter and the receiver/collar while any buttons are pressed.
The LED color indicates the battery life level.Green = Sufficient charge, Red = Replace battery
The LED on the handheld transmitter and receiver/collar also indicates the remaining battery life, with a green LED meaning sufficient charge, and a red LED meaning the battery needs to be replaced.
If the LED does not illuminate when a handheld transmitter button is pressed, the unit may need battery replacement.
7. Battery Replacement
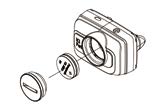
- Using a coin, unscrew the battery cover counterclockwise.
- Insert two batteries with both of the (+) plus sides facing upwards.
- Check to make sure that the rubber O-ring is in place, and screw in the battery cover clockwise.

- Using a coin, unscrew the battery cover counterclockwise.
- Insert two batteries with both of the (+) plus sides facing upwards.
- Check to make sure that the rubber O-ring is in place, and screw in the battery cover clockwise.
* ATTENTION
- When the batteries are placed incorrectly, the LED indicator light may turn on, but the unit will not operate properly.
- The unit is working properly when the LED Battery life indicator blinks once every 4 seconds.
- Make sure to remove the protective plastic battery covers before installing the batteries.
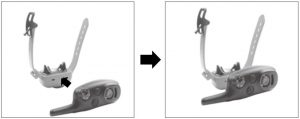
8. Attaching the Collar Strap

1. With the LED indicator and red dot facing up, insert the left portion of the iQ CLiQ receiver box into the collar strap.

2. Pull the collar strap firmly around the rest of the iQ CLiQ receiver box.

3. Be sure that the collar strap is wrapped fully around the receiver box of the iQ CLiQ.
* For video instructions on how to attach the collar strap, please visit www.dogtra.com
9. Expanding the iQ CLiQ into a 2-Dog System
- To turn the iQ CLiQ into a 2-dog system, start with the receiver/ collar turned off, and the handheld transmitter stimulation set to level 0. Hold down buttons 1 and 2 simultaneously for 5 seconds. Release the buttons once you see the LED indicator light blinking rapidly on the handheld transmitter.
- Place the red dot on the back of the handheld transmitter to the red dot on the receiver/collar. Hold the two red dots together for 5 seconds. Release them when the green LED blinks rapidly on the receiver/collar.
- While both the handheld transmitter and receiver/collar LED indicators are rapidly blinking, press button 2 to code that button to the receiver/collar you desire. The LED indicators on both the handheld transmitter and receiver/collar will blink rapidly for 15 seconds or until they have been coded together.
- When the iQ CLiQ has been coded with an additional receiver/ collar, button 1 will function as the Nick and Pulsating Nick stimulation on the first receiver/collar and button 2 will function as the Nick and Pulsating Nick stimulation on the newly coded second receiver/collar.
- To go back to a 1-dog system, repeat steps 1 and 2. While both the handheld transmitter and receiver/collar LED indicators are rapidly blinking, press button 1 on the handheld transmitter.
- When done correctly, both buttons 1 and 2 will now only operate the one receiver/collar you have coded. To check that the handheld transmitter is coded to the receiver/collar, press a button on the handheld transmitter, and the corresponding receiver/collar LED indicator will blink.
General Training Tips
Getting started with your iQ CLiQYour dog must know some very basic obedience commands before beginning training with the iQ CLiQ. A dog learns by first being shown a command, followed by lots of repetition over an extended period. As the dog becomes proficient at these commands, the trainer can introduce distractions and different locations to strengthen them. Throw in the correct amount of positive and negative reinforcement and you should end up with a wellmannered dog.
Obedience training on the leashYour dog must fully understand the obedience commands (sit, stay, here, heel, and kennel) before using the e-collar for reinforcement of these commands. A leash attached to a standard collar is used to “teach” the dog the basic obedience commands (here, heel, sit, and stay). A tug on the leash/collar is used to reinforce the command. When the dog complies with the command, use positive reinforcement/praise. Once the dog understands these commands, the e-collar can be used to reinforce them.
Training with the Clicker
1. Why a clicker?Since its introduction to dog training in the early 90s, the clicker has become a go-to tool among pro trainers and pet owners alike. Its utility as a training aid has been proven across a wide range of disciplines, including formal obedience and behavior modification.
2. Positive reinforcement and marker trainingPositive reinforcement strengthens correct behaviors by rewarding them. Rewarding your dog for a job well done is an important part of every sound training method, and as with effective punishment, good timing is critical. However, timing a reward with precision can be challenging, especially when delivering a toy or treat from your pocket.
The clicker, which makes a noise that is perfectly consistent and distinct, eliminates this problem by marking the exact moment your dog does something correctly. Clicking right as the behavior is occurring tells your dog that what he is doing in that moment has earned him a reward. You may then deliver the reward shortly afterward (a two second interval is best), even if the dog has moved on to some other behavior.
3. Getting started with your clickerTo teach your dog what the click means, practice clicking and then treating. Repeat until your dog clearly recognizes the sound and responds with a look of anticipation.
4. Capturing and shapingYou may select any behavior your dog does on his own and put it on cue, by clicking and rewarding when you see it. Take picking up a toy or lying down. By clicking and rewarding, you mark the behavior as something worth offering. Repeat until your dog offers it frequently enough that you can cue it ahead of time. Your dog will associate the cue with the selected behavior, after which you only click and reward it when performed on cue.
To shape new skills, begin by clicking and rewarding the closest behavior you are able to observe or elicit. As your dog offers it more reliably, gradually raise the bar, only clicking and rewarding those examples that come closest to the mark.
Your dog should enjoy working to earn clicks, and doing so should develop his mind more fully.
Beginning electric collar trainingWhen you feel your dog understands the obedience commands on the leash we can now start with the electric collar training. With the dog on the leash wearing the electric collar continue with your obedience drills. Light stimulation (Nick or Pulsating Nick) is going to be applied as a command is given; the stimulation is removed as the dog complies. Through repetition, a dog learns to turn off the light stimulation by performing the command. When the dog complies with the command, we use praise/positive reinforcement. The final step is the avoidance phase in which the dog learns that he can avoid the stimulation altogether by performing your commands. When these training procedures are complete, the electric collar is used as a reminder when the dog does not comply with your commands at home or in the field. Keep your initial training sessions short and positive. Dogs have a short attention span, especially young dogs.
How much stimulation to useAlways start with low levels of stimulation and work your way up depending on the disposition of your dog and any given situation. By using only enough stimulation to get your point across, you will have a more controllable environment and a dog that is under less stress. Animals (and humans) perform better in a less stressful environment.
For more training information, please visit our website at www.dogtra.com
Troubleshooting Guide
1. How do I replace the batteries and properly maintain the iQ CLiQ?
- If the iQ CLiQ does not turn on, the batteries may need to be replaced.
- With an average usage of 3 hours a day, the batteries will need to be replaced every 4 weeks.
- To clean the iQ CLiQ receiver/collar, first make sure the battery cover is fully sealed, then rinse the receiver/collar with soap and water. Dry the unit with a towel thoroughly before using. To clean the handheld transmitter, wipe down the outer casing with a damp cloth.
- When the battery is low on the iQ CLiQ handheld transmitter, the LED indicator light will go from green to red when any of the buttons are pressed. When the battery is low on the receiver/collar, the LED indicator will steadily blink red, every 4 seconds. With sufficient battery life remaining, the LED indicator on the receiver/collar will blink green, every 4 seconds.
- During storage, remove the batteries from both the handheld transmitter and the receiver/collar. When traveling, try to store your units in room or slightly warmer temperatures. Do not transport the unit exposed in extreme climates.
2. My dog is not reacting to the collar.
- Make sure the receiver/collar is turned on. Place the two red dots together to activate the receiver/collar.
- Be sure the collar strap is tight enough so both contact points are touching the dog’s skin.
- The unit may not be making proper contact with your dog’s skin because the coat is too thick and or long. The iQ CLiQ does not have an option for longer contact points so you may need to trim the hair on your dog’s neck, so both contact points are touching the skin.
- The intensity level may be too low for your dog. Keep increasing the stimulation until the dog responds usually by neck movement, head shaking, looking over his shoulder, etc. The response may be very subtle.
3. The LED indicator light comes on, but I do not feel any stimulation.
- Your tolerance may be higher than your dog’s. You may need to try the unit on your wrist where sensitivity is higher and/or increase the stimulation level. Be sure both contact points are touching your skin.
- The battery may be low, check the LED light for battery life.
- If you have done all of the above, your unit may need to be serviced. Please contact Customer Service at or 1-888-811-9111.
4. The handheld transmitter has no range, or stimulation is less when the dog is farther away.
- Make sure you are not touching the antenna as that may substantially decrease the range.
- The range indicated on the unit’s box is for flat terrain (line of sight). Hills, trees, buildings or moisture will affect the range of your unit. For best range, hold the handheld transmitter vertically above your head, and/or try moving to higher ground.
- Any electrical conductors can affect the range, such as cars, chainlink dog runs, metal structures, and radio towers. For best results, operate away from these items.
5. My dog has skin irritation.
- This may be due to an extended use of the contact points. If your dog exhibits signs of skin irritation, consult with a veterinarian. Once the dog’s skin returns to a normal condition, continue to use the collar and check your dog’s neck each time you use the unit. If you suspect your unit is malfunctioning please refer to the “Troubleshooting Guide” before sending your unit in for service.If you have any questions or concerns, you may direct your inquiries to or call 1-888-811-9111.
DOGTRA PRODUCT WARRANTY
LIMITED WARRANTYFor Dogtra Products Purchased from Dogtra Authorized Dealers
One-Year WarrantyExcept as otherwise provided below, Dogtra warrants to the original retail purchaser (“You”)that its Dogtra products shall be free of defects in materials and workmanship for a period of one (1) year from the date of purchase (“Warranty”). The Warranty covers the cost of repair (parts and labor) or replacement (if repair is not feasible) of a defective Dogtra product during said one-year period. For such repaired or replaced products, the remaining portion of the original warranty period, or ninety (90) days, whichever is longer, shall apply. Dogtra, at its sole discretion, shall determine whether to repair or replace a product covered by the Warranty.
Warranty ConditionsThe Warranty is not transferrable and applies to your Dogtra product only if:
- You are the original retail purchaser of the product,
- You bought the product from a Dogtra authorized dealer, and
- You present a receipt or other proof of purchase showing a valid purchase date, the nameand address of the authorized dealer, and the purchased product identified by model and/ or serial number.
Warranty ExclusionsThe Warranty does not cover damage, loss, or deterioration to your Dogtra product caused: by misuse, neglect, abuse, or other improper handling of the product; by failure to follow use or care instructions; by use of the product for other than its intended purpose; by accident or natural forces such as fire or flooding; or by normal wear and tear such as scratches to the product surface.
The Warranty also does not cover Dogtra products that: are purchased from non-authorizeddealers; are purchased outside of the United States or Canada; have been damaged during shipment (even if Dogtra paid or arranged for shipping); have been modified or tampered within any manner; are opened or repaired by anyone other than Dogtra; or have serial numbersthat have been altered or defaced.
Sole WarrantyThis Warranty is the only warranty offered by Dogtra for its Dogtra products. Other than said Warranty, Dogtra makes no other representations or warranties whatsoever regarding its products, whether oral or in any product manual, on any packaging, on any website, or in anyother written material. No dealer of Dogtra products, nor any employee or agent of Dogtra, isauthorized to make any additions, changes, or extensions to the Warranty. Dogtra, at its solediscretion and at any time, reserves the right to modify the Warranty.
DISCLAIMER OF OTHER WARRANTIESTHE FOREGOING WARRANTY IS PROVIDED IN LIEU OF ALL OTHER WARRANTIES, WHETHER EXPRESS OR IMPLIED. DOGTRA DISCLAIMS ANY IMPLIED WARRANTIES INCLUDING, BUT NOT LIMITED TO, THE IMPLIED WARRANTIES OF MERCHANTABILITY AND FITNESS FOR A PARTICULAR PURPOSE.
Limitation of RemediesDogtra’s liability is limited to the cost of repair or replacement of the Dogtra product under Warranty. Any claim or action to enforce the Warranty must be commenced within thirty (30) days of the Warranty’s expiration for your product. Dogtra will not be liable for any indirect, incidental, special, consequential, or similar damages based on breach of warranty, breach of contract, negligence, strict tort, or any other legal theory related to Dogtra and its products. Damages that Dogtra will not be responsible for include, but are not limited to: loss of income or profits; loss of revenue or savings; loss of use of the product or associated products; cost of any substitute products or services; inconvenience, downtime, or any other time; loss of goodwill; claims of third parties including customers; and damage to property.
Legal Rights May Vary By State or JurisdictionThe Warranty gives You specific legal rights, and You may also have other rights which varyby state or jurisdiction. Some states or jurisdictions do not allow certain limitations of impliedwarranties or of incidental or consequential damages or other remedies, so certain of the foregoing limitations may not apply to You.
If any portion of the Warranty is held by a court to be invalid or unenforceable, the remainingportions of the Warranty shall remain in full force and effect and shall in no way be affected or invalidated, and the invalid or unenforceable portion shall be modified so as to most nearly achieve the intent of the Warranty.
Product RegistrationDogtra recommends that customers register their products as soon as possible after purchase.Product registration will facilitate any future warranty service. You may also receive useful information and updates about your existing and future Dogtra products. To register your product, visit www.dogtra.com/product-registration. If your product is not registered with Dogtra, You will be required to provide a receipt or other proof purchase (as provided above) to qualify for warranty service.
How to Obtain Warranty ServiceShould your Dogtra product require warranty service, please contact Customer Service by phone or email for a warranty evaluation (see below for contact information). Upon approval of your warranty work, Dogtra will repair or replace (at Dogtra’s election) your product without charge for labor or parts. You are responsible for shipping, including cost, of your product to Dogtra for warranty service. Dogtra will handle shipping, including cost, of the repaired or replaced product back to customers in the USA. Dogtra will not be responsible for shipping, including cost and/or applicable taxes or fees, for products sent to Canada. Such costs, taxes, or fees will be borne by the customer.
To register your product, visit www.dogtra.com/product-registration.
Dogtra Customer Service22912 Lockness Avenue, Torrance, CA 90501(888) 811-9111Mon – Fri, 8:00 AM to 4:30 PM (PST)© 2019 Dogtra. All rights reserved.
References
[xyz-ips snippet=”download-snippet”]