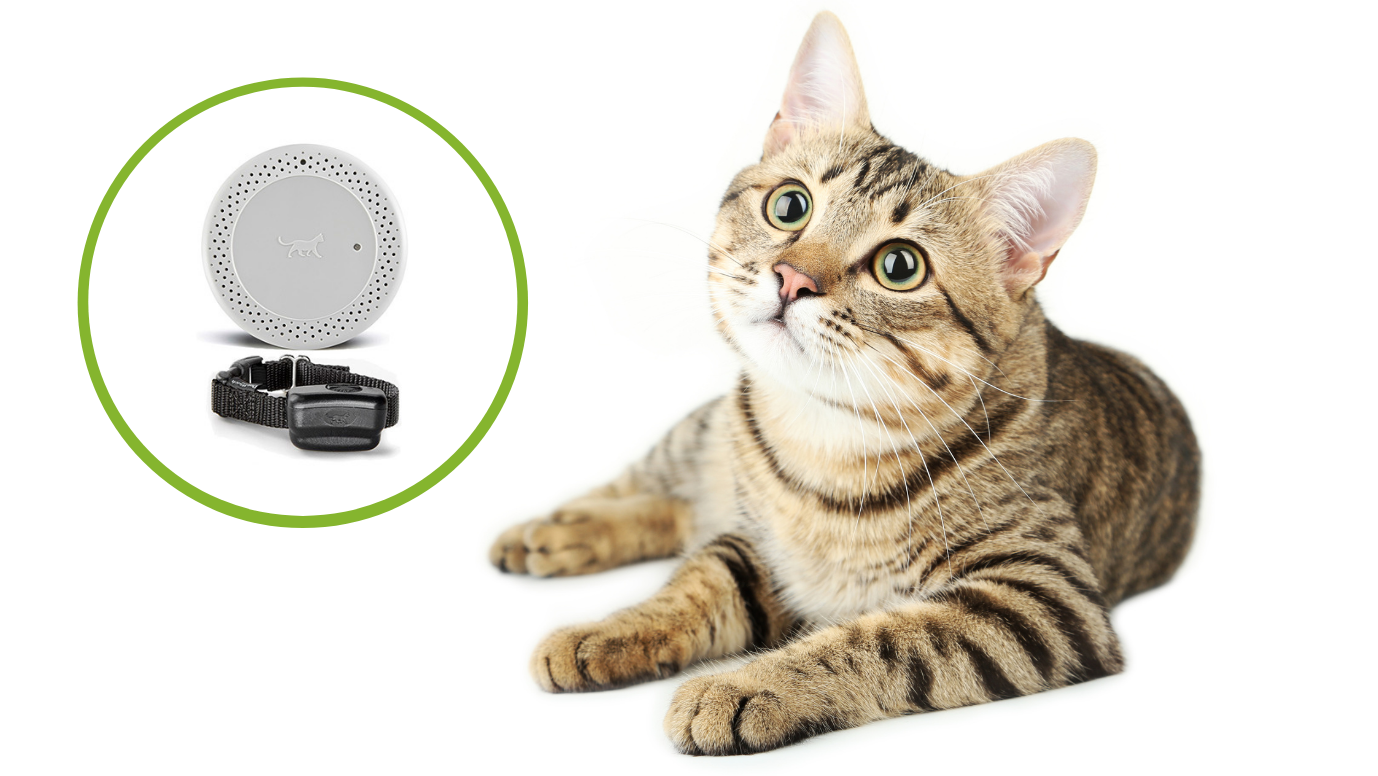
DogWatch CAT 200 Indoor Boundary
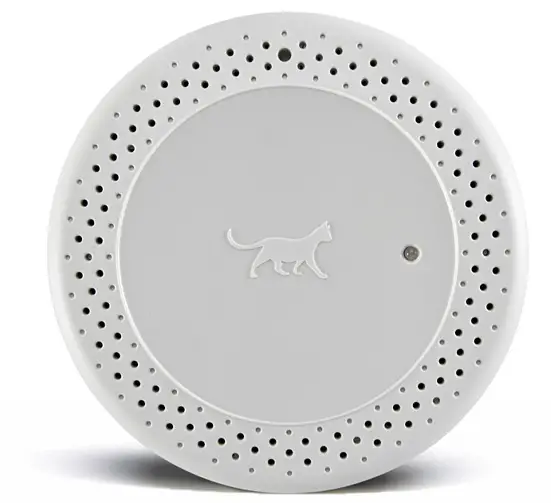
The DogWatch® CAT200 is a dual function transmitter designed to be used either with or without an attached boundary wire.
How the System Works
The CAT200 transmits a silent radio signal that is recognized by a receiver collar worn by your pet.
- When used without an attached boundary wire, the signal is transmitted a set distance from the transmitter. The signal can be adjusted from 2 feet to 10 feet in diameter (5 feet in all directions from the center of the transmitter) to create a pet-free avoidance area.
- When used with a boundary wire, the signal comes from the wire. The wire may be installed to the shape and size you need to create either an avoidance area (to keep your pet out of an area) or a containment area (to keep your pet within an area).
At the edge of the signal, there is a warning zone. As your pet approaches the warning zone, the receiver collar starts ‘beeping’ to alert your pet that he is too close to the boundary. With training (page 3), your pet learns that if he goes beyond the warning zone, the beep is quickly followed by a ‘correction’ (an unpleasant, but safe, sensation from the receiver collar). Your pet will learn to stay away from areas he associates with the warning beep.
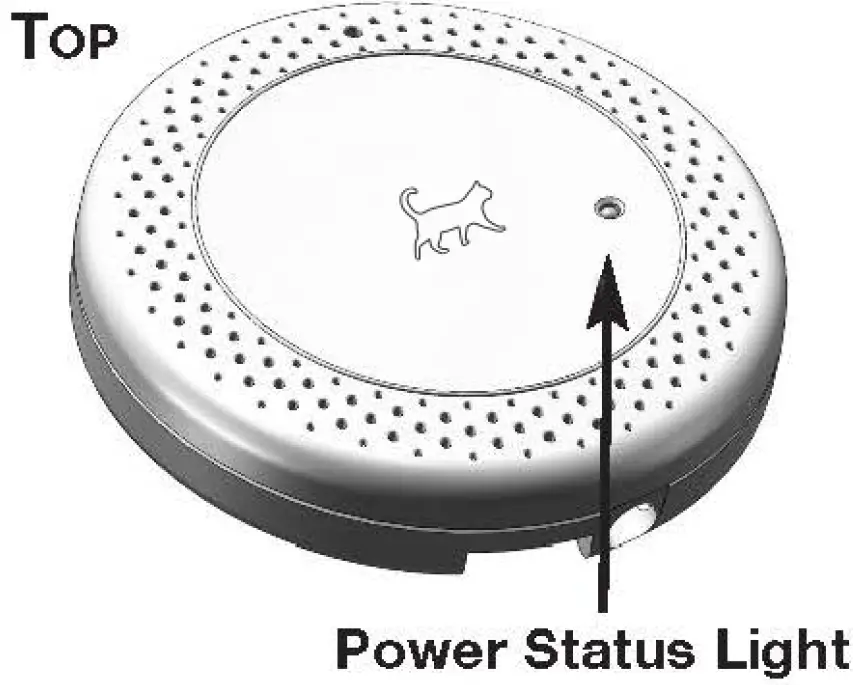
Power Status Light
The Power Status Light on the top of the transmitter glows green when the transmitter is plugged-in. The green light indicates that the transmitter is on and the signal is being sent.
- When used with a boundary wire, the Power Status Light glows green only if there is a continuous signal loop. The light glows red if there is no signal loop or if the wire is broken/damaged. (see page 2)Note: The green light may be steady green or blinking green. This depends on the Frequency setting of the transmitter.
Signal Range
Signal range is the distance the signal radiates from the transmitter or the boundary wire.
- Turn the knob toward the ‘+’ to increase the signal range.This increases the size of the signal field.
- Turn the knob toward the ‘-’ to decrease the signal range.This decreases the size of the signal field.Never adjust the signal range while your pet is wearing the receiver collar. Always test the signal field and mark the edge of the field with warning flags before allowing your pet near the boundary area.
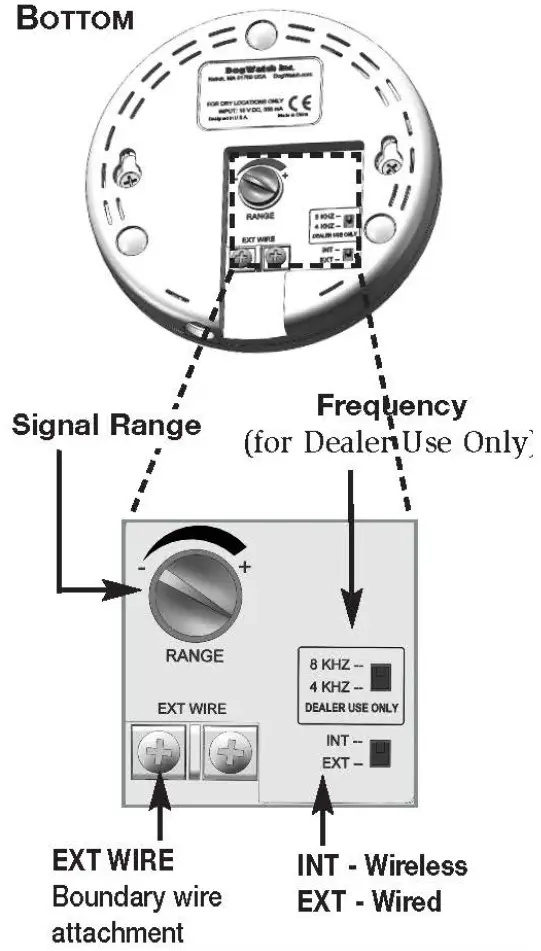
Frequency
This switch controls the broadcast frequency of the signal.Do NOT change this setting. It is for DEALER USE ONLY.
NOTE: Do not position the transmitter on or near large metal objects.
Installation
The INT/EXT switch on the back of the unit allows you to choose your preferred application. You cannot use both applications at the same time.
- INT allows you to use the transmitter without a boundary wire.
- EXT allows you to use the transmitter with a boundary wire.
WITH A WIRE
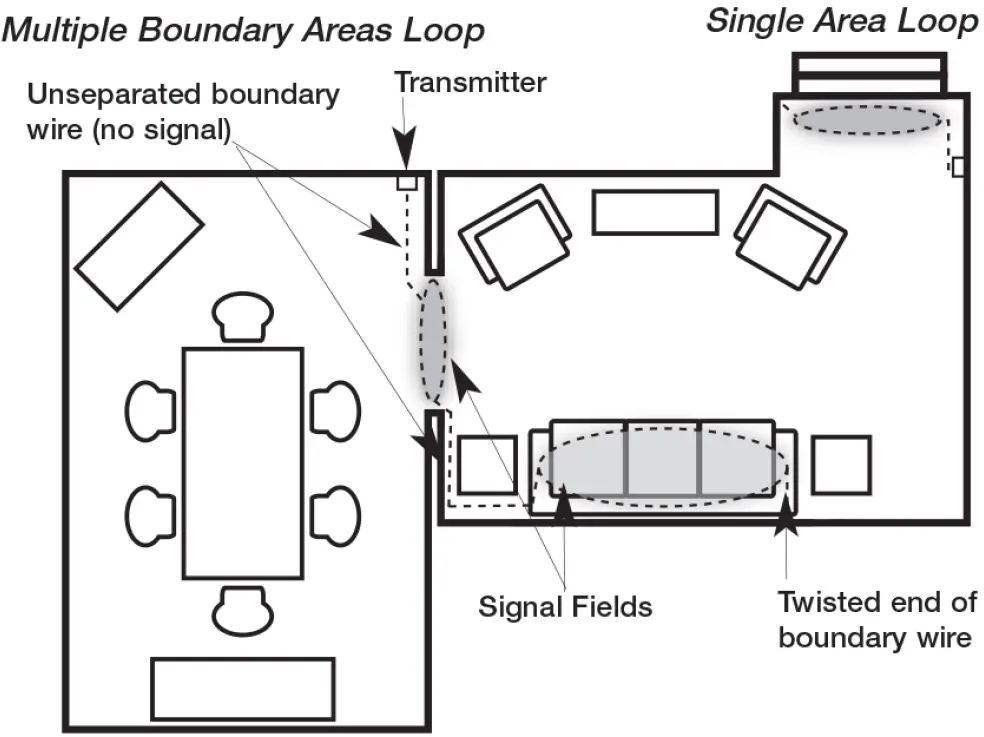
When using the boundary wire (EXT), you can create one or more avoidance areas that are off-limits to your pet or you can create customized containment areas. You can use the placement of the wire plus the size of the signal field to create customized areas. There are two ways to adjust the size of the signal field:
- Use the Signal Range adjustment
- Increase or decrease the distance between the separated wires (see below)
Follow these general guidelines when placing the wire.
- All wires should be placed so that they do not interfere with normal household activities.
- Do not install boundary wires next to baseboard heating units or set the transmitter on or near large metal objects as the these could pick up and transmit the radio signal.
Creating a Continuous Loop
The boundary wire must form a continuous signal loop for there to be a signal field. To accomplish this, you must strip and twist the final ends of the boundary wire together.The Power Status light turns red if you have not closed the signal loop or if the wire is broken.
Creating a Signal Field
The wire included with the transmitter is a double wire.
- The wires must be separated to create a signal.
- There is no signal when the wires are next to each other.
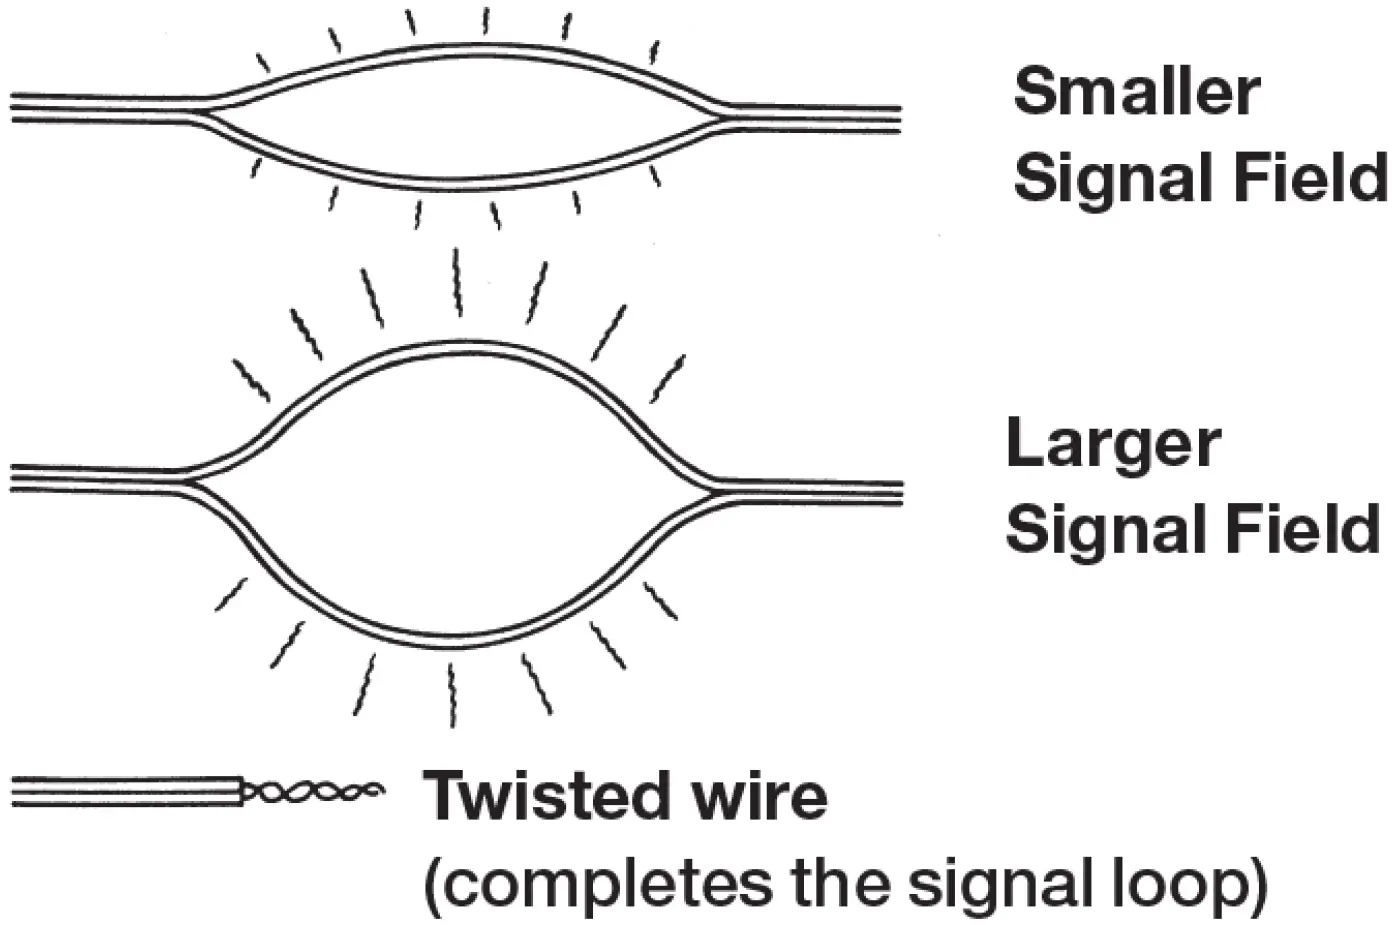
Separating the wires increases the size of the signal field as well as the signal range (the distance the signal travels from the wire).A signal field may be created in a single location or multiple locations on the wire.
- The boundary wire carries a harmless radio signal. You do not need to worry about an electrical shock from the wires.
- Boundary wire that is not separated to create a signal field may emit a slight radio signal which could activate the receiver collar if your pet lies directly on top of the wire.
Wire Break Alarm: If the boundary wire becomes disconnected or damaged so there is not a continuous loop, an alarm will sound and the Power Status Light on top of the transmitter turns red.
- The wire break tone sounds briefly when the unit is turned on and when the frequency is changed.
WITHOUT A WIRE
Set to INT on the back of the transmitter.Set to the desired signal range.Place the CAT200 transmitter in the center of the pet-free area. For example, on a counter, near a doorway or under a piece of furniture.
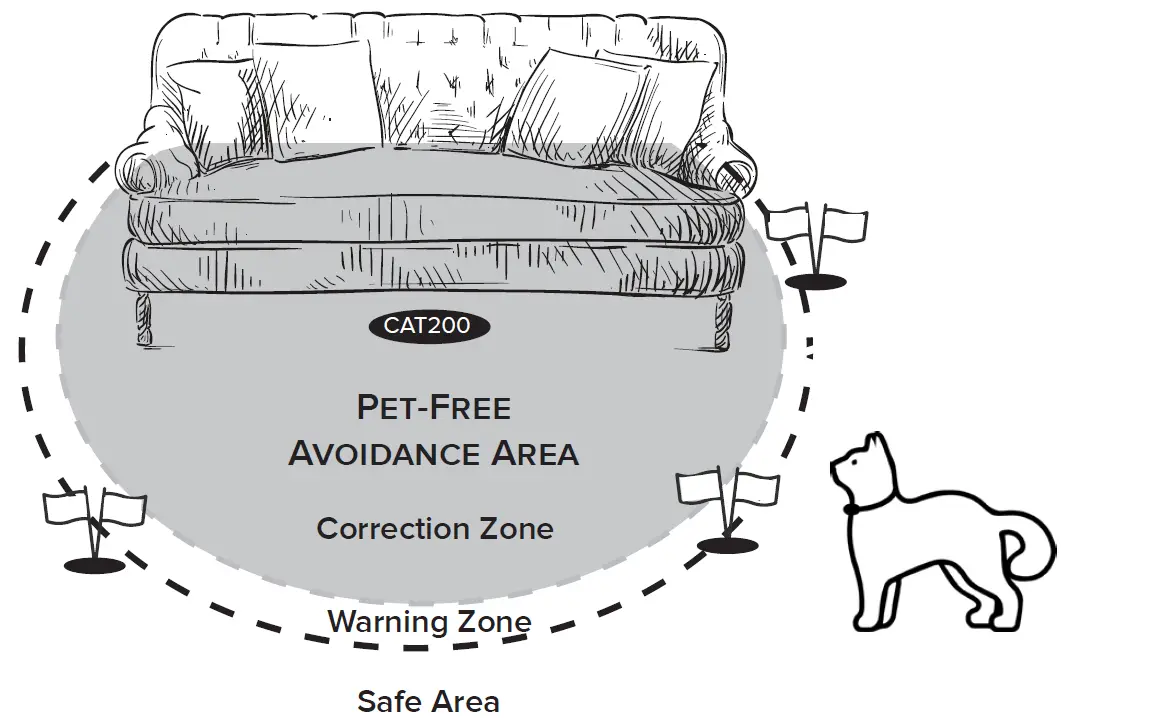
Training FlagsThe training flags are placed around the edge of the warning zone to mark the pet-free boundary area. The flags are gradually removed after your pet is trained.
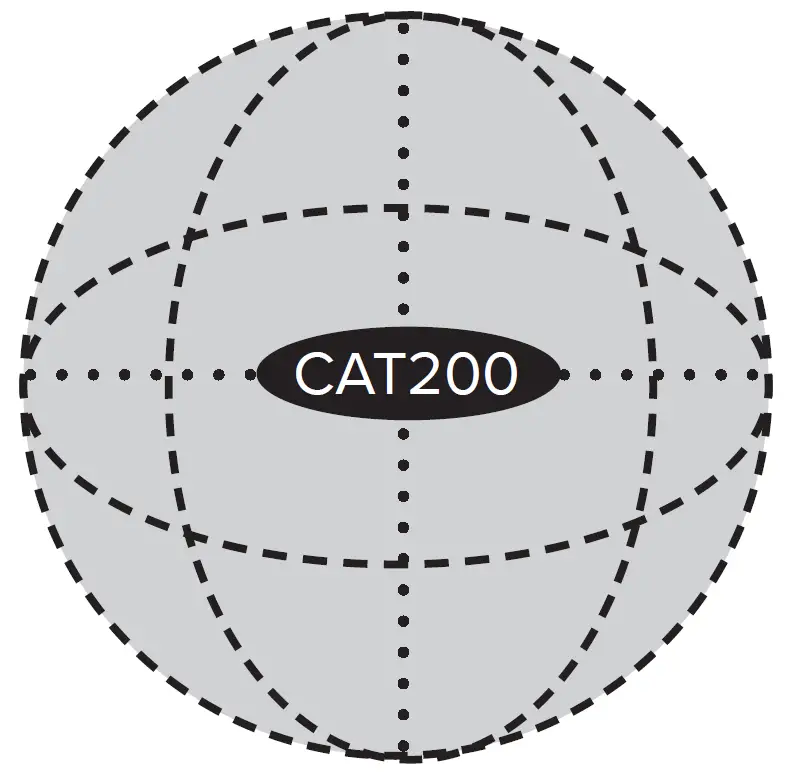
When used without an attached wire, the signal radiates in all directions around the transmitter (as if it were in the center of a large ball).The maximum signal range is up to 10 feet in diameter (5 feet in all directions from the center of the transmitter).
Training
The following is an abbreviated version of the training instructions. We recommend reading the full instructions on our website before you start the training. www.dogwatch.com/customer-resources/cats/training.
- Let your cat get comfortable wearing the collar. Before you set up the system, have your cat wear the receiver collar for a few hours a day. It should be snug, with the contact posts touching the skin, but not uncomfortably tight. When your cat is familiar with wearing the collar, set up the system.
- Mark the Pet Free Area with boundary flags. While the cat is not wearing the receiver, set up the transmitter to create your Avoidance Areas and turn it on. Set the receiver collar to its lowest level. Hold the muti-tool(included with collar) over the contact posts or hold the collar by its strap. When the collar is in the correction zone (or within the signal range of a wired system), you will hear “warning beeps” from the collar. Use the collar to locate the outer edge of the warning zone/signal range (where the warning “beeps” stop). Place the flags at the edge of the warning zone (see illustration above.)
- If you installed the system with a boundary wire, the “beep” will follow the wire placement. When using the transmitter without a boundary wire, the “beeps” will happen in a circle around the transmitter.
- Introduce your cat to the flags and warning beeps. The easiest way to do this is with two people. Person1 holds the cat about 6 feet from the flags. Person 2 holds the collar near the flags to activate the warning “beeps”. While the collar is “beeping”, Person 2 – without verbal cues – gently shakes the flags until the cat seems to associate the flags with the beeps. It is helpful to beep/shake for a few seconds, step away, repeat.
- Introduce your cat to the Avoidance Area. Place a special treat (chicken, steak, fish, etc. – not cat food) inside the Avoidance Area. Using small bites of the treat, make a trail that leads the cat to the flags. Set the receiver collar to the lowest level. At a safe distance from the Avoidance Area, put the receiver collar on your pet. Allow your cat to discover and eat the treats leading to the flags. When your cat gets close to the flags, it will hear the warning “beeps”. If your cat continues beyond the flags, it will trigger the stimulation from the collar. Upon receiving the stimulation, most cats will retreat from the flags. If the cat does not retreat, you may need to increase the stimulation level on the receiver collar. Continue the special treats food trail daily until the cat stops attempting to enter the Avoidance Area.
Troubleshooting
If your pet enters the signal field without responding to the correction signal, make sure that both the transmitter and the receiver collar are “on” and working. If both the transmitter and the receiver are functioning properly, you may need to increase the signal range on the transmitter (or the wire) or increase the correction level on the collar.Reminder: Never adjust the transmitter or the correction level while your pet is wearing the receiver collar.
Receiver
- Check to see if the transmitter is turned ‘on’.
- Take the receiver collar off the cat and check the receiver by placing the test light on the contact posts while holding the receiver next to your wireless transmitter or the boundary wire. If your test light lights up, your receiver is working properly. Be sure not to touch the contact posts.
- Make sure the collar fits and the contact posts on the receiver actually touch your pet’s skin.
- Be sure the receiver battery is inserted correctly.
- Replace the battery as needed. Battery life for the CR7 cat receiver is typically 6 months.
Transmitter
- Check to see if the transmitter is plugged-in and receiving power. Make sure that the power is not turned-off at a light switch or elsewhere. If functioning properly, the status light should be green (solid green or blinking green depending on the Frequency setting.)
- Make sure the transmitter INT/EXT switch on the back of the transmitter is correctly set for ‘Wired’ (ext) or ‘Wireless’ (int) use.
- If using a wire, make sure the wire is properly separated to create a signal field and make sure the ends of the wire are stripped and twisted together to create a continuous loop.
- Check the Range Setting on the back of the transmitter. Increase the range if necessary. Too small a signal field may allow your pet to get too close to the boundary area before receiving a warning.
2 Year Warranty
To see warranty information and submit Warranty Registration: www.dogwatch.com/support
This device complies with part 15 of the FCC Rules and with Industry Canada rules. Operation is subject to the following conditions: (1) This device may not cause harmful interference, and (2) this device must accept any interference received, including interference that may cause undesired operation.DogWatch products are lead-free and compliant with the Reduction of Hazardous Substances (RoHS) initiative.DogWatch Products are protected under U.S. Patent numbers: 6,360,698; 6,467,435; and 6,825,768
 report this ad
![]()
[xyz-ips snippet=”download-snippet”]