DOMETIC DM2672 DM & DMA Refrigerators Installation Guide DM2672, DM2682, DM2683, DMA4061, DMA4064,DMA4067, DMA4068, DM2872, DM2882,DMA4081, DMA4084, DMA4087
![]() WARNING: FIRE OR EXPLOSION HAZARD.
WARNING: FIRE OR EXPLOSION HAZARD.
Improper installation, adjustment, alteration, service or maintenance can cause injury or property damage. Refer to this manual. For assistance or additional information, consult a qualified installer, service agency or the gas supplier. Failure to follow these instructions could result in fire or explosion, which could cause property damage, personal injury or death.
![]() WARNING: FIRE OR EXPLOSION HAZARD
WARNING: FIRE OR EXPLOSION HAZARD
![]() WARNING: FIRE OR EXPLOSION HAZARD.
WARNING: FIRE OR EXPLOSION HAZARD.
IF YOU SMELL GAS:
- Open windows.
- Do not attempt to light any appliance and make sure all appliances are OFF.
- Extinguish any open flame.
- Do not touch any electrical switches.
- Do not use electronic devices, such as cell phones or landline phones.
- Evacuate the building or recreational vehicle.
- Shut off fuel supply at LP tank.
- Call emergency services.
Failure to follow these instructions could result in fire or explosion, which could cause property damage, personal injury or death.
FOR YOUR SAFETY: Do not store or use gasoline or other flammable vapors and liquids in the vicinity of this or any other appliance.
![]() WARNING
WARNING
Cancer and Reproductive Harm www.P65Warnings.ca.gov
NORTH AMERICAN ADDRESS INFORMATION
USA & CANADA
Service Office Dometic Corporation 5155 Verdant DrivekElkhart, IN 46514 1-800-544-4881 OPT 1
Service Center & Dealer LocationsVisit: www.dometic.com
Read these instructions carefully. These instructions MUST stay with this product.
EXPLANATION OF SYMBOLS AND SAFETY INSTRUCTIONS
This manual has safety information and instructions to help you eliminate or reduce the risk of accidents and injuries.
Recognize safety information
This is the safety alert symbol. It is used to alert you to potential physical injury hazards. Obey all safety messages that follow this symbol to avoid possible injury or death.
Understand signal words
A signal word will identify safety messages and property damage messages, and will indicate the degree or level of hazard seriousness.
![]() Warning: indicates a hazardous situation that, if not avoided, could result in death or serious injury
Warning: indicates a hazardous situation that, if not avoided, could result in death or serious injury
![]() Caution: indicates a hazardous situation that, if not avoided, could result in minor or moderate injury.
Caution: indicates a hazardous situation that, if not avoided, could result in minor or moderate injury.
Notice: is used to address practices not related to physical injury
indicates additional information that is not related to physical injury
Supplemental directives
![]() Read and follow all safety information and instructions to avoid possible injury or death.Read and understand these instructions before use / maintenance of t is product.Incorrect operation of this product can lead to serious injury or death. The installation must comply with all applicable local or national codes, including the latest edition of the following standards:
Read and follow all safety information and instructions to avoid possible injury or death.Read and understand these instructions before use / maintenance of t is product.Incorrect operation of this product can lead to serious injury or death. The installation must comply with all applicable local or national codes, including the latest edition of the following standards:
This appliance is certified under the latest edition of ANSI Z21.19, and CSA 1.4 Refrigerators using gas fuel. The installation must conform with local codes, or in absence of local codes, the following standards as applicable.
U.S.A.
- ANSI/NFPA70, National Electrical Code (NEC)
- ANSI/NFPA 1192, Recreational Vehicles Code
- Title 24 CFR, Part 3280, Manufactured Home Construction and Safety Standard
- National Fuel Gas Code, ANSI Z223.1/NFPA 54
Any modifications or deviations to this product:
- Will void agency certifications.
- Will void refrigerator warranty.
Canada
- CSA C22.1, Parts l & ll, Canadian Electrical Code
- CSA Z240 RV Series, Recreational Vehicles
- CSA Z240.4, Gas-Equipped Recreational Vehicles and Mobile Housing
- CSA B149.1, Natural Gas and Propane Installation Code CERTIFICATION
General safety messages
Warning: ELECTRICAL SHOCK, FIRE, AND/OR EXPLOSION HAZARD. Failure to obey the following warnings could result in death or serious injury:
- This product is equipped with a three-prong, (grounding) plug for protection against shock hazards. This product should be plugged directly into a three-prong receptacle that provides grounding in compliance with all applicable electrical codes. Do not cut or remove grounding prong from plug.
- Before refueling or parking near a gasoline pump, make sure all LP gas appliances (vented to the outside of the RV) are shut off. Otherwise, fumes from gasoline pumps could come into contact with an LP gas appliance burner flame and ignite.
- Do not store or use gasoline, oil- or gasoline-soaked rags, or other flammable vapors and liquids in the service area behind the refrigerator or in the vicinity of this or any other gas appliance
![]() Warning: FIRE, BURN, FROSTBITE, OR INHALATION HAZARD
Warning: FIRE, BURN, FROSTBITE, OR INHALATION HAZARD
Failure to obey the following warnings could result in death or serious injury:
- This product can produce carbon monoxide, which has no odor and can be life-threatening. The burner and flue system must be kept clean.
- Any modifications or deviations can lead to carbon monoxide leaking into the living area.
- Do not fracture or puncture the cooling unit
- Absorption-Cooling System: The cooling unit is under pressure and contains ammonia, sodium chromate, and other chemicals. Repeated or prolonged exposure to sodium chromate could cause organ damage or cancer. Exposure to a high concentration of ammonia refrigerant could cause pulmonary edema (fluid in lungs); chemical burns to eyes, lungs, and skin; and could cause a fire (when exposed to open flame).
- Compressor-Cooling System: The cooling unit is under pressure and contains tetrafluoroethane refrigerant, and may contain other chemicals. Contact with liquid refrigerant could cause irritation or frostbite to eyes and skin. Exposure to a high concentration of refrigerant could cause cardiac arrhythmia (irregular heartbeat). A high concentration of refrigerant could cause a fire (when exposed to open flame).
- If the refrigerator stops working and/or it emits an ammonia smell, immediately turn refrigerator off (if it is safe to do so), leave the vicinity, and contact a qualified Service Center.
- Do not touch cold surfaces (or stored items) in freezer compartment with damp or wet skin. Skin could stick to cold surfaces and freeze.
- Do not touch the cooling unit piping; it may be hot. Allow time to cool before touching.
![]() Warning: PRESSURE HAZARD.
Warning: PRESSURE HAZARD.
Do not place carbonated liquids. glass containers, or sealed bottles in the freezer. Liquids expand when frozen and could cause the container to explode.
Warning:
Failure to obey the following warnings could result in death or serious injury:
- This product must be installed by a qualified service technician.
- Any modifications or deviations can reduce cooling performance and/or result in damage to the refrigerator.
- Disconnect product from power supply when cleaning or maintaining the product.
- Do not allow anyone (including children) with reduced physical, sensory or mental capabilities, or lack of experience and knowledge, to use this product unless they have been given supervision or instruction (concerning use of this product) by a person responsible for their safety.
- Do not allow children to play with product or with fixed controls (if applicable).
INTENDED OPERATION AND STORAGE
The DM and DMA refrigerators are designed and intended for use only inside a recreational vehicle (hereinafter referred to as “RV”) for which it is supplied. Use the instructions to ensure correct operation of the refrigerator. Dometic Corporation accepts no liability for damage in the following cases:
- Faulty assembly or connection.
- Damage to the product resulting from mechanical influences and excess voltage.
- Alterations to the product without the expressed permission from Dometic.
- Use for purposes other than those described in the operating manual.Dometic Corporation reserves the right to modify appearances and specifications without notice.
Safe Storage
If this product is placed in storage for extended periods, it should be located in ambient conditions that do not go below a minimum temperature of -30 °F (-35 °C) or above a maximum temperature of 130 °F (54 °C) for periods in excess of 12 hours at one time.
Safe Operation
For purposes of operation, this product should not be operated in temperatures that go below a minimum temperature of 5 °F (-15 °C) or above a maximum temperature of 110 °F (43 °C) for periods in excess of 12 hours at one time.
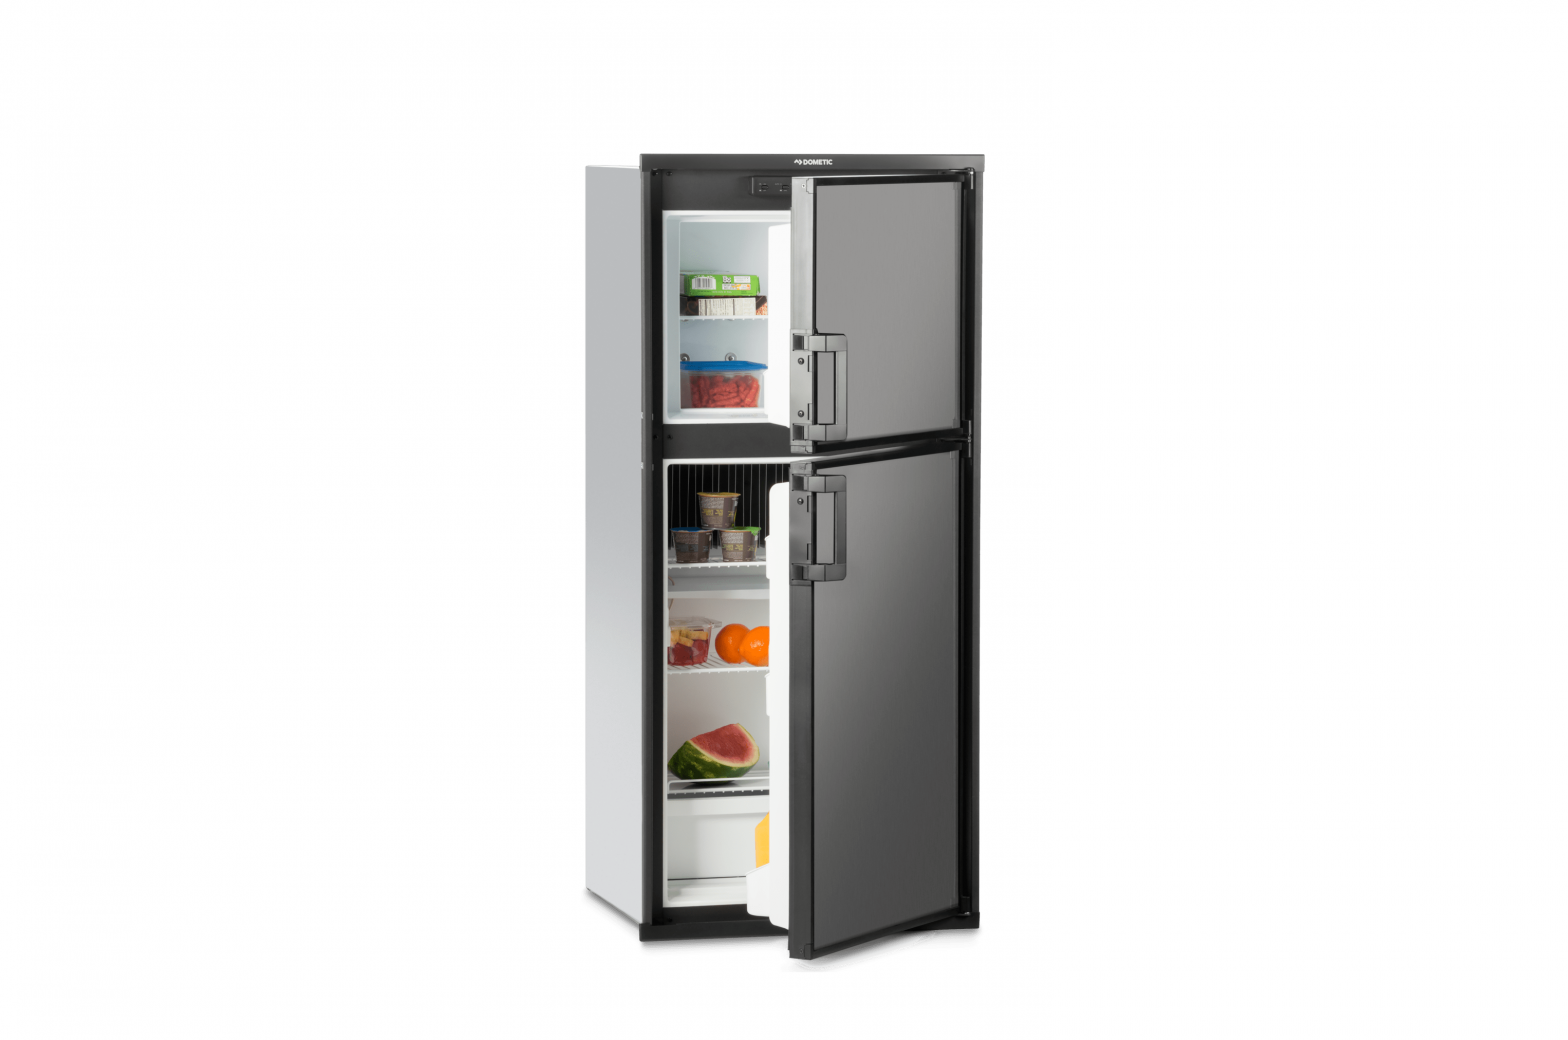
REFRIGERATOR OVERVIEW
Absorption cooling systems:
- Adjust the thermostat to the coldest temperature setting when turning on the refrigerator. The cooling cycle may require an extended running time before the cooling effect is observed.
- Turn off the refrigerator when it is not in use for an extended period of time.
Automatic energy selector system:
- The refrigerator can automatically select the most suitable energy source available.
- The system can be user-set to be fully automatic (AUTO mode turned on), or to operate on LP gas only (AUTO mode turned off).
- The system can be manually set to DC mode on three-way models. DC mode overrides all other operating modes. The refrigerator controls will work down to 9.6 VDC.
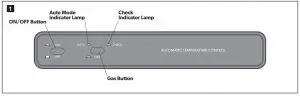
Understanding the control panel
 DM2672, DMA4061, DM2872, DMA4081
 DM2682, DMA4064, DMA4067, DM2882, DMA4084, DMA4087
 DM2683, DMA4068
| Button | Function |
| ON/OFF | Main power control |
| AUTO/GAS | Selects mode: auto or gas |
| Temperature | Selects temperature setting |
| DC | Selects DC mode |
| Lamp | Function |
| AUTO | AUTO mode is activated |
| CHECK | Check burner status |
| GAS | GAS mode is activated |
| Temperature | Indicates temperature setting |
| AC | AC mode is activated |
| DC | DC mode is activated |
Understanding the modes of operation
Auto mode
- The AUTO mode indicator lamp is illuminated.The control system will automatically select between AC and LP gas operation.
- AC has priority over LP gas. If AC is unavailable, the system will switch to LP gas. When AC is available, the system will switch back to AC.
DC mode
DM2683 and DMA4068 only.
- When operating in DC mode, all other indicator lamps will be off.
- Press the DC selector button to turn off the DC mode and select another mode.
- Switch to AUTO or GAS mode when there is no charging of the house battery. Running the refrigerator on 12VDC will quickly drain the battery
Gas mode
- This mode provides LP gas only.
- The control system activates the ignition system and attempts to light the burner for about 45 seconds.
- DM2672, DMA4061, DM2872, DMA4081: When operating in GAS mode, the AUTO mode lamp will be off.
- If the burner fails to ignite, the CHECK indicator lamp will flash on and off, and a buzzer will beep.
- Restart the refrigerator if the CHECK indicator lamp is flashing and the buzzer is beeping. The CHECK indicator lamp and buzzer will not turn off until the refrigerator is restarted, even if AC becomes available.
Limp mode
- If a major operating component fails, the control system will continue operating the cooling system.
DM2672, DMA4061, DM2872, DMA4081:
- The control will run the cooling unit continuously if it cannot read the temperature sensor.
- The refrigerator will continue operating in this mode indefinitely, or until a new sensor is installed and the system is reset.
DM2682, DM2683, DMA4064, DMA4067, DMA4068, DM2882, DMA4084, DMA4087:
- If the display module becomes nonfunctional:
- The control system reverts to full automatic operation
- The temperature setting is maintained at the middle position.
- The power module will continue to re-establish operation of the display module.
- If the temperature sensor fails:
- The control system operates on the energy source selected on the control panel.
- The cooling unit runs continuously.
- The refrigerator will continue to operate in this mode indefinitely, or until a new sensor is installed and the system is reset.
Understanding the storage compartments
Food storage
Read before proceeding:
- The food storage compartment should remain closed to maintain the required temperature.
- The coldest locations in the refrigerator are under the cooling fins and at the bottom of the refrigerator.
- The warmest locations in the refrigerator are on the upper door shelves.
- Cover foods to maintain freshness.
- Allow the refrigerator to cool before placing food inside.
- Allow hot drinks or food to cool to room temperature before placing them inside the refrigerator.
- Arrange foods in the refrigerator to allow for free air circulation. Do not overstock the refrigerator.
- Ensure that the refrigerator door is not left open longer than necessary. This will reduce frost formation and maintain the efficiency of the refrigerator
Frozen food storage
The frozen food storage compartment is not designed for deep- or quick-freezing food.
- Cover foods to prevent them from drying out.
- Place quick frozen fruits and ice cream at the bottom of the aluminum liner.
- Wipe excess moisture off items before storing them in the frozen food storage compartment. This will prevent frost buildup.
- Allow meat and fish to precool in the refrigerator before storing it in the frozen food storage compartment
| Model | Total Refrigerated Volume (cu. ft) |
| DM2672, DM2682, DM2683, DMA4061, DMA4064, DMA4067, DMA4068 | 6 |
| DM2872, DM2882, DMA4081, DMA4084, DMA4087 | 8 |
Ice Cubes
DM2672, DMA4061, DM2872, DMA4081 are controlled by factory preset temperature settings.
- Place ice cube trays in direct contact with the freezer compartment.
DM2682, DM2683, DMA4064, DMA4067, DMA4068, DM2882, DMA4084, DMA4087:
- Set the thermostat to the highest setting to make ice more rapidly.
- Return the thermostat to the normal setting once ice is formed to prevent the refrigerator from becoming too cold.
OPERATION
Read before proceeding:
- Keeping the refrigerator level:
- The refrigerator must be kept level when the RV is parked for several hours or more.
- Loss of cooling could occur if the refrigerator operates in a noticeable out of-level position for several hours.
- It is not critical for the refrigerator to be level when traveling.
- Operating the refrigerator at high altitudes:
- When the refrigerator is operating on LP gas, reduced cooling performance and burner outage may occur at elevations higher than 5,500 feet above sea level.
- Operate the refrigerator on electric power at altitudes higher than 5,500 feet.
- Operating the refrigerator in extreme cold:
- Refrigerator performance may be reduced in sub-zero temperatures. This temporary condition is normal for absorption refrigerators
Ice maker models only: the refrigerator is equipped with a heater tape wrapped around the water solenoid valve and outlet water tube. During cold weather operation below 32 °F (0 °C), the automatic temperature switch will turn the heater tape on automatically
Starting the refrigerator
Warning: FIRE HAZARD. Make sure there are no obstructions (blockage) between burner jet and burner tube BEFORE lighting LP gas burner. Failure to obey this warning could result in death or serious injury
- Check that all the manual gas valves are in the ON position.
- Ensure that a continuous 12 VDC supply is available for the electronic control to function.
- Press the ON/OFF button.
- Select the operation mode:
- AUTO mode (AC and Gas): Press the AUTO/GAS mode selector button (if not already on). Theilluminated lamp indicates the selected mode. If the CHECK indicator lamp is illuminated, refer to“4.2 Reigniting the burner” .
- GAS mode (LP gas operation only): Press the AUTO/GAS mode selector button to turn off the AUTOmode (if not already off). Within 45 seconds, the burner should ignite and operate normally.
- DC mode (three-way models only): Press the DC mode indicator button. The DC lamp will be turned on. To select AUTO or GAS mode, turn off the DC mode by pressing the DC mode selector button. The DC lamp will then turn off.
Refer to section “3.1 Understanding the control panel”.
Reigniting the burner
- If the CHECK indicator lamp is flashing, and the buzzer is beeping, turn the refrigerator OFF for five seconds and then ON again.
Read before proceeding:
- If 120 VAC becomes available while the CHECK indicator lamp is flashing and the buzzer is beeping, the CHECK lamp will remain flashing and the buzzer will continue to beep until the refrigerator is restarted. The refrigerator will operate on 120 VAC during this time.
- Refer to section “3.1 Understanding the control panel” .
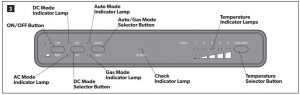
Removing and replacing the shelves
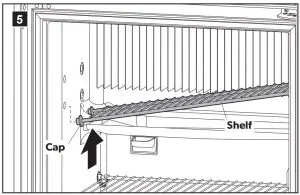
- Remove the shelf locks by inserting the tip of a flatbladed screwdriver into the slot in the locks.
- Turn the screwdriver counterclockwise and remove the shelf locks from the wire shelf.
- Slide the shelf to the left until the plastic caps disengage.
- Tilt the shelf to one side at an angle while pulling forward.
- Reposition the shelf in the desired location.
- Insert the ends of the wire shelf on the left-hand side and slide the shelf into the holes on the righthand side.
- Slide the plastic caps into the holes of the wall.
- Snap the shelf locks back onto the wire shelf.
Adjusting the thermostat
DM2682, DM2683, DMA4064, DMA4067, DMA4068, DM2882, DMA4084, DMA4087:
The thermostat controls both the gas and electric operation. After the initial start-up, adjust the thermostat to the desired temperature setting.
Press the temperature selector button until the lamp at the desired setting is illuminated
DM2672, DMA4061, DM2872, DMA4081: The temperature is controlled by a factory-preset temperature setting.
Using the ice maker (if equipped)
Read before proceeding:
- The first few cycles may produce small ice cubes due to air trapped in the water lines.
- If ice cubes remain too small or stick together, refer to “Adjusting the ice cube size” on page 10.
- Discard the first container of ice cubes if the water system has been winterized or out of use for several weeks.
Turning the ice maker on and off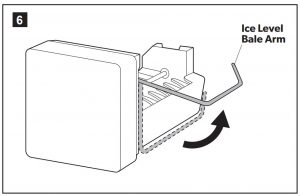
- Ensure that the refrigerator is connected to 120 VAC.
- Open the valve supplying water to the refrigerator.
- Keep the bale arm in the up (OFF) position until water enters the ice maker.
- Set the bale arm in the down (ON) position once there is ice in the ice maker.
- Raise the bale arm to the up (OFF) position about 1-1/2 hours before traveling, to allow the water in the mold assembly to freeze and prevent water from splashing out of the mold assembly.The ice maker will automatically fill the mold assembly and eject the ice cubes into the storage bin until it is full.
Adjusting the ice cube size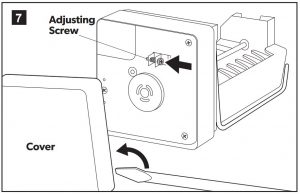
Read before proceeding:
- The water supply system must have a minimum pressure of 15 pounds-per-square-inch gauge(psig).
- A 1/4″ diameter water line to the water valve must be used at the rear of the refrigerator.
- The water line must have a manual shutoff valve in an easily accessible location.
- The maximum water level is represented by a thin line on the mold assembly. Do not allow the water level to exceed this line.
- Remove the protective cover from the ice maker by inserting a flat-bladed screwdriver into the slot and gently twisting the screwdriver.
- Adjust the ice cube size by turning the adjusting screw counterclockwise to increase the size of the ice cubes, and clockwise to decrease the size of the ice cubes.Do not turn the adjustment screw more than one revolution at a time.
- Place the protective cover back on the ice maker.
- Allow the ice maker to cycle several times before making further adjustments.
Turning off the refrigerator
Notice: Do not allow the refrigerator to run unattended when there is a risk of loss of electricity or fuel. Food spoilage could occur.
- Press the ON/OFF button on the control panel to the OFF position to shut off all power to the refrigerator.
The refrigerator’s control system will consume a few milliamps even after it is turned off. If the RV is being put into winter storage, put the RV batteries on a battery charger or turn off the RV’s main 12 VDC switch to prevent the battery from discharging.Refer to section “3.1 Understanding the control panel”.
CARE AND MAINTENANCE
Notice: Failure to obey the following notices could result in damage to the refrigerator:
- Do not use a hot-air blower to remove frost from storage compartment(s). Permanent damage could occur, including warped metal or plastic parts.
- Do not use strong chemicals or abrasives to clean parts, as their protective surfaces will be damaged.
Read before proceeding:
- Any absorption refrigerator that is to be taken out of service for an extended period of time must be turned off.
- Do not allow the refrigerator to run idle or unattended for an extended period.
- If the refrigerator has not been used for a long time, or the LP tanks have been refilled, air may be trapped in the supply lines.
- Turn the refrigerator OFF and then ON to purge the air from the lines.
- Repeat this procedure up to four times if the burner does not light after 45 seconds.
- Ensure that the LP gas supply tanks are not empty, and that all manual shutoff valves in the lines are open, if repeated attempts fail.
- Turn the refrigerator OFF and contact a service center if the problem persists.
Defrosting the refrigerator
- Press the main power ON/OFF button to turn OFF the refrigerator.Refer to section “3.1 Understanding the control panel” on page 5.
- Empty the refrigerator.
- Ensure that the drip tray is in place under the finned evaporator in the food storage compartment.
- Leave the cabinet and freezer doors open.Defrosting time can be reduced by filling ice trays with hot water and placing them in the freezer compartment.
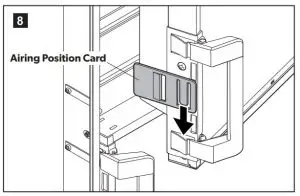
Using the door airing feature
If the refrigerator is to be put into storage or will not be used for an extended period of time, use the door airing feature to prevent mold, mildew, or unpleasant odors from developing.
DM2672, DM2682, DM2683, DM2872, DM2882:
- Use the door airing position card as shown to keep the doors latched, but ajar.
 DMA4061, DMA4064, DMA4067, DMA4068, DMA4081, DMA4084, DMA4087
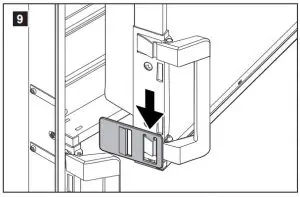
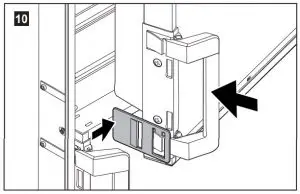
 - Use the door latch airing position to to prevent the door from closing.
- Open both the freezer and fresh food door to access the door latch.
- Swing the airing feature out from the door latch.
- Close the doors until they gently rest against the airing feature on the door latch.
 DMA4061, DMA4064, DMA4067, DMA4068, DMA4081, DMA4084, DMA4087
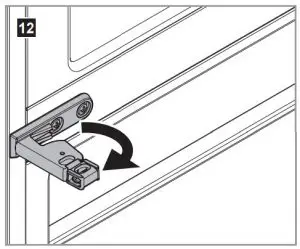
Cleaning the refrigerator
- Inspect and clean the refrigerator components periodically to keep the refrigerator operating efficiently.
- Use a lukewarm, weak solution of baking soda and water to clean the interior liner of the refrigerator.
- Use warm water only to clean the finned evaporator, gasket, and shelves.Do not spray liquids near electrical outlets, connections, or other refrigerator components.
- Ensure that the thermistor bulb and thermistor bracket are properly positioned. Refer to “6 Troubleshooting”
- Check the lower vent, upper vent, and the area between these openings for any obstructions, such as bird or insect nests.
- Dust off the coils on the back of the refrigerator, if accessible, using a soft bristled brush.Refer to sections “5.5 Maintaining the refrigerator” on page 13 and “6 Troubleshooting”.
Preparing the refrigerator for storage/winterizing the refrigerator
- Defrost the refrigerator. Refer to “5.1 Defrosting the refrigerator” .
- Prepare the ice maker, if equipped. This procedure must be performed by a qualified service technician.
- Clean the refrigerator. Refer to “5.3 Cleaning the refrigerator” on page 13.
- Place doors in the airing position. Refer to “5.2 Using the door airing feature”.
Maintaining the refrigerator
Read before proceeding:
- Two-way models are equipped with two fuses, one for the refrigerator control system and one for the AC heater.
- The fuse for the control system is a resettable fuse and must not be replaced with a standard fuse. If the resettable fuse has been tripped:
- Determine and remedy the cause.
- Press the ON / OFF button to OFF.
- Wait five seconds.
- Press the ON/OFF button to ON.
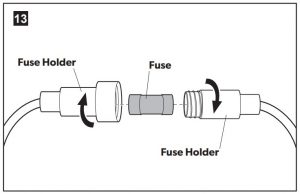
- Three-way models are equipped with three fuses: two fuses in the power module, and one inline blade fuse.
Changing the power module fuse
- Turn OFF the refrigerator.
- Unplug the refrigerator for 120 VAC and disconnect the 12 VDC wires.
- Remove the power module cover.
- Snap the fuse out of the fuse holder and fit the new fuse into the fuse holder.
- Replace the power module cover according to the instructions molded on the cover.
- Reconnect the 12 VDC wires and plug in the 120 VAC power cord.
- Turn ON the refrigerator.
Control System: 3 AAC Heater: 5 A12 VDC Heater: 30 A
DM2672 (OPTIONAL FAN), DM2872 (OPTIONAL FAN), DM2882 (OPTIONAL FAN), DMA4061, DMA4064, DMA4067, DMA4068, DMA4081, DMA4084, DMA4087: Inline Fuse Replacement
Refrigerators equipped with a vent fan(s) include an inline fuse on the wire supplying power to the fans(s). This wire is connected to the 12 VDC terminal block supplying DC power to the refrigerator controls.
- Disconnect 12 VDC power.
- Open the fuse holder.
- Replace the fuse using a 3 A fuse.
- Screw the fuse holder back together.
- Reconnect 12 VDC power.
Maintenance items
|
Owner-Performed |
Qualified Service Technician-Performed |
| Cleaning the refrigerator | Checking the LP gas connections |
| Defrosting the refrigerator | Checking the control system |
| Winterizing the refrigerator | Cleaning the burner |
| Changing the fuses | Removing and disposing of the refrigerator |
TROUBLESHOOTING
| Symptom | Check/Remedial Action |
| Refrigerator stops cooling. | Turn off the refrigerator immediately and contact a Dometic dealer or service center for repair. |
| Do not leave the refrigerator running for an extended period of time. | |
| Do not attempt to solve the problem by repeatedly restarting the refrigerator. | |
| Do not use the refrigerator until it has been repaired. | |
| Refrigerator emits an ammonia smell. | Immediately turn the refrigerator off at the front control panel. |
| Do not open refrigerator doors. | |
| Open RV windows and doors (to air out the RV) and evacuate. | |
| Turn off manual LP gas valve at the rear of the refrigerator. | |
| Disconnect the 120 VAC power at the rear of the refrigerator. | |
| Contact a Dometic dealer or service center for repair. | |
| Do not use the refrigerator until it has been repaired. | |
| Refrigerator or freezer is not cold enough. | Check the thermostat (if present) and adjust it if necessary. |
| Check the outlet by plugging in another device. | |
| Ensure that the refrigerator is level. | |
| Inspect the door gasket. | |
| Ensure that there is not heavy frost buildup on the evaporator fins. | |
| Ensure that the refrigerator is not overpacked. | |
| Refrigerator does not work on electric. | Check the outlet by plugging in another device. |
| Check if there is a power failure. | |
| Check the AC fuse in the refrigerator Power/Control module. | |
| Turn off the refrigerator and contact a Dometic dealer or service center for repair if the problem persists. | |
| Refrigerator does not work in gas operation mode. | Check the LP gas tank and change it if necessary. |
| Purge air from the gas line by repeating the ignition sequence. | |
| Turn off the refrigerator and contact a Dometic dealer or service center for repair if the problem persists. | |
| Refrigerator emits an odor from fumes. | Turn off the refrigerator and contact a Dometic dealer or service center for repair. |
| Refrigerator is too cold. | Ensure that the thermistor bracket is clipped to the last evaporator fin on the right side of the cooling flange and centered vertically on the fin. |
| Ensure that the thermistor bulb is positioned inside the thermistor bracket groove and centered vertically in the bracket. |
If the problem persists and the refrigerator is still not working properly, turn refrigerator OFF and contact the nearest service center. State the problem, model, product, and serial number. These details are stated on the data label inside the refrigerator compartment.
DISPOSAL
Warning: SUFFOCATION AND ENTRAPMENT HAZARD: Remove fresh food and freezer doors from refrigerator prior to disposal. Failure to obey this warning could entrap a child and result in death or brain damage.
![]() Leave shelves in place to prevent children from easily climbing inside the refrigerator. Recycle the refrigerator using environmentally responsible practices.
Leave shelves in place to prevent children from easily climbing inside the refrigerator. Recycle the refrigerator using environmentally responsible practices.
Refrigerants must be recovered/recycled by a licensed technician who is EPA certified in refrigerant recovery and recycling procedures. Disposal must comply with all applicable local and national codes.
Limited Warranty
LIMITED WARRANTY AVAILABLE ATWWW.DOMETIC.COM/WARRANTY.IF YOU HAVE QUESTIONS, OR TO OBTAIN A COPY OF THE LIMITED WARRANTY FREE OF CHARGE,CONTACT:DOMETIC CORPORATIONCUSTOMER SUPPORT CENTER5155 VERDANT DRIVEELKHART, INDIANA 465161-800-544-4881 OPT 1
YOUR LOCAL DEALER
YOUR LOCAL SUPPORT
YOUR LOCAL SALES OFFICE
References
[xyz-ips snippet=”download-snippet”]