DOMETIC PR2000, PR2500 Awnings Perfectroof
PR2000, PR2500 Awnings Perfectroof Installation


Explanation of symbols
 |
WARNING!Safety instruction: Indicates a hazardous situation that, if not avoided, could result in death or serious injury. |
 |
NOTICE!Indicates a situation that, if not avoided, can result in property damage. |
 |
NOTESupplementary information for operating the product. |
Safety instructions
Please observe the prescribed safety instructions and stipulations from the vehicle manufacturer and service workshops.
WARNING! Failure to obey these warnings could result in death or serious injury.
Electrocution hazard
- Ensure that the awning has been installed by a qualified technician in accordance with the Dometic installation manual.
- Only motor version: If connection cable of the awning is damaged, it must be replaced by the manufacturer, service agent or a similarly qualified person in order to prevent safety hazards.
Health hazard
- Keep a sufficient distance from objects or other vehicles. Once it is retracted, it should be at least 40 cm away from other objects and vehicles.
- If the installation position is not predefined by the mounting rail, ensure the roof of the motorhome can safely take the weight of the awning before installation. Otherwise, the awning may become unstable and bend or break.
NOTICE!
- If the vehicle-specific installation manual specifies through bolting, ensure the inner screw joints are accessible.
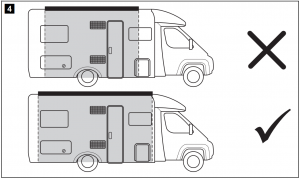
- If there is insufficient space above the door after the awning is mounted, the door must remained closed when retracting or extending to avoid the door making contact with the arms or the front panel.The required space depends on the design of the door (door width, swing or sliding door) as well as the set awning angle of inclination (fig.
 Check above).
 - The cables and cabinets in the interior of the vehicle may not be damaged by drilling the holes.
NOTE
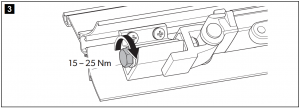
- Ensure the user of the vehicle is aware that the screws on the rear hinge (fig. Check above) must be tightened up (see operating manual). The arms must not bear any load. This must be done by a service agent.
Scope of delivery
PR2000
|
No. in fig. |
Awning width |
Description |
|
|
2.6 m, 3 m, 3.5 m, 3.75 m |
4 m, 4.5 m, 5 m, 5.5 m, 6 m |
||
|
1 |
1x |
1x |
Awning |
|
2 |
8x |
8x |
Self-tapping screw |
|
3 |
2x |
2x |
Mounting bracket (lower section) |
|
4 |
2x |
2x |
Mounting bracket (upper section) |
|
5 |
1x |
1x |
Crank bracket (lower section) |
|
6 |
1x |
1x |
Crank bracket (upper section) |
|
7 |
4x |
4x |
Rivets |
|
8 |
4x |
4x |
Pegs |
|
9 |
1x |
1x |
Crank |
|
10 |
– |
1x |
Latch for tension rafter |
|
11 |
– |
1x |
Hexagon head bolt |
|
12 |
– |
1x |
Tension rafter |
|
13 |
– |
1x |
Hexagon nut |
|
14 |
1x |
1x |
Remote control with connection material (optional) |
|
15 |
1x |
1x |
Switch (optional) |
Accessories
Available as accessories (not included in the scope of delivery):
| Description |
| TieDownKit Straps for anchoring the awning |
| CampRoomAwning tent front wall and sides for various models with support legs in different sizes |
| RainProtectFront wall and sides available in different sizes |
| SunProtectFront wall and sides available in different sizes |
| DometicLight LK120 LED light kit with remote control for installation on the awning arms |
| LED LightStripLED strip available in different lengths for installation on the underside of the awning |
| Awning cleanerSpecial awning cleaner |
| RepairKit Awning repair patch |
|
WARNING!Only use mounting rails recommended by Dometic fitting both to your vehicle and to your awning. Using the wrong mounting rails leads to danger while operating the awning. If you need support in choosing the correct mounting rails fitting to you vehicle, please ask your local service agent or visit dometic.com. |
Dometic awnings PR2000 and PR2500 are installed using a vehicle-specific, universal mounting rail that is not included in the scope of delivery.
Mounting rail including fastening material for Fiat Ducato, Citroën Jumper, Peugeot Boxer (average height, built from 2006)
| Vehicle length | Awning width |
| 5.41 m | 3.1 m |
| 5.99 m | 3.5 m |
| 6.36 m | 4.0 m |
A list of all available mounting rails can be found on the accessories sheet. Ask your local service agent for an up-to-date, comprehensive overview of available adapters or visit dometic.com.
If you have questions regarding the accessories, please contact your local service agent.
Intended use
The PerfectRoof PR2000 and PR2500 awnings are suitable for installation on motorhomes or caravans.
The awnings may be only be used while the vehicle is stationary. Please observe the operating manual.
This product is only suitable for the intended purpose and application in accordance with these instructions.
This manual provides information that is necessary for proper installation and/or operation of the product. Poor installation and/or improper operating or maintenance will result in unsatisfactory performance and a possible failure.
The manufacturer accepts no liability for any injury or damage to the product resulting from:
- Incorrect assembly or connection, including excess voltage
- Incorrect maintenance or use of spare parts other than original spare parts provided by the manufacturer
- Alterations to the product without express permission from the manufacturer
- Use for purposes other than those described in this manual
Dometic reserves the right to change product appearance and product specifications.
Installing the awning
Required installation material
For the installation of the rain gutter, you will need:
- Mounting rail (not in the scope of delivery, must be ordered suitable to the vehicle)
- Various tools, e.g. screwdriver
- A suitable flexible adhesive/sealant, e.g. Sikaflex®-252
- A cleaning agent that is recommended for use with the adhesive
- A primer that is recommended for use with the adhesive
Installing the awning
During installation, observe the following general information:
- The mounting rails are bolted to the vehicles in the area of the rear hinge. In addition, they are glued with installation adhesive (e.g. Sikaflex®-252 or a similar product) to ensure the load is evenly spread and an optimal level of protection from moisture is maintained.
- Observe the sealant manufacturer’s instructions.
- An illustrated instruction manual that covers each type of installation is enclosed with every vehicle-specific installation kit. As with the installation instruction manual, this manual must be observed closely and complied with.
- Before installation, check the access to the screw joints. Make sure no cables or cabinets are damaged when drilling.
- Contact your local service agent if you wish to have an angle of inclination different to the default setting.
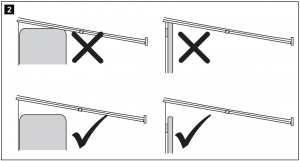
- If you wish to use an awning tent with the awning at a later date, when choosing the awning size and installation position ensure that vent windows and hatches remain accessible with erected tent (fig., Check above).
- Clean the adhesive surfaces on the mounting rail and the wall.
- Prepare the adhesive surfaces with the primer.
- After gluing, wait until the adhesive has set. For further details, please refer to the information provided by the sealant manufacturer.
- Seal the bore holes carefully to ensure no moisture can enter.
- Do not open the awning or leave it unattended, before the awning has been fastened to the mounting rail.
- As part of the regular maintenance procedure, the screws on the rear hinge must be tightened up by a service agent. Ensure the users of the vehicle are aware of this.
➤ Install the awning using the instructions in the operating manual enclosed with your mounting rail.
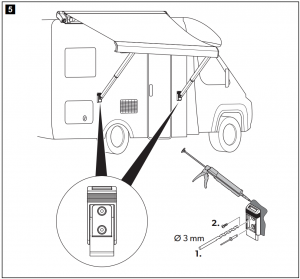
Installing the mounting bracket
The mounting bracket must be installed if the awning is to be attached to the side of the vehicle when extended.
- Select the location of the installation.
- Mark where the holes are to be drilled.
- At the marked points, drill holes with a diameter of 3 mm from the outside into the external wall (fig., Check above).
- Put the upper and lower sections of the mounting bracket together.
- Clean the outer sides of the lower section and the installation surface in the vehicle.
NOTEMake sure that no glue gets on to the movable upper section of the mounting bracket - To glue and seal, apply an elastic adhesive, such as Sikaflex®-221 for example, to the back of the mounting bracket.
- Fasten the mounting bracket with drill screws or rivet the mounting bracket in place (fig., Check above).
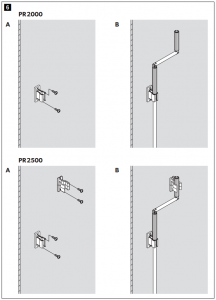
Installing the crank bracket
➤ Install the mounting bracket for the crank at a suitable location inside the vehicle (fig.![]() , Check above).
, Check above).
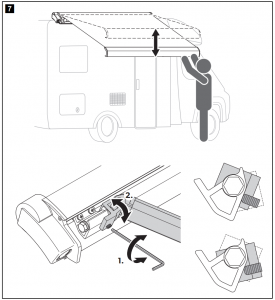
Adjusting the awning arm‘s inclination angle (PR2000 only)
|
NOTICE!Changing the inclination angle effects the closing of the awning. Make sure the awning is still working properly. If necessary, readjust the inclination angle. |
➤ Proceed as shown (fig.![]() , Check above).
, Check above).
Connecting the awning (PR2500 only)
|
WARNING!
|
|
NOTICE!The cables and cabinets in the interior of the vehicle must not be damaged through drilling the holes. |
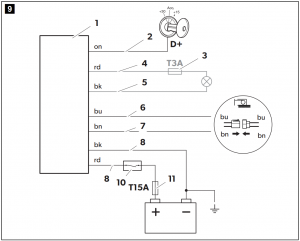
There are two options for the electrical connection of the awning:
- Awning switch with an integrated main switch
- Main switch and receiver for the remote control Observe the following installation instructions:
- Fit the supplied main switch and fuse (15 A) to the positive line of the power supply. The main switch is required to switch off the awning when side walls are fitted to the awning, for example, or if the vehicle is taken out of service for an extended period of time (otherwise the standby consumption may drain the battery).
- Install the receiver on the inside of the vehicle to protect it from moisture.
- Observe the length of the cable between the awning motor and receiver when choosing a place to install it.
- Do not shorten the antenna cable.
- When installing the supplied plug, use a suitable tool (crimping tool) to ensure that the connection is secure and durable.
- If you want to connect an awning light (accessory), make sure that its maximum power consumption is 30 W. When connecting, make sure the polarity is correct.
- Observe the required cable cross section when connecting to the power supply:
Cable length Required cable cross section 2 m 1.5 mm² 4 m 2.5 mm² 6 m 4.0 mm² 8 m 6.0 mm²
Legend for fig.![]() , Check above:
, Check above:
| No. | Description | |
| 1 | Receiver | |
| 2 | 3 A fuse for LED awning light (optional) | |
| 3 | on | Red line for LED awning light (optional) |
| 4 | rd | Red line for LED awning light (optional) |
| 5 | bk | Black line for LED awning light (optional) |
| 6 | bu | Blue line for motor connection |
| 7 | bn | Brown line for motor connection |
| 8 | bk | Black line for power supply |
| 9 | rd | Red line for power supply |
| 10 | Main switch | |
| 11 | 15 A fuse for main switch |
Installing the wall switch
➤ Find a suitable location inside the motor home, out of direct sunlight, to install the switch.
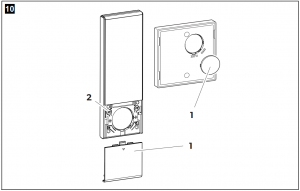
Installing the receiver of the remote control and connecting the electrical connections
- Find a suitable location inside the motor home, out of direct sunlight, to install the mounting bracket for the remote control.
- Connect the motor with the remote control in accordance with the applicable electrical engineering regulations and the circuit diagram (fig., Check above).
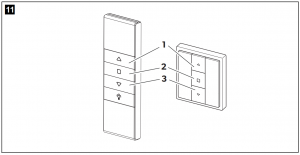
Programming the remote control and the wall switch
- Place the battery (fig., Check above).
- Switch on the power supply.✔ The receiver beeps once briefly.
- Press the programming button (fig.Check above) or the buttons and on the wall switch simultaneously (fig. Check above) within 4 seconds.✔ The receiver beeps once briefly.
- Press the programming button (fig Check above) or the buttons and on the wall switch simultaneously (fig. Check above) again briefly.✔ The receiver beeps once briefly.
- Briefly press the button (fig., Check above).✔ The receiver beeps four times briefly.✔ The awning moves briefly.
Proceed as follows to pair the wall switch:
- Press the programming button (fig., Check above) twice.✔ The receiver beeps twice briefly.
- Press the buttons and on the wall switch simultaneously (fig. Check above).✔ The receiver beeps five times briefly.✔ The remote control or wall switch and awning are now set to one another.
Warranty
The statutory warranty period applies. If the product is defective, please contact your retailer or the manufacturer’s branch in your country (see dometic.com/dealer).For repair and warranty processing, please include the following documents when you send in the product:
- A copy of the receipt with purchasing date
- A reason for the claim or description of the fault
Disposal
➤ Place the packaging material in the appropriate recycling waste bins wherever possible.
 If you wish to finally dispose of the product, ask your local recycling centre or specialist dealer for details about how to do this in accordance with the applicable disposal regulations.
YOUR LOCAL DEALERdometic.com/dealer
YOUR LOCAL SUPPORTdometic.com/contact
YOUR LOCAL SALES OFFICEdometic.com/sales-offices
![]()
References
[xyz-ips snippet=”download-snippet”]