
Dr Prepare Projection Alarm Clock

Identifying Parts
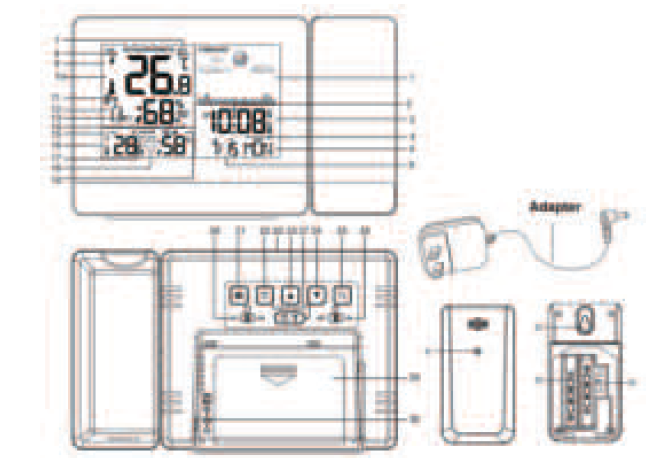
- Weather Forecast
- WWVB Signal Icon (Time Calibration)
- Alarm 1 and Alarm 2
- Time
- Weekday
- Month and Date
- Heat Index
- Dew Point Temperature
- Tendency Arrow (Outdoor Temperature)
- Outdoor Temperature
- Frost Alarm
- Channel Number and the RF Signal Icon
- Low Battery (Sensor)
- Outdoor Mold Index
- MAX / MIN Indoor Temperature / Humidity
- Indoor Temperature / Humidity
- Low Battery (Weather Station)
- Indoor Comfort Index
- Indoor Mold Index
- SNZ / LIGHT button
- SET Button
- ALARM Button
- UP Button
- DOWN Button
- MEM Button
- On/Off Switch of Alarm 1
- Rotate/Projection Button
- On/Off Switch of Alarm 2
- Battery Compartment of Weather Station (2 x AAA, not included)
- Power Supply Socket
- Wireless Signal Indicator (Flashes when data is being sent to the weather station)
- Mounting Hole
- Battery Compartment of Outdoor Sensor (2 x AAA, not included)
- TX Channel Selector (Select channel number of the sensor)
Features:
- 7 buttons: (SET), (ALARM), ▲ (+ / CH), ▼ (- / C / F), (MEM), (Rotate / Projection), (SNZ / LIGHT)2 switches: (ALARM 1 On / Off Switch), (ALARM 2 On / Off Switch)
- Time (Hour & Minute)
- Calendar (Month & Date)
- 12H / 24H Time Format
- Alternative Temperature Units: °C / °F
- Indoor Temperature: 32 °F – 122 °F (0 °C – 50 °C)Two Projection Modes: Time & Indoor Temperature, Time & OutdoorTemperature (Take turns displaying indoor and outdoor temperature every 5s)
- Outdoor Temperature: -40 °F – 158 °F (-40 °C – 70 °C)
- Indoor and Outdoor Humidity: 20% -95%
- Rotation of Projection: 180 Degrees
- Double Alarms with Snooze Function
- Max. / Min. Temperature and Humidity Records
- Indoor and Outdoor Mold Index
- Indoor Comfort Index
| Button
Mode |
||||||||
| Standard Mode |
Press |
(when plugged in) Adjust backlight: High- Medium Low-Off |
Enter the Alarm Mode |
Switch channel numbers |
Switch Tempera- ture Units (°C / °F) |
Display Max. & Min. Readings, Dew Point Tempera- ture, and Heat Index |
Flip the projection for 180 degrees |
(After you switch long-term
projection into short-term projection) The projection lights up for 15s |
|
Hold |
Enter the Time Setting Mode |
Enter the Alarm Setting Mode |
RF Reception (Manually) |
WWVB Signal Reception (Time Calibration) (Manually) |
Clear memory |
Switch from long-term projection (stay lit all the time) into
short-term projection (light up for for 15s) |
—— |
|
| Time Setting Mode |
Press |
Confirm the setting |
—— |
Advance 1 step at a time |
Go back 1 step at a time |
—— |
—— |
Get out of the Time Setting Mode; Light up projection for 15s (if you have chosen short-term projection ) |
|
Hold |
—— |
—— |
Advance 8 steps per second | Go back 8 steps per second |
—— |
—— |
—— |
|
| Alarm Setting Mode |
Press |
—— |
Confirm setting |
Advance 1 step at a time |
Go back 1 step at a time |
—— |
—— |
Get out of the Alarm Setting Mode; Light up projection for 15s (if you have chosen short-term projection ) |
|
Hold |
—— |
—— |
Advance 8 steps per second | Go back 8 steps per second |
—— |
—— |
—— |
|
| Alarm Mode |
Press |
Turn off alarm | Turn off alarm | Turn off alarm | Turn off alarm | Turn off alarm | Turn off alarm | Activate snooze |
| Hold | —— | —— | —— | —— | —— | —— | Turn off snooze |
Features:
- The LCD display lights up with all the icons for 2 seconds and 3 beeps when plugged in. Then the clock begins to search for RF signals (3 minutes, for temperature readings) and WWVB signals (3 minutes, for time calibration).
- Default Time: 12:00, 12-hour time format.
- Date: 01 / 01 2018, Monday.
- Alarm 1: 6:00 a.m. Alarm 2: 12:00 p.m.
- Weather Forecast: partly sunny.
- Default Temperature Unit: °F.
- Default Projection Setting: long-term projection.
Note: Batteries are only used to save the setting of your clock. Please do not use batteries as main power supply (you will not be able to operate the weather station when it is only powered by batteries). Instead, please use the included power adapter.
Setting the Wireless Sensor
This weather station is able to pair with three wireless sensors. One of these is included in the package while you can choose to purchase two more sensors separately if necessary.Step 1: Plug in your weather station.Step 2: Insert the batteries in the wireless sensor and use the TX channel selector to choose the desired transmission channel (1, 2 or 3).
Note:
- Please keep your weather station away from concrete walls, cellars, metal doors and equipment that generates magnetic fields such as mobile phones, televisions, etc.
- Since the cover of the sensor is designed to be splash-resistant, it may take 36-48 hours for the sensor to measure temperature readings that are relatively accurate.
- Please ensure the wireless range between the weather station and the sensor is within 200 feet (60 m).
Step 3: Short press the ▲ button to select the channel number that has been set on the wireless sensor in the previous step. The icon of channel number flashes in sequence of 1, 2, and 3. If signal of the sensor is not received by the weather station, the symbol “-” will appear on thescreen.
Receiving RF
- The weather station automatically receives RF signals for 3 minutes after the weather station is plugged in.
- Long press the “▲” button for two seconds to re-register data for the current channel.
- Reception of RF signals
- RF reception lasts for up to 3 minutes.
- During RF registration, the antenna icon starts to flash.Long press the “▲” button for two seconds to re-register data for the current channel.
- When the RF is successfully registered, the icon is displayed.
- If the reception fails once in the later synchronization, the icon will disappear.
- If the reception succeeds in the later synchronization, the icon will appear again and the outdoor temperature and humidity will be updated.
- If the weather station fails to receive RF signals more than 1 hour, it will display the latest temperature and humidity before the update.
Auto Time Calibration via WWVB Signals
- After the clock has received RF signals and displayed temperature readings, it starts searching for WWVB signals for time calibration.
- During the searching, the WWVB icon flashes and the screen as well as projection turns off. It takes about 3 minutes to complete the procedure and get the time set automatically. When the calibration completes, the WWVB icon changes from to .
- If the clock fails to receive the WWVB signal, press and hold the ▼ button for approx. 3s to start the searching manually.
- Press and hold the ▼ button again to end the searching manually.
Time Setting Mode
- Press and hold the ” ” button for 3 seconds, the WWVB signal starts to flash. Use “▲”and “▼” buttons to enable or disableA uto Time Calibration.
- Press button to confirm your setting and the Time Zone icon starts to flash. Use “▲” and “▼” buttons to set the correct time zone. The setting order is as follow:
- EST: Eastern Standard Time
- AST: Atlantic Standard Time
- HAT: Hawaii-Aleutian Standard Time
- AKT: Alaska Standard Time
- PST: Pacific Standard Time
- MST: Mountain Standard Time
- CST: Central Standard Time
- The default time zone is EST
- Press button to confirm your setting and the DST icon starts to flash. Use “▲” and “▼” buttons to turn on/of f DST.
- Press button to confirm your setting and the 12 / 24 hour mode icon starts to flash. Use “▲” and “▼” buttons to choose 12-hour / 24-hour time format.
- Press ” ” button to confirm your setting and the Hour icon starts to flash. Use “▲” and “▼” buttons to set the correct hour.
- Press ” ” button to confirm your setting and the Minute icon starts to flash. Use “▲” and “▼” buttons to set the correct minute.
- Press ” ” button to confirm your setting and the Year icon starts to flash. Use “▲” and “▼” buttons to set the correct year.
- Press ” ” button to confirm your setting and the Month icon starts to flash. Use “▲” and “▼” buttons to set the correct month.
- Press ” ” button to confirm your setting, the Date icon starts to flash. Use “▲” and “▼” buttons to set the correct date.
- Press ” ” button to confirm your setting. Then, the Month and Date icon start to flash. Use “▲” and “▼” buttons to set the date format, Month / Date or Date / Month.
- Press “ ” (or you can wait for 30 seconds without further operation) to save the setting and get out of the time setting mode.
Alarm Setting Mode
- In standard mode, press “ ” to enter alarm mode. The “AL1” icon will appear on the screen.
- In alarm mode, press and hold button for 2s until the Hour icon of the Alarm 1 starts to flash. Use the “▲” and “▼” buttons to set the desired hour .
- Press “ ” button to confirm your setting and the Minute icon of the Alarm 1 starts to flash. Use the “▲” and “▼” buttons to set the desired minute.
- Press “ ” button to confirm your setting and the Repeat icon starts to flash. Use the “▲” and “▼” buttons to set the repeat mode of Alarm 1: M-F or S-S, M-F and S-S.
- Press “ ” button to confirm your setting and the Snooze Time icon (5 min -60 min) starts to flash, use “▲” and “▼” buttons to set the desired snooze time for Alarm 1.
- Press “ ” button to confirm your setting and the Hour icon of the Alarm 2 starts to flash. Use the “▲” and “▼” buttons to set the desired hour.
- Press “ ” button to confirm your setting and the Minute icon of the Alarm 2 starts to flash. Use “▲” and “▼” buttons to set the desired minute.
- Press “ ” button to confirm your setting and the Repeat icon starts to flash. Use the “▲” and “▼” buttons to set the repeat mode of Alarm 2: M-F or S-S, M-F and S-S.
- Press “ ” button to confirm your setting and the Snooze Time icon (5 min – 60 min) starts to flash. Use “▲” and “▼” buttons to set the desired snooze time for Alarm 2.
- Press “ ” (or you can wait for 30s without further operation) to save the setting and get out of the alarm setting mode.
- You can press button to get out of the setting mode as well to be back in the standard mode.
- When the switch is turned ON, the Alarm 1 is activated. The icon “ ” will appear on the screen. When the switch is turned OFF, the ALARM 1 is closed. The icon “ ” will disappear The operation is the same with Alarm 2.
Alarm and Snooze
- When the alarm is beeping, the alarm icon will flash on the screen as well. It will stop automatically after 2 minutes.
- When the alarm is beeping, press the “ ” to enter the snooze mode. The alarm will beep again after the snooze timer expires.
- You can press any button other than the button to turn off the alarm. Or you can press and hold the button for 3s to shut off the alarm with a beep, which means the alarm has been turned off successfully.
- Alarm will ring in the way as bellowed.0-9s: 1 beep / second10-19s: 2 beeps / second20-29s: 3 beeps / secondAfter beeping 4 times per second for 30s, the alarm ring will end.
Indoor Temperature and Humidity
- The measurement range for indoor temperature is from 32 °F to 122 °F (0 °C to 50 °C).
- The measurement range for indoor humidity is from 20% to 95%.
- If the current temperature exceeds the maximum measurement range of the weather station, HH.H will appear on the screen. If the current temperature is lower than the minimum measurement range of the weather station, LL.L will appear on the screen.
- If the current humidity exceeds the maximum measurement range of the weather station, it will display 96% on the screen. Likewise, if the current humidity is lower than the minimum measurement range, the weather station will display 19% on its screen.
- The weather station will automatically update indoor temperature and humidity every 60 seconds.
- When the ALARM goes off or the weather station is receiving RF signals/WWVB signals, the weather station will stop updating temperature or humidity.
Outdoor Temperature and Humidity
- The measurement range for outdoor temperature is from -40 °F – 158 °F (-40 °C to 70 °C).
- The measurement range for outdoor humidity is from 20% to 95%.
- If the current temperature exceeds the maximum measurement range of the weather station, HH.H will appear on the screen. If the current temperature is lower than the minimum measurement range of the weather station, LL.L will appear on the screen.
- If the current humidity exceeds the maximum measurement range of the weather station, it will display 96% on the screen. Likewise, if the current humidity is lower than the minimum measurement range, the weather station will display 20% on its screen.
- The frequency of data updates for each channel are as followed: every 68s for channel 1, 72s for channel 2, and 76s for channel 3.
- When the current outdoor temperature is within 30.2 °F to 37.3 °F (-1.0 °C to 2.9 °C), the frost alarm icon starts to flash. It will disappear until the outdoor temperature is out of the temperature range
- There are 3 levels for Mold Index: HI, ME and LO. When the weather station displays LO or ME, the Mold Index icon will be displayed all the time. When the weather station displays HI, the Mold Index icon will flash.
Tolerance
- Temperature tolerance:
-22°F ~ -4°F: ±7.2°F (-30°C ~ -20°C: ± 4°C)-4°F ~ -32°F: ±3.6°F (-20°C ~ 0°C: ± 2°C)32°F ~ 122°F: ±1.8°F (0°C ~ +50°C: ±1°C)
- Humidity tolerance: ±5% from 35% to 75%, ±10% from 20% to 35% & 75% to 95%
Weather Forecast
- The weather forecast is for the next 12 hours based on the trends of outdoor temperature and humidity.
- Weather forecast: Sunny, Partly sunny, Cloudy and Rainy.
- Interval of update: every 60 minutes.
- The weather forecast can be more accurate if it is placed in a naturally well-ventilated space. If you place the weather station in air-conditioned rooms, the weather forecast may not be accurate.
Note: the weather station makes a weather forecast based on the tendency of outdoor temperature and humidity. If the weather station fails to receive the signals sent from the sensor, the weather forecast will be made based on the indoor temperature and humidity. If there are discrepancies between the results from your device and that of the local weather forecast service, please follow the advice from the latter one.
- When the humidity is over 85%, the weather station will display the rainy icon.
- When the humidity is below 35%, the weather station will display the sunny or partly sunny icon.
- When humidity rises more than 5% in an hour, the weather forecast icon will change to partly sunny (from sunny), cloudy (from partly sunny) or rainy (from cloudy).
- When humidity reading drops more than 5% in an hour, the weather forecast icon will change to cloudy (from rainy), partly sunny (from cloudy), or sunny (from partly sunny).
Backlight
- When plugged in using the included adapter, the backlight will always be on.
- Press the button to switch the brightness of the screen from High >> Medium >> Low >> OFF.
- When the weather station is powered by battery only, its backlight will be off.
Note:
- Batteries are only used to save the setting of your clock. Please do not use batteries as main power supply (you will not be able to operate the weather station when it is only powered by batteries). Instead, please use the included power adapter.
- When the alarm clock is searching for WWVB signal, the screen and the projection will shut off. When the searching is terminated halfway or complete, the screen and the projection will light up again.
- When the alarm clock is searching for WWVB signal, the screen and the projection will shut off. When the searching is terminated halfway or complete, the screen and the projection will light up again.
Projection
- In standard mode, press “ ” button to flip projection for 180 degrees.
- When the weather station is plugged in, the projection will stay on. If you want to change from long-term projection to short-term projection, press and hold the button. The projection will stay off. It will only light up for 15s when you press the button.
- Two projection modes: time and indoor temperature, time and outdoor temperature. The weather station will take turns displaying indoor and outdoor temperature every 5s.
References
[xyz-ips snippet=”download-snippet”]