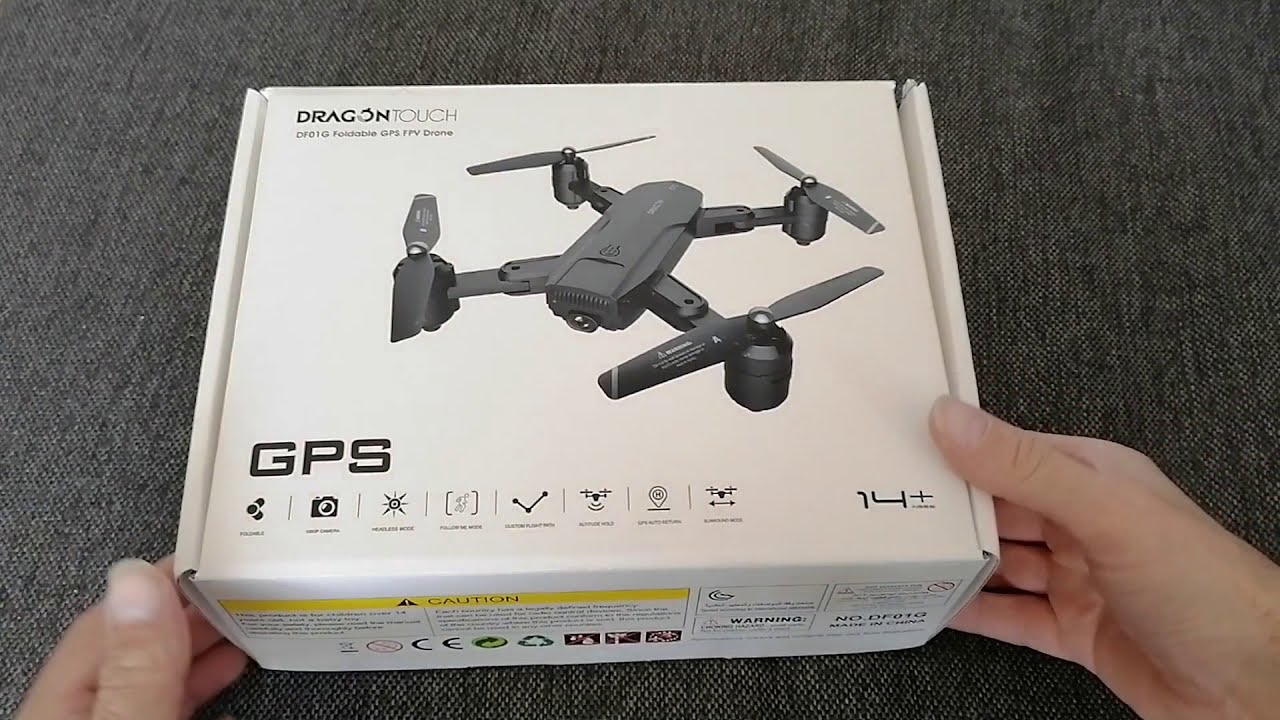

DRAGONTOUCH Dragon Touch DF01 DRONE
DISCLAIMER & SAFETY GUIDELINES
- For novices, please fly no higher than 20 meters (65 feet).
- Do not look directly into the drone light.
- Do not treat this product as household waste.
- Do not fly above or near obstacles, crowds, open water, public roads, high-voltage power lines, or trees.
- Do not use the drone in severe weather conditions such as wind, snow, rain, smog, hail, lightning, tornadoes, or hurricanes.
- Stay away from the rotating propellers and motors.
- Keep your drone in eyesight at all times. Please do not rely solely on a first- person-view camera to control your drone.
- This product is NOT a toy and is not recommended for users under the age of 14.
- Be sure to observe all local regulations, obtain appropriate authorizations, and understand the risks.Note: It is solely your responsibility to comply with all flight regulations.
DRAGON TOUCH accepts no liability for damage, injury, or any legal responsibility incurred directly or indirectly from the use of this product. The user shall observe safe and lawful practices including, but not limited to, those set forth in these Safety Guidelines.
MAINTENANCE AND CARE
- Thoroughly check the drone after a crash or violent impact.
- Do not charge the battery before it cools down.
- Remove the batteries if you don’t plan on using the drone for a long time.
- Do not overcharge the battery. Unplug the charger once it’s fully charged.
- Store the drone and remote in a cool dry place away from direct sunlight.
- Avoid bringing the camera into direct contact with water or other liquids. Wipe dry with a soft absorbent cloth if it gets wet.
- Do not charge the battery next to flammables, such as carpets, timber floors, or on the surface of electro-conductive objects. Please always keep an eye on the battery while charging.
- To avoid losing your drone, fly it in the open air after you’ve gained plenty of experience and are very confident in handling it.
DRONE DIAGRAM
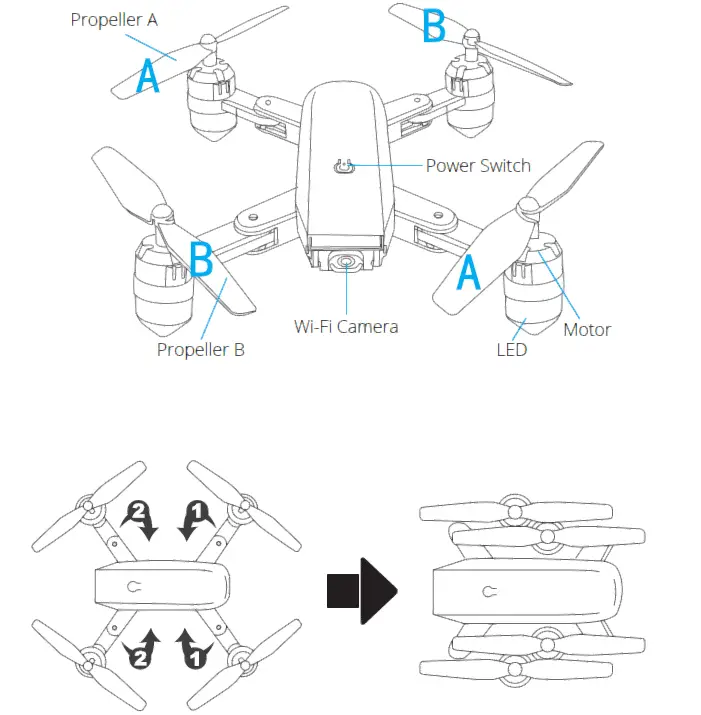
REPLACING THE PROPELLER
- The propellers are not identical. Propellers have either an “A” or “B” mark at the bottom and they should be installed in the position with a corresponding mark. Make sure you install them in the correct positions. Failure to do so will result in an inability to control the drone.
- When flying, propeller A rotates clockwise and propeller B rotates counterclockwise.
INSTALLING THE PROTECTIVE COVERSnap the protective frame connectors into the shackles.
TRANSMITTER DIAGRAM
![]()
- Speed switch
- One-key Return
- One-key Takeoff/landing
- Turn left/turn right ascend/descend
- Phone Clamps
- 360° Flip
- Headless Mode
- Emergency stop
- Direction
- Video
- Photo
- Turn on/off
(Short press to enter fine-tuning mode, press the joystick to slightly adjust the front, back, left and right. Press again to exit fine adjustment. Long press for an emergency stop.)
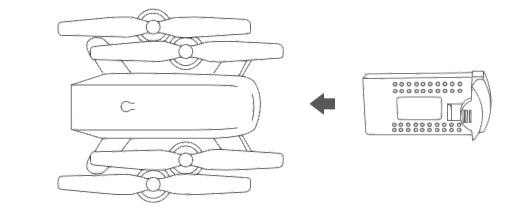
INSTALLING THE BATTERY
Transmitter: 3x 1.5V AA Battery (Batteries not included)
Insert the battery into the drone (3.7V 1000mAh Li-Po battery included)
RECHARGING THE DRONE BATTERY
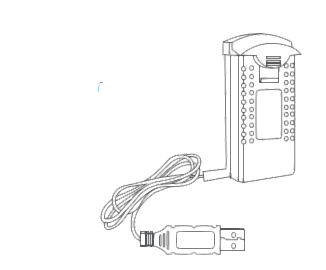
Take the battery out of the drone. To charge the battery, plug the battery’s USB connector into a USB port on a computer (or USB power adapter). The LED indicator light on the cable will turn red while it is charging and turn off when it is fully charged. The charging time is about 120-150 minutes.Note: Only use the provided charging cable to charge the battery. It is forbidden to use the provided charging cable to charge other products.
READY TO FLY
Note:
- Make sure the propellers and propeller protective covers are correctly installed and tightened.
- Before flying, please pair the drone with the remote control and calibrate the drone and the remote control.
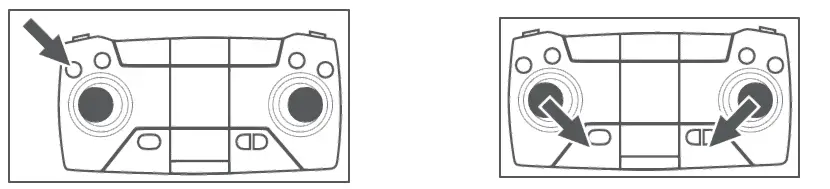
HOW TO PAIR YOUR DRONE WITH THE REMOTE CONTROL
- Turn on the fuselage power switch and place the drone on a level surface.
- Turn on the remote control power switch.
- Place the drone on a level surface. Push the left joystick upwards to the top, then pull downwards as far as possible. At this time, you will hear two beeps from the remote control, and the indicator light will change from quick flashing to constant on, indicating that pairing is successful.

HOW TO CALIBRATE AND TAKE OFF
- Place the drone on a level surface. Push the left and right joysticks as shown above simultaneously for 2-3 seconds. The drone lights will flash fast and turn to constant ‘on’ in 2-3 seconds, indicating the calibration is successful.
- To take off, the first method is to press the one-key takeoff button. The second method is to operate the two joysticks at the same time as shown above for 2- 3 seconds to unlock the drone, then slowly push the left joystick upwards.
- HOW TO LANDMethod 1: Slowly push the left joystick down until the drone descends slowly to the ground. Hold the left joystick at the lowest position for 2 seconds, the motor will stop and the drone is landed successfully.Method 2: When the drone is flying, press the one-key takeoff button again and the drone will land slowly.

 Method 2: When the drone is flying, press the one-key takeoff button again and the drone will land slowly.
FLIGHT OPERATION METHOD
| Ascending/ Descending | Push up or pull down the left joystick, and the drone will ascend or descend. | 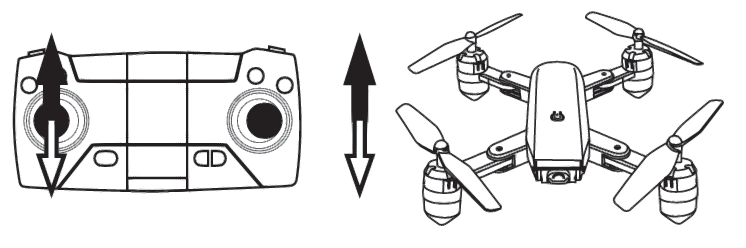 |
| Turning | Push the left joystick to the left or right, and the drone will turn left or right. | 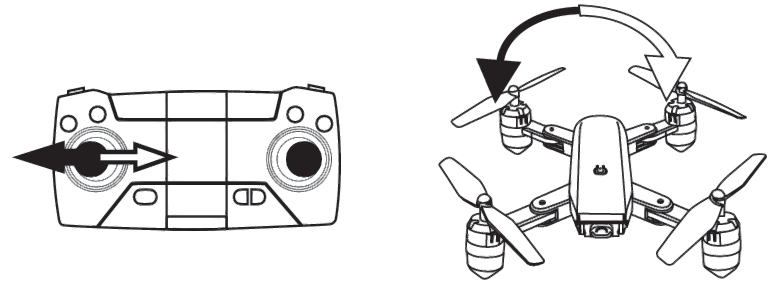 |
| Forward/ Backward | Push up or pull down the right joystick, and the drone will fly forward or backward. | 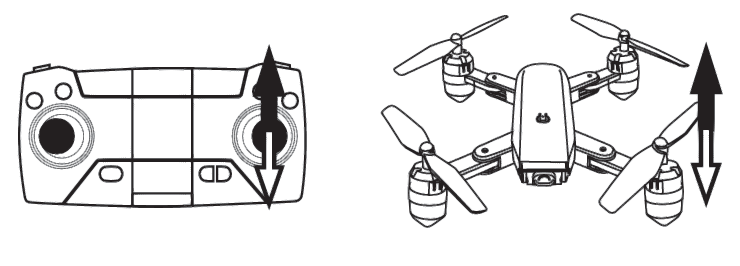 |
| Side Fly | Push the right joystick to the left or right, and the drone will fly horizontally to the left or right. | 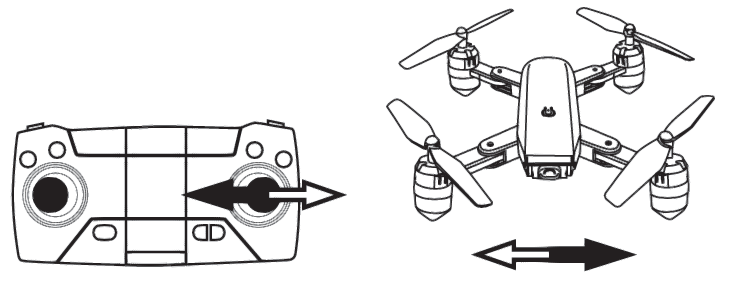 |
| Side-fly
Fine-tuning |
When the drone is hovering in the air, in the event that the drone is automatically flying sideward on the left or right, it can be rectified by pushing the right joystick to the right or left until the drone keeps the balance. | |
| Forward/ Backward Fine-tuning | When the drone is hovering in the air, in the event that the drone is automatically advancing forward or backward, it can be rectified by pushing the right joystick upward or downward until the drone keeps the balance. | 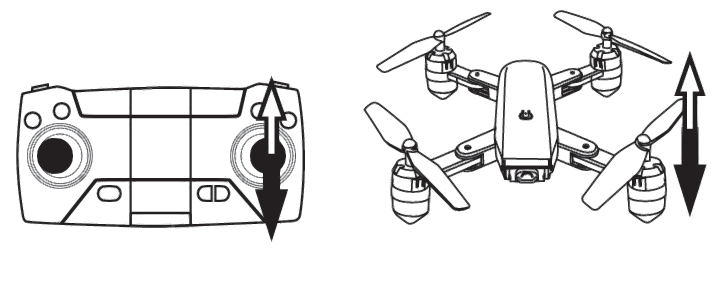
|
CONNECTING YOUR MOBILE DEVICE
- Download the VS FPV app onto your mobile device from the App Store/Google Play or by scanning the QR code below.
- Power on the drone and the LED lights will flash. Go to Wi-Fi settings on your mobile device. Connect to the network (DF01-xxxx).

APP OPERATION PANEL
- RUN THE APP “VS FPV”
- Tap the button to enter the Help interface.
- Tap the Connect button to enter the control interface.
- CONTROL INTERFACE
- Tap the button to open the control interface.
- Tap the button to open the altitude hold mode control button.
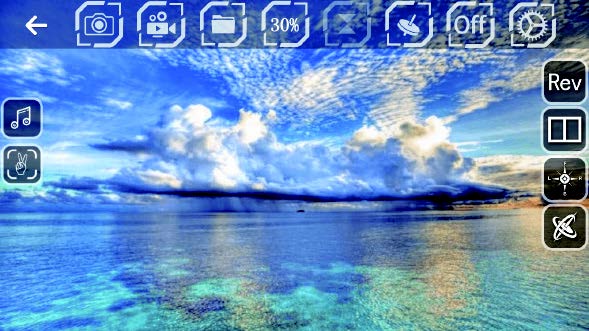
Overview

- Back
- Photo
- Video
- Files
- Speed Switch
- Altitude Hold
- Gravity Induction
- App ON/OFF
- More Settings
- Left Joystick (Accelerator)
- Left/Right Flip and Roll
- Left/Right Flip and Roll
- Left/Right Sideward
- Left/Right Sideward
- Forward/Backward
- Forward/Backward
- Forward/Backward Fine-tuning
- Forward/Backward Fine-tuning
- Left/Right Flip and Roll Fine-tuning
- Left/Right Flip and Roll Fine-tuning
- Left/Right Sideward Fine-tuning
- Left/Right Sideward Fine-tuning
- 360° Flip&Roll
- One-key Takeoff/Landing
- One-key Takeoff/Landing
- Trajectory Flight
- Emergency Stop
- Music
- Gestures For Photo
- Camera Reverse
- 3D Display
- Headless Mode
- Calibration
FLIGHT OPERATION GUIDE
HEADLESS MODEPress the Headless Mode button to activate. In this mode, the drone will fly in the direction as controlled by your right joystick regardless of the position of your drone’s head or the tail. Press the same button to exit this mode.
ONE-KEY RETURNPress the One-key Return button, the drone will roughly fly back along its original take-off path. Press the button again to exit the mode.
360° FLIPFly the drone to a height of over 3 meters, press the Flip button, and move the right joystick to flip the drone 360° accordingly.
TRAJECTORY FLIGHTTap to activate the Trajectory Flight mode. Draw a path in the blank area on the screen and the drone will fly following the path. Tap again to exit this mode.
SPEED SWITCHThe drone’s default speed is low speed. Press the Speed Switch button once for medium speed, press again for high speed. A third press will revert back to low speed.
ALTITUDE HOLD/HOVERThis is one of the default settings on the drone. When you release the Left Joystick after an ascending/descending action, the drone will hover at the current flight height.
GESTURES FOR PHOTOTap to activate. Facing 2-3m from the camera, make a V sign and the camera will take a photo.
FAQ
Q1: Why aren’t the drone LEDs lighting up?
• Press the power switch on the drone.• Replace or recharge your drone’s battery.• Make sure the battery connectors are firmly plugged in.
Q2: Why do the drone’s LEDs keep flashing, but it never responds to any command from the transmitter?
• Pair the drone with the transmitter again.• Replace or recharge the drone’s battery.• Make sure the transmitter’s batteries have enough power.
Q3: Why is the flight unstable?
• Return the drone and perform a flight calibration as instructed.• Ensure flight trimming accordingly.• Fly the drone in suitable weather conditions.
Q4: Why is the drone unresponsive control inputs?
• Make sure the distance between the drone and the mobile device is within range.• Stay away from open water, high-voltage power lines, or trees.
CONTACT US
 report this ad
For any inquiries about Dragon Touch products, please feel free to contact us, and we will respond within 24 hours.E-mail: [email protected]Tel: 888-811-1140 (US) Mon-Fri 9am-5pm (EST)Official website: www.dragontouch.com
References
[xyz-ips snippet=”download-snippet”]