
![]()
 USER MANUALDragon Touch DF01G GPS DRONEV1.0
Please read this manual before operating your drone, and keep it for further reference.
DISCLAIMER & SAFETY GUIDELINES
- For beginners, please fly no higher than 20 meters (65 feet).
- Do not look directly into the drone light.
- Do not treat products as household waste.
- Do not fly above or near obstacles, crowds, open water, public roads, high voltage power lines or trees.
- Do not use the drone in severe weather conditions. These include wind, snow, rain, smog, hail, lightning, tornadoes or hurricanes.
- Stay away from the rotating propellers and motors.
- Please maintain sight of your drone at all times. Please do not rely solely on the first-person camera view to control your drone.
- This product is not a toy and is not recommended for users under age 14.
- Be sure to observe all local regulations, obtain appropriate authorizations, and understand risks. Please note it is solely your responsibility to comply with all local flight regulations.
DRAGON TOUCH accepts no liability for damage, injury or any legal responsibility incurred directly or indirectly from the use of this product. The user shall observe safe and lawful practices, including, but not limited to, those set forth in these Safety Guidelines.
MAINTENANCE AND CARE
- Thoroughly check the drone after a crash or violent impact.
- Do not charge the battery until it cools down.
- Remove the batteries if the device will not be in use for a long time.
- Do not overcharge the battery. Unplug the charger once it’s fully charged.
- Store the drone and remote in a cool, dry place away from direct sunlight.
- Avoid exposing the camera to water or other liquids. Wipe dry with a clean, soft, absorbent cloth if it gets wet.
- Do not charge the battery next to flammables, such as carpets and timber floors, or on the surface of electroconductive objects. Please monitor the battery while charging.
- To avoid losing your drone, only fly it in the open air after you’ve gained experience and are very confident in controlling it.
DRONE DIAGRAM
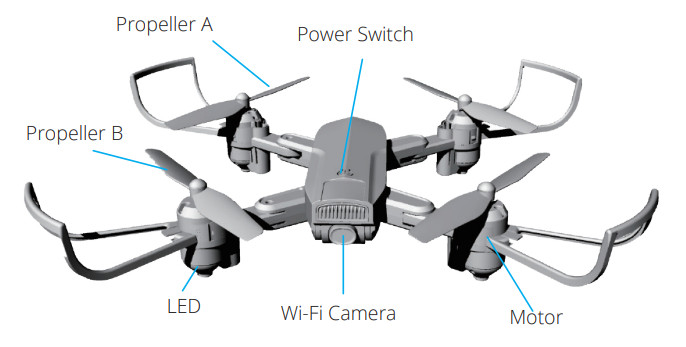
CHANGING A PROPELLER
- The replacement propeller must be replaced in the proper position on the machine. Propeller A needs to be installed in the position of A, and propeller B needs to be installed in the position of B, or you may not be able to properly control the drone. There are labels for A and B on the bottom of the propellers.
- When flight begins, propeller A rotates clockwise and propeller B rotates counterclockwise.
INSTALLING THE PROTECTIVE COVER
Snap the protective frame connectors into the shackles.
TRANSMITTER DIAGRAM
![]()
| 1. Speed Switch4. Geomagnetic Calibration7. Orbit Mode10. Power ON/OFF | 2. One-key Takeoff/Land5. Phone ClampsGPS SwitchHeadless Mode | 3. Left Joystick6. Photo/Video9. Right Joystick12. One-key Return |
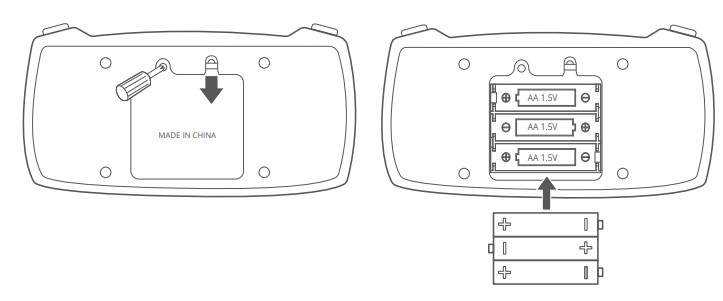
INSTALLING THE BATTERY
Obtain three 1.5V AA batteries (not included) and install them in the transmitter.
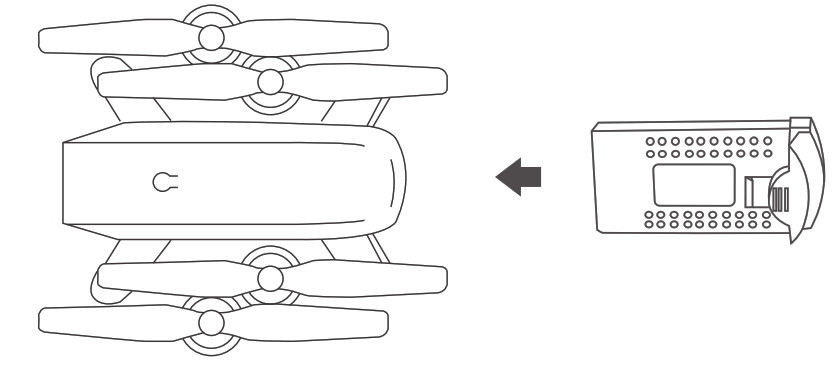
Insert the battery into the drone (7.4V 1200mAh Li-Po battery is included).
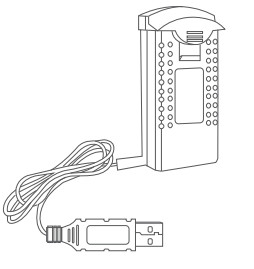
RECHARGING THE DRONE BATTERY
Remove the USB charging cable. Unplug the aircraft battery. Plug the battery’s USB connector into a USB port on a computer (or a USB power adapter). The LED indicator light on the cable will turn red while it is charging and turn off when it is fully charged. The charging time is about 120-150 minutes.Note: Only use the provided charger cable. It is dangerous to use the provided charge cable to charge other products.
GETTING READY TO FLY
Note:① Make sure the propellers and propeller protective covers are correctly installed and tightened.② Before flying, please pair the drone and transmitter (remote control), calibrate the drone, and obtain a GPS satellite signal.
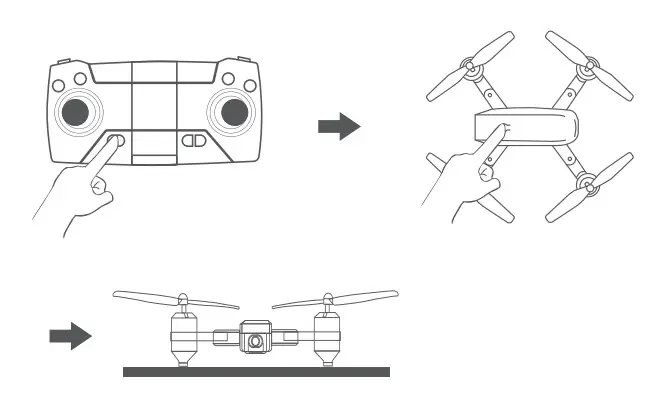
- HOW TO PAIR THE REMOTE CONTROL TO THE DRONE① Turn on the drone power switch and place the drone on a level surface.② Turn on the remote control power switch.③ Push the left joystick completely up once and completely down once.You will hear two beeps, and the indicator light will change from flashing to constant, indicating that the pairing is successful.
 HOW TO CALIBRATE① Long press the geomagnetic calibration button for 3 seconds. The remote control will beep, the drone’s front and rear lights will stay on. You have now entered the geomagnetic calibration mode.② Rotate the drone horizontally. The drone’s rear light stays on, and the horizontal calibration is successful.③ After successful horizontal calibration, the drone is upright and rotated (360°). The front light (red light) on the body stays on, and the calibration is successful.
- HOW TO OBTAIN A GPS SIGNALAfter the gyro and geomagnetic calibrations are successful, the drone’s rear light changes from slow flashing to solid. At this time, place the drone on an open, horizontal surface. When the drone’s rear light turns green, the GPS satellite signal has been obtained, and you can take off normally. The process takes a few minutes.Note: The drone can only fly after a GPS signal has been found. If the flight is indoors where a signal can not be obtained, the GPS function can be turned off.To turn it off, tap the remote control GPS switch button. At this time, the remote control will make a sound, indicating that the GPS function is off and you are ready to fly indoors.
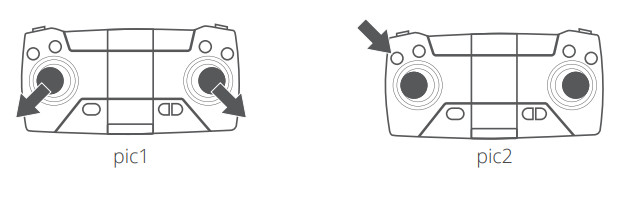
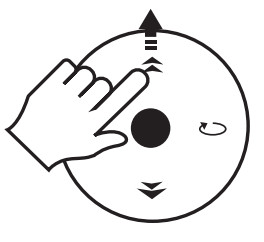
- HOW TO TAKE OFFMethod 1: Operate the two joysticks at the same time as shown in the figure pic1 for 2-3 seconds to unlock the drone. Then press the takeoff/land button pic 2.Method 2: Operate the two joysticks at the same time as shown in the figure pic 3 for 2-3 seconds to unlock the drone. Then slowly push the left joystick pic4.
- HOW TO LANDMethod 1: Slowly pull the left joystick pic 5 down until the drone is landing, keeping the left joystick down in the lowest position. The motor stops after 2 seconds and the drone lands successfully.Method 2: When the drone is flying, press the take off/land button again to land the drone slowly.
 HOW TO CALIBRATE① Long press the geomagnetic calibration button for 3 seconds. The remote control will beep, the drone’s front and rear lights will stay on. You have now entered the geomagnetic calibration mode.② Rotate the drone horizontally. The drone’s rear light stays on, and the horizontal calibration is successful.③ After successful horizontal calibration, the drone is upright and rotated (360°). The front light (red light) on the body stays on, and the calibration is successful.
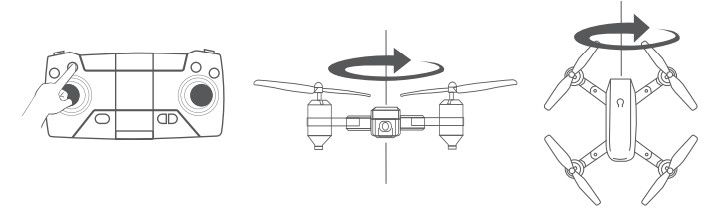
 Method 2: Operate the two joysticks at the same time as shown in the figure pic 3 for 2-3 seconds to unlock the drone. Then slowly push the left joystick pic4.
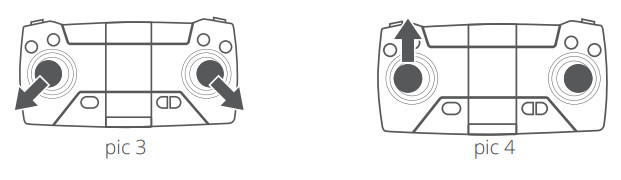
FLIGHT OPERATION METHOD
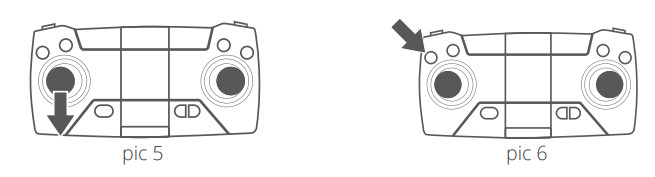
| Ascending/ Descending | When you push the left joystick up, the drone will ascend. When you pull the left joystick down, thethe drone will descend. | 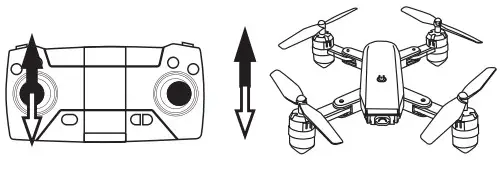 |
| Turning | When you push the left joystick to the left, the drone will turn left. When you push the left joystickto the right, the drone will turn right. |  |
| Forward/Backward | When you push the right joystick up, the drone will move forward. When you pull the right joystickdown, the drone will move backward. |  |
| Side fly | When you push the right joystick to the left, the drone will move to the left. When you push the right joystick to the right, the drone will move to the right. | 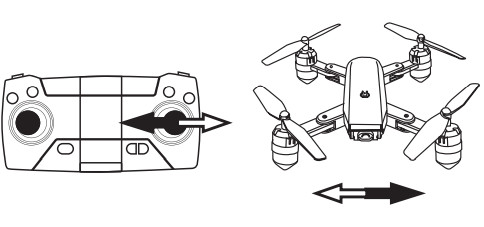 |
CONNECTING YOUR MOBILE DEVICE
- Download the VS GPS app to your mobile device from the App Store/ Google Play or by scanning the QR code below.https://itunes.apple.com/app/id1366172829 https://play.google.com/store/apps/details?id=com.vison.macrochip.gps
- Power on the drone. The LED lights will flash. Go to Wi-Fi settings on your mobile device. Connect to the network (DF01G-xxxx).

FLIGHT OPERATION GUIDE
HEADLESS MODEThe default front in the headless mode is the direction in which the drone is facing when pairing with the remote control. If you need to change the direction the drone is facing in the headless mode, please re-pair with the remote control. In headless mode, the drone always moves in the direction of the remote control joysticks, regardless of its orientation. For example, when you push the right joystick to the right, the drone will always move to the right (regardless of which direction the drone is facing). To enter this mode, turn on the drone, and press the Headless Mode button on the remote control. If you want to exit this mode, press the button again.Note: Please be sure to align the drone facing forward and in a straight line. Let the gyroscope automatically detect the direction to ensure proper functioning in headless mode.ONE-KEY RETURNPress the One-key Return button, and the drone will fly back approximately along its original take-off path. Press the button again to exit this mode. ONE-KEY TAKE-OFF AND LANDING While unlocked, press the One-key Takeoff/Land button on the remote. The drone automatically rises to a height of about 2 meters (6.5 feet). Keep flying smoothly at this approximate height. When you press the button again, the drone will automatically land itself slowly.ORBIT MODE/SURROUND FLIGHT MODE Press the Orbit Mode button. The drone will take the current flight position as the center. Push the right joystick up and the drone will move forward to the set radius distance. Move the right control stick left and right to start execution.
PHOTO/VIDEOPress the Photo/Video button on the remote control, which will beep twice to indicate the photo has been taken successfully. To record the video, hold down this button for 3 seconds. The remote control will beep, and the recording indicator will flash slowly to indicate that the recording is about to start. During the recording process, press and hold the button for 3 seconds to stop recording.SPEED SWITCHThe drone has three speeds and is set to low speed by default. Press the Speed switch button once for medium speed. Press it again for high speed. A third press will return to low speed.
APP OPERATION PANEL
1. RUN THE “VS GPS” APP① Press the Learn More button to get helpful information.② Press the![]() button to enter the control interface.
button to enter the control interface.
2. CONTROL INTERFACEPress the![]() button to open the remote control interface.
button to open the remote control interface.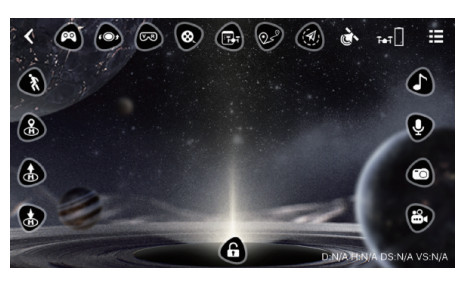
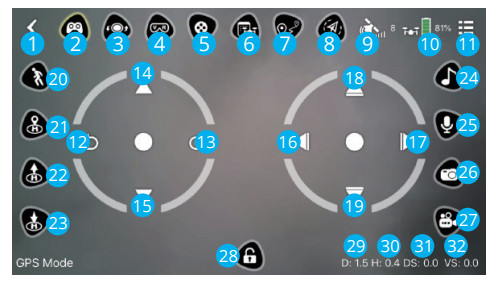
| 1. Back2. ON/OFF3. Lens Reverse4. VR5. Album6. Flight Record7. Multipoint Flight8. Surround Flight9. GPS Signal10. Drone Battery Level11. Settings12. 13. Turn Left/Right14. 15. Ascend/Descend16. 17.Move Left/Right18. 19. Move Forward/Backward | 20. Follow Me21. Smart RTH22. Take Off23. Land24. Music25. Record Audio26. Take Photo27. Shoot Video28. Unlock29. Distance30. Height31. Horizontal Speed32. Vertical Speed |
Notes:
- Before flying, make sure the GPS Signal shows 3 or 4 bars.
- The maximum flight distance (the maximum distance between the drone and the last recorded Home Point) is set to 30 meters (98 feet) by default. You can reset it in the app Settings.
3. SETTINGSPress to![]() start setting up your drone.
start setting up your drone.
 You can reset the Flight Distance and Flight Altitude as needed.Beginner Mode: This mode is ON by default. All flight parameters are preset.We recommend this mode for beginners.Flight Distance: Press to reset the maximum flight distance between the drone and the last recorded Home Point.Flight Altitude: Press to reset the maximum flight altitude of the drone.
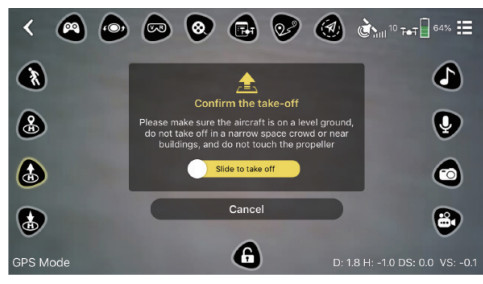
4. TAKEOFFMethod 1: Press ![]() to turn on the virtual remote. Then press
to turn on the virtual remote. Then press ![]() to unlock thedrone, and four propellers will start rotating. Press
to unlock thedrone, and four propellers will start rotating. Press![]() Slide the yellow bar to the right on the pop-up window to confirm takeoff.
Slide the yellow bar to the right on the pop-up window to confirm takeoff.
 Method 2: Press
 ![]() to turn on the virtual remote. Then press
to turn on the virtual remote. Then press ![]() to unlock the drone, and the four propellers will start rotating. Swipe the Left Control Stick up arrow button upwards to take off.
to unlock the drone, and the four propellers will start rotating. Swipe the Left Control Stick up arrow button upwards to take off.
5. LANDINGPress ![]() to land the drone during the flight.
to land the drone during the flight.

6. Smart RTHPress![]() to initiate the Smart RTH (Return to Home) procedure during the flight and have the drone return to the last recorded Home Point. Slide the yellow bar to the right in the pop-up window to confirm return.
to initiate the Smart RTH (Return to Home) procedure during the flight and have the drone return to the last recorded Home Point. Slide the yellow bar to the right in the pop-up window to confirm return.

7. AROUND POINT FLIGHTPress ![]() to activate Around Point Flight while flying. Input your desired fly radius and press OK to start. The drone will circle around the current drone position while keeping that point centered in the frame.
to activate Around Point Flight while flying. Input your desired fly radius and press OK to start. The drone will circle around the current drone position while keeping that point centered in the frame.
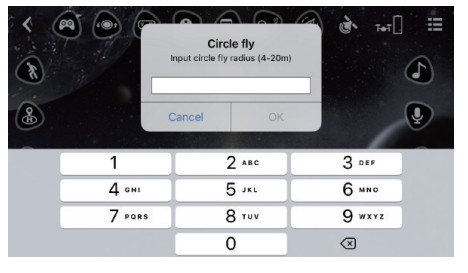
Press ![]() again during the flight to cancel this mode and regain control of the drone.Note: This function can’t be activated when the drone battery is low.
again during the flight to cancel this mode and regain control of the drone.Note: This function can’t be activated when the drone battery is low.
8. FOLLOW MEPress ![]() to enable the Follow Me function. When Follow Me is enabled during flight, the drone rotates automatically as you move with the controller.The drone’s camera lens will keep pointing at the target and maintain a 25 meter (82 foot) distance from it.
to enable the Follow Me function. When Follow Me is enabled during flight, the drone rotates automatically as you move with the controller.The drone’s camera lens will keep pointing at the target and maintain a 25 meter (82 foot) distance from it.
Press ![]() again during the flight to exit this mode and regain full control of the drone.Notes:① The functionality of Follow Me may vary due to GPS signal strength. Please maintain a safe distance between you and the drone when enabling this function.② Activate this function only when there are no obstacles around to avoid accidents.③ This function can’t be activated when the drone battery is low.
again during the flight to exit this mode and regain full control of the drone.Notes:① The functionality of Follow Me may vary due to GPS signal strength. Please maintain a safe distance between you and the drone when enabling this function.② Activate this function only when there are no obstacles around to avoid accidents.③ This function can’t be activated when the drone battery is low.
9. MULTIPOINT FLIGHTThe Multipoint Flight function allows you to define an exact flying route on a mapduring flight.① Press![]() to enter Multipoint Flight function, then press< to enlarge the map.② Press
to enter Multipoint Flight function, then press< to enlarge the map.② Press![]() to find your current location.③ Press ZOOM to zoom in on your current location on the map. You will see a blue circular area. Next, press some desired waypoints within the blue area. Press Delete to delete waypoints.④ Press Send to send waypoint(s).
to find your current location.③ Press ZOOM to zoom in on your current location on the map. You will see a blue circular area. Next, press some desired waypoints within the blue area. Press Delete to delete waypoints.④ Press Send to send waypoint(s).

10. PHOTO/VIDEOPress ![]() to take one photo.Press
to take one photo.Press ![]() to start recording video. Press
to start recording video. Press ![]() again to end and save the video to your microSD card and mobile device.
again to end and save the video to your microSD card and mobile device.
11. RECORD VIDEOS WITH PRELOADED MUSIC① Press ![]() to select Music, and the music provided will be displayed on the screen.② Click your preferred background music and confirm your choice. Then press
to select Music, and the music provided will be displayed on the screen.② Click your preferred background music and confirm your choice. Then press![]() .③ Press
.③ Press ![]() and then press OK on the pop-up window to start recording the video.Video will be saved to the album after you finish the recording.④ Share your videos in the album with your friends by tapping on
and then press OK on the pop-up window to start recording the video.Video will be saved to the album after you finish the recording.④ Share your videos in the album with your friends by tapping on![]() the lower-left corner of the selected video.
the lower-left corner of the selected video.

LED INDICATOR DESCRIPTIONS
| Function | Front LEDs | Rear LEDs |
| Color | Red | Red/Green/Yellow |
| Power On | Red | Yellow light flashes quickly for 4 seconds, then flashes slowly |
| Pairing | Solid red light | Solid red light |
| CalibrateGeomagnetic | The red light flashes quickly, the drone is upright and rotated, and then the red light goes on. | The red light flashes quickly, then the drone rotates horizontally, and the yellow light goes on. |
| Follow Me | Solid red light | Solid green light |
| One-key Return | Solid red light | Solid red light |
| Low Battery | Solid red light | Quickly flashing red light |
FAQQ1: Why aren’t the drone LEDs lighting up?
- Press the power switch on the drone.
- Replace or recharge your drone’s battery.
- Make sure the battery connectors are firmly plugged in.
Q2: Why do the drone’s LEDs keep flashing, but it never responds to any command from the transmitter?
- Pair the drone with the transmitter again.
- Replace or recharge the drone’s battery.
- Make sure the transmitter’s batteries have enough power.
Q3: Why is the flight not stable?
- Fly the drone back to you, and restart to do a flight calibration as instructed.
- Ensure flight is trimmed appropriately.
- Fly the drone in suitable weather conditions.
Q4: Why is the drone unresponsive to the controls?
- Make sure the distance between the drone and the mobile device is within range.
- Stay away from open water, high-voltage power lines, or trees.
 report this ad
CONTACT USFor any inquiries about Dragon Touch products, please feel free to contact us, and we will respond within 24 hours.E-mail: [email protected]Tel: 888-811-1140 (US) Mon-Fri 9am-5pm (EST)Official website: www.dragontouch.com
References
[xyz-ips snippet=”download-snippet”]