
DRAPER 12V Battery Starter Charger

These instructions accompanying the product are the original instructions. This document is part of the product, keep it for the life of the product passing it on to any subsequent holder of the product. Read all these instructions before assembling, operating or maintaining this product.This manual has been compiled by Draper Tools describing the purpose for which the product has been designed, and contains all the necessary information to ensure its correct and safe use. By following all the general safety instructions contained in this manual, it will ensure both product and operator safety, together with longer life of the product itself.All photographs and drawings in this manual are supplied by Draper Tools to help illustrate the operation of the product.Whilst every effort has been made to ensure the accuracy of information contained in this manual, the Draper Tools policy of continuous improvement determines the right to make modifications without prior warning.
WARRANTY
Draper tools have been carefully tested and inspected before shipment and are guaranteed to be free from defective materials and workmanship.Should the tool develop a fault, please return the complete tool to your nearest distributor or contact:Draper Tools Limited, Chandler’s Ford, Eastleigh, Hampshire, SO53 1YF. England.Telephone Sales Desk: (023) 8049 4333 or:Product Helpline (023) 8049 4344.A proof of purchase must be provided.If upon inspection it is found that the fault occurring is due to defective materials or workmanship, repairs will be carried out free of charge. This warranty period covering parts/labour is 12 months from the date of purchase except where tools are hired out when the warranty period is 90 days from the date of purchase. This warranty does not apply to any consumable parts, any type of battery or normal wear and tear, nor does it cover any damage caused by misuse, careless or unsafe handling, alterations, accidents, or repairs attempted or made by any personnel other than the authorised Draper warranty repair agent.Note: If the tool is found not to be within the terms of warranty, repairs and carriage charges will be quoted and made accordingly.This warranty applies in lieu of any other warranty expressed or implied and variations of its terms are not authorised.Your Draper warranty is not effective unless you can produce upon request a dated receipt or invoice to verify your proof of purchase within the warranty period.Please note that this warranty is an additional benefit and does not affect your statutory rights. Draper Tools Limited.
INTRODUCTION
SCOPEThis manual is intended to give the user an overview of the function and controls of this product to aid its safe and effective use. Any application other than that it was intended for, is considered misuse.
SPECIFICATION
Stock No’s. ………………………………………………………………………………………………………………70807Part No’s. …………………………………………………………………………………………………………… BCMC18Rated Voltage ………………………………………………………………………………………………… 230V~50HzCharging voltage ……………………………………………………………………………. 2A, 5A, 10A, 20ACharge type…………………………………………………………………………….. Fully automatic smart chargeDisplay……………………………………………………………………………………………………………………….LCDUSB outputs …………………………………………………………………………………………………….1.5A or 2.4ASuitable battery types……………………………………………………………………Lead acid, GEL, AGM, MF.Weight (machine only)……………………………………………………………………………………………… 2.18kg
HANDLING & STORAGE
- Care must be taken when handling this product.
- Dropping this product could have an effect on its accuracy and could also result in personal injury. This product is not a toy and must be respected.
- Environmental conditions can have a detrimental effect on this product if neglected.
- Exposure to damp air can gradually corrode components.
- If the product is unprotected from dust and debris, components will become clogged.
- If not cleaned and maintained correctly or regularly, the product will not perform at its best.
Store in a dry location out of the reach of children.
HEALTH AND SAFETY INFORMATION
GENERAL SAFETY INSTRUCTIONS FOR POWER TOOL USE
- When using any type of power tool there are steps that should be taken to make sure that you, as the user, remain safe.
- Common sense and a respect for the tool will help reduce the risk of injury.
- Read the instruction manual fully. Do not attempt any operation until you have read and understood this manual.
- Most important, you must know how to safely start and stop this machine, especially in an emergency.
- Keep the work area tidy and clean. Attempting to clear clutter from around the machine during use will reduce your concentration. Mess on the floor creates a trip hazard. Any liquid spilt on the floor could result in you slipping.
- Find a suitable location. If the machine is bench mounted, the location should provide good natural light or artificial lighting as a replacement. Avoid damp and dust locations as it will have a negative effect on the machine’s performance. If the machine is portable, do not expose the tool to rain. In all cases do not operate power tools near any flammable materials.
- Keep bystanders away. Children, onlookers and passers by must be restricted from entering the work area for their own protection. The barrier must extend a suitable distance from the tool user.
- Unplug and house all power tools that are not in use. A power tool should never be left unattended while connected to the power supply. They must be housed in a suitable location away, locked up and from children. This includes battery chargers.
- Do not overload or misuse the tool. All tools are designed for a purpose and are limited to what they are capable of doing. Do not attempt to use a power tool (or adapt it in any way) for an application it is not designed for. Select a tool appropriate for the size of the job. Overloading a tool will result in tool failure and user injury. This also covers the use of accessories.
- Dress properly. Loose clothing, long hair and jewellery are all dangerous because they can become entangled in moving machinery. This can also result in parts of body being pulled into the machine. Clothing should be close fitted, with any long hair tired back and jewellery and neck ties removed. Footwear must be fully enclosed and have a non-slip sole.
- Wear personal protective equipment (PPE). Dust, noise, vibration and swarf can all be dangerous if not suitably protected against. If the work involving the power tool creates dust or fumes, wear a dust mask. Vibration to the hands caused by operating some tools for longer periods must be protected against. Wear vibration reducing gloves and allow long breaks between uses. Protect against dust and swarf by wearing approved safety goggles or a face shield. These are some of the more common hazards and preventions. However, always find out what hazards are associated with the machine/work process and wear the most suitable protective equipment available.
- Do not breathe contaminated air. If the work creates dust or fumes, connect the machine (if possible) to an extraction system either locally or remotely. Working outdoors can also help if possible.
- Move the machine as instructed. If the machine is hand held, do not carry it by the power supply cable. If the product is heavy, employ a second or third person to help move it safely or use a mechanical device. Always refer to the instructions for the correct method.
- Do not overreach. Extending your body too far can result in loss of balance and you falling. This could be from a height or onto a machine and will result in injury.
- Maintain your tools correctly. A well maintained tool will do the job safely. Replace any damaged or missing parts immediately with original parts from the manufacturer. As applicable; keep blades sharp, moving parts clean, oiled or greased, handles clean and emergency devices working.
- Wait for the machine to stop. Unless the machine is fitted with a safety brake; some parts may continue to move due to momentum. Wait for all parts to stop; then unplug it from the power supply before making any adjustments, carrying out maintenance operations or just finishing using the tool.
- Remove and check setting tools. Some machinery requires the use of additional tools or keys to set, load or adjust the power tool. Before starting the power tool always check to make certain they have been removed and are safely away from the machine.
- Prevent unintentional starting. Before plugging any machine in to the power supply make sure the switch is in the OFF position. If the machine is portable, do not hold the machine near the switch and take care when putting the machine down that nothing can operate the switch.
- Carefully select an extension lead. Some machines are not suitable for use with extension leads. If the tool is designed for use outdoors use an extension lead that is also suitable for that environment. When using an extended lead select one capable of handling the current (amps) drawn by the machine in use. Fully extend the lead regardless of the distance between the power supply and the tool. Excess current (amps) and a coiled extension lead will both cause the cable to heat up and can result in fire.
- Concentrate and stay alert. Distractions are likely to cause an accident. Never operate a power tool if you are under the influence of drugs (prescription or otherwise), including alcohol or if you are feeling tired. Being disorientated will result in an accident.
- Have this tool repaired by a qualified person. This tool is designed to confirm to the relevant international and local standards and as such should be maintained and repaired by someone qualified using only original parts supplied by the manufacturer. This will ensure the tool remains safe to use.
RESIDUAL RISK
Important note: Although the safety instructions and operating manuals for our tools contain extensive instructions of safe working with power tools, every power tool involves a certain residual risk which can not be completely excluded by safety mechanisms. Power tools must therefore always be operated with caution!
SAFETY INSTRUCTIONS FOR BATTERY PACKS/CHARGERS
- Do not use the charger in adverse weather conditions.
- Prior to plugging the charger into the supply, check that the plug and the cable are in good repair. If either are damaged, have the defective item replaced immediately by a suitably qualified person. If the casing of the battery charger is damaged, it is good policy to have the charger checked over by a suitably qualified person.
- Only use a correctly rated mains outlet to provide power. Do not plug into site generators, engine generators or D.C. sources. Do not use a mains socket outlet that is not switched.
- Set up the charger in a safe place where the cable won’t be knocked, tripped over, stepped on, etc., and where it is well ventilated. Make sure the ventilation slots in the charger case are not obstructed.
- Before charging the battery, read the instructions.
- Do not charge any other product with the charger. Any other application is considered misuse.
CONNECTION TO THE POWER SUPPLY (CHARGER)
Make sure the power supply information on the machine’s rating plate are compatible with the power supply you intend to connect it to.This charger comes supplied with a UK standard 3 pin plug. It is designed for connection to a domestic power supply rated at 230V AC.This charger is Class II† and is designed for connection to a power supply matching that detailed on the rating label and compatible with the plug fitted.If an extension lead is required, use an approved and compatible lead rated for this appliance.Follow all the instructions supplied with the extension lead. If using an extension lead, follow the instructions that came with your lead regarding maximum load while cable is wound, if in doubt ensure that the entire cable is unwound. Using a coiled extension lead will generate heat which could melt the lead and cause a fire.Double insulated : This product requires no earth connection as supplementary insulation is applied to the basic insulation to protect against electric shock in the event of failure of the basic insulation.Apart from replacing the fuse in the plug, no other electrical work is recommended on this product.
TECHNICAL DESCRIPTION
IDENTIFICATION
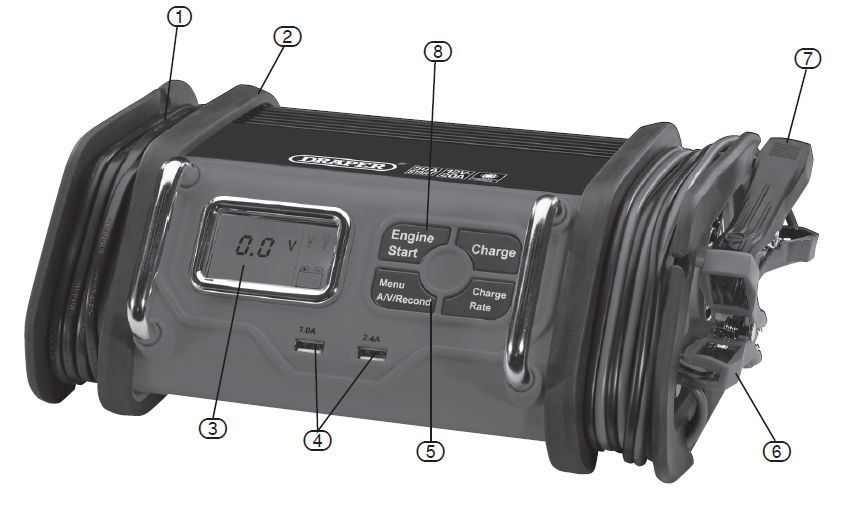
- Power cord storage
- Non-slip feet
- LCD display
- 2 USB Port 1.5A & 2.4A
- Control panel
- Battery terminal positive (RED) clamp
- Battery terminal negative (BLACK) clamp
- Engine start.
UNPACKING AND CHECKING
PACKAGING
Carefully remove the product from the packaging and examine it for any sign of damage caused during shipping. Lay the contents out and check them. If any part is damaged or missing, do not attempt to use the tool and contact the Draper Helpline immediately (see back page for details).Retain the packaging material at least during the guarantee period: in case the machine needs to be returned for repair.Warning! Some of the packaging materials used may be harmful to children, keep them out of reach from children.Disposed of any packaging correctly and according to local regulations.
PREPARING THE BATTERY CHARGER
BEFORE CHARGING YOUR BATTERY
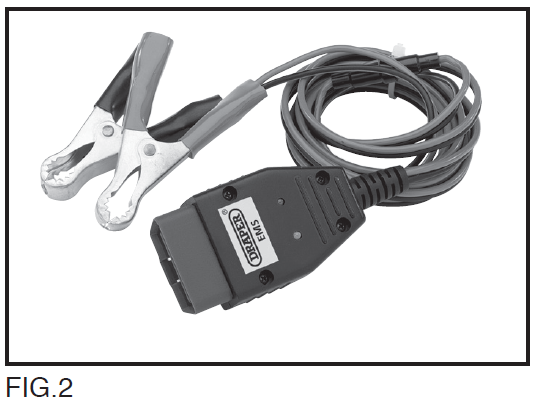
We recommend that the battery is disconnected from the vehicle, this will avoid any possible damage to the alternator. Loss of codes for audio and security etc, can be prevented by connecting a Draper Memory Saver – Stock No. 22277 12V socket type (Fig.1), or Stock No. 22231 EOBD 16pin diagnostic socket type (Fig.2) before disconnecting the battery. Check that the voltage of the battery matches that of the charger.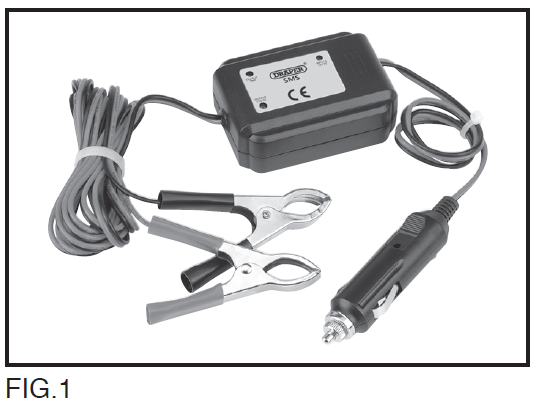
 Before connecting the battery to the charger ensure that both are stable and on a level surface. If the battery has cell filler caps, loosen or remove them to aid in the escape of charging gasses (if the battery is a Gel or maintenance free/sealed type, please refer to battery manufacturers published charging advice). Once the cell caps have been loosened or removed it is advisable to check the level of electrolyte in each cell and top up with distilled water only to the recommended fill level.Caution! Never top up your battery with tap water.
CHARGING A BATTERY
The appliance is only intended for charging 12V batteries.
- Plug the charger into a power point, icons for voltage, clips and battery are shown on the display.WITH A BATTERY REMOVED FROM VEHICLE:
- Connect the RED positive charger lead (6) to the positive (+) terminal on your battery.
- Connect the BLACK negative charger lead (7) to the negative (–) terminal on your battery.WITH A BATTERY CONNECTED TO VEHICLE:2. Connect the RED positive charger lead (6) to the positive (+) terminal on your battery.3. Connect the BLACK negative charger lead (7) to your vehicles ground connection on either the engine or chassis, away from any fuel lines or the battery vents.If the clips are connected with the wrong polarity and Err will be shown on the display and a warning signal will be heard until the clips are disconnected. Release the clips and connect them with the correct polarity.
- When the appliance is connected correctly, press the charging button on the control panel. The display shows the charging current, icon for the clips, and a battery icon that fills up as the battery is charged.Note: The standard charging current is 2A. You can change the charging current by pressing the charge rate button.Important: If the appliance overheats the overheat icon will be shown on the display. The charger automatically reduces the charging current to lower the internal temperature.
- When battery is fully charged “FULL” will be shown on the display.Note: The charger will detect the internal temperature. If the internal temperature is below 0°C an icon will be shown on the display.Note: If the battery to be charged has fallen below 2 volts, the battery cannot be recharged with this charger.Important: After an extended period of charging the back of this machine can become warm.
BATTERY INFORMATION
Typical readings.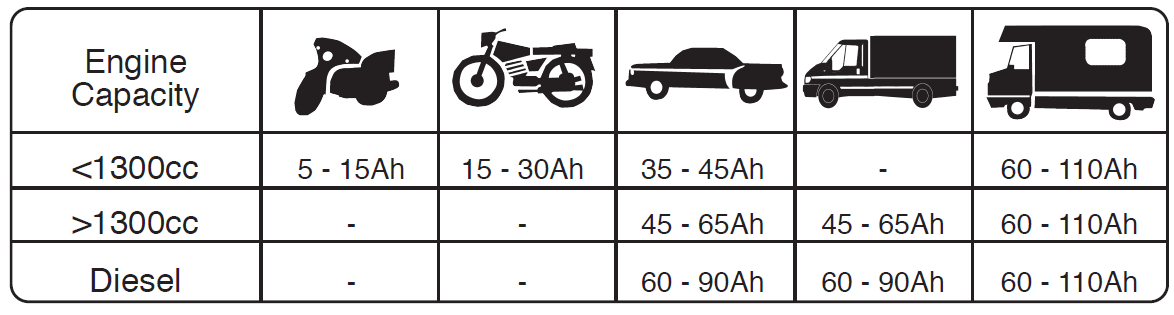
CHARGING TIMES
The charging time depends on the batteries charge condition. A partially charged battery will take less time to charge than a fully discharged battery. The approximate charging time for a battery can be calculated using the following equation:-
For example, a 45Ah battery would require approximately 11 hours to charge from a 4.2A battery charger.The above table is to give an average charge time.If the charger you are using is an automatic or smart charger then it will automatically turn off or revert to “float” charge status to maintain the battery in its fully charged state.
USING THE ENGINE START FUNCTION
- Setup the battery charger and connect to the battery as the “8.2 charging the battery” section.
- Press the engine start button.
- The engine start icon will be shown on the screen. The vehicle is ready to start.
- Crank the engine, typically in 3 to 5 second bursts. The digital display shows “5sec” indicating a 5-second countdown.
Note: Pls do connect the battery first, then press Engine Start button, otherwise, it won’t work, and the LCD screen will display “LO” with sound alarm.Important: the function requires a resting /cooling period between attempts, wait 4 to 5 minutes before a second attempt at starting the engine, if needed.When disconnecting charger, disconnect AC cord, remove clamp from vehicle chassis, and then remove clamp from battery terminal.
DISPOSAL
- At the end of the machine’s working life, or when it can no longer be repaired, ensure that it is disposed of according to national regulations.
- Contact your local authority for details of collection schemes in your area.In all circumstances:
- Do not dispose of power tools with domestic waste.
- Do not incinerate.
- Do not dispose of WEEE* as unsorted municipal waste.
EXPLANATION OF SYMBOLS
- Read the instruction manual.
- Do not abandon into the environment.
- Keep out of the reach of children.
CONTACTS
Draper Tools Limited, Hursley Road,Chandler’s Ford, Eastleigh, Hampshire. SO53 1YF. U.K. Helpline: (023) 8049 4344Sales Desk: (023) 8049 4333Internet: drapertools.comE-mail: [email protected]General Enquiries: (023) 8026 6355Service/Warranty Repair Agent: For aftersales servicing or warranty repairs, please contact the Draper Tools Helpline for details of an agent in your local area.
![]()
References
[xyz-ips snippet=”download-snippet”]