Dreamland Luxury Heated ThrowInstruction Manual
ILLUSTRATIVE GUIDE
DESCRIPTION OF THE APPLIANCE
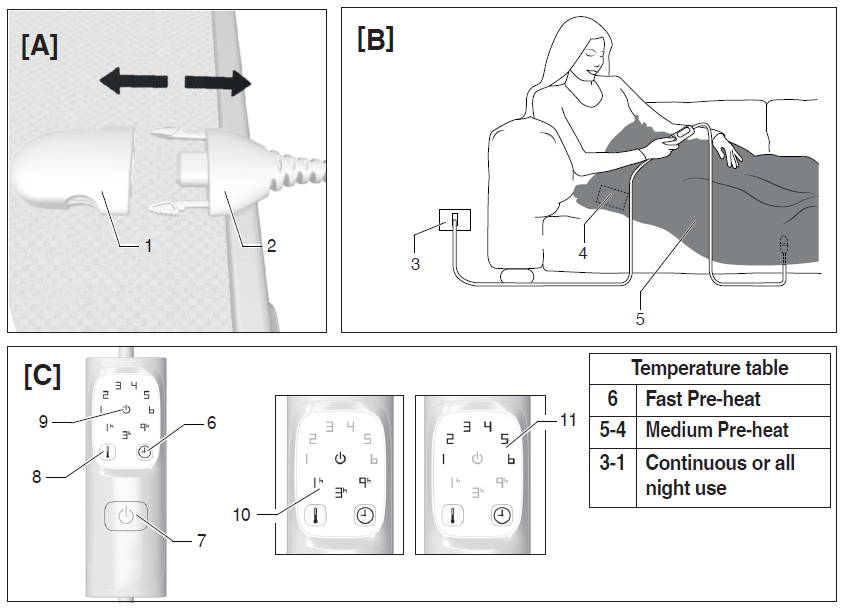
- Throw connector
- Control unit connector
- Mains socket
- Rating Label
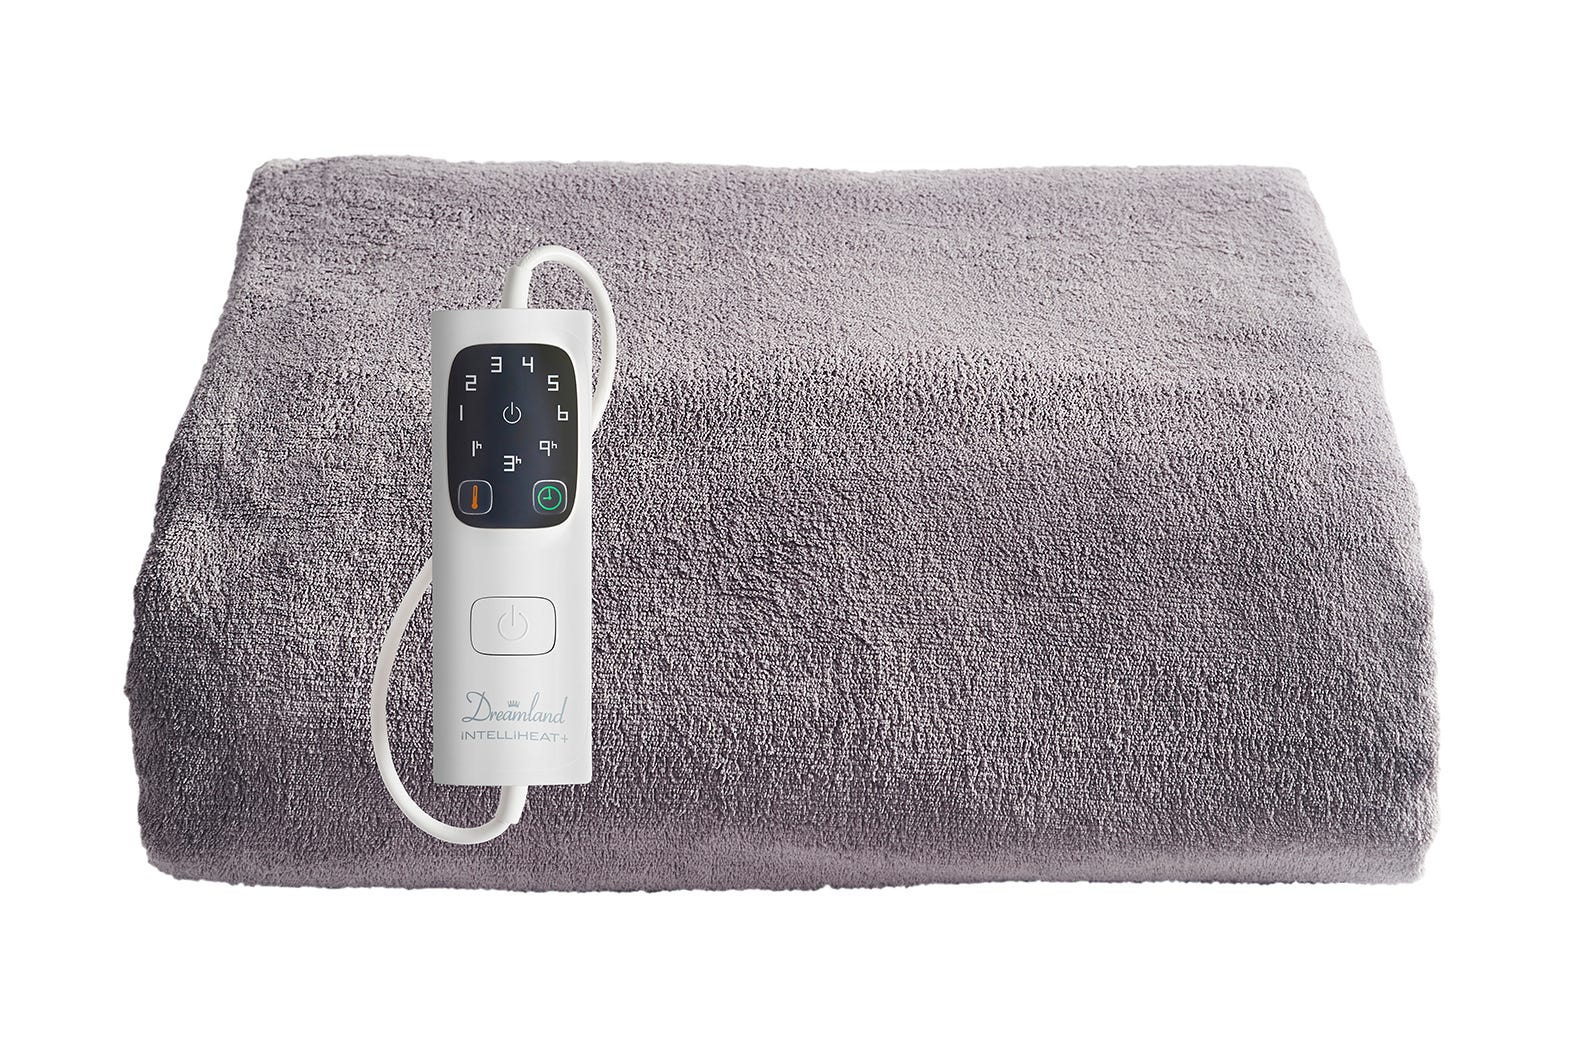
- Throw
- Timer selector
- ON/OFF button
- Temperature selector
- Stand-by LED
- Auto shut off timer LED
- Temperature LED
TECHNICAL DATA
- TYPE R7507 : 220-240 V 50/60 Hz 150 W
- TYPE R7523 : 220-240 V 50/60 Hz 150 W
Dear Customer, thank you for choosing our product. We feel certain EN you will appreciate its quality and reliability as it was designed and manufactured with customer satisfaction in mind. These instructions for use are compliant with the European Standard EN 82079.
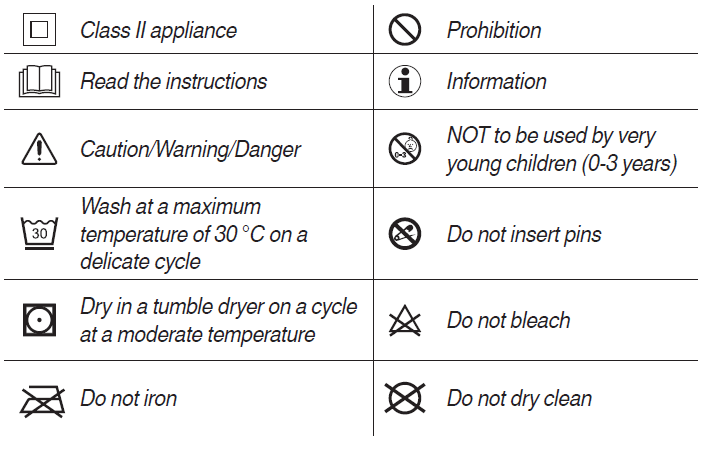
SYMBOLS
IMPORTANT INSTRUCTIONS.
RETAIN FOR FUTURE USE.
WARNING! Instructions and warnings for safe use.Before using this appliance, carefully read the instructions for use and in particular the safety notes and warnings, which must be complied with. Keep this manual together with its illustrative guide for future consultation. Should you transfer the appliance to another user, make sure you hand over this documentation as well.
NOTE: Should any part of this manual be difficult to understand or any doubt arise, contact the company at the address indicated on the last page before using the appliance.
NOTE: Persons with impaired vision may consult these instructions for use in digital format at the website www.dreamlanduk.co.uk
- After unpacking, make sure the appliance is intact, complete with all its parts as shown in the illustrative guide and with no sign of damage. If in any doubt, do not use the appliance and contact an authorised service centre.
WARNING! Risk of suffocation.Children shall not play with the packaging. Keep the plastic bag out of the reach of children.
- This appliance must be used only for the purpose for which it was designed, namely as a throw (wrap) for home use. Any other use is considered not compliant with the intended use and therefore dangerous.
- Before connecting the appliance to the mains supply, make sure that the voltage and frequency indicated on the technical data of the appliance correspond to those of the mains supply. The rating is on the appliance or on the power supply unit, if any (see illustrative guide).
- This appliance can work automatically at a frequency of 50 Hz or 60 Hz.
- This appliance is only to be used with the types of detachable control EN unit that are marked on the appliance.Children under the age of three are not to use this appliance due to their inability to react to overheating.
- This appliance can be used by children older than 3 years and younger than 8 years under supervision and with the control always set to minimum temperature (heat setting 1).
- This appliance can be used by children aged from 8 years and above and persons with reduced physical, sensory or mental capabilities or lack of experience and knowledge if they have been given supervision or instruction concerning use of the appliance in a safe way and understand the hazards involved. Children shall not play with the appliance. Cleaning and user maintenance must not be carried out by children without supervision.
- This appliance must not be used by persons insensitive to heat and other very vulnerable persons who are unable to react to overheating.
- The cable and control unit of the appliance can give rise to risks of entanglement, strangulation, tripping or treading if not correctly arranged. The user shall make sure that electric cords shall be arranged in a safe way.
- Always disconnect the appliance from the mains supply before cleaning or performing maintenance and when the appliance is not in use.
- Examine the appliance frequently for signs of wear or damage. If the appliance has been misused or does not work, contact an authorized technical service centre before switching it on again.
- If the supply cord is damaged, take the whole appliance to an authorised technical service centre for the replacement of the control unit, so as to prevent all risks.
- If the appliance is used on an adjustable bed, check that the blanket and cord do not become trapped or rucked, for example in hinges.
- This appliance is not intended for medical use in hospitals.
- DO NOT use if wet.
DO NOT INSERT PINS OR NEEDLES.
- When storing the appliance, allow it to cool down before folding.
WARNING! DO NOT crease the appliance by placing items on top of it during storage.WARNING! For use, cleaning, maintenance and storage of the appliance, please follow the instructions specified in the corresponding chapters.
- DO NOT use the appliance with wet hands or damp feet.
- DO NOT pull the power cable or the appliance itself to remove the plug from the socket.
- DO NOT pull or lift the appliance by the supply cord.
- When using the appliance at home outside, do not expose the appliance to humidity, to the effects of weather (rain, snow, etc. ) or to extreme temperatures. DO NOT leave the appliance outside after use.
- If the appliance is faulty or malfunctions, switch it off and do not tamper with it. Contact an authorised technical service centre for any repairs.
- DO NOT use this appliance to warm animals.
- DO NOT tuck in.
- See the external packaging for the characteristics of the appliance.
USE
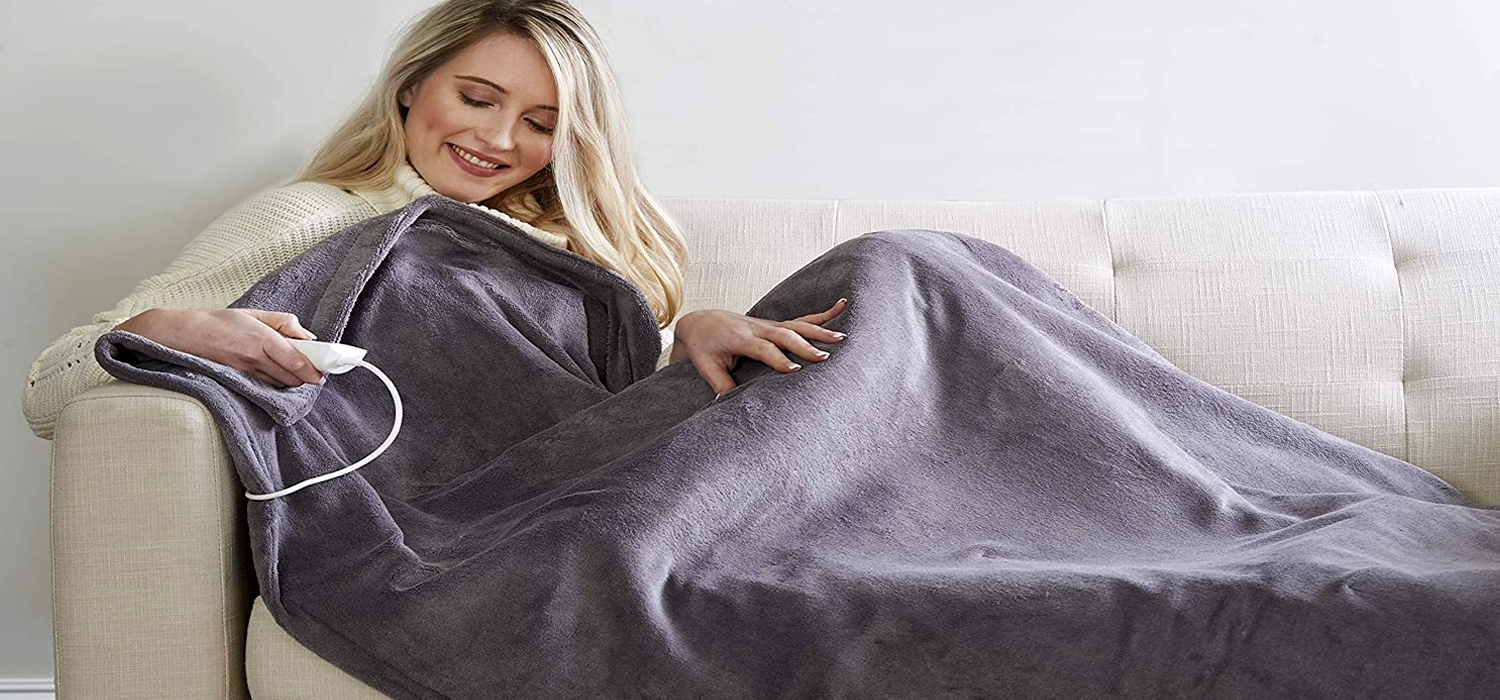
- Spread the throw over your sofa, armchair or bed ensuring that the throw connector is at the foot position.
- Place the throw over you without wrapping it tightly and without sitting on it as this may cause the overheat protection system to activate.
CONNECTING THE CONTROL UNIT
- Insert the control unit connector (2) in the throw connector (1) to connect the control unit to the throw.
- Insert the plug of the control unit cable in the mains socket (3). Every time the plug is EN inserted, the control unit automatically performs a self-diagnosis, lighting up all LEDs (10, 11) in a clockwise sequence for around two seconds.
SWITCHING ON AND SELECTING THE RIGHT TEMPERATURE
The control unit can be set to the following temperature levels:6: Fast pre-heat temperature5-4: Medium pre-heat temperature3-1: Continuous or all-night use
- To switch the throw on press the ON/OFF button (7). Every time the appliance is turned on, the control unit automatically checks the appliance is working correctly, lighting up all LEDs (10, 11) in a clockwise sequence. Following this check, the control unit automatically sets temperature 6 and the timer (auto-off time) to 1 hour.
- For fast pre-heat, use maximum temperature 6. If you like a medium pre-heat temperature, then you can select 4-5 by pressing the temperature selector button (8) until the LED for the required temperature lights up (11). The higher the number selected, the higher the temperature.
IMPORTANT: To judge the temperature accurately, lie on your sofa with the throw draped over you. Do not rely on a hand placed on the throw.
Note: For continuous use, set the control unit to temperature levels from 1 to 3 only.
To set the control unit to the continuous use temperature, press the temperature selector button (8) until LEDs 1, 2 or 3 light up (11).
WARNING! DO NOT set the control unit to a higher temperature than recommended for continuous use.If the control unit is set to a higher temperature the user may suffer skin burns or heat stroke.
WARNING! DO NOT place the control unit under the pillow or under the sheets when in use.
AUTO SHUT OFF TIMER
The throw has an automatic shut off timer of 1,3 or 9 hours. When switched on, the control unit automatically sets itself to 1 hour on the auto shut off timer and LED 1h lights up in green (10). To set a different auto shut off timer, press the timer selector button (6) and select the desired timer. Each time the auto shut off time is reset, the timer starts from zero. When the time has elapsed, the throw switches off and the standby LED (9) lights up in blue.
NOTE: should the power supply accidentally be interrupted during use, when the control unit is switched back on, it will maintain the temperature and timer settings in use previously and the timer counter will start from zero.
NOTE: the light intensity reduces around 15 seconds after any button is last pressed, so that the display light does not bother users. Similarly, the standby LED becomes less bright 15 seconds after it is activated.
SWITCHING OFF
Switch the throw off by pressing the ON/OFF button (7) and remove the plug from the socket (3).
WARNING! Always disconnect the appliance from the mains and disconnect the control connector from the throw before cleaning or performing maintenance.
BEFORE WASHING
- Take the plug of the control unit cable out of the mains socket (3).
- Press the grip levers at the sides of the control unit connector (2) to remove the control unit connector from the throw connector (1).
MACHINE WASHING
- The throw can be cleaned in the washing machine at 30°C, on a delicate cycle.
- Pre-treat any stains by spot cleaning before placing in the washing machine.
- Use only the delicate cycle for spinning. DO NOT make an additional spinning cycle.
DRYING IN THE TUMBLE DRYER
- The throw can be dried in a tumble dryer on a delicate cycle at a moderate temperature, but at the end of the drying cycle it must be air-dried to allow it to dry completely. EN
- Remove the throw from the tumble dryer at the end of the drying cycle and reshape it to its original size.
- Allow the throw to fully air-dry before using it again.
DRYING IN THE OPEN AIR
- When the throw is spread out to dry on a clothes airer, it must be stretched so the original size is more or less maintained. This is best done while the throw is still damp, working alternately on the opposite corners and pulling one side at a time. You might have to repeat this procedure several times until the throw is completely dry.
WARNING! Dry the appliance flat without using pegs to avoid damaging it. Leave it to dry, laid out flat on a clothes airer, not in direct sunlight.
- Only use the throw when it’s thoroughly dry.
- Do not iron the throw.
WARNING! Examine the appliance against the light to make sure the cables are not bent or twisted.WARNING! If the appliance does not resume its original size or if problems arise with the internal cables contact an authorized service centre for a safety check.
STORING THE THROW
When not in use, store as follows:
- If the throw has been washed, wait until it’s completely dry;
- Fold it like a normal throw;
- You are advised to store the throw in the original packaging it was supplied in;
- When storing the appliance, allow it to cool down before folding;
- Put the throw away in a dry place.
Examine the appliance and its supply cord frequently for signs of wear or damage.If there are such signs or in the case of malfunction, contact an authorized technical service centre.
TROUBLESHOOTING
This chapter describes the most common problems that can arise using the appliance. If the problems cannot be solved with the information below, please contact the Authorized Service Centre.

DISPOSAL
 The packaging of the appliance is made of recyclable materials. Dispose of the packaging in accordance with the environmental protection regulations.
Pursuant to Directive 2012/19/EU on waste electrical and electronic equipment (WEEE), the crossed bin symbol on the appliance or its packaging indicates that the appliance must be disposed of separately from other waste at the end of its useful life.
The user must therefore take the appliance to an appropriate recycling centre for electrical and electronic equipment. Alternatively, instead of handling the disposal, the user can hand over the appliance to the retailer when a new, equivalent one is purchased. The user can hand over electronic products measuring less than 25 cm to retailers of electronic products having a sales area of at least 400 m2 free of charge and with no obligation to buy. Proper waste sorting prior to sending the equipment no longer used for recycling, processing and disposal in a manner that respects the environment contributes towards avoiding negative impacts on the environment and on health and promotes the reuse and/or recycling of the equipment’s material.
GUARANTEE
This product is guaranteed for a period of 2 years from the date of purchase against material, mechanical and electrical defects. The guarantee is binding if it is accompanied by a valid receipt of payment. This guarantee is only valid if the appliance is used solely for domestic purposes in accordance with the instructions provided that is not connected to an unsuitable electricity supply, dismantled, interfered with in any way damaged, through misuse, fair wear and tear. Under this guarantee we undertake to repair or replace free of charge any parts found to be defective.
PLEASE NOTE, THE COST OF A SAFETY INSPECTION IS NOT COVERED BY THIS GUARANTEE. A CHARGE WILL BE MADE IN RESPECT OF ANY PRODUCT RETURNED UNDER THIS GUARANTEE, WHERE NO FAULT IS FOUND.
This guarantee is offered as an extra benefit and does not affect your statutory rights as a consumer. This guarantee does not confer any rights other than those expressly set out above and in particular we shall not be liable for any indirect or consequential loss or damage. Nothing in this guarantee or the instructions relating to the product excludes, restricts or otherwise affects your statutory rights. In line with our policy of continuous development, we reserve the right to change this product, packaging and documentation without notice. If a defect appears and after checking that the blanket is being used properly in accordance with the instructions, return it with a valid proof of purchase, as soon as possible to the manufacturer’s Service Centre. This guarantee is valid in the UK only.
SERVICE CENTREPO Box 166 – Middlewich – Cheshire – CW10 0ZU – Tel: 0333 0050305E-mail: www.dreamlanduk.co.uk
References
[xyz-ips snippet=”download-snippet”]