
DC Bidirectional Digital Multi meter
Introduction
SIN9020S is a multi functional meter that is able to measure voltage, current, charge and discharge capacity, time, power and many other physical quantities. It also can set parameters to achieve protective functions like over voltage protection, under voltage protection, over current protection, over-charge capacity protection and limited-time protection. The measured data will be displayed with colourful LCD, and the information is comprehensive and humane. This instrument is ideal for monitoring the output of voltage and current, as well as the battery charge and discharge applications.
Main Characteristics
- Bidirectional detection of current makes it convenient for users who want to detect charge and discharge to detect bidirectional current without changing the wiring.
- Power off memory function enables the instrument to remember the AH value before power failure, which makes observation and measurement convenient.
- Time and AH value clear function will not affect the next measurement.
- AH value can be filled and it doesn’t affect the measurement of direct discharge.
- Voltage, current, charge capacity (AH value), WH value, time, power are displayed simultaneously, and the displayed information are comprehensive and clear.
- With a function key of output shutdown, turning on or off the output is flexible.
- Protection feathers including over-voltage protection, undercurrent protection, over-power protection, limited-time protection, overcharge protection, etc.
- Online calibration enables users to correct the error promptly.
- LCD display can be turned off when necessary to reduce power consumption.
Technical Indicators

Panel Description
This instrument is a split structure, composed of two parts, meter and power expansion board. The front panel is as Figure1 while the power expansion board is as Figure 2. 
Back Panel
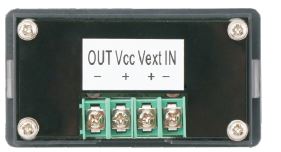
Wiring
There are four wiring ports on the back of the meter, which are “OUT-“, “VCC +”, “Vext +” and “IN-“. “Vext +” is positive terminal for external-supply power in three-wire connection system. “VCC +” is not only the positive of the power supply, but also the positive of the load.There are two-wire connection and three-wire connection for this instrument. For the two-wire wiring system, users can connect the instrument directly to the power supply, while the three-wire connection system requires an external supply power separately to support.
Wiring diagram and method for self-supply power (battery)
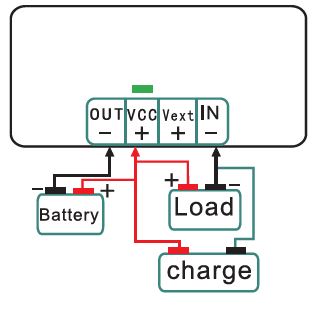
Two-wire connection system:
The positive of the battery, the positive of charge and the positive of the load should be connected to the common “VCC+”. The negative of the battery should be connected to “OUT-“. The negative of the load and negative of charge should be connected to “IN-“. Attention to the direction of positive and negative when wiring, do not take the reverse.Wiring diagram and method for external-supply power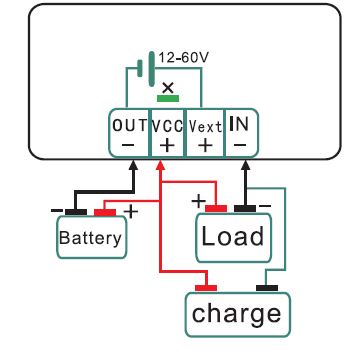
Three-wire connection system:
Open the back cover of the instrument, and pick apart the short-circuit point with a soldering iron. Connect the positive of external power supply to the “Vex!+”, while the negative of external-supply power should be connected to the “OUT-“. Then connect the positive of the load, battery and charge to “VCC +”, while the negative of the load and charge should be connected to the “IN-“. The negative of battery should be connected to “OUT-“. Pay attention to the direction of positive and negative when wiring, be careful not to reverse.
Instructions
Wiring
Select the appropriate wiring based on the range of the measured voltage. Ensure that the input voltage is within the tolerance range of the instrument.Note: The range of input voltage for self-supply power: 1 0V – 90V; The range of input voltage for external-supply power : 0V – 90V.
The Output
If the instrument is connected to a relay, click on the the button to move the yellow cursor to the “OUT” point, and click on the “OK” button to control output. If the “OUT” light is shown in green, it means the output is open. If the “OUT ” light turns Gray, then the output is off and the power state on the machine defaults to the state before last shutdown. If the instrument is not connected to a relay, the output stays on, and the OUT light fails.
Expand Function Settings
If you want to open an expand functions, move the yellow cursor to the corresponding item, and click the “OK” button to make the corresponding indicating light turns green. The light turning green means this protection is on while turning gray means off. Before turning on the protection function, user should set protection parameters first by pressing “OK” button for three seconds or so to enter the protection parameters settings page. And then increase or decrease the parameter by the t-♦ button.Click “OK” to return to the initial interface when all the parameters are set. Factory default parameters for each function are 000.NOTE: If you didn’t set any parameters in the adjustment page, you need to click on the t- button for once and♦ button for once then click on the OK button to return to the original page.
Expand Function Introduction
CD “OVP”, Over Voltage Protection. If user sets OVP value and opens the OVP protection option, when the input voltage exceeds the limited voltage, the instrument will cut off the output automatically and the “OUT” light will change from green to gray. To restore output after the protection option is turned off, move the yellow cursor to “OUT” and click the “OK ” button to reopen output.
CZ) “OPP”, Over Power Protection. If user sets OPP value, and opens the OVP protection option, when the output power exceeds the limited power, the machine will cut off the output automatically and the “OUT” light will change from green to gray. To restore output after the protection option is turned off, move the yellow cursor to “OUT” and click the “OK ” button to reopen output.
® “OCP”, Over Current Protection. If user sets OCP value, and opens the OCP protection option, when the input current exceeds the limited current, the machine will cut off the output automatically and the “OUT” light will change from green to gray. To restore output after the protection option is turned off, turn off the protection option and return to normal output.
®”OFT”, Out of Time Protection. If the OFT value is set, and the OFT protection option is selected, when the operating hours exceeds the set operating hours, the machine will cut off the output automatically and the “OUT” light will change from green to gray. To restore output after the protection option is turned off, move the yellow cursor to “OUT”, and click on the “OK” button to reopen output.
® “OAH”, Over AH Protection. If OAH value is set, and the OAH protection options is selected, when the accumulative AH value exceeds the set value, the machine will cut off the output automatically and the “OUT” light will change from green to gray. To restore output after the protection option is turned off, turn off the protection option and restore normal output. Percentage of the and opens the OVP protection option, when the input voltage exceeds the limited voltage, the instrument will cut off the output automatically and the “OUT” light will change from green to gray. To restore output after the protection option is turned off, move the yellow cursor to “OUT” and click the “OK ” button to reopen output.CZ) “OPP”, Over Power Protection. If user sets OPP value, and opens the OVP protection option, when the output power exceeds the limited power, the machine will cut off the output automatically and the “OUT” light will change from green to gray. To restore output after the protection option is turned off, move the yellow cursor to “OUT” and click the “OK ” button to reopen output.
® “OCP”, Over Current Protection. If user sets OCP value, and opens the OCP protection option, when the input current exceeds the limited current, the machine will cut off the output automatically and the “OUT” light will change from green to gray. To restore output after the protection option is turned off, turn off the protection option and return to normal output.
®”OFT”, Out of Time Protection. If the OFT value is set, and the OFT protection option is selected, when the operating hours exceeds the set operating hours, the machine will cut off the output automatically and the “OUT” light will change from green to gray. To restore output after the protection option is turned off, move the yellow cursor to “OUT”, and click on the “OK” button to reopen output.
® “OAH”, Over AH Protection. If OAH value is set, and the OAH protection options is selected, when the accumulative AH value exceeds the set value, the machine will cut off the output automatically and the “OUT” light will change from green to gray. To restore output after the protection option is turned off, turn off the protection option and restore normal output. Percentage of the
- The measuring range must not exceed the voltage and current ranges, otherwise the instrument will be damaged.
- Positive and negative cannot be reversed,
- Working temperature is10 – 50 °C. Storage temperature is 20 – 70 °C. Keep the instrument in a dry environment.
- Do not attempt to disassemble the instrument. Destroying the package will lead to void warranty. There are no user-serviceable parts of this instrument, so repairs only can be carried out by designated repair outlets or by returning to the factory.
- Please do not move the instrument violently when the instrument is working properly, in order to avoid severe irreparable damage to the internal circuit.
Drok SKU-200320 DC Bidirectional Digital Multimeter Instruction Manual – Drok SKU-200320 DC Bidirectional Digital Multimeter Instruction Manual –
[xyz-ips snippet=”download-snippet”]