![]()
DRYING PODINSTRUCTION BOOKLET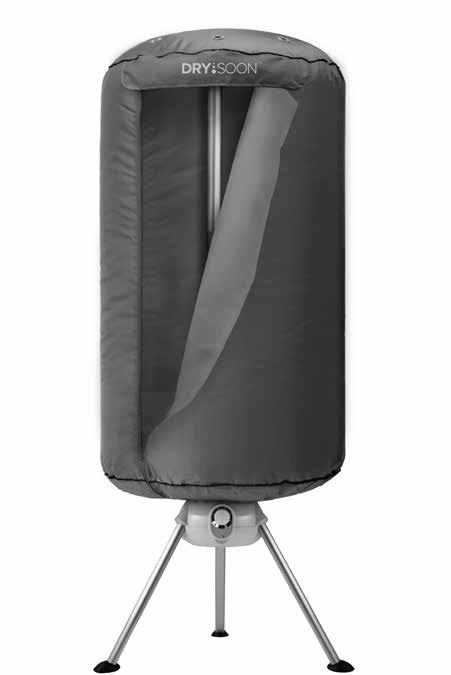
Model: 53211![]()
DRY:SOON DRYING PODThank you for choosing the Lakeland Dry:Soon Drying Pod. Please take a little time to read this booklet before getting started and keep it in a safe place for future reference.
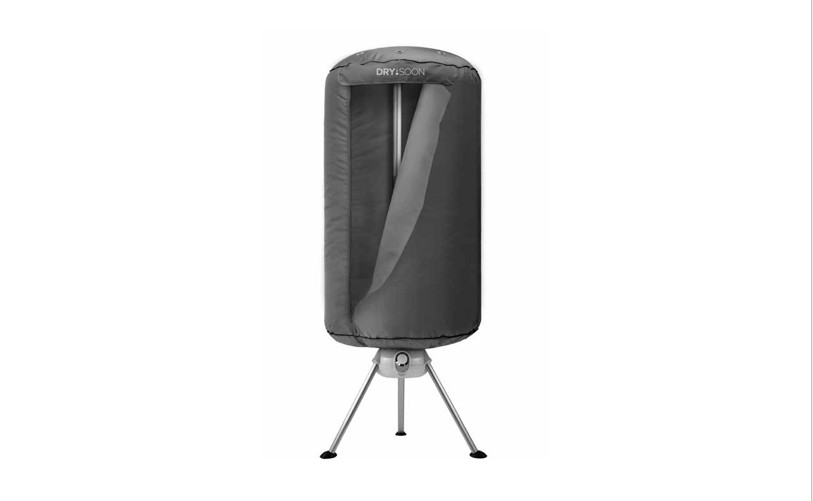
This electric clothes dryer is the ideal solution for drying your laundry whatever the weather. It works by circulating warm air at 70°C, around damp clothes with its powerful fan, and is very simple to set up. It holds up to 12 hangers, ideal for shirts, blouses, trousers, jumpers, T-shirts and delicates, allowing clothes to be kept straight, ironing time is reduced too. Here at Lakeland, our award-winning family-owned business still offers the same excellent quality, value for money and exceptional customer service as when we founded the company back in the 1960s. Our products are hand-picked and thoroughly tested so you can be sure that everything you purchase will be a pleasure to use for many years to come.
PRODUCT FEATURES

- Outer cover
- Foldaway clothes rack
- Upper pole
- Connector
- Lower pole
- Fan cover
- Fan
- Power unit
- 180-minute timer
- Power indicator light
- Air intake with mesh filter
- Detachable tripod feet
SAFETY CAUTIONS
Carefully read all the instructions before using the appliance and keep in a safe place for future reference. Always follow these safety cautions when using the appliance to avoid personal injury or damage to the appliance. This appliance should be used only as described in this instruction book.
- This appliance can be used by children aged from 8 years and above and persons with reduced physical, sensory or mental capabilities or lack of experience and knowledge if they have been given supervision or instruction concerning use of the appliance in a safe way and understand the hazards involved. Children shall not play with the appliance. Cleaning and user maintenance shall not be done by children unless they are older than 8 and supervised.
- Make sure your electricity supply matches the voltage shown on the appliance.
- Ensure all packaging materials and any promotional labels or stickers are removed from the appliance before the first use.
- Always inspect the appliance before use for noticeable signs of damage. Do not use if damaged or has been dropped. In the event of damage, or if the appliance develops a fault contact the Lakeland customer care team on 015394 88100.
- Always use the appliance on a dry, level, heat resistant surface.
- Unplug from the mains when not in use. To disconnect, turn the socket to “off” and remove the plug from the mains socket.
- Do not use any accessories or attachments with this appliance other than those recommended by Lakeland.
- To protect against fire, electric shock or personal injury, do not immerse cord, plug or lid in water or other liquids.
- Avoid contact between the lead and hot surfaces. Keep the appliance plug and lead away from ovens, electric and gas burners, flames and water sources.
- For indoor use only.
- For domestic use only.
- This appliance should be used for airing clothes as described within the instructions for use that accompany it.
- Always ensure that your hands are dry before removing the plug from the mains socket. Never pull the plug out of the mains socket by its lead or carry the appliance by its lead.
- Do not allow the lead to be compressed or curled, or touch sharp edges.
- Do not connect this appliance to an external timer or remote control system.
- An extension cable may be used with care. The electrical rating of the cable should be at least as great as the appliance.
- This appliance complies with the basic requirements of Directives 2014/30/ EU (Electromagnetic Compatibility) and 2014/35/EU (Low voltage Directive).
- WARNING: A cut off plug inserted into a socket is a serious safety (shock) hazard. Ensure the cut off plug is disposed of safely.
- CAUTION: The plastic bags used to wrap this appliance or the packaging may be dangerous. To avoid risk of suffocation, keep these bags out of reach of babies and children. These bags are not toys.
- Always switch off and unplug the Drying Pod after use leaving it to cool down completely before storing it away.
- The appliance must be placed on a level, dry surface at least 0.5 metres away from heat or water sources.
- Ensure the appliance is folded out securely before loading it with laundry and switching it on.
- When opening and closing the foldaway clothes rack never use force. The mechanisms should move freely and easily.
- Keep fingers away from folding parts.
- Do not overload the Drying Pod, the maximum load of the airer is 10kg. Load evenly across the surface to avoid the Drying Pod tipping over.
- Clothes should be spin-dried in your washing machine or well-wrung by hand before being placed in the Drying Pod.
- The metal fan will get extremely hot in use. To prevent burns, keep your hands well away from the fan and do not switch on the Drying Pod until the outer cover is zipped into place. Let the fan cool completely before storing away or cleaning the power unit.
- Never insert any object into the fan vents. Check regularly for blockages, the airflow should be kept clear.
- Never use the Drying Pod without the outer cover in place.
- Do not allow children to play with the airer.
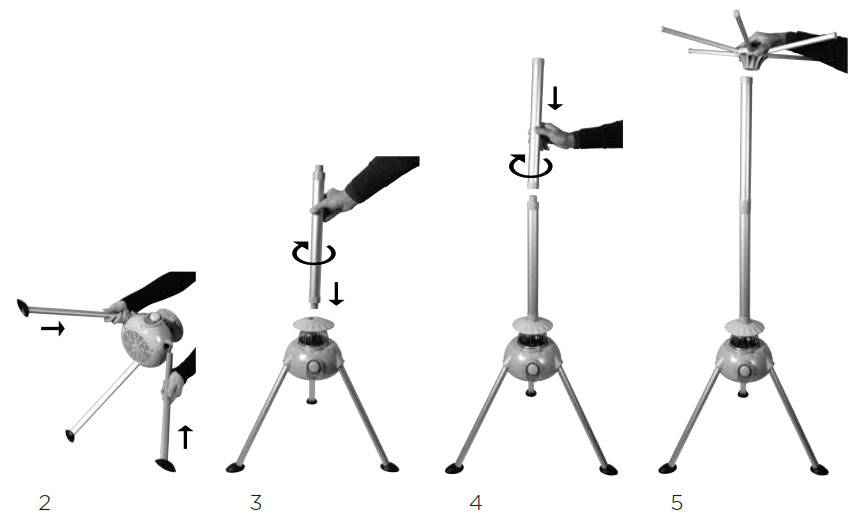
SETTING UP YOUR DRYING POD FOR THE FIRST TIMEThe Drying Pod is quick and easy to put together.
- Carefully unpack the Drying Pod and remove all the packaging.
- With the power unit switched off and unplugged, push the tripod feet firmly into the holes on the underside of the unit.
- Fit the lower pole into the hole on top of the power unit, turning it clockwise to tighten.
- Fit the upper pole into the connector on the top of the lower pole, turning it clockwise to tighten.
- Sit the foldaway clothes rack onto the upper pole, turning it clockwise to tighten.PLEASE NOTE: Keep your face away from the rack when folding out the arms.
INSTRUCTIONS FOR USE
The Drying Pod gets clothes dry whatever the weather by circulating warm air (up to 70°C) around them. The powerful fan is quiet and efficient, drying your laundry in 1 to 3 hours.It’s also gentler on your clothes than tumble drying. Garments are placed on your own coat-hangers, which helps to reduce creasing and the need for ironing. Plastic, wooden and metal hangers are all suitable. There is none of the friction associated with tumble drying, and the Drying Pod also consumes less energy than a tumble dryer.We highly recommend that laundry is spin-dried in your washing machine first or that hand-washed items are well-wrung – to help keep drying times to a minimum and prevent excess water dripping onto your floor.
- Firstly, make sure the Drying Pod is fully assembled, unplugged and switched off.
- Place the Drying Pod on a level, dry surface ready for use.
- Place your laundry onto coat-hangers and hook them onto the clothes rack, spacing them out evenly for best results. Each arm is designed to hold 2-3 hangers. Load evenly across the clothes rack to avoid the Drying Pod tipping over. Do not exceed the maximum load for the Drying Pod of 10kg.WARNING: Do not touch or cover the motor with clothes at any point.
- Unzip the outer cover and place it over the clothes. Zip up the cover and make sure it is pulled well down over the metal fan.PLEASE NOTE: Clothes will take much longer to dry if the cover is not fully zipped.
- Plug in and switch on the Drying Pod at the mains socket. To use the integral timer, turn the dial clockwise to the desired time minimum 30 minutes, maximum 180 minutes. The power light will light up red.
- To use the Drying Pod without the timer, turn the dial anticlockwise to ON. The power light will light up red.
- The fan will start working straight away, filling the outer cover with warm air to dry the clothes. Moist air will escape through the ventilation holes at the top of the outer cover.
- When the set drying time has elapsed, the Drying Pod will automatically shut off. The dial will turn to OFF and the power light will go out. If using the Drying Pod without the timer, simply turn the dial to OFF.
- Switch off and unplug at the mains socket, then let everything cool down for a few moments before unzipping the cover and removing the hangers. Please take care in case the metal parts of the hangers have become hot.CAUTION: Keep your hands well away from the metal fan as it will be extremely hot.
- Let the Drying Pod cool completely before storing it away.
FREQUENTLY ASKED QUESTIONS
Question: Why is my Drying Pod not heating up?Answer: It may not be switched on. Check the Drying Pod is plugged in, switched on at the socket.Question: Why are my clothes taking a long tome to dry?Answer: The clothes may be too heavy or thick, not spin-dried or well-wrung. May sure that the outer cover is closed properly.Question: Why has my Drying Pod stopped suddenly?Answer: The set drying time may have elapsed. The fan may be blocked, activating the safety cut-out. Switch off and unplug the Drying Pod and let it cool down completely, before clearing any blockages from fan vents and air intake holes on the underside of the power unit.
STORING YOUR DRYING POD
- The Drying Pod is designed to be easily taken apart for compact storage after use. Always switch off, unplug and let the Drying Pod cool down completely before taking it apart and storing away. Simply follow the steps in ‘Setting up your Drying Pod for the first time` in reverse.
- Check the fan vents and the air intake holes on the underside of the power unit to make sure they are clear of blockages.
- Check the parts for wear or damage after every few uses.
- Store the Drying Pod with the power cable loosely coiled. Never wrap it tightly around the appliance.
TECHNICAL INFORMATION
- Power: 1000W.
- Voltage: 220-240V.
- Frequency: 50Hz.
Approximate size:
- Fully open: 62cm Dia. x 146cm H. (24½ x 57½).
- Weight of product: 3.1kg.
ELECTRICAL CONNECTIONS
THIS APPLIANCE MUST BE EARTHEDThe appliance is fitted with a fused three-pin plug to BS1363 which is suitable for use in all homes fitted with sockets to current specifications.
CHANGING THE 13 AMP FUSEUse a 13 amp BS1362 fuse. Only BSI or ASTA approved fuses should be used. If you are unsure which plug or fuse to use, always refer to a qualified electrician.
Note: After replacing or changing a fuse on a moulded plug which has a fuse cover, the cover must be refitted to the plug; the appliance must not be used without a fuse cover. If lost, replacement fuse covers can be obtained from an electrical shop. This appliance complies with the following EU Directives: 2014/35/EU (Low Voltage Directive) and 2014/30/EU (EMC Directive).
![]() RECYCLING YOUR ELECTRICALS
RECYCLING YOUR ELECTRICALS
 Along with many other high street retailers, Lakeland has joined a scheme whereby customers can take their unwanted electrical products to recycling points set up around the country. Visit www.recycle-more.co.uk to find your nearest recycling point.
LakelandAlexandra Buildings, Windermere, Cumbria, UK LA23 1BQTel: +44(0)15394 88100 www.lakeland.co.uk
References
[xyz-ips snippet=”download-snippet”]