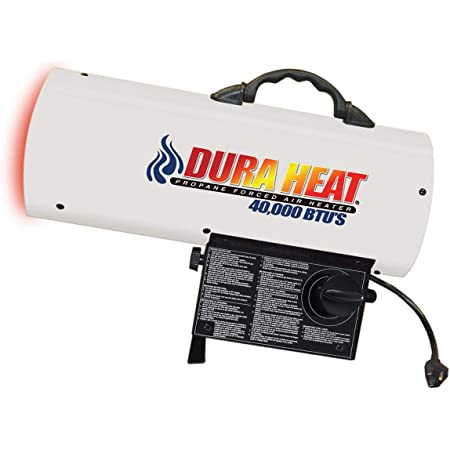
Dura Heat Propane Construction Heater User Manual

 GENERAL HAZARD WARNINGFAILURE TO COMPLY WITH THE PRECAUTIONS AND INSTRUCTIONS PROVIDED WITH THIS HEATER, CAN RESULT IN DEATH, SERIOUS BODILY INJURY AND PROPERTY LOSS, OR DAMAGE FROM THE HAZARDS OF FIRE, EXPLOSION, BURN. ASPHYXIATION, CARBON MONOXIDE POISONING, AND/OR ELECTRICAL SHOCK.
ONLY PERSONS WHO CAN UNDERSTAND AND FOLLOW THE INSTRUCTIONS SHOULD USE OR SERVICE THIS HEATER.
IF YOU NEED ASSISTANCE OR HEATER INFORMATION SUCH AS AN INSTRUCTION MANUAL, LABELS, ETCETERA, CONTACT THE MANUFACTURER.
CONSUMER: Retain this manual for future reference.
Made byWorld Marketing of America, Inc.PO Box 192, 12256 William Penn Hwy.Mill Creek PA 17060-0192(Tel) 1-800-776-9425www.worldmkting.com
WARNING : FIRE, BURN, INHALATION, AND EXPLOSION HAZARD, KEEP SOLID COMBUSTIBLES, SUCH AS BUILDING MATERIALS, PAPER OR CARDBOARD, A SAFE DISTANCE AWAY FROM THE HEATER AS RECOMMENDED BY THE INSTRUCTIONS.
NEVER USE THE HEATER IN SPACES WHICH DO OR MAY CONTAIN VOLATILE OR AIRBORNE COMBUSTIBLES, OR PRODUCTS SUCH AS GASOLINE, SOLVENTS, PAINT THINNERS, DUST PARTICLES OR UNKNOWN CHEMICALS.
CALIFORNIA PROPOSITION 65: Fuels used in gas or oil fired appliances and the products of combustion of such fuels, contain chemicals known to the State of California to cause cancer, birth defects or other reproductive harm. This product contains chemicals, including lead and lead compounds, known to the State of California to cause cancer, birth defects or other reproductive harm. Wash hands after handling.
WARNING : Using this heater in a residential garage requires that the heater is positioned so that it is protected against any possible damage by a moving vehicle, etc. It must be positioned so that the base of the heater is no less than 18 in (450 mm) above the garage floor or 8 ft (2450 mm) in repair garages. The heater must be placed on a stable surface. Do not place it on a chair, ladder, etc. Raising the heater will reduce BUT NOT eliminate the possibility of lighting the vapor of any flammable liquids which may be improperly stored or accidentally spilled. If the smell of gasoline is present, DO NOT operate this heater until the area has been properly ventilated.
![]()
WARNING: CONSTRUCTION HEATERS ARE NOT FOR USE IN GARAGES IN CANADA.
![]() WARNING: NOT FOR HOME OR RECREATIONAL VEHICLE USE.
WARNING: NOT FOR HOME OR RECREATIONAL VEHICLE USE.
NEVER LEAVE THE HEATER UNATTENDED WHILE BURNING!
DURAHEAT PROPANE FORCED AIR CONSTRUCTION HEATERS
The heater is designed and approved for use as a construction heater under ANS Z83.7 CSA 2.14. It is hard to anticipate every use which may be made of this heater. CHECK WITH YOUR LOCAL FIRE SAFETY AUTHORITY IF YOU HAVE QUESTIONS ABOUT APPLICATIONS.
Other standards govern the use of fuel gases and heat producing products in specific applications. Your local authority can advise you about these.
IMPORTANT: READ THIS USER’S MANUAL CAREFULLY AND COMPLETELY BEFORE TRYING TO OPERATE OR SERVICE THIS HEATER. IMPROPER USE OF THIS HEATER CAN CAUSE SERIOUS INJURY OR DEATH FROM FIRE, EXPLOSION AND CARBON MONOXIDE POISONING.
This is a direct-fired forced air construction heater for either indoor construction or outdoor use. Its intended use is primarily the temporary heating of buildings or structures under construction, alteration or repair. All the products of combustion generated by the heater are forced through the heater and released into the area being heated. This heater operates at approximately 98%+ combustion efficiency but still produces a small amount of carbon monoxide. Humans can tolerate small amounts of carbon monoxide for short periods. Carbon monoxide can build up in a heated space and failure to provide adequate ventilation could result in poisoning or death.
WARNING : NOT FOR USE WITH DUCT WORK.
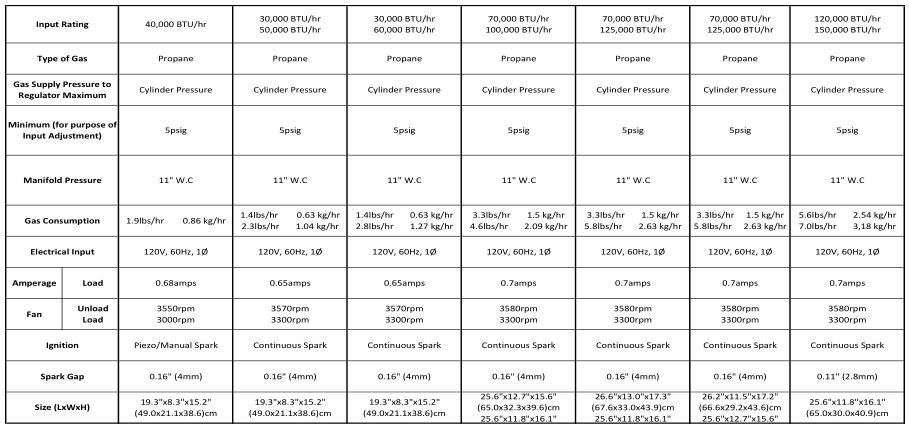
SPECIFICATIONS
GENERAL SAFETY INSTRUCTION
Accidents are always tragic especially because so many of them could have been prevented with little care and judgment. There are some basic good practices, we hope you will follow for safe use of your heater.
IMPORTANT SAFETY INSTRUCTION
- Children should be carefully supervised, when they are in the area.
- Always maintain proper clearance from combustible materials. Minimum clearance from combustibles: Side – 24” (61 cm); Top – 36” (92 cm); Front – 72” (183 cm). Floor – combustible. Not for use on finished floors.
- Heater must be placed on level and stable surface.
- Never place anything including clothes or other flammable items on the heater.
- The appliance area shall be kept clear and free from combustible materials, gasoline and other flammable vapours and liquids.
- Do not modify or operate a heater which has been modified.
- Adequate clearance for accessibility and for combustion & ventilation air supply must be maintained at all times when the heater is operating.
- Service and repair should be done by a qualified service person. The heater should be inspected before each use and at least annually by a qualified person. More frequent cleaning may be required as necessary. Do not service while hot or operating.
- Never connect heater to an unregulated gas supply.
- The heater is shipped from the factory for LP(Propane) gas. This heater is for use with propane gas only, do not convert heater to any other gas. Installation must conform to local codes or, in the absence of local codes, with the standard for the Storage and Handling of Liquefied Petroleum Gases ANSI/NFPA 58 and the Natural Gas and Propane Installation Code CSA B149.1
- The minimum and maximum inlet pressures to the regulator from the gas tank are 5 psi and bottle pressure, respectively. Use only the regulator & hose assembly provided with the heater. Inspect the regulator/hose assembly prior to each use of the heater. If there is excessive abrasion or wear, or hose is cut, replace with regulator/hose assembly listed on the parts list prior to using this heater.
- Gas supply connections should be checked using a 50/50 solution of liquid dish soap and never use a flame to check for gas leaks.
- The electrical connection & grounding must comply with National Electrical Code. ANSI/NFPA 70 or in Canada CSA C22.1, Canadian Electrical Code, Part 1. Use only a properly grounded three (3) prong receptacle.
- Do not restrict inlet or outlet by any means. The flow of combustion and ventilation air is not to be obstructed.
- This heater should not be directed toward any propane-gas container within 20 ft (6M). The heater must be located at least 6 ft. (1.83 m) in the U.S.; or (ii) 10 ft. (3 m) in Canada, from any propane gas container.
- The propane cylinder supply system must be arranged to provide for vapour withdrawal from the operating cylinder.
- This heater is not to be used with external thermostats, timers or other devices that control or alter electrical supply to the heater.
WARNING : Motor and fan must be running before lighting, during operation and at shutdown, in order to prevent a flame-out condition which could result in personal injury or property damage.
PRODUCT FEATURES
- Portable & Stable
- Wind Resistant & Rain Protected
- Continuous Spark Ignition or Piezo Electric Spark Ignition
- 100% Safety Shutoff System
- Continuous Adjustable Input Ratings (Except FA40)
UNPACKING HEATER
- Remove heater from carton.
- Remove all protective packing applied to heater for shipment.
- Retain cartons and packaging material until unit is operated and found in good condition.
- Check heater for any shipping damage. If heater shows any external or internal damage, promptly inform dealer/distributor where you purchased heater.
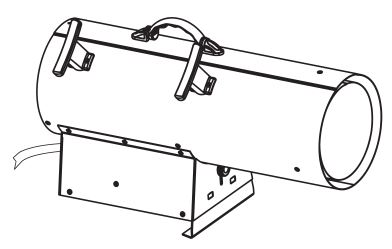
Assembly Components and Instructions for Steel Base Units:
Tools required for assembly:All Models: Adjustable WrenchFA100 – FA150: Phillips Head Screw Driver
Contents:All Models: Unit, Manual, Hose and Regulator AssemblyFA100 – FA150 Series Includes: 2 Cord Wrap Attachments, 4 Screws (ST3.5×10)
Assembly Time:5 Minutes
- Assembling the Cord Wrap Attachments: (FA100 – FA150 Series Only)Parts Required:4 Screws (ST3.5×10), and 2 Cord Wrap AttachmentsPlace the cord wrap attachment as shown, then use Phillips screwdriver to tighten the screws and secure the cord wrap attachments.

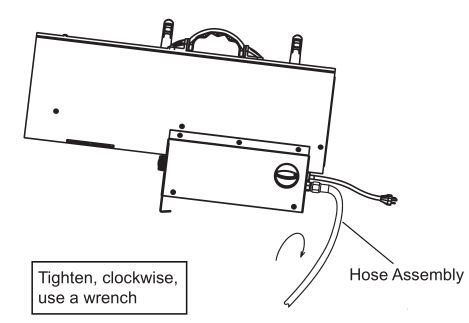
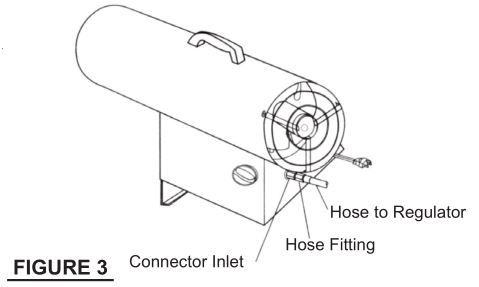
- Regulator and Hose Connection: (All Models)See figure on right.Connect the hose tightly to the heater using a wrench.Please also refer to page 8 in the manual.
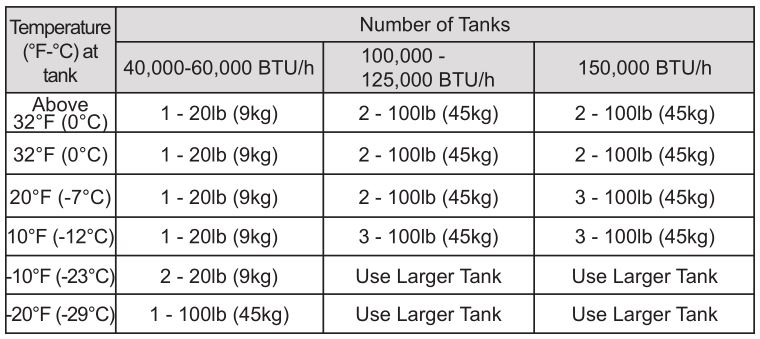
INFORMATION ON SIZE * CAPACITY OF PROPANE GAS CYLINDERS:
The chart below shows the number and size of propane tanks needed to run this heater.*Less gas is vaporized at lower temperatures.You may need two or more 100 pound (45 kg) tanks or one larger tank in colder weather.(See the parts list for your model of heater to get the specified regulator assembly.)
The propane (LP) gas tank must also be equipped with the following:
- A collar to protect the Propane gas valve.
- A shutoff valve terminating a Propane gas cylinder valve outlet as specified in the American National Standards for Compressed Gas Cylinder Valve Outlets and Inlet Connections.
- A safety relief valve having direct communications with the vapor space of the tank.
- An arrangement of vapor withdrawal.
The propane (LP) gas pressure regulator and hose assembly supplied with this heater must be used without alteration.
The hose assembly shall be visually inspected prior to each use of the heater. If it is evident that there is excessive abrasion or wear, or the hose is cut, it must be replaced prior to the heater being put into operation. The replacement hose assembly shall be that specified by the manufacturer.
INSTALLATION TO THE PROPANE GAS TANK
IMPORTANT: You must use a propane/LP gas supply cylinder that is compatible with the connection device provided with the hose and regulator.

- Provide propane/LP supply system. Ensure that the valve on the cylinder is fully closed by turning the knob fully clockwise (). Ensure that the cylinder is fully upright for vapor withdrawl. (see size/capacity, page 7).
- Connect hose to heater inlet. Tighten firmly using a wrench. You must use the regulator supplied with heater.
- Connect fuel gas fitting hose/regulator assembly to propane LP tank(s).
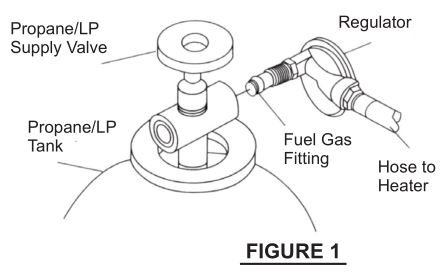
- For units with a POL fitting (see figure 1) turn fuel fitting counterclockwise into threads on tank. Tighten firmly using a wrench. Some models have a hand wheel that can be used to tighten the fitting. This hand wheel can be slid off of the nut so that a wrench can also be used to tighten the fitting. IMPORTANT: Position regulator so that hose leaving the regulator is in a horizontal position.
- For units with a QCC fitting (see figure 2) turn QCC gas fitting clockwise onto threads on tank. Tighten firmly using your hand (DO NOT USE A WRENCH). IMPORTANT: Position regulator so that the regulator vent is pointing down toward the floor and the arrow on the regulator is visible.
- Open propane/LP supply valve on propane/LP tank(s) slowly. NOTE: If not opened slowly, excess flow device in regulator may stop gas flow. If this happens, close propane/LP supply valve, wait one minute (or until you hear a click) and open again slowly.
- Check all connections for leaks. Apply a 50/50 solution of liquid dish soap and water to gas joints. Bubbles forming show a leak that must be corrected.
- Close propane / LP supply valve before attempting to repair connection.
WARNING : Purging and filling of LP gas tanks must be performed by personnel who has been thoroughly trained in accepted LP gas industry procedures. Failure to follow these instructions may result in explosion, fire, severe personal injury, or death.
REFILLING THE PROPANE GAS TANK
ALL NEW CYLINDERS MUST BE PURGED BEFORE THE FIRST FILLING.
- Turn heater gas valve knob and gas tank valve to OFF position.
- Propane tank valve equipped with the old style fitting has LEFT HANDED THREADS. Turn POL fitting CLOCKWISE to loosen. Protect POL fitting when disconnected from tank.
- Have tank filled by your local Propane gas supplier.
- Fasten full Propane tank and connect POL fitting to tank valve by turning COUNTERCLOCKWISE.
- With heater gas valve knob still in the OFF position, turn ON tank valve and check for leaks with soap solution.
PROPANE SAFETY
Propane is safe to use when properly handled. Careless handling of the Propane gas tank could result in fire and/or an explosion. Therefore:
- Always keep tank/cylinder securely fastened in an upright position.
- Avoid tipping tank on its side when connected to a regulator since this may cause damage to diaphragm in regulator.
- Handle valves with care.
- Never connect an unregulated Propane tank to construction heater.
- Do not subject Propane tank to excessive heat.
- Tightly close the gas shutoff valve on the Propane tank after each use.
- The POL fitting must be protected when disconnected from the propane tank.
- Never store a Propane gas tank inside a building or in the vicinity of any gas burning appliance.
THE DISCONNECTED TANK MUST NEVER BE STORED IN A BUILDING, GARAGE OR ANY OTHER ENCLOSED AREA.
LEAK CHECKING
Check all gas connections with a soap solution to be sure they are tight and leak proof.
- The installation of your heater must meet all local codes and/or gas utility requirements or, in the absence of local codes, with the Storage and Handling of Liquefied Petroleum Gases, ANSI/ NFPA 58 and the Natural and Propane Installation Code, CSA B149.1.
- The minimum clearances to combustible construction: Side – 24” (61 cm); Top – 36” (92 cm); Front – 72” (183 cm); Floor – combustible, must be maintained at all times.
- The hose assembly should be visually inspected prior to each use of the heater. If it is evident that there is excessive abrasion or wear, or the hose is cut, it must be replaced prior to the heater being put into operation.
- The replacement hose assembly shall be that specified by the manufacturer (Refer to parts list).
LIGHTING INSTRUCTIONS
WARNING : Motor and fan must be running before lighting, during operation and shutdown, in order to prevent a flame-out condition which could result in personal injury or property damage.
NOTE: This heater uses a continuous spark ignition system. This unit will continue to make a clicking/ticking sound at all times before ignition, after ignition and during operation, regardless of valve knob positioning.
- Connect power cord to a properly grounded three (3) prong 120V, 60Hz, single phase receptacle.
- Turn gas valve knob clockwise to OFF position.
- Wait five (5) minutes to clear any gas. Then smell for gas, if you don’t smell gas, go to next step.
- Turn gas supply ON by turning Propane tank valve counterclockwise .
- Push in and turn gas control knob counterclockwise to “LOW/IGN”. This will light the burner. If needed, keep pressing control knob until the burner lights and keep depressing and turning from OFF to LOW/IGN on Piezo electric spark models. (“HIGH/IGN”: In case of FA40 series)
- Keep the valve knob depressed for at least 30 seconds after lighting the burner. After 30 seconds release valve knob.
- If burner does not stay lit, repeat the lighting procedure.
- When burner is lit, turn gas valve knob counterclockwise to desired setting. (All models, except FA40 series).
SHUTDOWN INSTRUCTIONS
WARNING : Motor and fan must be running before lighting, during operation and at shutdown, in order to prevent a flame-out condition which could result in personal injury or property damage. Turn gas valve knob clockwise ![]() to OFF
to OFF ![]() position.
position.
TEST FIRING HEATER
Test fire your construction heater, following the lighting instructions applicable to the gas control system employed. Leak test all gas connections with soap solution. Soap bubbles indicate gas leakage. DO NOT use a match or flame to test for gas leaks.
STORAGE
Never store a Propane gas tank inside a building or in the vicinity of any gas or oil burning appliance. When the Propane tank is not disconnected from the construction heater, the gas tank and heater must be stored outdoors in a well ventilated area, out of the reach of children. If for any reason the heater is to be stored indoors, the tank must be disconnected and stored outdoors in a well ventilated area out of reach of children, in accordance with the standard for the the Storage and Handling of Liquefied Petroleum Gases, ANSI / NFPA 58 and CSA B149.1, Natural Gas and Propane Installation Code. The plastic tank valve plug supplied with your tank must be tightly installed when the tank is disconnected from the heater.
MAINTENANCE INSTRUCTIONS
- Turn unit off, allow heater to fully cool and disconnect propane hose before performing any Maintenance functions. Unplug the unit from the 120V receptacle.
- Keep unit clean and keep the inside of the torpedo housing debris free.
- Have unit checked by a qualified technician at least once a year, preferably prior to the heating season.
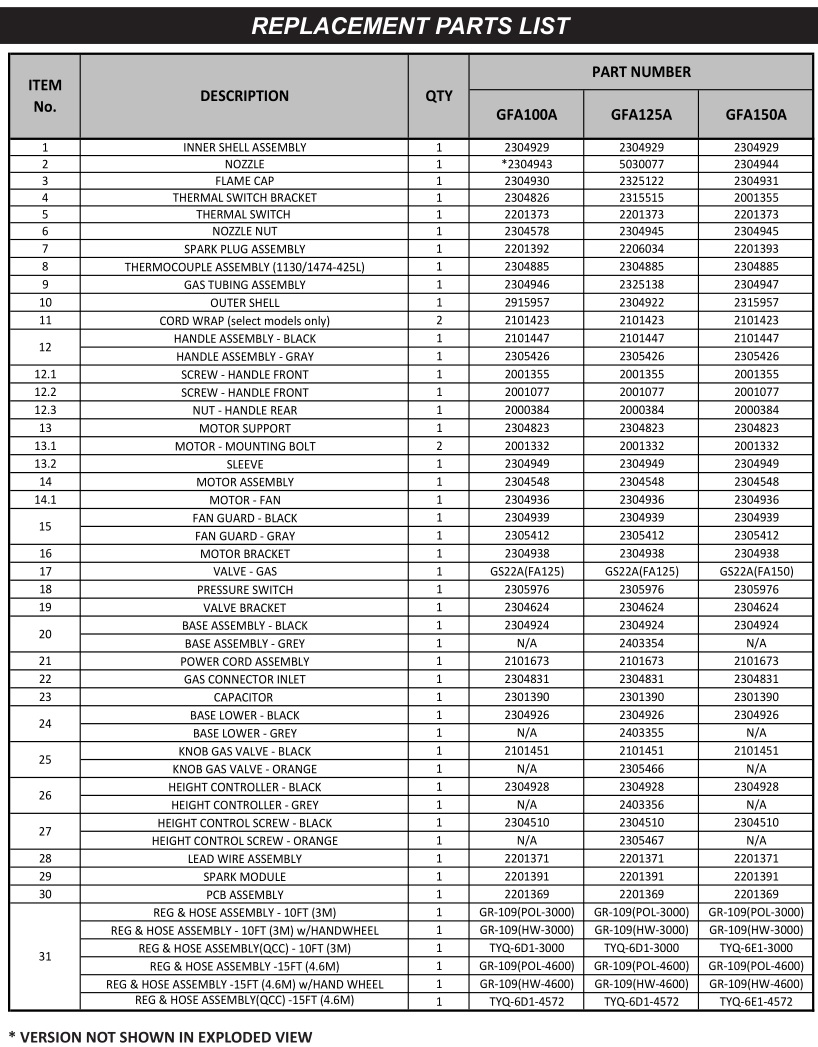
REPLACEMENT PARTS
Warning: Use only original replacement parts. This Heater must use design-specific parts. Do not substitute or use generic parts. Improper replacement parts could cause serious or fatal injuries. This will also protect your warranty coverage for parts replaced under warranty.Parts warranty and non-warranty: Contact authorized dealers of this product. If they can not supply original replacement part(s), either contact your nearest Parts Central or World Marketing of America at 1-800-776-9425.
When calling World Marketing, have ready:
- your name
- your address
- how heater was malfunctioning
- serial number of heater
- model number of heater
- replacement part number
TROUBLESHOOTING
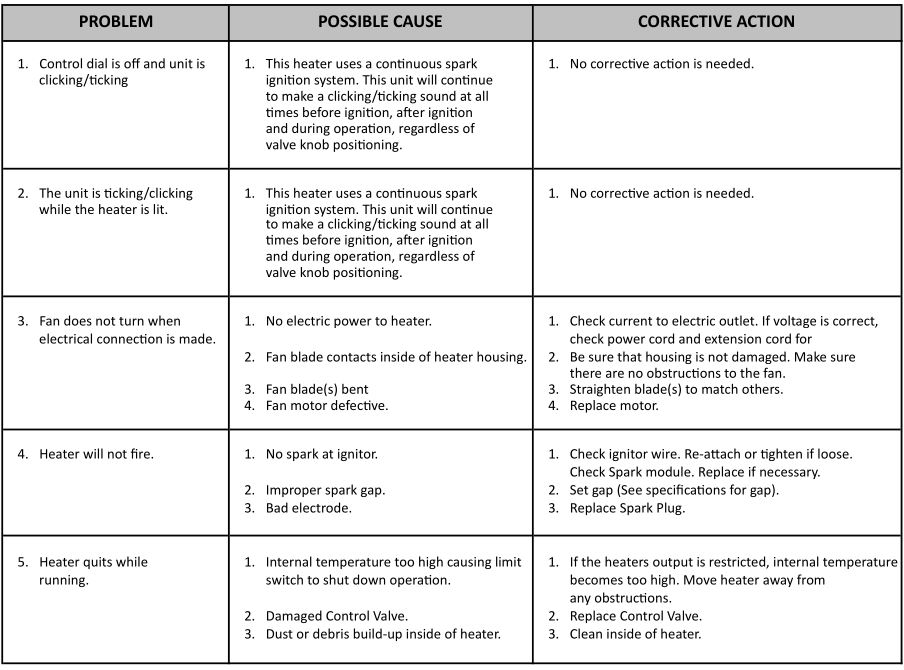
Always be sure to follow proper maintenance procedures, by cleaning the heater once per month during regular usage, and check spark gap at least once per season.
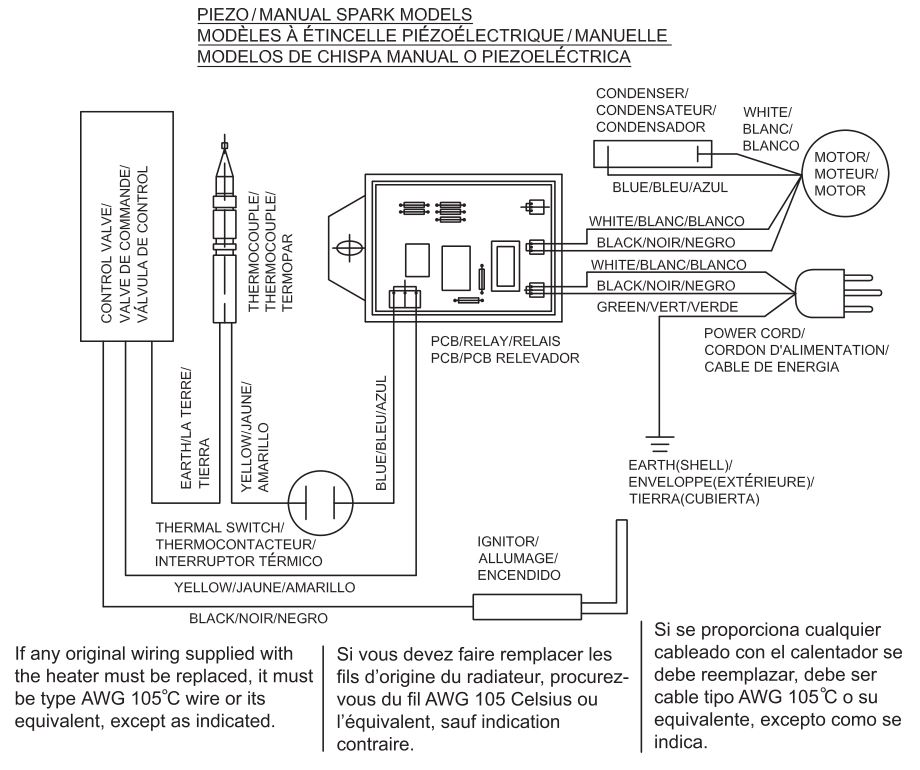
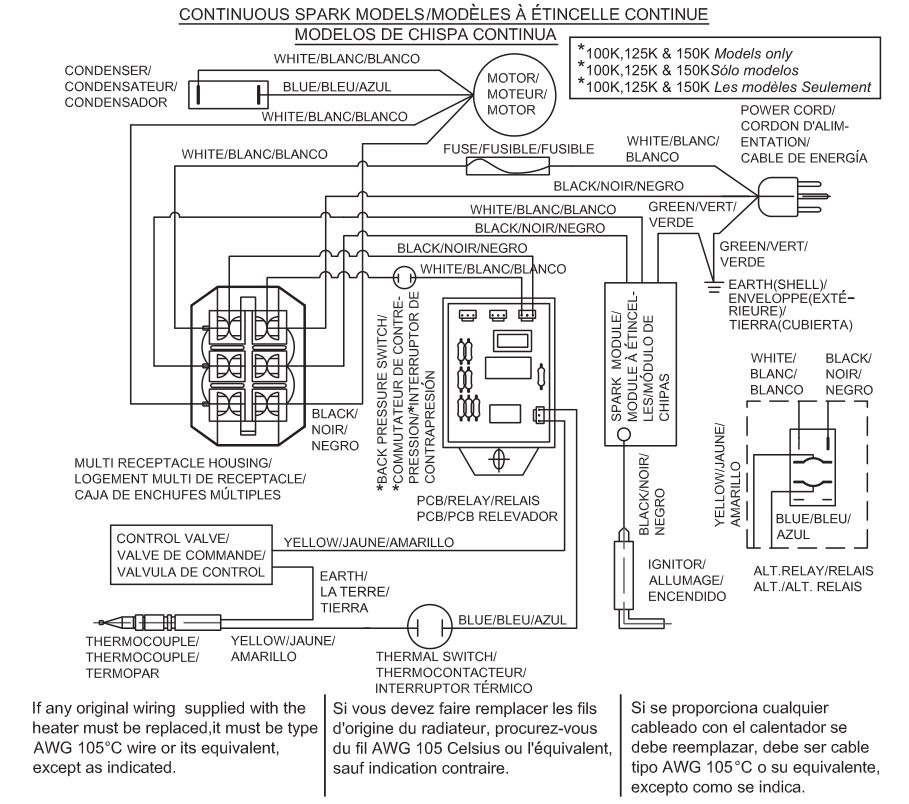
WIRING DIAGRAMS
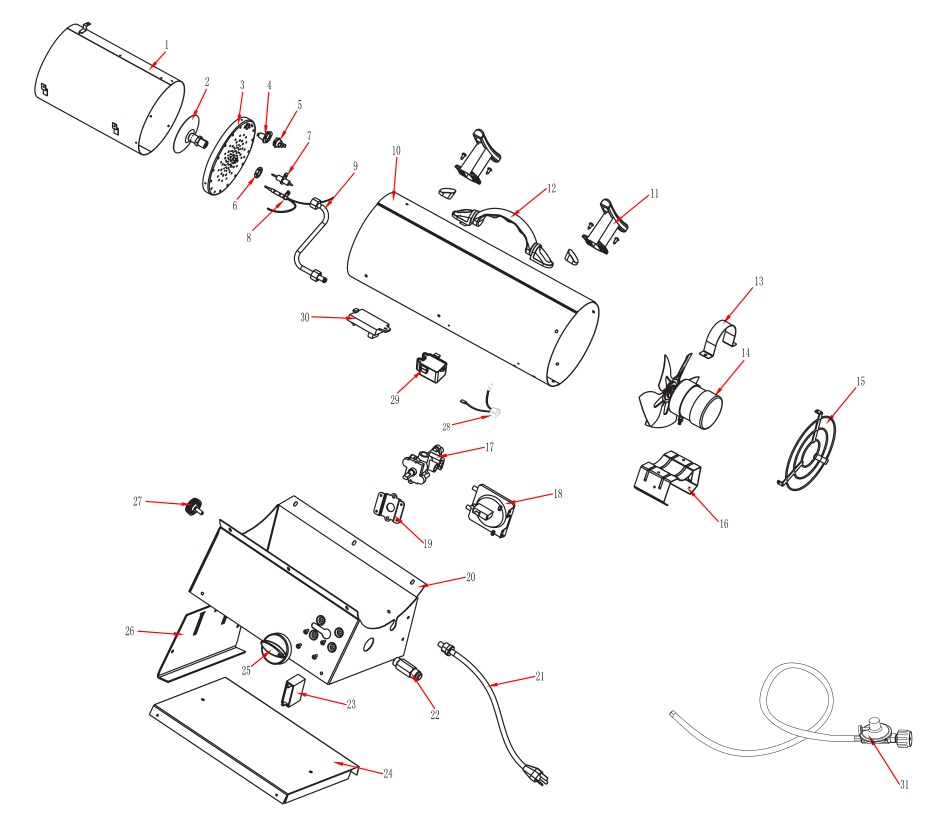
REPLACEMENT PARTS LIST
MODELS:GFA40GFA50AGFA60A
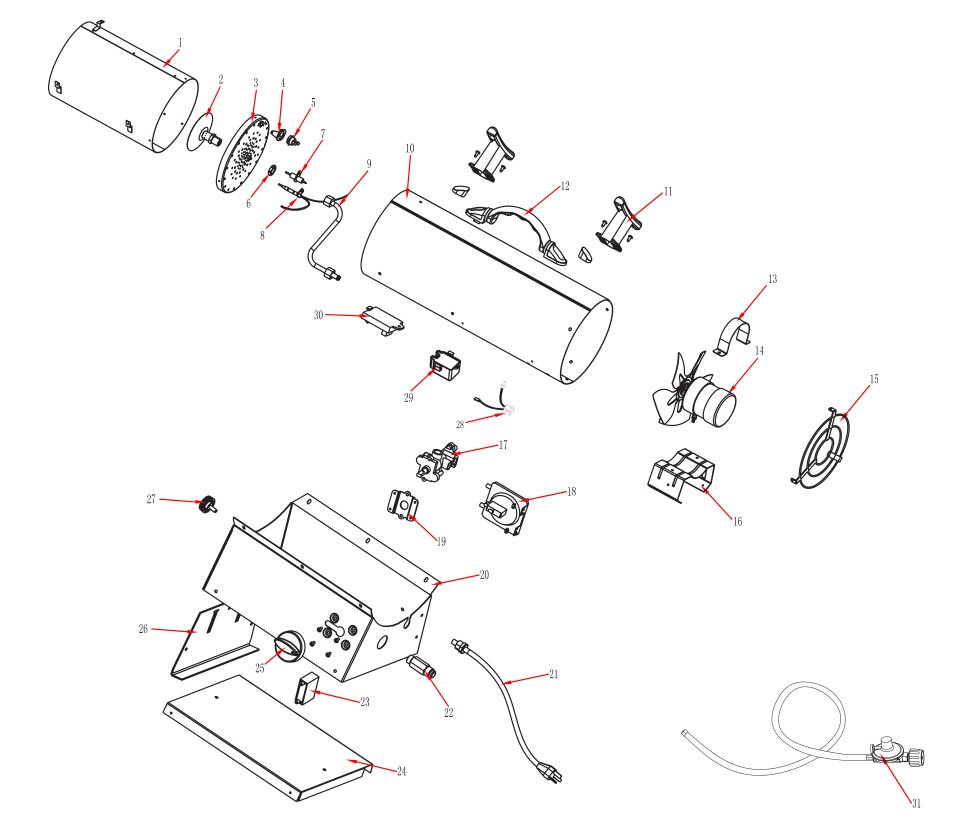

PROPANE CONSTRUCTION HEATER ILLUSTRATED / PARTS BREAKDOWN
MODELS:GFA100AGFA125AGFA150A
WARRANTY
LIMITED WARRANTY:This limited warranty is extended to the original retail purchaser of this Duraheat Forced Air/Convection/Radiant Heater and warrants against any defect in materials and workmanship for a period of one (1) year from the date of retail sale. World Marketing of America, Inc., at it’s option, will either provide replacement parts or replace or repair the unit, when properly returned to the retailer where purchased or one of our service centers as directed by World Marketing, within one (1) year of retail purchase. (Shipping costs, labour costs, etc. are the responsibility of the purchaser.)
DUTIES OF THE OWNER:This heating appliance must be operated in accordance with the written instructions furnished with this heater. This warranty shall not excuse the owner from properly maintaining this heater in accordance with the written instructions furnished with this heater. Abill of sale, canceled check or payment record must be kept to verify purchase date and establish warranty period. Original carton should be kept in case of warranty return of unit.
WHAT IS NOT COVERED:
- Damage resulting from use of improper fuel.
- Damage caused by misuse or use contrary to the owners manual and safety guidelines.
- Damage caused by a lack of normal maintenance.
- Fuses
- Use of non-standard parts or accessories.
- Damage caused in transit. Freight charges on warranty parts or heaters to and from the factory shall be the responsibility of the owner.
This warranty does not imply or assume any responsibility for consequential damages that may result from the use, misuse, or the lack of routine maintenance of this heating appliance. Acleaning fee and the cost of parts may be charged for appliance failures resulting from lack of maintenance. This warranty does not cover claims which do not involve defective workmanship or materials. FAILURE TO PERFORM GENERAL MAINTENANCE (INCLUDING CLEANING) WILL VOID THIS WARRANTY.
THIS LIMITED WARRANTY IS GIVEN TO THE PURCHASER IN LIEU OFALLOTHER WARRANTIES, EXPRESSED OR IMPLIED, INCLUDING BUT NOT LIMITED TO THE WARRANTIES OF MERCHANTABILITY OF FITNESS FORAPARTICULAR PURPOSE. THE REMEDY PROVIDED IN THIS WARRANTY IS EXCLUSIVEAND IS GRANTED IN LIEU OFALLOTHER REMEDIES. IN NO EVENT WILL WORLD MARKETING OFAMERICABE LIABLE FOR INCIDENTALOR CONSEQUENTIALDAMAGES.
Some states do not allow limitations on how long an implied warranty lasts, so the above limitation may not apply to you. Some states do not allow the exclusion or limitation of incidental or consequential damages so the above limitation or exclusion may not apply to you.
CLAIMS HANDLEDAS FOLLOWS:
- Contact your retailer and explain the problem.
- If the retailer is unable to resolve the problem, contact our Consumer Warranty Dept. detailing the heater model, the problem, and proof of date of purchase.
- A representative will contact you. DO NOT RETURN THE HEATER TO WORLD MARKETING OFAMERICA, INC. unless instructed by our Representative.This warranty gives you specific legal rights and you may also have other rights which vary from state to state.

WARRANTY REGISTRATIONIMPORTANT: We urge you to fill out your warranty registration card within fourteen (14) days of date of purchase. You can also register your warranty on the internet at www.worldmkting.com. Complete the entire serial number. Retain this portion of the card for your records.
World Marketing of America, Inc.Route 22 WestPO Box 192Mill Creek, PA 17060Tel: (800) 776-9425www.worldmkting.com
SAVE THIS CARD!
Dura Heat Propane Construction Heater User Manual – Dura Heat Propane Construction Heater User Manual –
[xyz-ips snippet=”download-snippet”]