

XP13000EH GENERATORQuick Start GuideREV: XP13000EH-QS-04102020
This manual provides information regarding the operation and maintenance of these products. We have made every effort to ensure the accuracy of the information in this manual. We reserve the right to change this product at any time without prior notice.
5800 Ontario Mills PkwyOntario, CA 91764 USAwww.duromaxpower.comCall our Customer Care Team Toll Free 8-5 pm PST Mon-Fri844-DUROMAX
QUICKSTART GUIDE (GASOLINE)
|
1. Remove shipping bracesThe shipping braces prevent engine movement duringshipment. Flip the generator over and remove the brightlycolored brace between the motor and the frame, and thewood brace under the generator. |
|
2. Add oilThe oil fill cap is located on the lower engine block to theright of the recoil start housing. Remove the oil fill cap andfill with 10w30 oil. |
|
3. Add gasolineThe fuel cap is located on top of the fuel tank. Fill the tankwith fresh unleaded gasoline 87 octane or higher. The tankis full when you see fuel in the bottom of the fuel filter cup.DO NOT overfill the tank. |
|
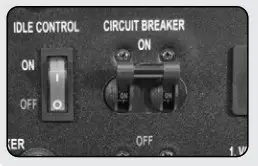
4. Turn breaker offThe breaker is located on the right side of the front power panel. Flip the breaker down to prevent accidental load when starting the generator. |
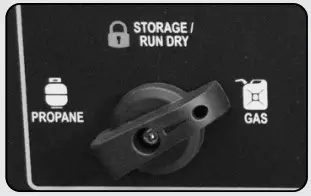 |
5. Turn fuel switch to GASThe fuel switch is located on the left front panel. Rotate the switch clockwise to the GAS position to turn on the gas supply. |
|
6. Turn battery switch onThe battery switch is located on the top center of the main power panel. Turn the switch ON to allow power to the push-button start. |
 |
7. Turn idle control offThe idle control is located on the top center of the main power panel. Turn the switch OFF to prevent the unit tryingto idle down before the engine is warmed up. |
|
8. Start generatorThe push-button starts left side of the main power panel. Press the button for 1 second to start the generator. |
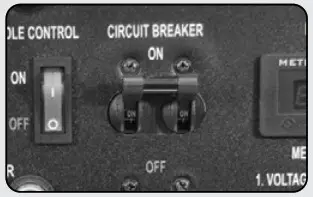 |
9. Turn breaker onThe breaker is located on the right side of the front power panel. Flip the breaker up to allow power to flow to the receptacles. |
|
10. Connect devicesConnect your devices to the receptacles on the front panel.Start with the largest loads first. |
QUICKSTART GUIDE (PROPANE)
 |
1. Remove shipping bracesThe shipping braces prevent engine movement duringshipment. Flip the generator over and remove the brightlycolored brace between the motor and the frame, and thewood brace under the generator. |
|
2. Add oilThe oil fill cap is located on the lower engine block to theright of the recoil start housing. Remove the oil fill cap andfill with 10w30 oil. |
|
3. Turn breaker offThe breaker is located on the right side of the front power panel. Flip the breaker down to prevent accidental loadwhen starting the generator. |
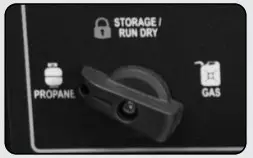 |
4. Turn fuel switch to PropaneThe fuel switch is located on the left front panel. Rotatethe switch counter-clockwise to the Propane position toturn on the fuel supply. |
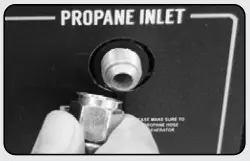 |
5. Connect propane hoseThe propane inlet is located on the right-hand front panel to the right of the fuel switch. Securely connect the propanehose to the inlet. |
|
6. Connect propane tankThe propane hose is located on the left side of the regulator,below the OHV valve cover. Screw the open ACME nut connection to your propane tank and turn the tank on. |
|
7. Turn battery switch onThe battery switch is located on the top center of the mainpower panel. Turn the switch ON to allow power to thepush-button start. |
|
8. Turn idle control offThe idle control is located on the top center of the main power panel. Turn the switch OFF to prevent the unit from trying to idle down before the engine is warmed up. |
 |
9. Start generatorThe push-button starts left side of the main power panel. Press the button for 1 second and release it to start the generator. |
 |
10. Turn breaker on / connectThe breaker is located on the right side of the front power panel. Flip the breaker up to allow power to flow to the receptacles. Connect your devices to the receptacles onthe front panel. Start with the largest loads first. |
GENERATOR COMPONENTS
- Recoil Start – Easy Pull Recoil Start to start the engine without the electric start.
- Air Cleaner – a removable, cleanable, oiled, element that cleans the air going into the engine.
- Fuel Valve – On/Off valve that allows gasoline to the fuel switch.
- Fuel Tank – All metal 7.8 Gallon gasoline fuel tank.
- Power Panel – Contains the start switch, plugs, meters, and circuit breakers.
- Handles – Longest handles of any DuroMax Model allow easy movement across any surface.
- Battery – 12V DC Battery that powers the Electric Start System
- Oil Fill and Dipstick – Use to add or check the oil.
- Fuel Switch – Fuel selection switch to choose Gas, Propane, or Storage mode.
- Propane Inlet – Provides a regulated LPG Fuel supply to the engine. (Intended for use with aLPG Source of 3 PSI or more.)
- Engine Switch – Push Button start switch. Press for 1 second to start the generator. Hold for 3seconds to stop the generator.
- Charging Light – Will light when the generator is charging the onboard battery.

- Low Oil Alert – Will light only if the generator shuts down due to low oil.
- Battery Switch – Prevents battery discharge during storage.
- Idle Control – Slows the engine to save fuel and lower noise when no load.
- Circuit Breaker – Protects the panel from overload and short circuits.
- Multimeter – Displays voltage, hertz, and time running.
- 12v Auto – Provides a 12v automotive-style plug for appliances and chargers.
- 120/240v 4-Prong Receptacle – Use to connect electrical devices that run 120 or 240 Volt, 60Hz, single-phase, AC current (NEMA 14-50)
- 120/240v 4-Prong Twist Lock – Use to connect electrical devices that run 120 or 240 Volt, 60Hz, single-phase, AC current (NEMA 14-30)
- 120v 3-Prong GFCI Receptacle – Use to connect electrical devices that run 120 Volt, 60Hz, single-phase, AC current (NEMA 5-20)
- 120v 3-Prong Twist Lock – Use to connect electrical devices that run 120 Volt, 60 Hz, single-phase, AC current (L5-30).
- Circuit Protectors – Protects the receptacles from overload.
PACKAGE CONTENTS
Your generator comes with the items listed below. Please check to see that all of the following items are included with your generator.
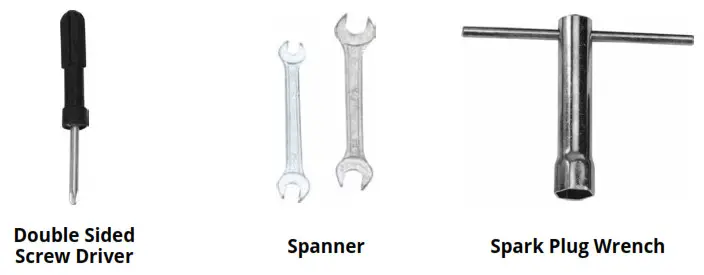
Phillips and slot blade screwdriver used for generator maintenance.Assorted wrenches used in generator maintenance and assembly. Commonly 8mm, 10mm, 13mm, and 15mm.Used in spark plug maintenance, inspection, and installation.
CUSTOMER SERVICE
Duromax Power Equipment is committed to ensuring that our products perform when they need to. Our generators are your lifeline in the event of an emergency. Should you have any problems, please contact our customer service department:
DUROMAX POWER EQUIPMENT5800 Ontario Mills ParkwayOntario, CA 91764Customer Service: 844-DURAMAXCustomer Service Hours: 8-5 pm PSTWebsite: www.duromaxpower.comEmail: [email protected]
 report this ad
5800 Ontario Mills ParkwayOntario, CA 91764United States844-DUROMAX
References
[xyz-ips snippet=”download-snippet”]