Whisper Flex Portable FanUser Manual


https://duux.com/en/instruction-movies-whisper-flex/
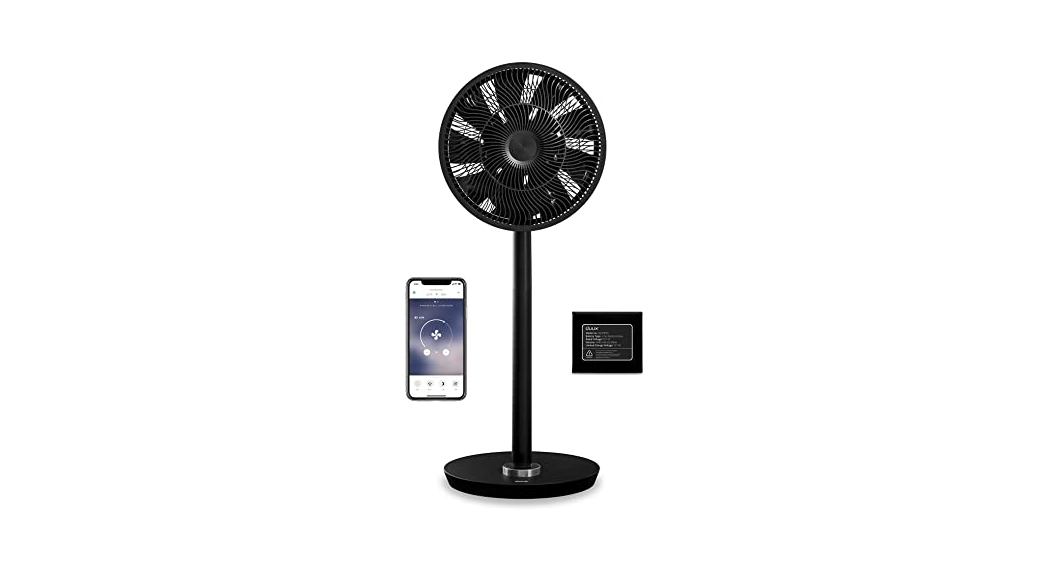
Thank you for choosing Dulux.We’re so glad you decided to read the instructions to your new Dulux fan! Many users casually dismiss instructions and seek to figure it out on their own. But studies show that people who read instructions will get up to speed more quickly and efficiently than those who poke around with trial and error.At Duux, we believe in the importance of a comfortable and healthy living environment. Enhancing your well-being by designing appealing, functional and effective products is the passion that drives us every day. With our range of innovative air treatment products, we aim to provide you the best possible indoor air quality.Meet the cooling fan that surprises you with a gentle breeze, a vigorous gust of wind, and everything in between. The Duux Whisper Flex has no less than 26 settings. In this way, you can always find the perfect airflow environment. Thanks to the horizontal and vertical oscillation function, the Whisper Flex provides a pleasant coolness throughout any room. Choose yourself, which mode you prefer: fixed speed, ‘natural wind’ or perhaps the night mode, by which you are lulled into sleep by the whispering breeze. The separately available dock and battery pack allow you to freely move the device without wires.Read the manual carefully to get the most out of your Whisper Flex fan.
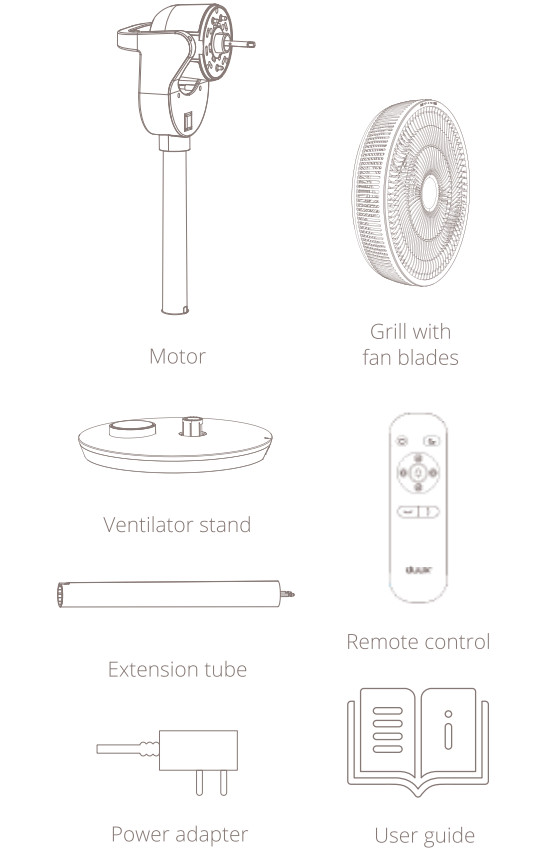
Box contents
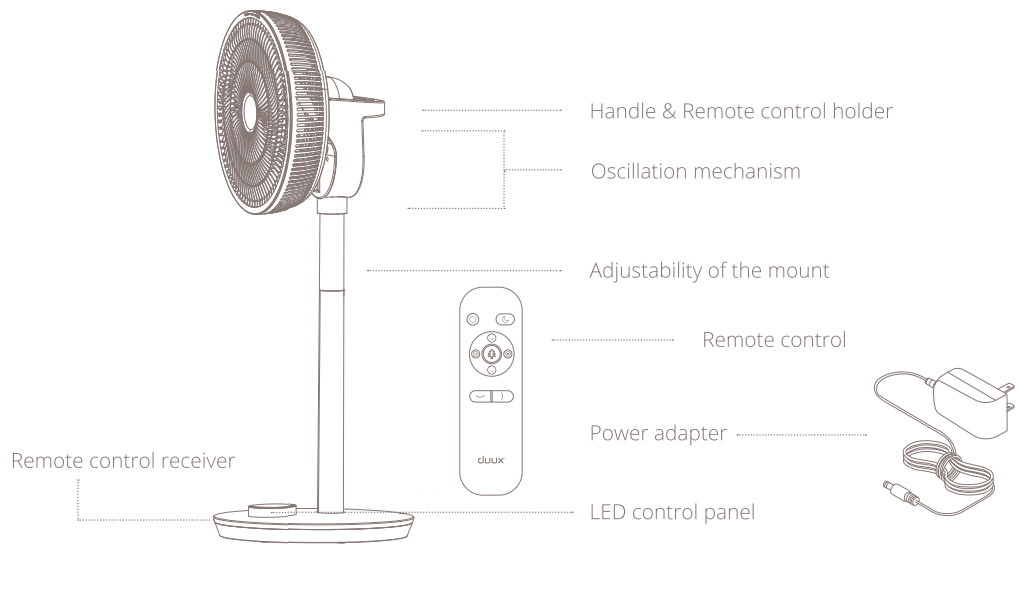
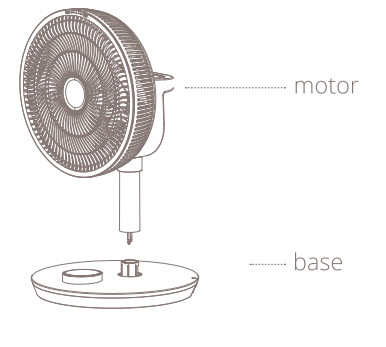
Product Overview
PartsEach part is packaged separately, see below the contents per bag:
- User manual
- Base unit
- Extension tube
- Motor
- Front / back grill + fan blades
- Tools (locking ring + plastic screw + metal screw)
- Power adapter
- Remote control
Installation and use
Read before installation:
- When using electrical appliances, basic precautions should always be followed to reduce the risk of fire, electric shock, and injury.
- Before using the device, please carefully read the entire instruction manual.
![]() General cautions
General cautions
For indoor use only. Do not use in commercial, industrial or outdoor environments.
Do not use the device in the vicinity of flammable or explosive substances or fuels. Never use any paint, cleaning sprays, anti-insect sprays or similar near the unit; this could deform the plastic or cause electrical damage.
- Always turn off and unplug the power cord when not in use, servicing, cleaning or moving the device.
- Do not route the power cord or adaptor under rugs, carpets or furniture. This may damage the cord/adaptor or cause it to overheat creating a fire hazard.
- Do not route the power cord in or through doorways or areas where the cord may be damaged or create a tripping hazard.
- Only use the device in the upright position on a flat level surface (even during transport) and at least 50cm from any objects.
- Never insert or allow fingers or objects to enter grill openings while the device is operating to prevent injury and/or damage to the device.
- Do not block, cover or obstruct the air inlet/ outlet while the device is operating.
- Never use a single extension cord to operate more than one electrical device.
- Do not use the device near a window opening. Rain may create an electrical hazard.
- Do not use this device when it is damaged or not functioning properly.
- Do not operate the device with a damaged cord or plug.
- Do not mount the device on walls or ceiling.
- Do not operate the device when the housing is removed or damaged.
- Do not use the device in swimming pools, washrooms or similar wet areas.
- Do not use the device in a potentially explosive environment containing combustible liquids, gases or dust.
- Ensure that there is at least 50cm between the sides of the device and any flammable, heating
- Closely supervise any children and pets when the device is in use.
- Keep children away from playing with the device.
- Do not pull the unit along by the cord.
- If the supplied power cord is damaged it must be replaced by an electrician or qualified person to avoid any hazard.
- The mains supply must conform the specification shown on the rating label on the back of the device.
- Close doors and windows for optimal efficiency. Keep curtains or blinds closed during the sunniest hours of the day.
- Do not turn on the device if you have discovered damage to the appliance, cord or plug or if the device is malfunctioning or if there are signs of any other defect. Return the complete product to the point of purchase or to a certified electrician for inspection and/or repair.
- Always ask for original parts. The device (incl. cord and plug) may only be opened and/or repaired by properly authorized and qualified persons.
- Only a licensed professional is allowed to dismantle or modify the device.
- This device is to be used only for its prescribed purpose. Any other use is deemed to be a cause of misuse. The user/operator, not the manufacturer will be liable for any damage or injuries of any kind caused as a result of this
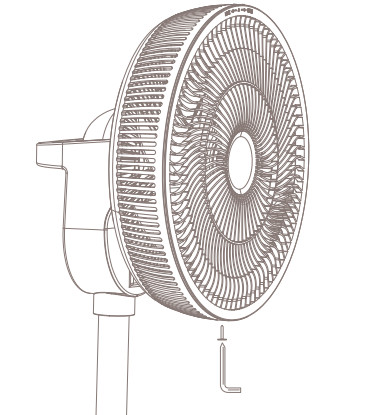
Installing the product
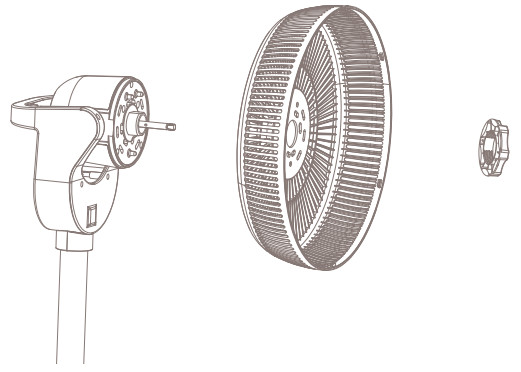
- Place the rear grill (part 5) over the motor (part 4) and tighten with the locking ring (part 6).

- Attach the fan blades (part 5) to the motor. Note: make sure that the grooves in the fan blades are slid over the pins
- Use the plastic screw (part 6) to secure the fan blades. Note: turn the screw anticlockwise firmly to secure it.
- Fit the front grill (part 5) and rotate it a little, clockwise, until the arrow on the grill lines up with the left-side marker.
- Fit the supplied screw (part 6) to the underside of the grill and connect the two halves firmly together.
- Attach the motor to the connector input on the base unit (part 2). Refer to point 7 for attachment of extension tube.
- (optional) To extend the height of the fan, connect the male pins of the extension tube (part 3) to the female connectors on the base and lower side of the motor. To release the tube, push the buttons together with your thumb and forefinger. Pull the extension tube at the same time.


Installing the remote control
- Open the battery compartment with your thumb and forefinger.
- Place the battery according to the instructions on the lid with the correct polarity on the back of the remote control.
- Slide the cover back on the remote control.
 Note:
Note:
- Only use 1x CR2025 31/ batteries
- Non-rechargeable batteries are not to be recharged
- Exhausted batteries are to be removed from the remote control and safely disposed of
- If the remote control is to be stored unused for a long period, the battery should be removed
- The supply terminals are not to be short-circuited.
Installing the dock + battery pack
![]() Note: The battery and charging dock are not supplied as standard with the DXCF10 and DXCF11 models. These can be ordered separately using article number DXCFBP01 or DXCFBP02.
Note: The battery and charging dock are not supplied as standard with the DXCF10 and DXCF11 models. These can be ordered separately using article number DXCFBP01 or DXCFBP02.
- Open the battery hatch on the bottom of the base unit by switching the lock position to “unlock” and remove the lid.
- Place the battery according to the instruction inside the battery hatch with the correct polarity
- Close the battery hatch by placing back the lid and switching the lock position to “lock”

Maintenance
Important: Always unplug the device from the mains before cleaning. To maximize the efficiency of the device, clean regularly
Cleaning the body
Use a soft, damp cloth to wipe the body clean. Never use aggressive chemicals, gasoline, detergents, chemically treated cloths, or other learning solutions. These all could possibly hurtthe casing material .
Cleaning the fan blades
- Follow the below instructions to clean the fan blades:
- Turn clockwise and remove the grill.
- Disassemble the fan blades from the motor as shown in the picture.

Functions
Instructions for use
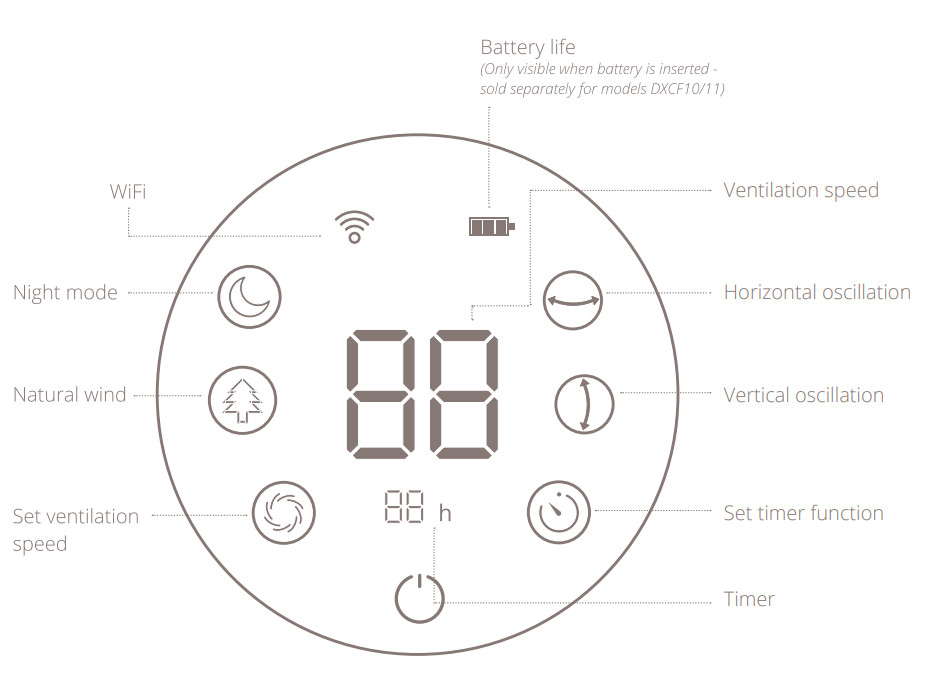
![]() Ventilation speedThe Whisper Flex has 26-speed settings. When the LED display shows ’00’, the device is switched off.
Ventilation speedThe Whisper Flex has 26-speed settings. When the LED display shows ’00’, the device is switched off.
![]() Horizontal oscillationThe fan swivels horizontally, 0 to 90 degrees, from left to right.
Horizontal oscillationThe fan swivels horizontally, 0 to 90 degrees, from left to right.
![]() Vertical oscillationThe fan swivels vertically, 0-100 degrees, from top to bottom.
Vertical oscillationThe fan swivels vertically, 0-100 degrees, from top to bottom.![]() TimerThe timer can be set to switch the fan off automatically. This can be set to between 0 and 12 hours from the time that the fan is first turned on.
TimerThe timer can be set to switch the fan off automatically. This can be set to between 0 and 12 hours from the time that the fan is first turned on.![]() Night modeBy selecting this mode, the LED display will automatically turn off after 10 seconds for an undisturbed night’s sleep.
Night modeBy selecting this mode, the LED display will automatically turn off after 10 seconds for an undisturbed night’s sleep.![]() Battery modeDetach the fan from the dock to operate on battery mode.|
Battery modeDetach the fan from the dock to operate on battery mode.|![]() Natural windThe fan rotates at different speeds to simulate natural wind conditions.
Natural windThe fan rotates at different speeds to simulate natural wind conditions.
Battery operation![]() Note: In battery mode, the fan speed is limited to position 15. Depending on the settings, the battery will last max.18 hours. Lower the ventilation speed and activate night mode to increase battery life. See below comparison chart for reference:
Note: In battery mode, the fan speed is limited to position 15. Depending on the settings, the battery will last max.18 hours. Lower the ventilation speed and activate night mode to increase battery life. See below comparison chart for reference:
| Fan speed | Oscillation | Battery life* |
| 1 | Off | 12:00 H |
| Horizontal or Vertical | 07:30 H | |
| Horizontal & Vertical | 05:00 H | |
| 5 | Off | 10.00 H |
| Horizontal or Vertical | 06:00 H | |
| Horizontal & Vertical | 04:10 H | |
| 10 | Off | 08:00 H |
| Horizontal or Vertical | 04:30 H | |
| Horizontal & Vertical | 03:20 H | |
| 15 | Off | 06:00 H |
| Horizontal or Vertical | 03.00 H | |
| Horizontal & Vertical | 02:30 H |
* For reference only. Test environment conditions: 21,50C, 3596 humidity.
Operating instructions
- Remove the parts from the packaging and assemble the device according to the instructions in this manual.
- Connect the power cable to the input terminal in the base of the product. Then insert the plug into the wall socket. The LED display will light up and show ’00’.
- Press the control ring once, to turn the product on. The fan springs into life and will thereafter default to the most recent speed setting.
- Use the stainless steel exterior of the aluminum control ring to switch between settings.
- When an icon flashes, you can adjust this functionality by turning the LED display and set it by pressing the LED display. When the desired position is reached, press the control ring again to confirm the selection.
- When setting the fan speed and timer function, the LED display will continue to flash until the desired setting is selected. After this, press the control ring again to confirm the selection.
- Once the function is set, the icon will stop blinking and will remain visible in the display, for as long as this function is set to on.
- Press and hold the control ring to switch off the device.

WiFi modePress and hold the control ring for 5 seconds to activate the WiFi mode. The timer will count down from 99 and start searching for devices to pair Once connected, the wifi will turn solid.APP operation Scan below QR code to download the Duux APP or search DUUX APP in the App Store or Google Play Store. Once installed, enter your e-mail address and complete the registration.Connect to WiFi
- Once registered, click “add duux device” on the main screen or use the “+” button in the top right corner to add a new device.
- Search for “Whisper Flex” and press to continue
- Connect to your preferred WiFi network and enter the corresponding password
- Follow the instructions in the app to complete the pairing process.Note: If you experience any problems with connecting or using the app, please refer to the FAQ in the app menu.

https://play.google.com/store/apps/details?id=com.duux.control https://apps.apple.com/app/duux/id1474620119
Technical Specifications

Disposal The European directive 2012 / 19 / CE on Waste Electrical and Electronic Equipment (WEEE), requires that old household electrical appliances must not be disposed of in the normal unsorted municipal waste stream. Old appliances must be collected separately in order to optimize the recovery and recycling of the materials they contain and reduce the impact on human health and the environment. The crossed-out “wheeled bin” symbol on the product reminds you of your obligation, that when you dispose of the appliance it must be separately collected. Consumers should contact their local authority or retailer for information concerning the correct disposal of their old appliances.
Notes……………………………………..
Designed in The Netherlands by Duux BV. Made in P.R.C. Duux BV, P.O. Box 145, 5400 AC Uden Netherlands, www.duux.com© 2021 Duux. All rights reserved. DUUX® is a trademark of Duux BV, registered in the EU and other countries.The brand cited belongs exclusively to the respective owners.Specifications are subject to modification without notice.Version: IMDXCF10111213_V3
[xyz-ips snippet=”download-snippet”]