
![]()
MODEL: DT1775OWNER’S MANUAL
Thank you for purchasing thisDYNATRAP® Insect Trap!![]()
IMPORTANT SAFETY INSTRUCTIONS
WARNING, When using electric appliances, basic precautions should always be followed, including the following:– To disconnect, turn all controls to the off (“O”) position, then remove plug from outlet.– Unplug from outlet when not in use and before servicing or cleaning.– To reduce the risk of electrical shock, do not put appliance in water or other liquid.– This appliance is provided with double insulation. Use only identical replacement parts.– Connect only to a circuit that is protected by a ground-fault circuit-interrupter (GFCI).See instructions for Servicing of Double-Insulated Appliances.
INSTRUCTIONS FOR DOUBLE-INSULATED, CORD-CONNECTED APPLIANCES:In a double-insulated appliance, two systems of insulation are provided instead of grounding. No grounding means is provided on a double-insulated appliance, nor should a means for grounding be added to the appliance. Servicing of a double-insulated appliance requires extreme care and knowledge of the system, and should be done only by qualified service personnel. Replacement parts for a double-insulated appliance must be identical to those parts in the appliance.
IMPORTANT SAFETY INSTRUCTIONS
Please read these instructions before using the DynaTrap®Insect Trap and keep for future reference.
- Always turn unit off and disconnect plug before servicing, cleaning, or changing bulb.
- Do not position the unit near heat, gas, oil or other flammable materials.
- Mount product out of reach from children.
- Never operate this product if it has a damaged cord or plug, if it is not working properly, if it has been dropped or damaged, or if it has been dropped into water.
- This product is equipped with 2-conductor cord and 2-prong polarized plug as a safety feature. This plug will fit in a polarized outlet only one way. If the plug does not fully fit in the outlet, then reverse the plug. If it still does not fit, then contact a qualified electrician. To reduce the risk of electrical shock, only plug into a properly installed outlet. Do not attempt to defeat this safety feature.
- Do not insert fingers or any foreign objects into the unit while it is connected to an electrical outlet.
- Collected insects within the unit may contribute to fire, so clean insects from the unit frequently.
- Do not clean this product with water spray. Do not place where it can fall into water, or near flammable materials.
- Do not touch fan while in motion.
- Do not abuse cord—Never carry or hang unit by cord or yank it to disconnect from receptacle. Keep cord away from heat, oil, or sharp edges.
- Use only extension cords that are clearly marked “Suitable for Use with Outdoor Appliances” and that have plug and receptacles that match the product plug. Replace all damaged cords.
INSTALLATION & OPERATING INSTRUCTIONS
- Unpack unit. Save carton for off-season storage (if needed).
- If hanging the unit, place approximately 3-6 feet above the floor/ground level for optimal catch rate and easy access for cleaning. Unit can also be placed on the floor or ground.
- Plug cord into an outlet or UL listed extension cord as described in “IMPORTANT SAFETY INSTRUCTIONS”.
- Turn power switch to “ON” postion. The Switch is located under the upper housing on the outer rim.
- For best catch results leave unit on at all times, except when cleaning or servicing.
- Catch rate activity will be higher at night. For best catch results it is recommended to keep the unit away from competing light sources. Intended for household use only.
- It is recommended to place the unit at least 20 to 40 feet away from your outdoor living area.
- This unit is all-weather resistant – designed for outdoor use including rainy conditions.
CLEANING
Frequent cleaning will prolong the life of the unit, ensure fire prevention and provide for more efficient operation.
- Be sure to clean the unit once per week
- Switch the unit off and unplug before cleaning
- For weekly cleaning, twist the cage clockwise. Remove any buildup from the inside of the retaining cage.
- When replacing the retaining cage – DO NOT press/push against the screen windows.
REPLACING BULB
The light bulb life expectancy is approximately 3,000 hours (or about 4 months), and should be replaced regularly to ensure optimal UV effectiveness. Even though the bulb’s light may be visible to you, its ability to attract insects diminishes over time.
- Turn power switch to “off” position. UNPLUG UNIT, and allow bulb to cool before replacing. Turn the unit upside down.
- Twist the black threaded fastener piece securing the light housing counterclockwise to loosen. Move the light housing to the side.
- Twist the two black threaded fastener pieces securing the light and carefully remove the silver clips.
- Cover the bulb with a cloth to protect your fingers and hand. Grasp the bulb (with your hand and fingers protected by the cloth) and gently pull the bulb from the socket.
- Remove any debris from the lamp socket with a brush before inserting the new bulb. Insert new replacement bulb. Place metal clips in place and secure black threaded fasteners.
- Twist the light housing clockwise into place and secure the black threaded fastener. Replacement fluorescent bulbs can be found at your local retailer or can be ordered directly from DynaTrap by calling 1-877-403-TRAP (8727) or visiting www.dynatrap.com
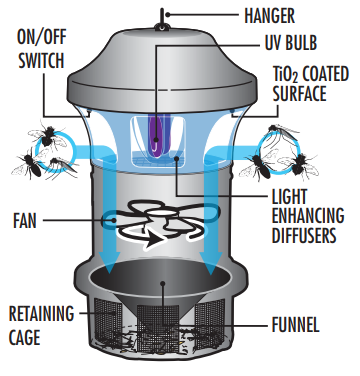
HOW THE DYNATRAP®INSECT TRAP WORKS
Flying insects are attracted to the unit by the UV light and CO2 that is generated by the photo-catalysis between the UV lamps and the special TiO2 coating. The fan then pulls the insects into the screened base, trapping them until they dehydrate and die. The base can be removed, allowing the contents to be periodically emptied into the trash. The see-through screen shows the insects trapped in the compartment, alerting you when the cage needs to be emptied.
TROUBLESHOOTING
| Problem: | Possible cause: | Correction: |
| Bulbs do not illuminate and fan does not spin. | 1. No electrical power |
|
| Bulb illuminates, but fan does not spin.
|
1. Shorted fan |
|
| Fan spins, but bulb does not illuminate |
|
|
LIMITED WARRANTY
DYNAMIC warranties to the original purchaser that this product is free from defective materials and workmanship. This warranty is limited to remedy any defective part for a period of one year from date of original date of purchase. Retain your original receipt as proof of purchase. This warranty does not apply to the light bulb, nor to, in our judgment, misuse or abuse. If this unit has been altered, no warranty is in force. This warranty does not apply if this unit is purchased outside the United States, Canada, and Mexico. In no case shall DYNAMIC be liable for any accidental, punitive, consequential, or any other damages of any kind for breach of this or any other warranty, expressed or implied, whatsoever. Some states do not allow limitation on how long an implied warranty lasts, so the above limitation or exclusion may not apply to you. This warranty gives you specific legal rights, and you may also have other rights that vary from state to state.
PARTS & ACCESSORIES AVAILABLEPART / DESCRIPTION43050 – 26-Watt UV Replacement Bulb (1 piece) Dynamic Solutions Worldwide, LLC
![]() 12247 W. Fairview Ave. Milwaukee, WI 53226Phone: 414-431-2819Toll free: 1-877-403-TRAP (8727)Toll free fax: 877-403-3293Email: [email protected]Visit us online at www.dynatrap.com© Dynamic Solutions Worldwide, LLC
12247 W. Fairview Ave. Milwaukee, WI 53226Phone: 414-431-2819Toll free: 1-877-403-TRAP (8727)Toll free fax: 877-403-3293Email: [email protected]Visit us online at www.dynatrap.com© Dynamic Solutions Worldwide, LLC
SAVE THESE INSTRUCTIONS
DynaTrap DT1775 Owner’s Manual – DynaTrap DT1775 Owner’s Manual –
[xyz-ips snippet=”download-snippet”]