User manual
Dyson micro one point five kilogramsThe Dyson cordless vacuum cleaner is in an upright position with the wand and cleaner head attached.
In the box
Main body showing the handle and bin attached.
A soft fluffy brush bar is housed within the cleaner head. There is an electrical connecter end that can attach to the end of the wand or directly to the machine.
Soft woven nylon and anti-static carbon fiber filaments remove dust from hard floors. Smaller than a standard Fluffy™ cleaner head – with a low profile to reach under furniture.
The narrow connector end at the top, this connects to the bin and the wider end at the bottom connects to the cleaner head or tool.
A charger is a one-piece unit with the plug, connector end, and cable.
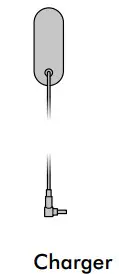 Charges your vacuum with or without a dock.Some tools may not be included.You can buy additional tools at www.dyson.com.
This tool has a combination of the brush head and crevice tool together in one unit. The brush head slides down the crevice tool when needed.
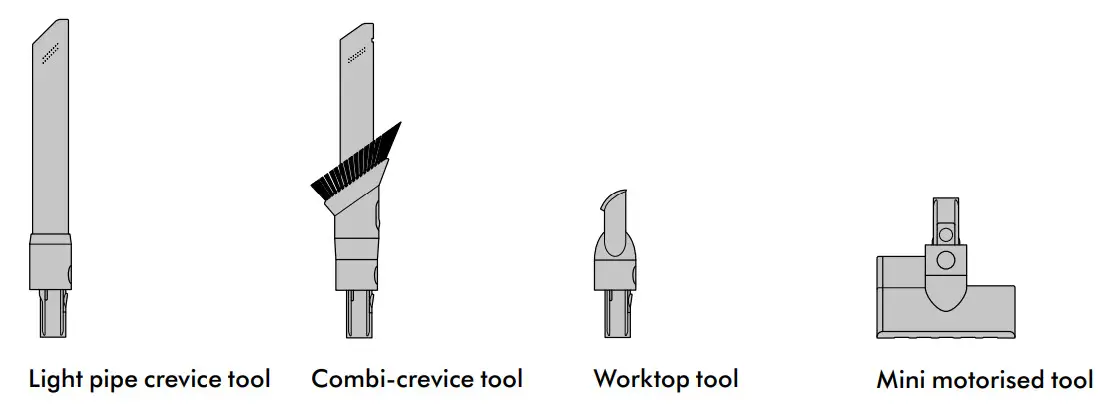
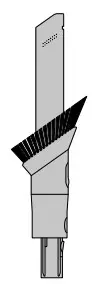 Combi-crevice toolTwo tools in one – narrow nozzle and brush, for quick switching between cleaning and dusting tasks.A long tool with an angled end.
Light pipe crevice toolCrevice tool with LED lights lets you reach into dark, narrow spaces and see where you’re cleaning.
A small cleaner head with a body housing the motor and an electrical connector to attach to the wand or directly to the machine.
Mini motorized toolMotorized brush bar, concentrated in a smaller head to remove stubborn dirt from mattresses, upholstery, and stairs.This tool is angled and has a nozzle end.
Worktop toolEngineered for cleaning kitchen worktops, tables, and hard surfaces.A plastic clip that attaches to the wand
Wand clipClips to your vacuum wand to hold tools.
Getting started
Charging your machine
For the best experience, we recommend fully charging your machine, and any additional batteries, as soon as you open the box and after every clean. The LED light on the end of the handle will flash when the power is running low and you need to put your battery on to charge.Connect the charger directly to the charging point on the base of the handle of your machine. You can also connect to your dock as shown in the installation instructions supplied with your dock.
The LED light on the end of the handle will pulse with a blue LED light when charging, and the light will go out when fully charged.It can take up to four hours to fully charge your battery. Your battery has been designed to be left on charge.Your machine won’t operate or charge if the ambient temperature is below 5°C (41°F). This is designed to protect both the motor and battery.You can help prolong the battery life by leaving your machine to cool down before recharging.
Caring for your floors
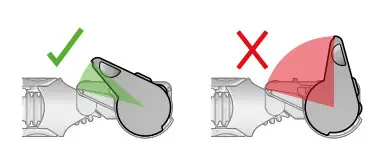
Check that the underside of the cleaner head or tool is clean and free from any objects that may cause damage.Before vacuuming your flooring, rugs, and carpets, check the manufacturer’s recommended cleaning instructions.This machine is designed for use on hard floors. The brush bar on your machine can damage certain flooring. Some rug materials may fuzz if a rotating brush bar is used when vacuuming. If this happens, we recommend vacuuming without the motorized floor tool and consulting with your flooring manufacturer.
Emptying your bin
Empty your bin as soon as the dirt reaches the MAX mark.You may need to clean the filter more often if you use your machine with a full bin.The MAX mark on the bin of the machine, showing that the dirt should not be filled over the Max mark when the machine is at the angle of normal use.
Remove your wandPress the red wand release button, on the top of the wand, and pull the wand away from the bin.Illustration of the bin being emptied into a bag with images demonstrating to take care not to press the trigger when emptying the bin.
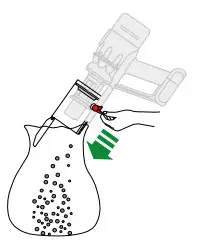 Release the dirtHold your vacuum over a bin.Push the red bin release button, taking care not to press the power button.The bottom of the bin will open and the shroud will slide down inside the bin, wiping away any dirt.If the bin doesn’t open, check the bin release button is pushed down fully.Illustration of the bin being emptied into a bag.
To remove the bin for emptying:If the bin doesn’t empty fully, remove the bin and empty the dirt.Press the red button located on the bin runner to release the bin and slide your bin off the runner.Minimize dust contactCover your bin tightly in a dust-proof bag while you empty. Remove the bincarefully, seal the bag tightly and dispose of.The bin lid closes with an audible click and the bin is pushed upwards with another click once it is fully in place. Reassemble your machineIf you have removed your bin, slide it back onto the runner. Make sure that bin and lid are both securely in position.Push the bin base upwards until the bin and lid both click into place.Reconnect the wand.Two images of the bin with arrows showing the bin lid closing and a click symbol and the bin being pushed upwards with another click symbol.
Cleaning your bin
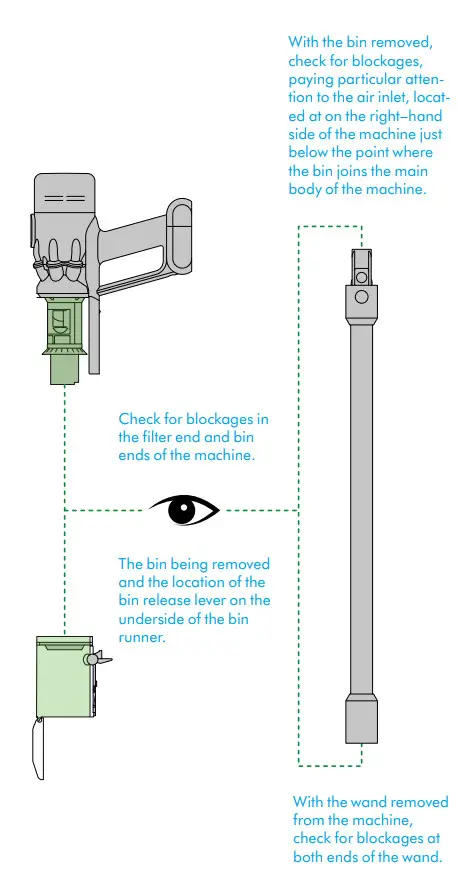
Don’t put any part of your machine in a dishwasher or use detergents, polishes or air fresheners.Clean your binIf it is necessary to clean your bin, empty it as shown in the ‘Emptying your bin’ section.Press the red button located on the bin runner to release the bin and slide your bin off the runner.The bin being removed and the location of the bin release lever on the underside of the bin runner.
Only clean your bin with a damp cloth.Make sure that the bin and seals are completely dry before replacing.Replace your binInsert the spine on to the bin runner.Close your bin by pushing the bin base upwards until the bin and bin base click into place.The bin is being pushed back into position on the bin runner.
Washing your filter
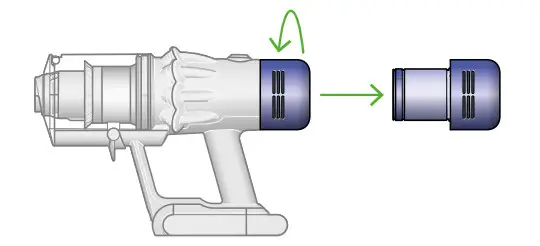
Wash your filter at least once a month to maintain the best performance.Make sure the filter is completely dry before refitting.Twist off your filterDon’t put any part of your machine in a dishwasher or use detergents, polishes or air fresheners.Turn your filter anti-clockwise and pull it away from your machine.Before washing your filter, tap it gently over a bin to remove any loose dust and debris.
 The filter is located at the rear of your machine.Wash your filterWash the outside of the filter, rubbing with your fingers to remove the dirt.Carefully rinse the inside filter, without allowing water to fill the filter.Repeat these steps until the water runs clear.Holding the filter by the hard, plastic, tap the other end over the bin.Filter held in an upright position, with the wider end in the palm of a hand. Water running from a tap into the narrower end.
 Filter with hand over the open end with arrows showing a shaking motion.Shake and dryEmpty the filter and shake firmly to remove excess water.Keep shaking until there’s no water coming from the filter.Place your filter end up, as shown.Leave your filter to dry for at least 24 hours in a well-ventilated, warm place.Don’t dry your filter in a tumble dryer, microwave or near a naked flame.Important: your filter must be completely dry before you put it back into the machine. Your machine could be damaged if used with a damp filter.A hand holding the filter with the narrow end pointing downwards with droplets of water being shaken from the filter and again, with the end pointing downwards shaking water out.
Refit your filterTo refit your filter, slide it onto the handle and turn it clockwise until it clicks into place.Your filter may need more frequent washing if you vacuum fine dust, use Max mode frequently or use with the bin full.The filter is left to dry with the pleated filter facing upwards.

Washing your brush bar
To maintain optimum performance, check and wash the brush bar regularly.Remove brush barDon’t put any part of your machine in a dishwasher or use detergents, polishes or air fresheners.Press the cleaner head release button to remove it from the wand.Pull the brush bar off the end cap and put the end cap to one side, don’t wash it.
The lock located on the side of the cleaner head is rotated 90 ° to release the end cap and the brush bar can be removed.
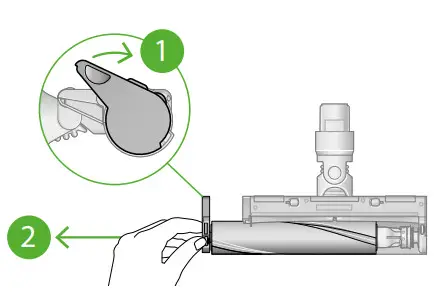 The end cap is located at the side of the cleaner head. Push this upwards to unlock the brush bar. Don’t wash the end cap.
Wash and dry brush barHold your brush bar under cold tap water and gently rub to remove any lint or dirt. Keep washing until the water runs clear.Stand the brush bar upright and leave for at least 24 hours to dry.The brush bar has an open end and a closed-end. Stand upright, with the closed end facing upwards, to dry.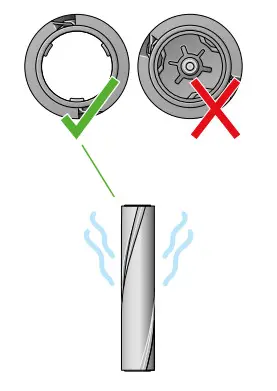
Replace your brush barsMake sure your brush bar is completely dry before refitting.Reattach the end cap to the brush bar and slide it back into the cleaner head.Rotate the end cap until it clips securely back into position.The cleaner head housing is not washable and should only be wiped over with a damp lint-free cloth.The brush bar was reinserted into the cleaner head and the end cap rotated to the locked position.
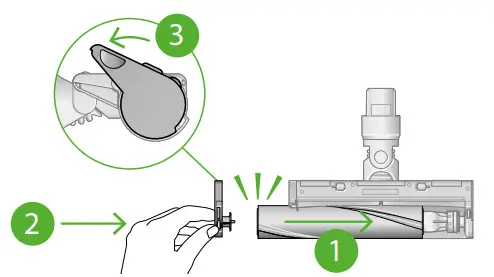
The end cap should be attached to the cleaner head at an angle less than 90°, any angle greater than this will not allow the end cap to close.
Cleaning your tools
Don’t put any part of your machine in a dishwasher or use detergents, polishes, or air fresheners.Wipe with a damp, lint-free cloth, without touching the connector end.Make sure your tools are completely dry before using.
Clearing blockages
If your machine detects a blockage, the motor will pulse six times. You won’t be able to use your machine until the blockage has been cleared. If you try to use your machine when the motor is pulsing, it will automatically cut out.Leave your machine to cool down before looking for blockages and, for your safety, take care not to touch the power button.
 Disconnect your machine from the charger before looking for blockages.Be careful not to touch the trigger and be aware of sharp objects.Leave your machine to cool down before looking for blockages.Don’t use your machine when looking for blockages as this could cause injury.
 Turn the cleaner head over to check for obstructions on the brush bar and air inlet. Remove any obstructions from the brush bar.
Looking after your machine
report this adTo always get the best performance from your machine, it’s important to clean it regularly and check for blockages.Look after your machine If your machine is dusty, wipe with a damp lint-free cloth.Check for blockages in the cleaner head, tools and main body of your machine.Wash your filter regularly and leave to dry completely.Don’t use detergents or polishes to clean your machine.Look after your batteryTo get the best performance and life from your battery, use Eco mode.Your machine won’t operate or charge if the ambient temperature is below 5°C(41°F). This is designed to protect both the motor and battery.Your serial numbersYou can register your machine using the serial number found on the bottom of your machine.You can find your serial numbers on your machine, battery, and charger.Use your serial number to register.
References
[xyz-ips snippet=”download-snippet”]