
EACHINE Atomrc Seagull Fpv Bundle User Manual

I n t r o
ATOMRC Seagull FPV Bundle, the ATOMRC EXCEED TOWER have compact size and powerful feature, F405 FC and 500mW VTX.The ESC can support 35A for 60s( environment 25℃). The ATOMRC PHOTON 2004 2700KV MOTOR have max 634g thrust, give more maneuverability for drones. Flight time with standard 4S 850mah battery is 9 min, user change use bigger battery for more flight time. The Cobra L FPV goggles have 4.3 inch 480*272 LCD Screen, integrated with DVR, goggles have diversity receiver for stable image reception, goggles can power by 18650 battery or USB C. The T8 lite radio have ergonomic design and 4 aux switch, support multiple mode.
P a c k i n g l i s t
Seagull FPV Racing drone*1、Cobra L FPV FPV Goggles*1、T8 Lite Radio*1、Cobra L accessories*1、Seagull Bundle user manual*1、Charger*1、4S Lipo Battery*1。
S e a g u l l B a s i c M a n u e l
- Make sure nothing is blocked the props when power on.
- User can change the settings on Betafight ground station.
- Before flight, please make sure know the arm switch and mode switch, if the drone out of control, please disarm the drone immediately, the prop will stop spinning. (radio content below)
- User 4S 850mah battery, flight time about 9min,with naked gopro flight 7min, full size gopro about 6 min.
- If the battery voltage below 14.5V, there is no much power remain, user need land the drone to avoid crash and over discharge.
- Angle mode: the drone will self-level when release the sticks. Self-level modes are easier to fly for beginner.
- Air mode, there is no angle limit for the drone, drone will have much more maneuverability, this mode is for advanced fight.
C o b r a L U S E R M A N U E L
S P E C S
| MODEL | COBRA L |
| Screen | LCD |
| Resolution | 480*272 |
| FOV | 50° |
| Aspect Ratio | 16:09 |
| Receiver | 5.8Ghz 48 CH Diversity RX |
| Power Supply | 18650/USB 5V |
| Power Consuption | 5V 0.5A |
| DVR | H264, 30fps,MOV 6Mbps, Max 32Gb |
| SIZE | 122*165*100mm |
| Weight | 330g |
F r e q u e n c y T a b l e
| BAND/CH table | ||||||||
| BAND/CH | CH 1 | CH2 | CH3 | CH4 | CH5 | CH6 | CH7 | CH8 |
| A | 5865M | 5845M | 5825M | 5805M | 5785M | 5765M | 5745M | 5725M |
| B | 5733M | 5752M | 5771M | 5790M | 5809M | 5828M | 5847M | 5866M |
| E | 5705M | 5685M | 5665M | 5645M | 5885M | 5905M | 5925M | 5945M |
| F | 5740M | 5760M | 5780M | 5800M | 5820M | 5840M | 5860M | 5880M |
| R | 5658M | 5695M | 5732M | 5769M | 5806M | 5843M | 5880M | 5917M |
| L | 5362M | 5399M | 5436M | 5473M | 5510M | 5547M | 5584M | 5621M |
| Sensitivity | -98dBm±1dBm | |||||||
| Antenna Port | 2 X SMA-K,50ohm |
B u t t o n F u n c t i o n
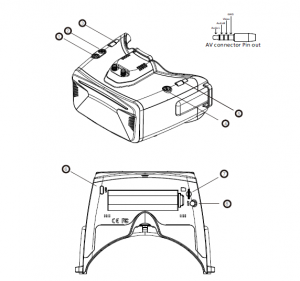
- Power
- CH/BAND/Search
- Mode
- SD card connector
- Menu
- Record/Delet
- USB C Connector
- Audio/Video connector
G o g g l e s M e n u
- Install the 18650 battery.
- Long press the power on button to power on.
- Press the right wheel, then roll the right wheel to change channel, press the wheel again switch to band setting mode, then roll the wheel to change the band.
- H old the righ wheel to search, it will take 20s to search.
- Sometime the auto search channel is not accurate, user may need manually select the channel.
- D VR need SD card to record, please format SD card to FAT32.
- When goggles receive image, press record button,the DVR icon will flash, press record button again to stop recording.
- Short press left wheel, when OSD show PB(Play Back Mode), roll right wheel to select, press right wheel to record or fast forward .
- press mode button to quit play back mode.
- Goggles OSD is below.
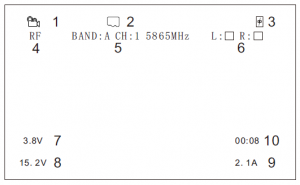
- DVR Status
- .SD Card Status
- Battery Status
- Mode
- Frequency
- RSSI
- Drone Battery voltage per cell
- Drone Battery voltage
- Drone Current
- Flight Time
The Goggles OSD time out can be set, turn off means the OSD is always on.
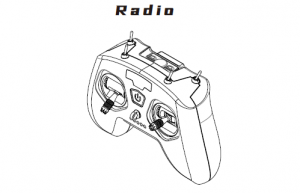
- Make sure all switch is down, throttle stick is at the bottom.
- Hold power button is turn on, the LED will turn green.
- If the green LED is flashing and radio start beep, it means that Switch is not down or throttle stick is not bottom. push switch down and throttle to bottom, the radio will back to normal.
- The radio can charge by USC C port 5V.
F l i g h t M o d e
Push up SC Switch to Arm the quad, the prop will spinning.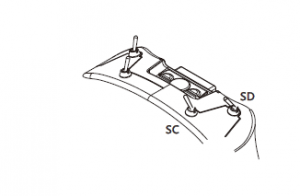
Push up SD, Switch Angle mode to Air Mode.
SA Switch is buzzer switch, drone will beep when pull up this switch. SB is anti flip switch, when drone is flipped, pull up this switch thenpush sticks, drone will flip back to normal.
S t i c k m o d e
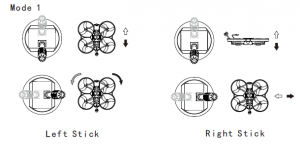

Push the throttle Stick upward, the drone will fly upward. Push the Yaw Stick right, the drone will rotate horizontal clockwise.Push the Pitch Stick upward, the drone will tilt down. Push the Roll Stick left, the drone will roll left.
H o w t o B i n d R X
- Hold the BIND button on the receiver and turn on the power .After about
- seconds, the receiver LED red light will be on. And wait for the link.
- Keep the throttle stick at the lowest position, and then press the link button for more than 1 second to bind the receiver. The power button will flash, indicating that linking is in progress. At this time, the red light of the receiver flashes to indicate that the linking is successful, and the receiver can be used after powering on again Special.Attention: different D8 protocol receivers may enter the pairing mode in different ways. For details, please refer to the corresponding manuals of various receivers to ensure correct use. Various different receivers and models will have different methods to place the model or receiver in to bind mode. Please follow the instructions from the model or receiver manufacturers user manual to in.
P r e f i g h t C h e c k
- Make sure drone、radio and goggles batter are fully charged.
- Make sure familiar with stick mode and switch mode function.
- Make sure the goggles received the image, and image is clear.
- Ensure the prop is properly installed, no damage on prop.
- Turn on the radio and Goggles.
- Use battery strap to tie the battery, make sure no slide.
- Plug the battery, and put the drone to the level ground.
- Now the drone is ready to fly.
- If not familiar with the drone, use angle mode first.
F l i g h t E n v i r o n m e n t
- Do not fly in windy or snow and rain days.
- Choose open area, no crowds and cars near by.
- Keep away from crowds、 powerline 、 water、 radio tower etc.
- Do not fly over height.
Chager And Maintain
- Charger support 110~220V AC IN.
- F y, do not charge the or safet battery unattended .
- To reserve the battery, make sure battery is not fully charged, discharge battery to 14.8V .
F A Q
Cant Arm?Check throttle stick, make sure it at bottom, make sure quad is level.How to install prop?The prop is spinning from inside to out size, prop is locked by M2*8mm Hex screw.Goggles screen black?Make sure its in RF mode, press left wheel to switch.How to change the Frequency?The VTX have IRC protocol, user can change it with osd command.
| ATOMRC Seagull RTF Bundle | |
| Drone | |
| Flight Controller | ATOMRC Exceed F405 MINI |
| ESC | ATOMRC Exceed 30A MINI BLS 2~4s 4in1 |
| Motor | ATOMRC 2004 2700KV |
| VTX | ATOMRC Exceed 500mW MINI |
| Cam | Foxeer Razer nano |
| Prop | Gemfan 90mm |
| COBRA L Goggles | |
| Resolution | 480*272 |
| Receiver | Diversity |
| DVR | MJPEG |
| POWER | 1 Cell 18650/ USB C |
| RADIO | |
| Frequency | 2.4Ghz |
| Channel | 8 |
| Protocal | D8 |
 Please download the latest user manual atwww.atomrc.com/pages/download
Read More About This Manual & Download PDF:
References
[xyz-ips snippet=”download-snippet”]