
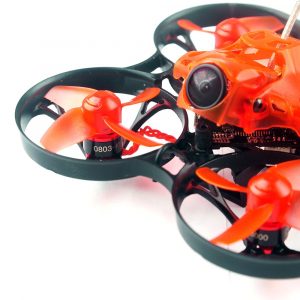
Eachine DSM2/ DSMX Version Trashcan 2S Brushless Whoop Racing Drone
Specifications
| Brand Name: Eachine |
| Item Name: 2S 75mm Brushless Whoop racer drone BNF |
| Wheelbase: 75mm |
| Size: 98mm*98mm*36mm |
| Weight: 33g(without battery) |
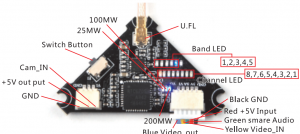
VTX Bands and Channels setup
Blue LEDS and Red LEDS light on.indicating frequency5917MHZ( BANDS and CH5)Blue LEDl and Red LED2 light on,indicating frequency5845MHZ(BAND1 and CH2)
Frequency and channel frequency table:
|
FR————— CH |
CH1 | CH2 | CH3 | CH4 | CH5 | CHG | CH7 | CHS |
|
Band1(A) |
5865M | 5845M | 5825M | 5805M | 5785M | 5765M | 5745M |
5725M |
|
Band2(B) |
5733M | 5752M | 5771M | 5790M | 5809M | 5828M | 5847M |
5866M |
|
Band3(E) |
5705M | 5685M | 5665M | 5665M | 5885M | 5905M | 5905M |
5905M |
|
Band4(F) |
5740M | 5760M | 5780M | 5800M | 5820M | 5840M | 5860M |
5880M |
| Band5(R) |
5658M |
5695M |
5732M |
5769M |
5806M |
5843M |
5880M |
5917M |
There are 3 ways to switch the vtx channels:
- Long press the switch button to change the Band of the VTX, shorter press the switch button tochange the channels of the VTX.{Can’t save ,it will lost the channel while re-power for the Trashcan since the SmartAudio function enabled)
- Go to Betaflight CU ,type the command:Setvtx_band=3Setvtx_channel=lSetvtx_freq=5705saveNotes: The vtx_freq should match the vtx_band and vtx_channle as the VTX Channel list shows.For example, if you setvtx_freq=5732, you should setvtx_band=5 and vtx_channel=3
- Enable SmartAudio for UART1, then move the stick of the transmitter (THR MID+YAW LEFT + PITCH UP) to enter OSD Menu, Enter to Features, then enter to VTXSA to set VTX Band and channel


Binding procedure
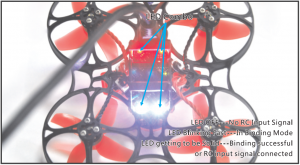
- Connect Crazybee F4 PRO DSM2/DSMX Version to computer and open Betaflight configurator, From CLI tab type: “set spektrum_sat_bind = 9• for DSMX radio or •set spektrum_sat_bind = S” for DSM2 radio
- Type “save” and after Flight controller reboot remove USB cable (=Power off the board)
- Wait a second and reconnect the USB cable. After cold start satellite led combo on the backsideof the board (2 red led+2 white led) should start blinking and transmitter should be turned on while pressing the bind button
- After binding satellite LED combo should be solid. Connect Betaflight and use receiver tab to test that satellite is working correctly.
- Final step is to go to CLI tab and type “set spektrum_sat_bind = o· and then type “save”. This must be done so that satellite doesn’t go back to binding mode when the flight controller is repowered again.

Receiver configuration
We have configured the DSM2/DSMX receiver for the Trashcan before shipping. If you flashed the firmware ,Please setup as the following steps: Enable Serial_RX for UART2, then select RX_SERIAL from the RECEIVER Mode and set the Serial Receiver Provider to be Spektrum1024 for DSM2 radio and Spektrum2048 for DSMX Radio in Betaflight Configurator.
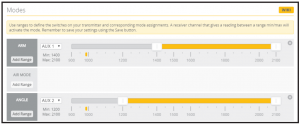
Arm/Disarm the Motor
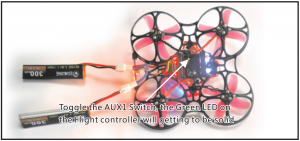
- The Default Arm/Disarm switch for Trashcan is AUX1(Channel 5),and you can also customize it with Betaflight Configurator.
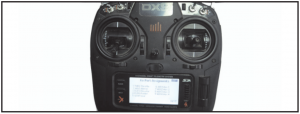
- For most of Spektrum radio the default channel 5 is Gear switch and you can also customize it. Use DX9 for example, Go to menu and select System setup ,then choose Channel sign.
- The default channel map for Trashcan DSM2/X version is TAER1234, please make sure your transmitter is matched, otherwise it will can’t be armed. Toggle the AUX1 Switch ,the Green LED on the flight controller will getting to be solid, this indicates the motor was armed. And also you can found “Armed” displayed on your FPV Goggles or the FPV Monitor. Please make sure keep the Mobula7 level before arming .Be careful and enjoy your flight now!
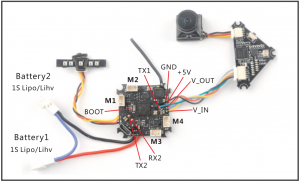
Flight controller connection diagram

Charger the Lipo Battery

Mixer type and ESC/motor protocol

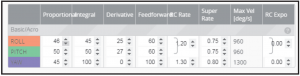
Default PID setting
ESC Check and Flash firmware
- Download New release Blhelisuite from:https://www.mediafire.com/folder/dx6kfaasyo24I/BLHeliSuite
- Connect the Crazybee F4 PRO flight controller to computer and power for it with battery
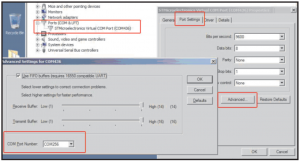
- Open the Device Manager of your computer, find the Ports, please make sure the Com port Serial Number is under 255, otherwise it will can’t connect to the BLHELISUITE. You can change the port serial number like the bellowing step:
- Open the BLHELISUITE, Select SI LABS BLHeli Bootloader (Clean flight) from the third tab on the top side. Then Select the right Serial corn port and Click connect. You can also Flash the new release BLHeli_s firmware via the BLHEILISUITE, the firmware Target is “S-H-50”


Flight controller firmware update
- Install latest STM32 Virtual COM Port Driverhttp://www.st.com/web/en/catalog/tools/PF257938
- Install STM BOOTLOAD Driver (STM Device in DFU MODE)
- Open Betaflight configurator and choose firmware target “CrazybeeF4 DX” ,then select the firmware version.
- There are 2 ways to get in DFU Mode: 1). solder the boot pad and then plug USB to computer 2). loading betaflight firmware and hit “flash” , then it will getting into DFU Mode automatically.
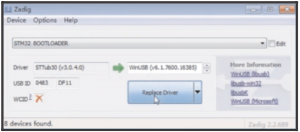
- Open Zadig tools to replace the drivers from STM32 Bootloader to WINUSB Driver.
- Reconnect the flight controller to the computer after replace driver done, and open Betaflight Configurator, loading firmware and flash.
*We will update the firmware for Crazybee F4 PRO and release to our website in time.
“Flip over after crash” procedure
Set one channel of your radio transmitter to activate the Flip over function in the Mode tab of Betaflight configurator.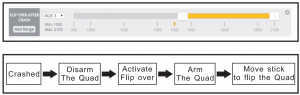
Eachine DSM2/ DSMX Version Trashcan 2S Brushless Whoop Racing Drone Instruction Manual – Eachine DSM2/ DSMX Version Trashcan 2S Brushless Whoop Racing Drone Instruction Manual – Eachine DSM2/ DSMX Version Trashcan 2S Brushless Whoop Racing Drone Instruction Manual –
[xyz-ips snippet=”download-snippet”]