Eachine EC300D New 5.8G FPV Goggles User Manual
Package Included
| Eachine EV300D Goggles •1 | Sponge•1 + EVA pad•2 |
| Zipper case•1 | User Manual”1 |
| Eyeglass Frames•2 | 18650 battery case•1 |
| Lens wiping cloth•1 | Third party module cover*2 |
|
FPV Receivers*2 (Only set B available) |
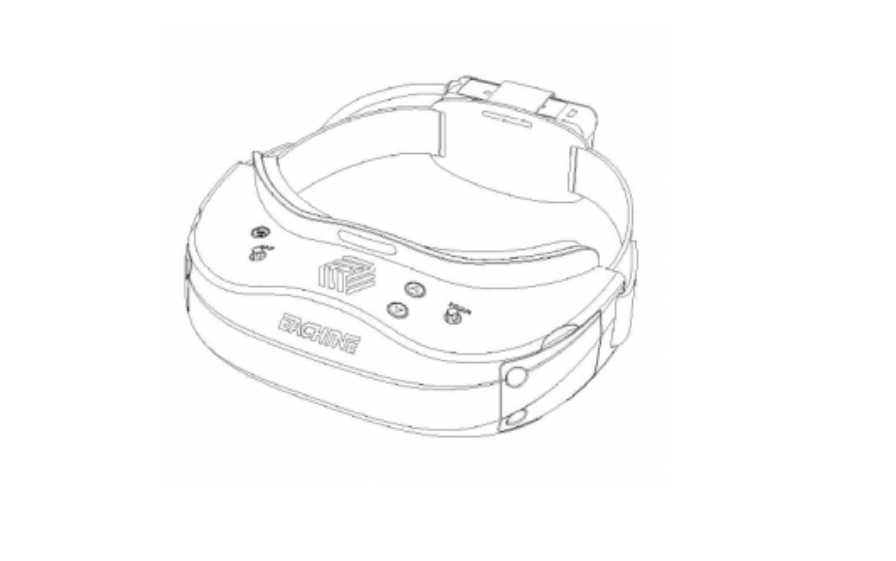
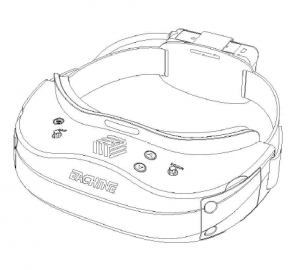
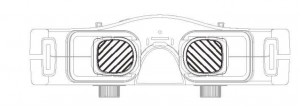
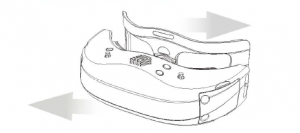
Diagram
Product specifications
| Resolution | 1280″960 |
| IPD | 56 ~ 72 mm (Adjustable) |
| Focal length | Under 800 degree of myopia and Hyperopia300 degrees |
| FOV | 42° ( Diagonal ) |
| Video Format | NT SC/PAL Auto selecting |
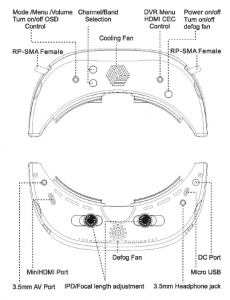
| User Controls | Channel / Band selectionUser Controls Mode (5.BG /Racer/ HDMI /AV)PICTURE/ SOUND /OPTION I VOLUMEPower on and off/ Tum on and off Fan/ OSD / DVR |
| Digital Video | Integrated analog mode DVRTF card max 64G.Video compression format AVI |
| Ports | 3.5mm AV in/out portPorts 3.5mm stereo earphone portDC-IN(2S-6S)/Micro USB/HDMI portfTF slot |
| Battery case | 7.4V 18650 LI-ION battery case with integrated USBcharger and LED indicator(2×3.7V LI-ION 18650 stylecells not included) |
| Frequency | 5.8GHZ 5333 ~ 5945MHz |
| Operating Temp | -9°C-391:: |
| Dimensions | 185″90*40mm |
| Weight | 208g |
| Packaging | 240*140″100mm |
Controls
Power on/off and turn on/off defogging fan control
Power supply: (1) DC in: 7.4V-30V(2S-6S),Thedevicewill not work when the DC input voltage is higher than 30V. The device hardware is designed with overvoltage protection to prevent damage fromexcessive voltage. The device will work properly once reconnect the appropriate power supply.;(2) USB in : 5V==2.4A , When using power bank to supply the gogles, you must select the output port 5V==2.4A with the USB cable voltage drop under 0.4V .Power on/off: Press and hold the power button for 3 seconds to tum on or off. Coollng fan:By default, the goggles can not be turned off during operation . Turn on/off defog fan : When goggles is powered on, press the power button to turn on the defogging fan, and the fan symbol appears at the top right of the screen.Press the power button again to tum off the defogging fan, and the fan symbol disappears at the top right of the screen. When defogging fan is turned on, it will automatically tum off after 10 minutes with no operation. If you need to use it, please turn it on again.
Mode: a.5.8G mode: Default mode after booting . long press “mode” button towards the right until it beeps to enter Input Source page.Press “mode” button foiward or backward to selecting ,short press “mode” button vertically to switch HDMI /5.BG/AV. b.Racing mode: Under 5.8G mode,short press .. mode” button vertically to switch mode from 4 pilots/6 pilots/8 pilots. For example: 4 pilots/6pilots/8 pilots/exit racing mode switching circularly. c.Auto search: Long press “mode”” button vertically until first beep to enter auto search. d.Turn on/off OSD: Long press “mode” button vertically until second beep to tum on/off OSD.Volume: Press “mode” button forward or backward to increase/decrease
>Long press “mode” button toward left unit it beep, entering MENU. Then press mode button towards left or right to switch PICTURE/SOUND/OPTION page. The selected option turns to yellow background.>In PICTURE page, there are Picture Mode Standard/Color Temperature Aspect Ratio/Noise Reduction/MPEG Noise Reduction .Picture Mode Standard contains standard/soft/vivid/user.> In User mode, brightness/contrasVcolor/sharpness/tint are adjustable. The default value of user mode is 50. Press mode button towards left or right to change parameter.> In Aspect Ratio.adjust settings Auto/4:3/16:9/Zoom1/Zoom2/Panorama{Default) In SOUND page, there are Sound Mode Standard/Balance/Auto Volume Surround Sound.Sound Mode Standard contains music mode/movie mode/sport mode/user mode. In User mode, treble/bass parameters are adjustable.>In OPTION page,Restore Factory DefaulVHDMI CEC/Color Range/ Software Update(USB),press “mode” button forward or backward to select, when selected option turns into yellow, short press “mode” button vertically to confirm,press mode button towards the left or right to change settings.Long Long press “mode” button toward the left exit menu page.
NOTE:Under menu page, it will auto-exit if no operation done within 7~10s.
Channel/Band select
Channel: Short Press channel up/down buttons will cause the channel to incrementally increase/decrease from channels 1 to 8 (refer to frequency table).Band: Long press channel up/down buttons will cause the band to incrementally increase/decrease from band A to H (refer to frequency table).
DVR
Built-in DVR H.264 Encoded Video. Video Format: Auto toggles between NTSC or PAL.DVR Recording file resolution : NTSC at 720″480 or PAL at 720~576. Video file container: AVI. High-quality Video encoding with H.264, 30fps. Storage speed~ 10 (Class 10) high speed TF card recommended.
>TF high speed card must be formatted before using, otherwise the device may not be recognized.>Please turn off the device while inserting or removing TF high speed card to avoid damage of the card or device.> DVR can only record signals in RF mode, it is not able to record signals in HDMI mode and AV mode.
- DVR function Is lnvalld If no TF card Inserted
- Whether TF card is inserteda. Check TF slotb. Under REC mode, screen will display TF card symbol as – If no TF card inserted, screen will display symbol as .
Recording:
Under 5.BG mode{available TF cards), long press DVR button vertically until first beep to enter REC mode. Short press DVR button vertically to start recording(dot character change from green to red), press DVR button vertically again to pause recording (dot character change from red to green). Long press DVR button vertically until first beep to exit REC mode.Under REC mode, short press DVR button vertically, if goggles beep continuously and exit REC immediately, saying that TF card run out of memory. Please change a TF card or format this TF card.
Playback:
Under REC mode(available TF cards), long press DVR button towards the right until it beeps to enter Play Video List page. Press DVR button towards the forward/backward/rightlleft to select avideo and short press DVR button vertically to play. Under play status, short press DVR button vertically to pause video play; short press DVR button towards the left or right to back or fast forwardplay, short press DVR button vertically to return to normal video play. Long press button towards the right to return Play Video List page; then long press button towards the right to return REC mode.
In Play Video List page, long press DVR button towards the left until first beep to enter Playback, where users can Delete or Protect files. Press DVR button towards the left or right to switch to Movie Mode or General Settings, long press DVR button towards the right until first beep to return Play Video List page.then long press DVR button towards the right to return REC mode.
NOTE:If beeper rings, then the button operation is available , otherwise pressing button Is unavallable.
OSD display
5.BG mode: Band-A CH1 5865MHz(referto frequency table)
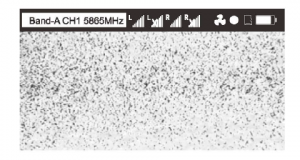 Band-A CH1 5865MHz(referto frequency table)
– Indicates RSSI signal for left and right RX modules.L stands for left, R stands for right (the RX modules are printed with Lor R stickers). There are two antenna plugs on the RX modules of left and right side. Each of the sides have blue and red LED, used to distinguish 1# and 2# antennas. Green bars stand for antenna signal strength. Red X indicates no antenna signal inputs. If using a third party RX module, the RSSI function will not be available.I,- Defogging Fan icon.If it appears on the display in green color, indicating defogging fans is activated. otheiwise, it is deactivated. -REC icon.Entering REC mode, if REC icon appears on the display ingreen color, indicating recording function standby. REC turns red indicates recording in progress. REC icon disappears when exit REC mode.– TF Card icon.Entering REC mode, ifTF card icon appears on the display In green color, indicating TF card available. Otherwise, TF card unavailable. ta,- Battery Capacity icon.Battery capacity icon appears on the upper right of the display in green color, indicating 5-level battery capacity 100%175%/50%125%/0%.
Racing mode:
| Mode | Status description |
| RACEIM | RACEIM–1 |
| ll.ACrn6 | ll.ACrn6-2 |
| RACEFl-8 | RACEFl-8•8 |
FPV Receiver
Dual True diversity RX modules Frequency: 5.8GHZ Receiver Sensitivity:~ -93dB SMA : RP-SMA Female Size: 43.7″30.5″10.7mm

Goggles Supports Open Source RX Modules.
► When using two diversity receivers, you should not use third-party (Include EV200D) diversity receiver and EV300D diversity receiver together.► A third party RX module is able to work with EV300D, but it is not controllable via the goggles .
IPD/Focal length Adjustment
Independent control for both sides, adjust the range of 56 ~ 72 mm.

Move the slider to adjust IPD. (+) means to increase IP □, (-)means to decrease IPD.
Under 800 degree of myopia and Hyperopia 300 degrees. Adjust the diopter to a suitable condition by turning the knob clockwise or counterclockwise
Eyeglass Frames
Using fitted eyeglasses, astigmatism/ myopialhypempia(Diopter lens not include)
HDMI Port(support CEC control)
The HDMI port can be connected to HDMI devices via a MiniHDMI to HDMI cable.(max resolution 1920′”1080) Order of connectiona. Press and hold mode button towards right to enter input source.Press mode button to select input source andselect HDMI.b. Connect the HDMI cable to computer.c. Connect the Mini HDMI to goggles.
HDMI support CEC control: After entering the HDMI display, the device {support CEC control) that connected to goggles will be controllable via DVR 5-way button. Press DVR 5-way button vertically to play/pause or confirm. Press the button towards left/right/up/down to select. Press and hold the DVR button towards right to return to previous. Press and hold the DVR button towards right twice to exit. Press and hold the DVR button vertically to return to the main page. Standby control: When pressing button to power off the goggles, connected HDMI CEC device will enter standbystatus, eliminating complicated operations.
NOTEMost HDMI connectIvIty issues are due to incorrect monitor settings or faulty HDMI cable Before assuming the HDMI Is defective, try with alternative HDMI sources and alternative cables
Micro USB Port
Micro use Port
- Forfinnware upgrading, Upgrading via PC{Upgrade USB cable provided) and upgrading via U disk(USB converter is not provided)
- Alternative power supply, when using power bank to supply the gogles, you must select the output port 5V==2.4A with the USB cable voltage drop under 0.4V . If multiple power sources are supplied at same time (Like: power Bank andhead strap battery) the goggles will draw power from the highest voltage.
AV Port
3.5mm AV ConnectorAV input & output3 Support external HOM I to AV inputSupport external DVR

Detachable Patch
Snap joint assemblies allows easy replacement and maintenance.
Replaceable sponge
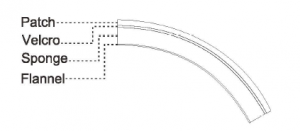
Using Velcro as a bridge, sponge and flannel can be easily replaced, and Velcro can be used for a long time.
18650 Battery Case
18650 BATTERY CASE 7.4V 18650 LI-ION battery case with integrated USB charger and LED indicator (2×3.7V LI-ION 18650 style cells not included) Low battery waming : Buzzer warning if input voltage drops below 6.8V.
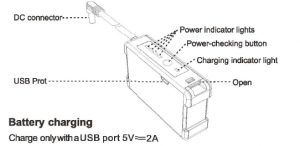
Battery charging
Charge on~w1thaUSB port 5V=2A
- If the goggles not turned on after power on , it means that (1)tha battery voltage Is too low, please replace with a fully charged battery; (2)The battery pack Is reversed In the direction, Please re-Install the two 18650 batteries according to the label on the battery pack.
- It is not recommended to charge the battery via PC USB, since the insufficient current will damage the battery.
- If the battery case is not used for a long time,do not install the battery.
A.WARNING
Do not use if signs of failure.>Never leave batteries near fire or high temper.> There are dangers using charging lithium-ion batteries.>Check with your battery manufacturer for a complete list ofwaring & precautions.
>Not for children under 14 years.> This Is not a toy,
Band & Frequency Table
Racing mode frequency
 Racing mode frequency
Trouble Shooting
No image, display is completely dark
- No power supplied. Check power connections.No image, display is grey
- If using wireless module, ensure RX is working.
- If using AV in cable, check video source.
- Ensure TX is on and camera connections solid
- Ensure lens cap is removed from cameraComplete white screen
- LCD driver has failed and needs to be replaced under warranty. Contact your retailer. Short range
- Ensure 5.8Ghz antenna were installed.
Upgrading
•TF card upgrading(TF card max 32G)
- Format the TF card and load in the upgrading file SD_ CarDV.bin into TF card root directory, insert the TF card into the goggles then power it on,the goggles will get into automatic upgrading status and keep beeping, the upgrading will end up with a long alarming. Taking the TF card out to check if the upgrading file SD_CarDV.bin is still there, if not, the upgrading is success, then power it off and restart ; If file is still there, please retry.
- For upgrading failure(wrong processing, TF card took out, goggles powered off), imperative upgrading operation is necessary.a. Power off the goggles, format the TF card and load in the imperative upgrading file SdFwCode.bin and upgrading file SD_CarDV.bin.b. Insert the TF card into the goggles then long press and hold DVR button vertically and plug battery, then press the power button to turn on the goggles, release the DVR button when it start beeping, and the pgrading begin, the process will end up with a long alarming. Formating the TF card and power off the goggles and restart.
• IC (Zbit32) upgrading operation
- Load the USB device into the upgrade file MERGE.BIN and insert it into the micro usb interface of the goggles. Press the mode button towards left to enter menu, select software Update (USB) in Option sub-menu, and short press to confirm Upgrade, Restart EV300D until progress bar complete. (Note: please do not power off during upgrading process)
- Please refer to IC upgrade manual. (TF card must be taken out)

Read More About This Manual & Download PDF:
Eachine EC300D New 5.8G FPV Goggles User Manual – Eachine EC300D New 5.8G FPV Goggles User Manual –
[xyz-ips snippet=”download-snippet”]