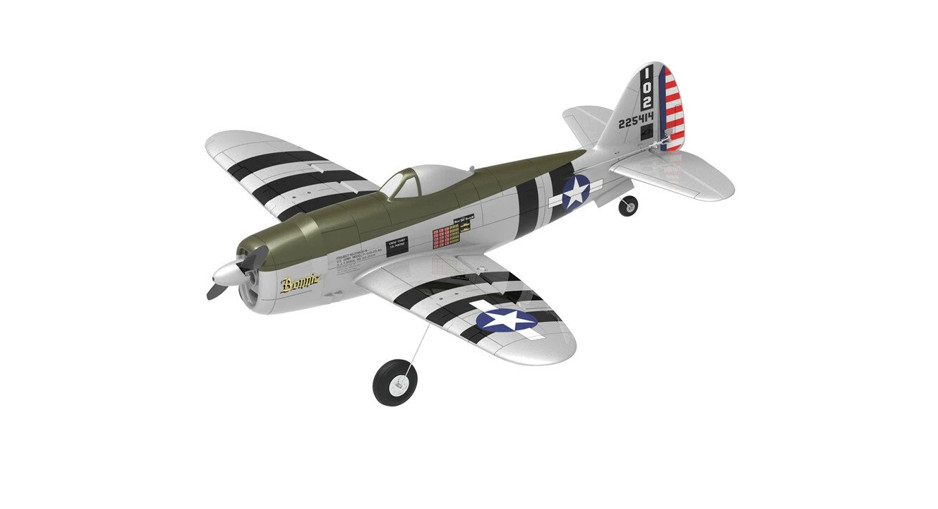

User ManualMINIP-47RAZORBACK
NOTICEThe following terms are used throughout the product literature to indicate various levels of potential harm when operating this product:WARNING:Procedures, which if not properly followed, create the probability of property damage, collateral damage, and serious injury OR create a high probability of superficial injury. CAUTION:Procedures, which if not properly followed, create the probability of physical property damage AND a possibility of serious injury.NOTICE: Procedures, which if not properly followed, create a possibility of physical property damage AND little or no possibility of injury.WARNING:Age Recommendation: Not for children under 14 years. This Is not a toy.Read the ENTIRE instruction manual to become familiar with the features of the product before operating. Failure to operate the product correctly can result in damage to the product, personal property and cause serious injury. This is a sophisticated hobby product. It must be operated with caution and common sense and requires some basic mechanical ability. Failure to operate this product in a safe and responsible manner could result in injury or damage to the product or other property. This product is not intended for use by children without direct adult supervision. Do not use incompatible components or alter this product in any way outside of the instructions. This manual contains instructions for safety and operation. It is essential to read and follow all the instructions and warnings in the manual, prior to assembly, setup or use, in order to operate correctly and avoid damage or serious injury.
Safety Precautions and Warnings
- Always keep a safe distance in all directions around your model to avoid collisions or injury. This model is controlled by a radio signal subject to interference from many sources outside your control. Interference can cause momentary loss of control.
- Always operate your model in open spaces away from vehicles, traffic, and people.
- Always carefully follow the directions and warnings for this and any optional support equipment (chargers, rechargeable battery packs, etc.).
- Always keep all chemicals, small parts, and anything electrical out of the reach of children.
- Always avoid water exposure and moisture to all equipment not specifically designed and protected for this
- Never place any portion of the model in your mouth as it could cause serious injury or even death, touch never moving parts.
- Never operate your model with low transmitter batteries.
- Always keep aircraft in sight and under control, keep the transmitter powered on before the aircraft is powered.
- Always use fully charged batteries, remove batteries before disassembly, remove batteries after use.
- Always keep parts clean and dry, let parts cool after use before touching
Battery and Charging Warnings
The included USB charger has been designed to safely charge the included Li-Po battery.
CAUTION: All instructions and warnings must be followed exactly. Mishandling of Li-Po batteries can result in a fire, personal injury and/or property damage.
- By handling, charging, or using the included Li-Po battery, you assume all risks associated with lithium batteries.
- If at any time the battery begins to balloon or swell, discontinue use immediately. If charging or discharging, discontinue and disconnect. Continuing to use, charge or discharge a battery that is ballooning or swelling can result in fire.
- Always store the battery at room temperature in a dry area for best results.
- Always transport cr temporarily store the battery in a temperature range of 40–120° Do not store the battery or model in a car or direct sunlight. If stored in a hot car, the battery can be damaged or even catch fire.
- Always charge batteries away from flammable materials.
- Always inspect the battery before charging, monitor the temperature of the battery pack while charging.
- Always disconnect the battery after charging, and let the charger cool between charges.
- ONLY USE A CHARGER SPECIFICALLY DESIGNED TO CHARGE LI-PO BATTERIES. Failure to charge the battery with a compatible charger may cause a fire resulting in personal injury and/or property damage.
- Never discharge Li-Po cells to below 3.0V under load.
- Never cover warning labels with hook and loop strips.
- Never leave charging batteries unattended.
- Never charge batteries outside recommended levels.
- Never charge damaged batteries.
- Never attempt to dismantle or alter the charger.
- Never allow minors to charge battery packs.
- Never charge batteries in extremely hot or cold places (recommended between 40-120° F or 5–49° C) or place in direct sunlight.
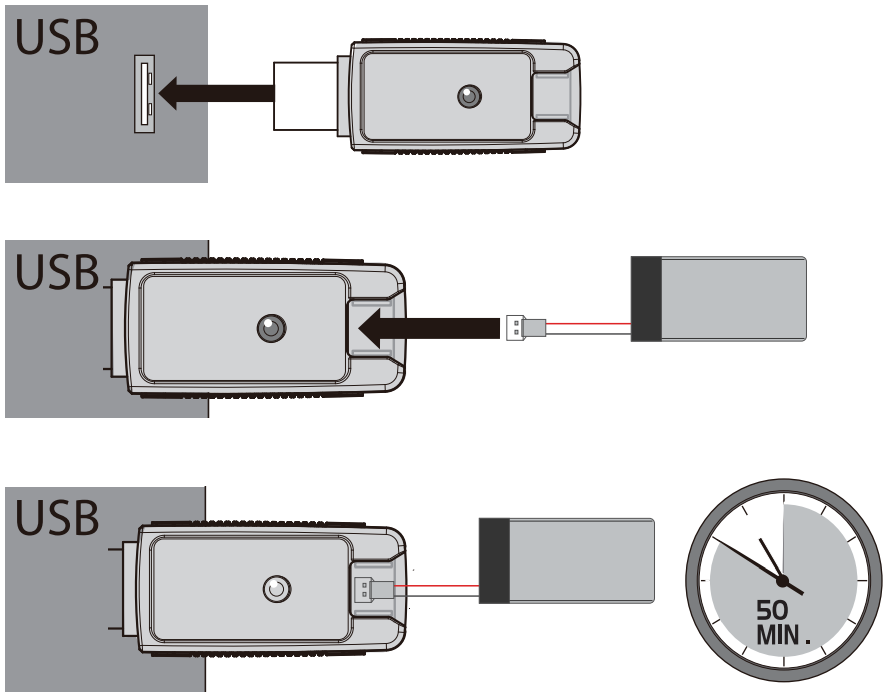
Charging the Battery
CAUTION: Once charging is complete, immediately remove the battery. Never leave a battery connected to the charger.
- Insert the charger into a USB port.
- Properly connect the battery to the charger.
- Charging a fully discharged (not over-discharged) 380 mAh battery takes approximately 30-40
- The LED Solid Red means charging, the LED off means charging is complete.
Installing the Battery
The transmitter comes pre-bound to the aircraft, so binding should not be necessary.Keep the aircraft and transmitter away from large metal objects, wireless sources, or other transmitters while installing the battery.
CAUTION:
- Before flying, power on the transmitter first, then power on the plane. After flying, power off the plane first, then power off the transmitter.
- Always disconnect the LiPo battery from the aircraft receiver when not flying to avoid over-discharging the battery. Batteries discharged to a voltage lower than the lowest approved voltage may become damaged, resulting in loss of performance and potential fire when batteries are charged.
- Always keep hands away from the propeller. When armed, the motor will turn the propeller in response to any throttle movement.
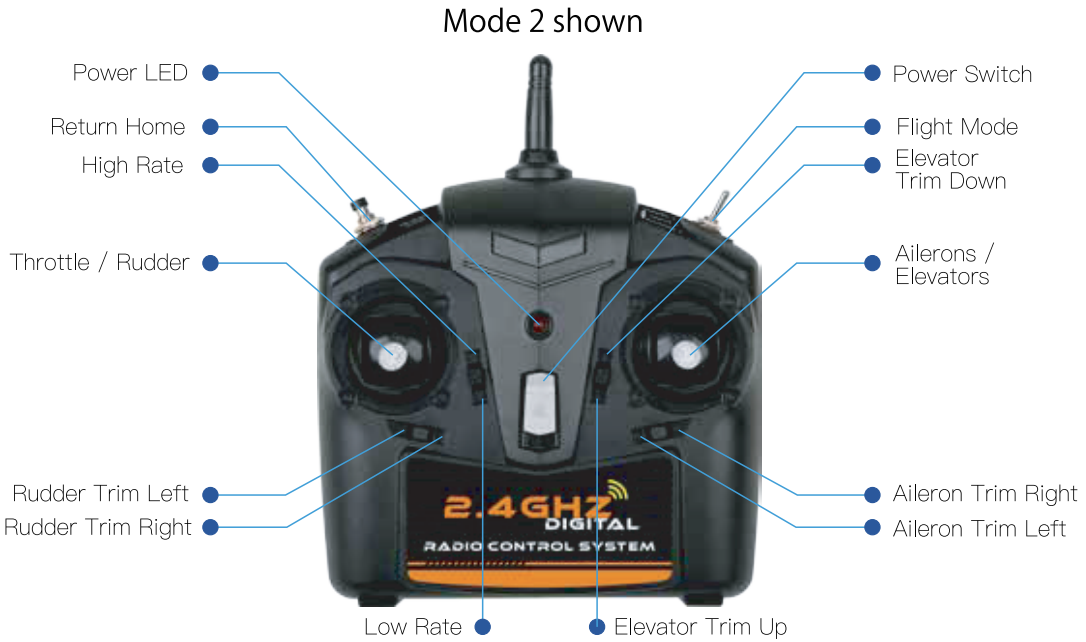
Transmitter Batteries Installation
Remove the battery cover. Install the four batteries (noting proper polarity) and reinstall the battery cover.
Transmitter Low Battery Alarm
When the battery voltage drops too low, an alarm sounds (D.D.D). The batteries must be replaced immediately. If this happens while flying, land your aircraft as soon and as safely as possible.
Transmitter LED Indicator
The transmitter LED gives a visual representation for various data. The following table gives an explanation of the possible LED indications.
|
STATUS |
Transmitter LED Indicator |
| Transmitter voltagetoo low | Transmitter keeps beeping “D.D.D’ |
| Aircraft voltage | When aircraft voltage is less than 3.3V, the transmitter keeps beeping KDDO.DDD.DDD”, you can still fly for another 3-4 minutes, which will give you the time to land the plane before lost the power. |
| Control rate | Low rate: LED solid; High rate: LED flashes |
| Flight Mode | “D” beeps means Beginner Mode; “D’ beeps means Middle Mode; “DOD° beeps means Advanced Mode. |
Flying Tips
- Consult local laws and ordinances before choosing a location to fly your aircraft.
- The built-in Flight Controller System is designed as flight assistance, not on autopilot. The pilot is always in Control and required to fly the aircraft at all
- Start in Beginner mode. As you learn and become more confident, change modes to advance your flying skills.
- Always make deliberate and steady control stick movements for smooth control of your aircraft.
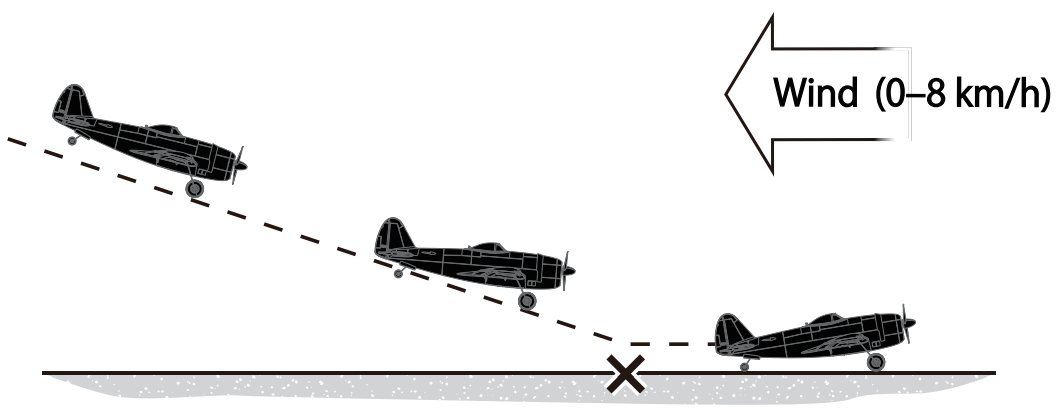
- Fly your aircraft outside in no greater than light winds.
- For indoor flight, fly the aircraft inside a large gymnasium.
- Keep your aircraft in plain sight and upwind.
- Always avoid flying near houses, trees, wires, and buildings.
- Always avoid flying in areas where there are many people, such as busy parks, schoolyards, or soccer fields.
Included In the Box1 x airplane with battery 1 x transmitter1 x USB charger1 x main landing gear (left and right) |
1 x spare parts bag 1 x manual
1 x screwdriver |
Installation

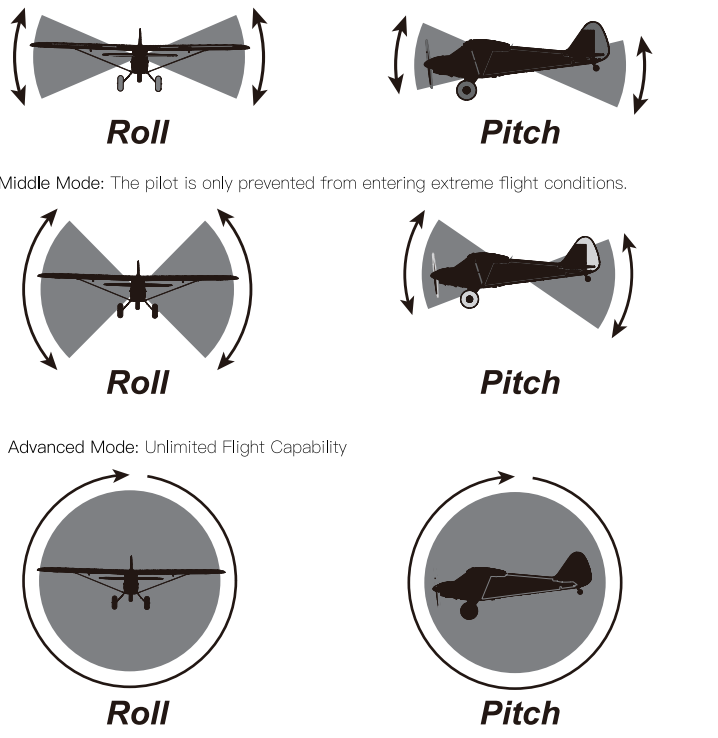
Different Flight Modes
Beginner Mode (with self-leveling): Pitch (nose up and down) and Roll (wing tips up and down) angles are limited to help you keep the aircraft airborne. Release both sticks for self—leveling.
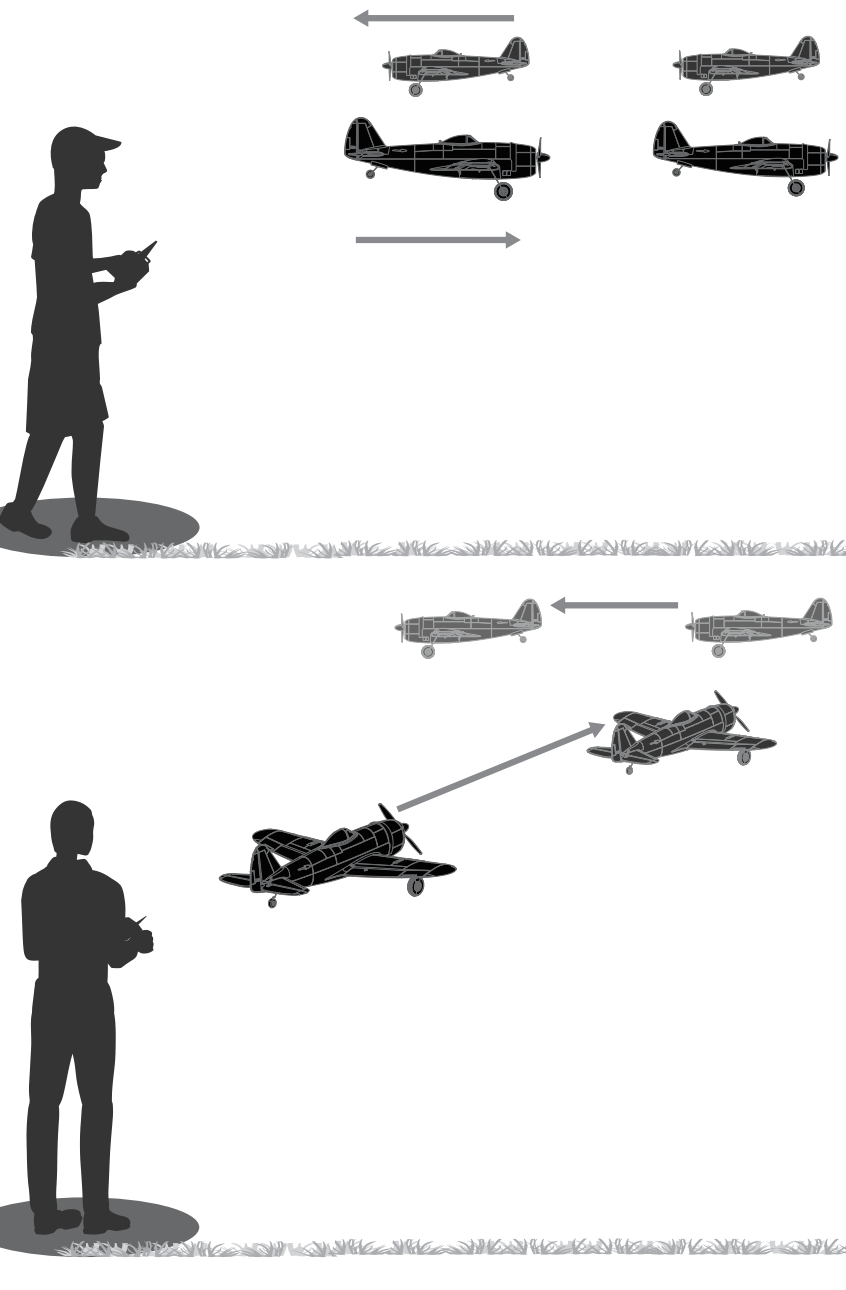
Set “One Key Retum Han?Place the plane on the ground, pointing to the front of the flying field, power on the transmitter and then the plane, make sure the binding is finished, then press ‘RETURN HOME “button, the rudder will move then back to neutral, which means the plane already remember the take-off direction and the setting for “One Key Return Home” finished. If you feel you have lost control or want the plane fly back (this function works only in Beginner mode or Middle mode, not in Advanced mode), just press the ‘RETURN HOME” button, then the plane will turn around and fly back toward to the take-off direction when it closer to the take-off point, you should take over the control again, or it will keep flying toward the same direction (far away from you). It will be very easy to take over the control again by just moving any of the joysticks.
Note: This function will only make the plane fly backward against the take-off direction, so you can use this function when the plane is in front of your take-off point, if the plane already goes to the back of your take-off point, when you press the “RETURN HOME” button, it will keep flying in the same direction (far away from you).
Binding Procedure
Power on the plane, the LED in the FC (Flight Controller) will flash, then power on the transmitter, if the LED in the FC change to solid, means the binding was finished. If the LED in the FC still flashing, which means the binding failed, please do the above-mentioned procedure again. Note: If the throttle stick is not in the lowest position (0 positions) when you binding, you have to move the throttle sticker back to the lowest position then move the throttle sticker again and you can have the throttle working.
Mode 2 shown
Take offHand LaunchUse the Beginner mode for takeoff in the first flights. Get help to hand launch your aircraft so you can concentrate on flying. If you must hand launch the aircraft alone, hold the Aircraft in your dominant hand and the transmitter in your other hand.
Ground Launch
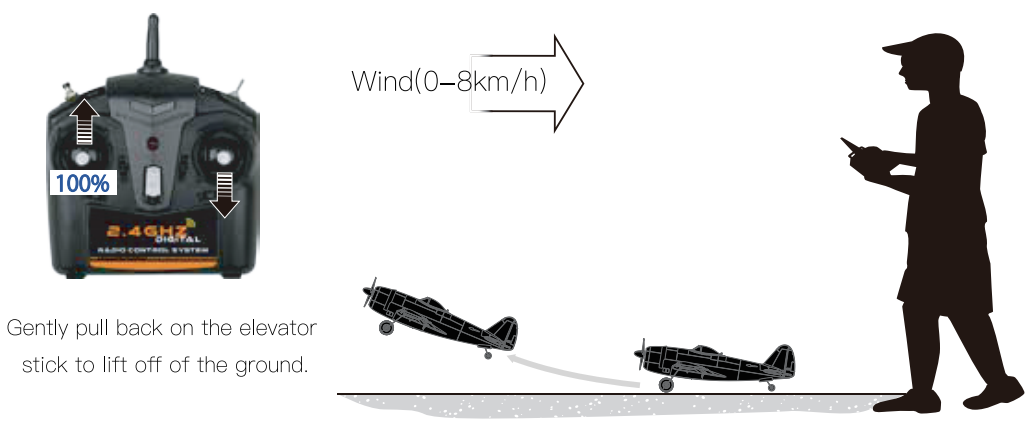
- Take off from a hard and level runway.
- Use the rudder control to keep the aircraft rolling straight.
- Turn the aircraft only after it is high off the ground.
Flying
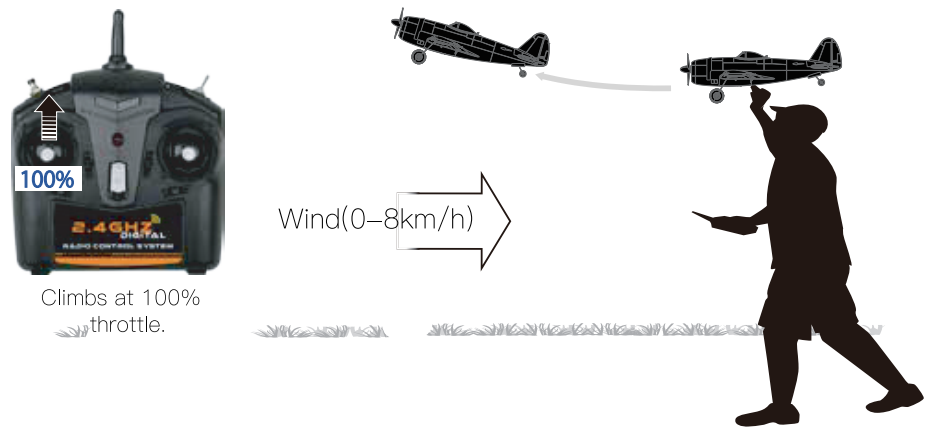
In Beginner mode, when properly trimmed, your aircraft will climb at full throttle without use of the elevator stick.
- Try to fly the first few times for about 6 minutes to know more about the flying capability.
- If the motor pulses, land the aircraft immediately and recharge the flight battery.
- Flying with the nose pointed toward you is one of the hardest things to do when learning to fly. To practice piloting the aircraft, try flying in large circles high off the ground.
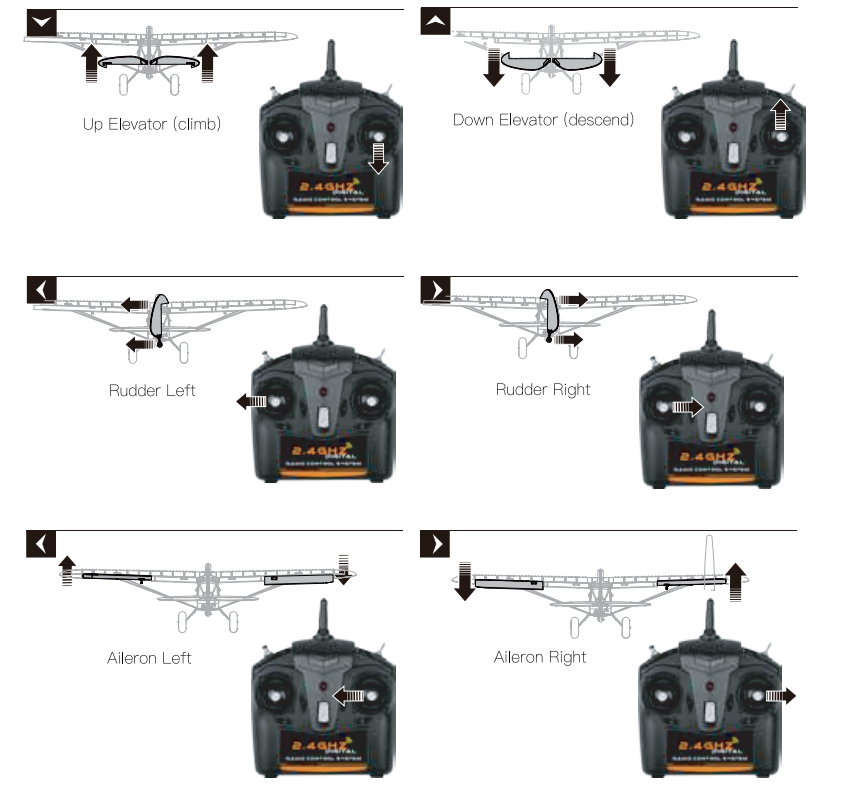
Manually Adjusting Trim
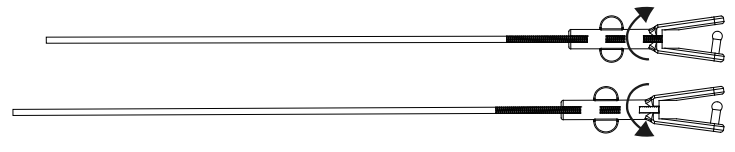
Settings for Control Horns
The illustration shows factory settings for linkages on the control horns. After flying, if you want to modify control throw, carefully adjust the linkage positions for desired control response.

Landing
Fly to your runway, keeping the aircraft pointed into the wind and the wings level. Bring the aircraft down by lowering the throttle to 25%. Near the ground, fully lower the throttle and pull back on the steering stick.CAUTION: Never catch a flying aircraft in your hands. Doing so could cause personal injury and damage to the aircraft.
After Flying
- Lower the throttle stick completely and do not move the steering stick. Wait at least 5 seconds.
- Disconnect and remove the battery from the aircraft. Keep hands away from the propeller.
- Power off the transmitter.
- Fully charge the aircraft battery.
- Remove the battery after charging is complete.
NOTICE: When you are finished flying, never leave the aircraft in direct sunlight or in a hot, enclosed area such as a car. Doing so can damage the foam.
NOTICE: Always disconnect the battery from the aircraft before powering off the transmitter or injury and damage may result.
REPAIRSRepair this aircraft using foam-compatible CA (cyanoacrylate adhesive) glue or clear tape.Only use foam-compatible CA glue as other types of glue can damage the foam.NOTICE: Use of foam-compatible CA accelerant on your aircraft can damage the paint. DO NOT handle the aircraft until the accelerant fully dries.
 SCHEUFER Technologies GmbHAddress: Hertleinstrasse 37, 91052, Erlangen, GermanyE-mail: [email protected]
 viSHTEC UK Co.,LtdAddress: Unit G25 Waterfront Studios, 1DockRoad, London, E161/\HE-mail: [email protected]
![]()
References
[xyz-ips snippet=”download-snippet”]