![]()
|
Item |
Part No. | RTF |
FLY More |
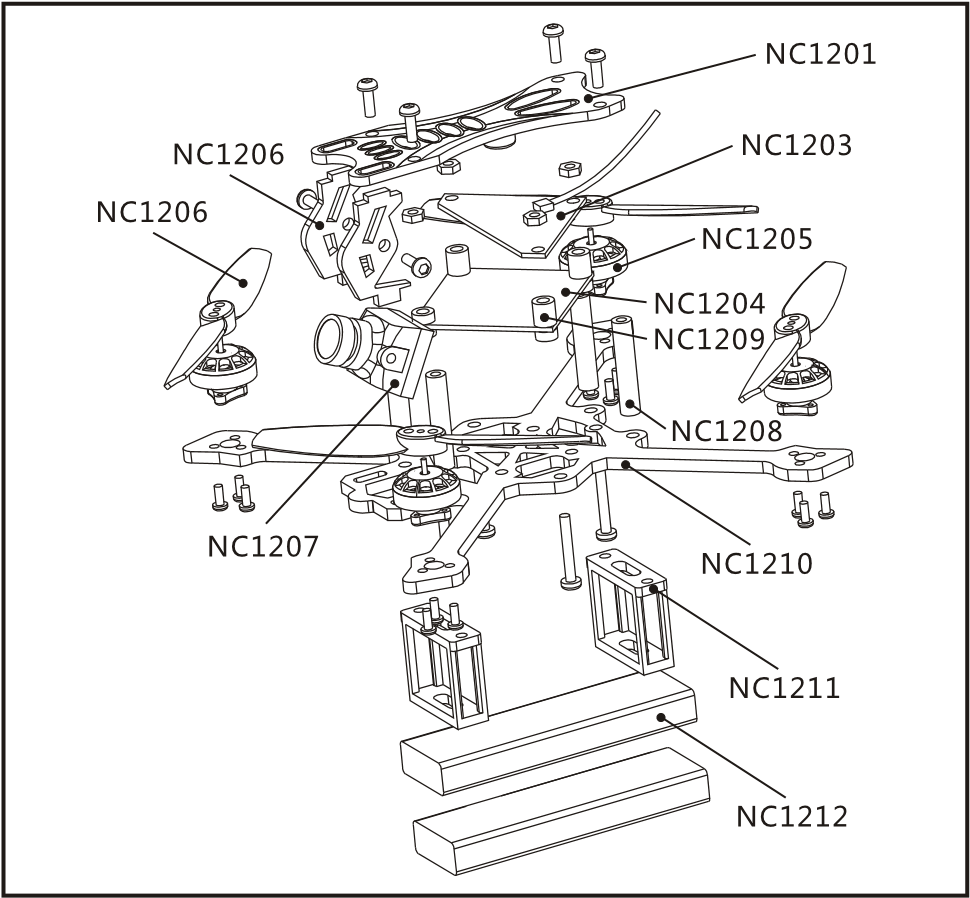
| 120mm toothpick frame | NC1210 | 1 | 1 |
| Nano X F4 flight controller | NC1204 | 1 | 1 |
| Eachine NC1103 KV8500 | NC1205 | 4 | 4 |
| HQPROPT65 bi-blade propeller | NC1206 | 2 | 2 |
| Caddx EOS2 v2 version 4:3 | NC1207 | 1 | 1 |
| VTX: 5.8g 25mw~200mw switchable Whoop VTX | NC1203 | 1 | 1 |
| 3.8v460mah battery | NC1212 | 2 | 10 |
| 6inl 6-way LIPO/LIHV Charger | 1 | 1 | |
| Eachine WT8 2.4G radio transmitter | 1 | 1 | |
| Eachine VR009 5.8G 40CH goggles | 1 | 1 | |
| Propeller disassemble tool | 1 | 1 | |
| Screwdriver | 1 | 1 | |
| LED&Buzzer PCB top board | NC1201 | 1 | 1 |
| M2*D3.5*L20 Aluminum Alloy column | NC1208 | 4 | 4 |
| Damping ball | NC1209 | 4 | 4 |
| Battery mounted tray | NC1211 | 2 | 2 |
- Specification
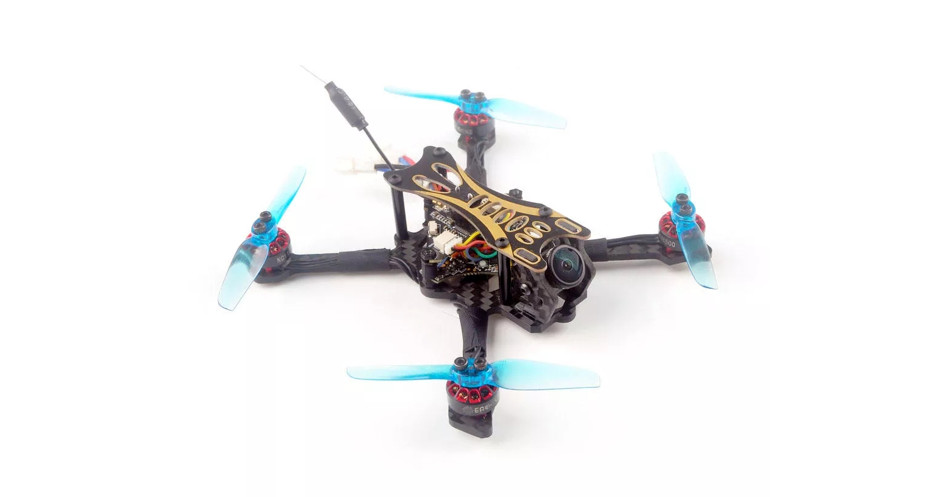
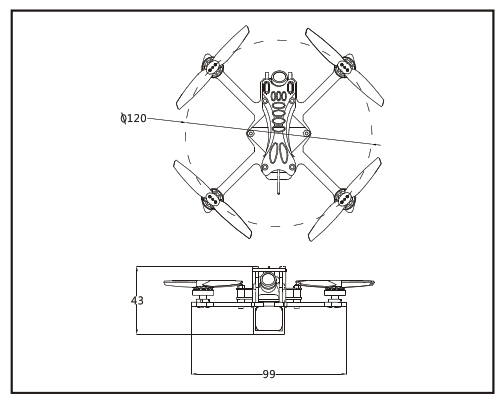
Brand Name: Eachine Item Name: NOVICE-111-2S Toothpick RTF & Fly more Wheelbase: 120mm Size: 100mm*100mm*40mm Weight: 50g(without battery) - Features
Nano X F4 pro flight controller Powerful and smoothly Led Strip ready Built-in Buzzer New design 1103 KV8500 motors Camera Angle adjustable VTX power switchable 25mw~200mw Smartaudio ready, change VTX bands, powers, channels via OSD Ready to fly Compatible both for 1s-2s Lipo/LIHV 
- Start FPV FlightStart by powering on your Radio and Goggles. NOVICE-II comes already bound to your radio and on the right video channel matched with your goggles. Power on NOVICE-II by sliding the battery into the battery tray and plugging it in. Once the battery is plugged in, set NOVICE-II on a stable surface so it can calibrate.Calibration takes a few seconds then NOVICE-II is ready to fly.Install 4x AAA 1.5v battery to the radio and Short press the power switch to turn on the radio. If the throttle stick was not at the bottom position the radioter will alarm.Connect the battery for the NOVICE-II.Turn on the Vr009 goggles and check the VideoPress AUX1 (CH5) switch to arm the NOVICE-II, you will find “ARMED” notice in the screen of the Goggles. Recommend press AUX2(CH6) to choose Stable mode for the beginner. Happy flight and keep it safe.Press AUX2 switch(ch6) to select flight mode (Default is Aero mode)
- Charger the Lipo Battery Ports are numbered 1-6. Do not put more than one battery on a single port. For example: do not insert one battery on the Picoblade 1.25 plug and another on the same port with the PH 2.0 plug.
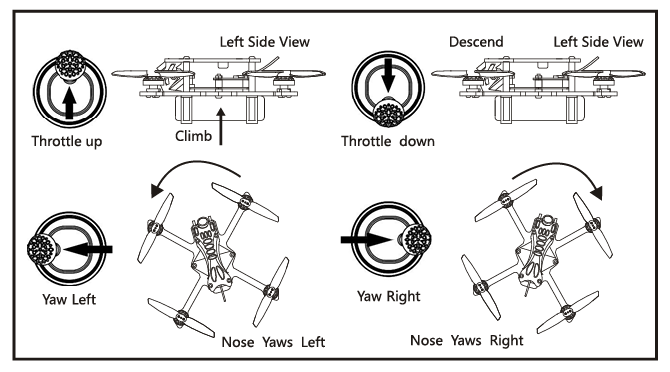
- Flight and Radio Stick ControlsAlways use caution when flying and operate in an open and controllable area. Please learn the flight controls first before powering on the aircraft to fly. The left stick controls throttle and yaw direction of NOVICE-II. The right stick controls pitch and roll of the aircraft.Left Stick DiagramRight Stick Diagram
- Important notice:1. The belowing content are about advanced tutorial. The drone comes out already finished all the settings and bound with the radio.2. Don’t mod to XT30 Plug, it will burnt the flight controller if mod to xt30 and use high discharge rating battery.
- Binding procedurel.Plug the USB and go to the CLI command tab in the beta flight configurator, then type “bind_rx_spi” ,the receiver will getting into bind mode, and then2.Turn on the Radio. Press and hold the bind button for 3 seconds then the radio will beep one time, release the bind button, then the Blue LED will starting to blinking fast, it means the radio is in bind mode. If the LED combo (2pcs red LED and 2pcs white LED) starting to blinking slowly , it means bind successful. Now short press the bind button to exist bind mode.3. If you want to use other Frsky radio. Please choose receiver mode D16 or D8 according to your betaflight receiver configuration(Frsky_X = D16 mode, Frsky_D = D8 mode), we recommend use D8 mode.
- Receiver configurationPlease set Receiver mode to be SPI RX from the Configuration tab of the Betaflight Configurator, then select Frsky_D for the stock Radio. If you use other radio which support D16 , then you can select Frsky_X.
- VTX Bands and Channels setupNotes:Default VTX setting is 200mw but the VTX power LED indicate will always show 25mw when the quad was disarmed, because we have “set vtx_low_power_disarm=on”There are 3 ways to switch the VTX channels:l.Short press to choose the VTX channel, press and holding the button to Choose the VTX Band (Can’t save, it will lost the channel while power off)2. Go to Betaflight CLI .type the command:Setvtx_band=3Setvtx_channel=lSet vtx_freq=5705saveNotes:The vtx_freq should match the vtx_band and vtx_channle as the VTX Channel list shows.For example, if you set vtx_freq=5732, you should setvtx_band=5 and VTX_channel=33 .Enable Smartaudio for UART2, then move the stick of the transmitter (THR MID+ YAW LEFT+ PITCH UP) to enter OSD Menu, Enter to Features, then enter to VTX SA to set VTX Band and channel
- Goggles and VTX Receiver channel setting.D escription:Key 1: Short press for MENU mode; Long press (More than 3 sec) for Power ON/OFF.Key 2: Short press for Auto-Searching (Automatic selection of the strongest channel).Key 3: Short press for Band+ (Change bands A-B-E-F-R circularly).Key 4: Short press for Channel* (Change channels 1-2-3-4-5-6-7-8 circularly).Micro-USB Charging port: Supports DC5V only.Antenna port B: RP-SMA male.Charging indicator: Red light when charging light; full power, the indicator goes off.Antenna port A RP-SMA male.AV Jack: In RF receiving mode can output AV signal; In AV mode can enter the video signal.Menu O peration Instructions:In normal mode, press Key 1 to enter the MENU mode.In MENU mode:Key 1: Select the option bar.Key 2: Return to normal mode.K e y 3: V alue-.Key 4: Value +.Frequency (5.8GHz):
Band
CHI CH2 CH3 CH4 CH5 CH6 CH7 CH8
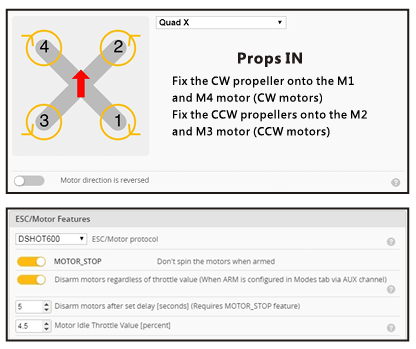
A 5865 5845 5825 5805 5785 5765 5745 5725 B 5733 5752 5771 5790 5809 5828 5847 5866 E 5705 5685 5665 5645 5885 5905 5925 5945 F 5740 5760 5780 5800 5820 5840 5860 5880 R 5658 5695 5732 5769 5806 5843 5880 5917 - Mixer type and ESC/motor protocol
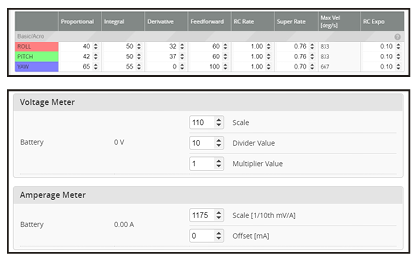
- efault PID setting and currents setting
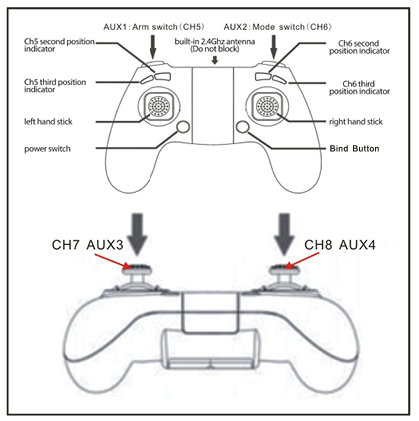
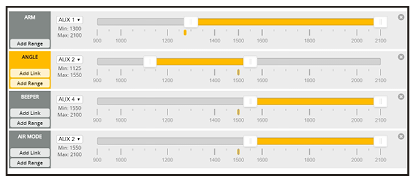
- Radio channels/Switch and Betaflig mode setting
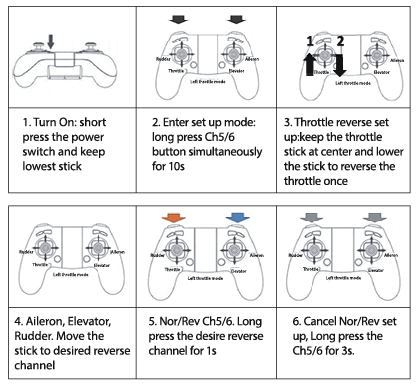
- Nor/Rev setup for the radioRemarks: every channel Nor/Rev will be sound and LED indicated. Set up Steps:
- Other features of the radioTurning the Radio on and offShort press 3 seconds to turn on,Long press 3 seconds to turn off.Radio will turn off automatically when idle 20s no moving. The radio will recover to normal mode when any action input is made Low Voltage alert on Radio4.6V second grade alert Beep-Beep-Beep.4.2V first grade alert Beep-Beep-Beep-Beep.
- ESC Check and Flash firmware1 .Download New release Blhelisuite from:https://www.mediafire.com/folder/dx6kfaasyo24l/BLHeliSuite2 .Connect the NOVICE-II flight controller to computer3 .0pen the Device Manager of your computer, find the Ports, please make sure the Com port Serial Number is under 255, otherwise it will can’t connect to the BLHELISUITE. You can change the port serial number like the bellowing step :4.0pen the BLHELISUITE, Select SILABS BLHeli Bootloader (Cleanflight) from the third tab on the top side. Then Select the right Serial com port and Click connect. You can also Flash the new release BLHeli_s firmware via the BLHEILISUITE, the firmware Target is “S-H-50”17. Flight controller firmware updatel. Install latest STM32 Virtual COM Port Driverhttp://www.st.com/web/en/catalog/tools/PF2579382. Install STM BOOTLOAD Driver (STM Device in DFU MODE)3 .0pen Betaflight configurator and choose firmware target “CrazyBeeF4FR” , then select the firmware version.4. There are 2 ways to get in DFU Mode: 1). Press_and_hold_the_boot_button^then plug USB to computer 2).loading betaflight firmware and hit “flash” , then it will getting into DFU Mode automatically.5 .0pen Zadig tools to replace the drivers from STM32 Bootloader to WINUSB Driver.6 .Reconnect the flight controller to the computer after replace driver done, and open Betaflight Configurator, loading firmware and flash.
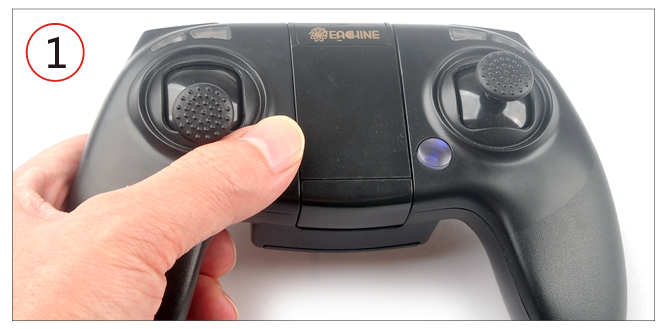 Install 4x AAA 1.5v battery to the radio and Short press the power switch to turn on the radio. If the throttle stick was not at the bottom position the radioter will alarm.
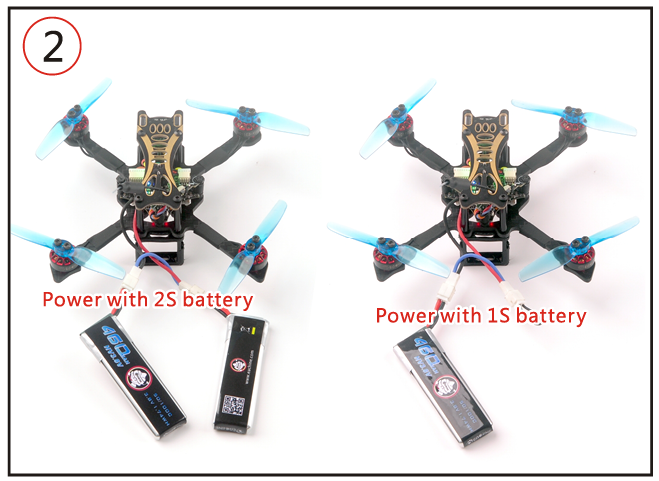 Connect the battery for the NOVICE-II
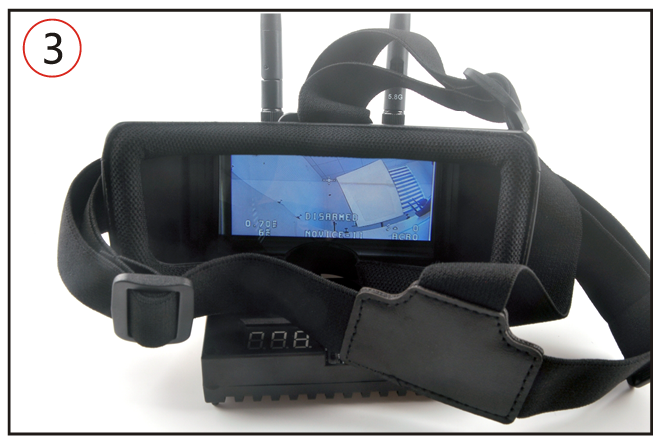 .Turn on the Vr009 goggles and check the Video
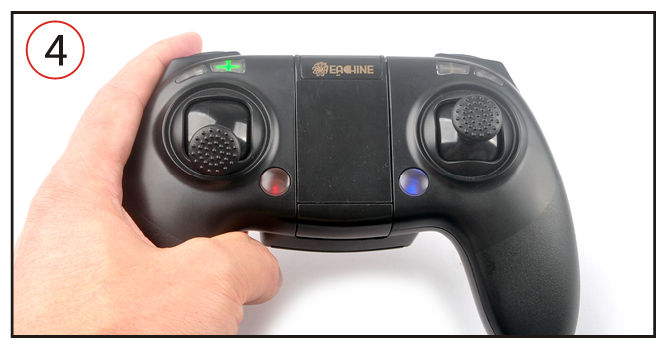 Press AUX1 (CH5) switch to arm the NOVICE-II, you will find “ARMED” notice in the screen of the Goggles. Recommend press AUX2(CH6) to choose Stable mode for the beginner. Happy flight and keep it safe.
 Press AUX2 switch(ch6) to select flight mode (Default is Aero mode)
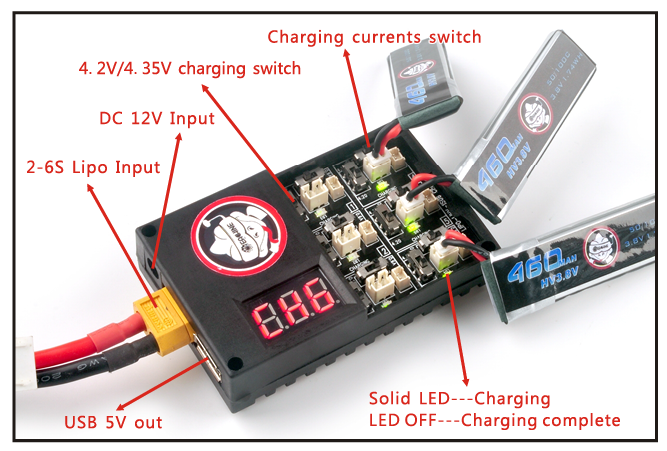
 Right Stick Diagram
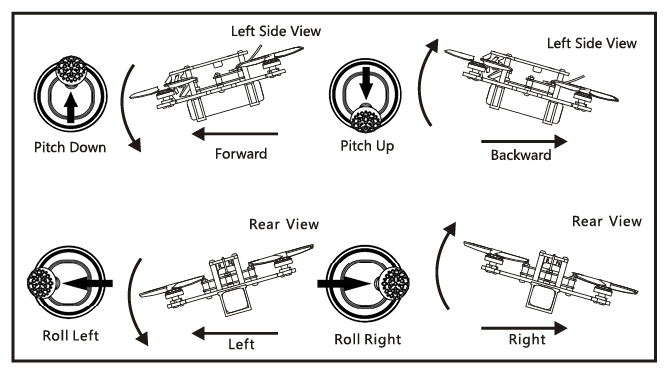
 2.Turn on the Radio. Press and hold the bind button for 3 seconds then the radio will beep one time, release the bind button, then the Blue LED will starting to blinking fast, it means the radio is in bind mode. If the LED combo (2pcs red LED and 2pcs white LED) starting to blinking slowly , it means bind successful. Now short press the bind button to exist bind mode.
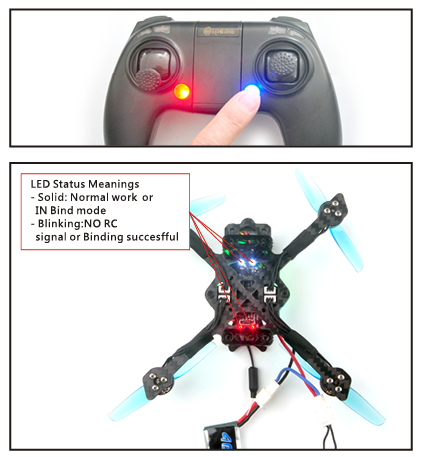 3. If you want to use other Frsky radio. Please choose receiver mode D16 or D8 according to your betaflight receiver configuration(Frsky_X = D16 mode, Frsky_D = D8 mode), we recommend use D8 mode.
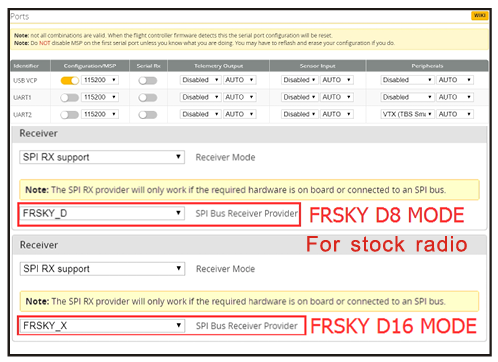
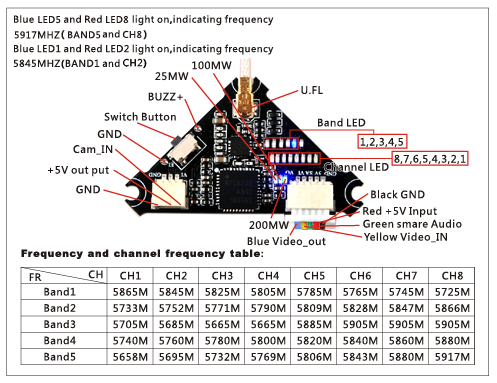 Notes:Default VTX setting is 200mw but the VTX power LED indicate will always show 25mw when the quad was disarmed, because we have “set vtx_low_power_disarm=on”There are 3 ways to switch the VTX channels:l.Short press to choose the VTX channel, press and holding the button to Choose the VTX Band (Can’t save, it will lost the channel while power off)2. Go to Betaflight CLI .type the command:Setvtx_band=3Setvtx_channel=lSet vtx_freq=5705saveNotes:The vtx_freq should match the vtx_band and vtx_channle as the VTX Channel list shows.For example, if you set vtx_freq=5732, you should setvtx_band=5 and VTX_channel=33 .Enable Smartaudio for UART2, then move the stick of the transmitter (THR MID+ YAW LEFT+ PITCH UP) to enter OSD Menu, Enter to Features, then enter to VTX SA to set VTX Band and channel
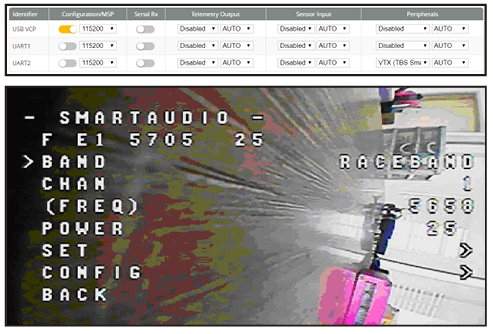
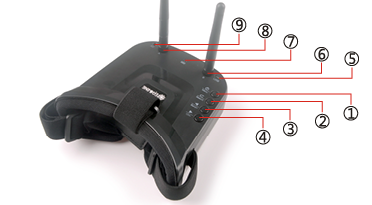 D escription:Key 1: Short press for MENU mode; Long press (More than 3 sec) for Power ON/OFF.Key 2: Short press for Auto-Searching (Automatic selection of the strongest channel).Key 3: Short press for Band+ (Change bands A-B-E-F-R circularly).Key 4: Short press for Channel* (Change channels 1-2-3-4-5-6-7-8 circularly).Micro-USB Charging port: Supports DC5V only.Antenna port B: RP-SMA male.Charging indicator: Red light when charging light; full power, the indicator goes off.Antenna port A RP-SMA male.AV Jack: In RF receiving mode can output AV signal; In AV mode can enter the video signal.Menu O peration Instructions:In normal mode, press Key 1 to enter the MENU mode.In MENU mode:Key 1: Select the option bar.Key 2: Return to normal mode.K e y 3: V alue-.Key 4: Value +.Frequency (5.8GHz):
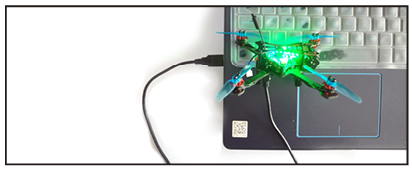 3 .0pen the Device Manager of your computer, find the Ports, please make sure the Com port Serial Number is under 255, otherwise it will can’t connect to the BLHELISUITE. You can change the port serial number like the bellowing step :
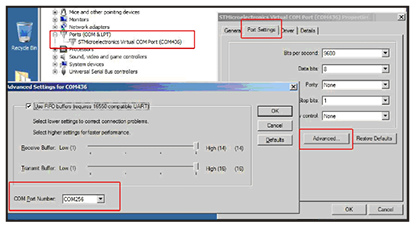 4.0pen the BLHELISUITE, Select SILABS BLHeli Bootloader (Cleanflight) from the third tab on the top side. Then Select the right Serial com port and Click connect. You can also Flash the new release BLHeli_s firmware via the BLHEILISUITE, the firmware Target is “S-H-50”
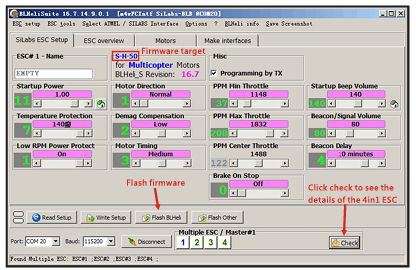 17. Flight controller firmware updatel. Install latest STM32 Virtual COM Port Driver
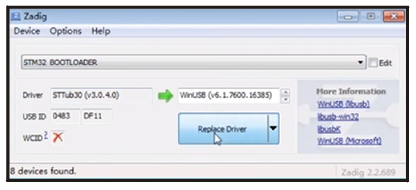
Eachine Novice-II 1-2S Toothpick RTF Micro Drone User Manual – Eachine Novice-II 1-2S Toothpick RTF Micro Drone User Manual –
[xyz-ips snippet=”download-snippet”]