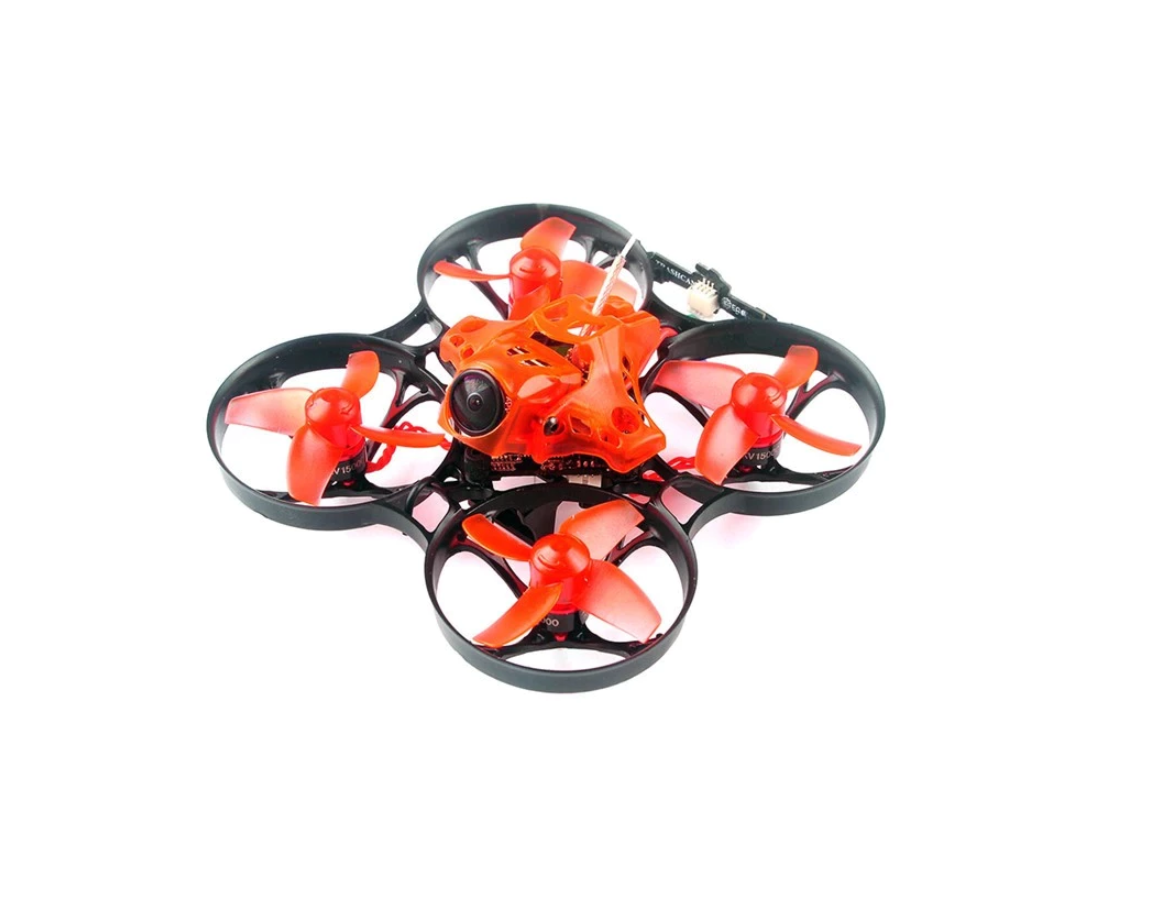
Eachine Trashcan 2S Brushless Whoop Racing Drone FlySky Version

Specifications
| Brand Name: Eachine |
| Item Name: 2S 75mm Brushless Whoop racer drone BNF |
| Wheelbase: 75mm |
| Size: 98mm*98mm*36mm |
| Weight: 33g(without battery) |
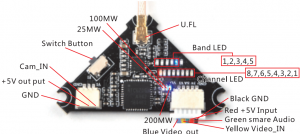
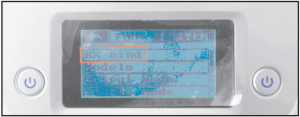
VTX Bands and Channels setup
Blue LEDS and Red LEDS light on. indicating frequency5917MHZ( BANDS and CHS)Blue LED 1 and Red LED 2 light on, indicating frequency5845MHZ(BAND1 and CH2)
Frequency and channel frequency table:
|
FR————— CH |
CH1 | CH2 | CH3 | CH4 | CH5 | CHG | CH7 | CHS |
|
Band1(A) |
5865M | 5845M | 5825M | 5805M | 5785M | 5765M | 5745M |
5725M |
|
Band2(B) |
5733M | 5752M | 5771M | 5790M | 5809M | 5828M | 5847M |
5866M |
|
Band3(E) |
5705M | 5685M | 5665M | 5665M | 5885M | 5905M | 5905M |
5905M |
|
Band4(F) |
5740M | 5760M | 5780M | 5800M | 5820M | 5840M | 5860M |
5880M |
| Band5(R) |
5658M |
5695M |
5732M |
5769M |
5806M |
5843M |
5880M |
5917M |
There are 3 ways to switch the vtx channels:
- Long press the switch button to change the Band of the VTX, shorter press the switch button to change the channels of the VTX. {Can’t save ,it will lost the channel while re-power for the Trashcan since the SmartAudio function enabled)
- Go to Betaflight CU ,type the command:Setvtx_band=3Setvtx_channel=lSetvtx_freq=5705saveNotes: The vtx_freq should match the vtx_band and vtx_channle as the VTX Channel list shows. For example, if you setvtx_freq=5732, you should setvtx_band=5 and vtx_channel=3
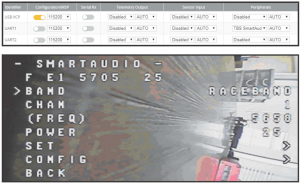
- Enable Smart audio for UART1, then move the stick of the transmitter (THR MID+YAW LEFT + PITCH UP) to enter OSD Menu, Enter to Features, then enter to VTXSA to set VTX Band and channel

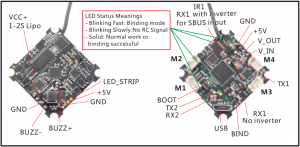
Binding procedure
- Press and hold the bind button and then Plug the USB to power for the Crazybee F4 PROFS flight controller, the LED Combo(2 red LED an 2 white LED) will blinking fast, this indicate the Crazybee F4 PROFS flight controller is in binding mode and then release the binding buttonAnother easy way to getting into binding mode(Need the latest Firmware):Plug USB and go to the CLI command in the Betaflight configurator ,then type “bind_rx_spi” , the Crazybee F4FS Pro flight controller will getting into binding mode, and then you just make the Flysky transmitter to Binding with it.
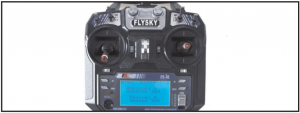
- Turn on your Flysky transmitter, and Choose receiver mode AFHDS-2A or AFHDS according to your Betaflight receiver configuration(A710S_Flysky_2A=AFHDS-2A, A7105_Flysky=AFHDS)
- ENT RX [BIND] to binding with the Crazybee F4 POR Flight controller, the LED Combo(2 red LED and 2 white LED) will getting to be solid on the flight controller ,this indicate binding successfully, the AFHDS-2A radio will auto exist the binding mode but the AFHDS radio should exist binding mode by yourself.
 Another easy way to getting into binding mode(Need the latest Firmware):Plug USB and go to the CLI command in the Betaflight configurator ,then type “bind_rx_spi” , the Crazybee F4FS Pro flight controller will getting into binding mode, and then you just make the Flysky transmitter to Binding with it.
Receiver configuration
Please set Receiver mode to be SPI RX Support from the Configuration tab of the Betaflight Configurator, then select A7105_Flysky_2A Provider for AFHDS-2A Protocol Radio transmitter or Select A7105_Flysky Provider for AFHDS Protocol Radio transmitter, don’t enable Serial RX since the Crazybee F4 PRO Flight controller is integrated SPI BUS Receiver
Arm/Disarm the Motor
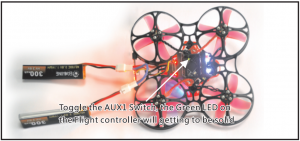
- The Default Arm/Disarm switch for Trashcan is AUX1 (Channel S),and you can also customize it with Betaflight Configurator.
- Set Arm/Disarm switch for your Flysky Radio: Move to the Aux. channels interface, Set “SWA” or “SWB” or “SWC” switch etc. for Ch5 to ARM/DISARM the motor.
- The default channel map for Trashcan Flysky version is AETR1234, please make sure your transmitter is matched, otherwise it will can’t be armed. Toggle the AUX1 Switch ,the Green LED on the flight controller will getting to be solid, this indicates the motor was armed. And also you can found “Armed” displayed on your FPV Goggles or the FPV Monitor. Please make sure keep the Trashcan level before arming .Be careful and enjoy your flight now!
Flight controller connection diagram

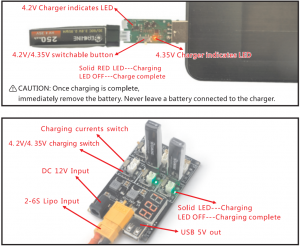
Charger the Lipo Battery
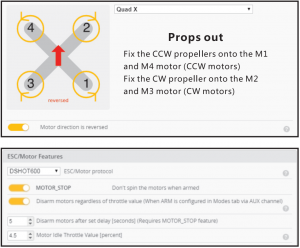
Mixer type and ESC/motor protocol
Default PID setting

ESC Check and Flash firmware
- Download New release Blhelisuite from:https://www.mediafire.com/folder/dx6kfaasyo24I/BLHeliSuite
- Connect the Crazybee F4 PRO flight controller to computer and power for it with battery
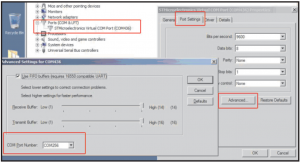
- Open the Device Manager of your computer, find the Ports, please make sure the Com port Serial Number is under 255, otherwise it will can’t connect to the BLHELISUITE. You can change the port serial number like the bellowing step:
- Open the BLHELISUITE, Select SI LABS BLHeli Bootloader (Cleanflight) from the third tab on the top side. Then Select the right Serial com port and Click connect. You can also Flash the new release BLHeli_s firmware via the BLHEILISUITE, the firmware Target is “S-H-50”
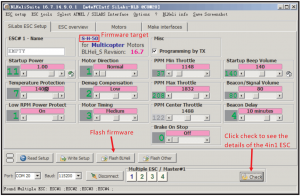
*We will update the firmware for Crazybee F4 PRO and release to our website in time.
“Flip over after crash” procedure
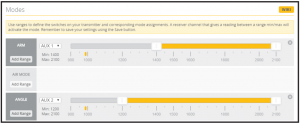
Set one channel of your radio transmitter to activate the Flip over function in the Mode tab of Betaflight configurator.

Eachine Trashcan 2S Brushless Whoop Racing Drone FlySky Version User Guide – Eachine Trashcan 2S Brushless Whoop Racing Drone FlySky Version User Guide – Eachine Trashcan 2S Brushless Whoop Racing Drone FlySky Version User Guide –
[xyz-ips snippet=”download-snippet”]