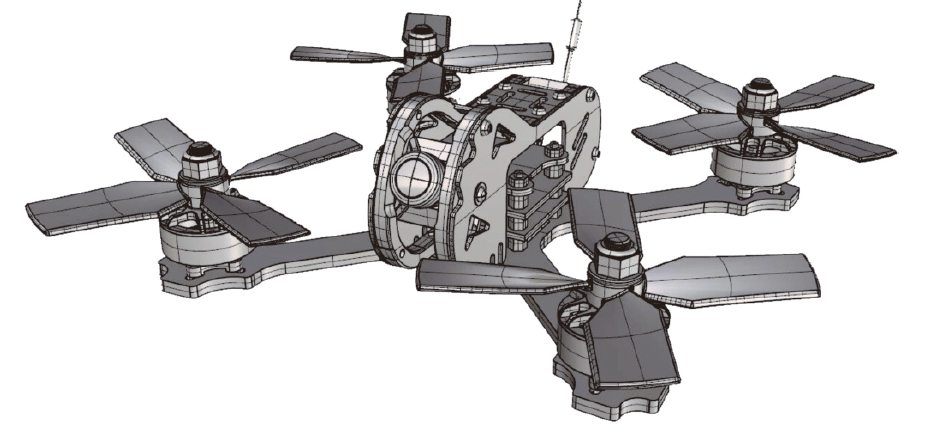
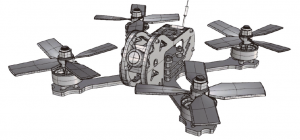
Eachine TYR079 Drone Quick Start Guide
Package included:
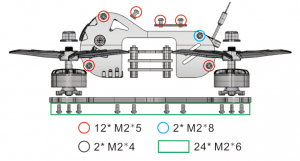
1 x 140mm racing frame kit2 x 1607 2800KV brushless motor CW2 x 1607 2800KV brushless motor CCW1 x 4 IN 1 20A BLHeli_S ESC1 x Customized F4 flight controller1 x 700TVL CMOS camera1 x 5.8G 40CH 0mw/25mw/200mw switchable VTX2 x 3030 4-blade propeller CW2 x 3030 4-blade propeller CCW

1.0 Frame kit
Wheel base: 140mmBottom plate thickness: 3mmSide plate thickness: 1mmFrame kit material: 3K carbon fiber & 6065 aluminium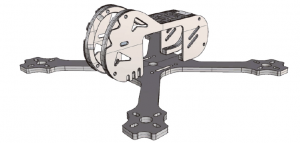
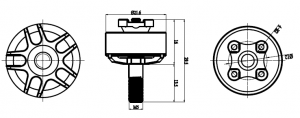
2.0 Motor
KV: 2800KV Configu-ration: 9N/12PLipo cell: 2-4S Mounting holes distance: 12*12mmWeight: 17.8g (includes wires) Mounting holes: φM2Output shaft length: 14mm Bearing: NSKMaximum pull: signal 630g N52 Strong NdFeB Magnet(4S 3030 4-blade propeller) Recommend propeller: 3 inchMaximum power: 350W
3.0 ESC
Continuous current: 20APeak current: 25A (10S)BEC output: noInput voltage: 2-4SMain control chip: 48mhz EFM8BB2Firmware upgrade: Supports Dshot600/BLHeli_S/Oneshot125MOS: 3*3MOS type: vs3610ae 30v64a
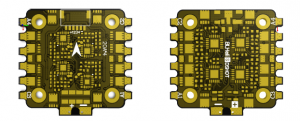
4.0 Flight controller
Main control chip: STM32F411Sensor: ICM20602 6-axisIntegrated OSDPPM/DSM/IBUS/UAR share: UART1-RXMounting holes distance: 20*20mmWeight: 24g PID circulation rate and refresh rate can up to 32kHz Supports Betaflight/cleanflight/inav firmware 5.0 Switchable VTX
 5.0 Switchable VTX
Supports TBS SmartAudioTransmitting power: 0mW/25mW/100mW/200mW switchableChannel: 40CHFull video format: NTSC/PALInput voltage: 7V~24VPower dissipation: +12V/600MWSize: 25×20×6mmWeight: ≤3.2g (except antenna) There are two ways to control the frequency and powerof the launches: <1>Enter the release: FEATURES->VTX SA can enter the following interface. uses remote control to visualize control, as shown in Figure1.1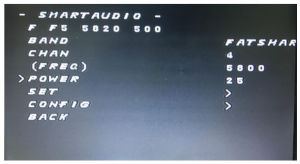 Figure 1
The second row is the status bar, respectively.F:freestyle modeF5: is now in frequency band F, fifth frequency point.5820: now has a frequency of 5820.500: now has a transmit power of 500MW Third linesBAND: indicates frequency band, and BAND can be modified by remote control.A (BOSCAM A) B (BOSCAM B)E (BOSCAM E) F (FATSHARK) F (E) Fourth linesCHAN: represents frequency points, and the 1—8 can be modified by remote control. Fifth lines(FREQ): indicate the corresponding frequency now, changing with the band and Chan above. Sixth linesPOWER: indicates the transmission power and can be adjusted.
5.0 Switchable VTX
Seventh linesSET: Enter and select YES to confirm your BADN, CHAN, POWER settings and take effect immediately., as shown in Figure 1.2 below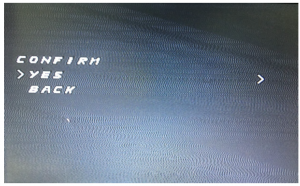 Figure 2
Eighth linesThe CONFIG: function is set in, as shown in Figure 1.3 below.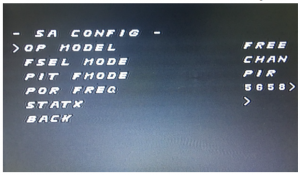 Figure 3
OP MODEL: mode adjustment, with free mode and race mode, needs reboot to take effect.FSEL MODE: regulates frequency setting mode, CHAN and user, user mode is temporarily invalid.PIT FMODE:PITMODE mode, with PIR and POR mode.
5.0 Switchable VTX
In the POR mode, POR FREQ: can enter into any frequency between 5300-5900, as shown in Figure 1.4.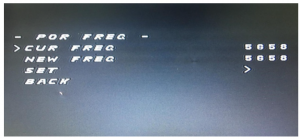 Figure 4
STATX: status information
<2> XMM-VTX is operated by a button with three LED lights (red light CH1-8; blue light BAND1-5; green light power 1-3 <25- 100-200 mW>)and TBS Smart Audio remote control operation. Keyboard operation: Long press 3S (three LED indicators are all on) to open and enter CH switching operation, and the red light will flash, flashing once represents the currentCH1 (2-8 times for CH2-CH8 respectively). At this time, a short press of the key CH plus 1 will flash the corresponding number of times. CH1-8 cycle. Press the button 3S (three LED lights are all on) to open and enter the BANDswitching operation, and the blue light will flash. The flash once represents the current BAND1(2-5 times for BAND2-BAND5 respectively). At this time, press the button BAND plus 1, and the blue light will flash correspondingly. BAND1-5 cycle. Press the button 3S (three LED lights are all on) again to open the power switching operation, and the green light will flash, one time represents the current power of the first grade (2-3 times for the green light flashing respectively), at this time, press the button power to add one gear, and the green light will flash the corresponding number of times. Power stall 1-3 cycle.Press the button 3S again (3 LED lights are all bright) to release the above settings again. Note that the previous settings will not be saved if the power is off before saving. For example, if CH is only set, it is also necessary to press 3S three times longer to save the settings.Long press button 8S (green light) quit PIT mode.
5.0 Switchable VTX

Note: In the remote control, the power of 25 corresponds to the actual 25 mW, 200 corresponds to the actual 100 mW, and 500/800 corresponds to the actual 200 mW.
6.0 Camera
Case size: 19mm*19mmWeight: 9.5gTotal pixels: PAL: 1020H×596V (0.61MP);NTSC: 1020H×508V (0.52MP) Effective pixels: PAL: 976H×582V (0.57MP);NTSC: 976H×494V (0.48MP) Signal system: PAL/NTSC switchableResolution ratio(horizontal center): 700TVLVideo output: 1.0Vp-p/75ΩAutomatic gain control: 0.25/0.50/0.75/1.00, up to 55dBWhite balance: offExposure mode: electron exposureElectronic shutter: 1/50(1/60) – 1/100000 SGamma correction: 0.45/1.0Synchronization method: inter-syncCamera lens: standard 2.1mmLens operating voltage: DC 5-12VWorking current: 70mA (low power consumption)Working temperature: -20℃~ – 60℃Humidity: 0%~98%
7.0 Screws
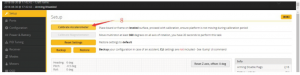
8.0 Adjusting parameter
- Click connect connection
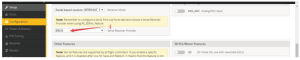
- Click the RX interface under UART2 under the ports option, as shown in the figure.
- Click CONFIGURATIN to change to dshot600.
8.0 Adjusting parameter
- Click CONFIGURATIN; change to SBUs
- Click modes, add arm and angle, drag the slider between 1300 and 1700, and set arm to AUX1 and angle to aux2
- Push the slider to test the positive and negative rotation of the motor, such as error,
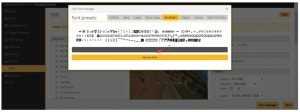
- Click font manager, select betaflight, click upload font
- Click setup, calibrate accelerometer


9.0 Motor Unlock/lock
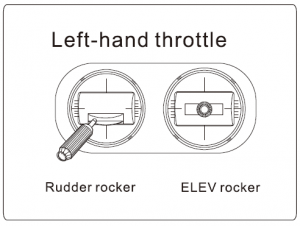
Put the throttle rocker at the lowest point, move the rudder rocker to the right and keep it for more than 2 seconds. The blue state indicator is always on, that is unlock the motor.
 Motor lockPut the throttle rocker at the lowest point, move the rudder rocker to the leftmost side, and the red state indicator is always turned on to lock the motor. At this time, pushing the throttle rocker motor upward will not rotate.
10.0 Traversing flight
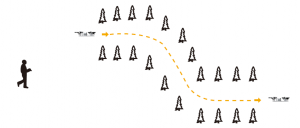
- Flying is more suitable for experienced pilots.
- During the flight, please keep the flight within the video receiving range (the actual range depends on the flight environment and weather conditions).
- During flight, please avoid crowd, animals and High voltage wires and other obstacles
Read More About This Manual & Download PDF:
Eachine TYR079 Drone Quick Start Guide – Eachine TYR079 Drone Quick Start Guide –
[xyz-ips snippet=”download-snippet”]