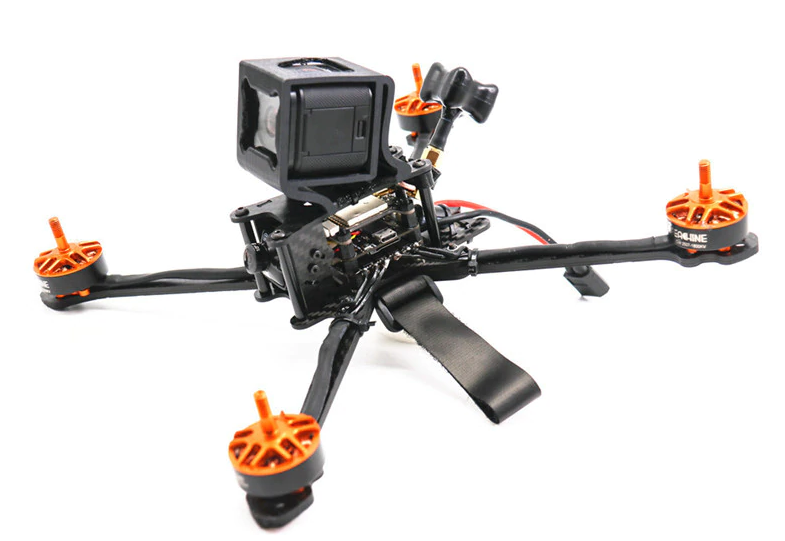
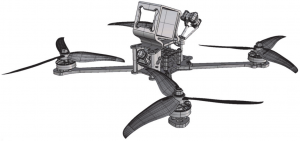
Eachine TYRO129 Mini Drone
Package Included
- 1 x frame kit
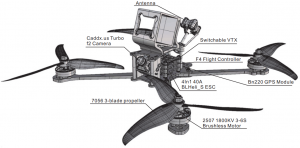
- 2 x 2507-1800KV brushless motor CW
- 2 x 2507-1800KV brushless motor CCW
- 1 x 4In1 40A BLHeli_SESC
- 1 x F4 Flight Controller
- 1 x Caddx.us Turbo f2 Camera
- 1 x 5.8G 40CH 25/100/200/600mw switchable VTX
- 1 x Antenna
- 1 x BN220 GPS Module
- 2 x 7065 3-blade propeller CW
- 2 x 7065 3-blade propeller CCW
- 1 x Antenna Fixing Seat Mount 3D Printing
- 1 x Gopro Fixing Seat Mount 3D Printing

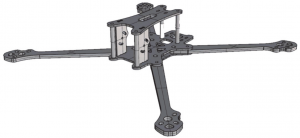
Frame kit
- Wheel base: 280mm
- Frame arm thickness: 5mm
- Bottom plate thickness: 2mm
- Side plate thickness: 1.5mm
- Frame kit material: 3K carbon fiber
Motor
KV: 1800KVLipo cell: 3-6SWeight: 39gWhole shaft length: 35mmMaximum pull: 1488g (4S 7inch propeller)Maximum power: 840WConfiguration: 12N/14PMounting holes distance: 16*16mmMounting holes: φM5Recommend propeller: 6-7 inch
ESC
Continuous current: 40APeak current: 45A (10S)BEC output: noInput voltage: 2-6SMain control chip: 48mhz EFM8BB2Firmware upgrade: Supports Dshot150-600/Multishot/Oneshot/PWMSize: 37.5×37.5mmMounting Hole: 30.5×30.5mm
Features
- High-performance EFM8BB21F16G microprocessor with operating frequency up to 48MHz;
- Japan’s Toshiba 5×6 package MOSFETs are more reliable than 3×3 package MOSFETs;
- 6-layer high TG 3OZ copper-thick PCB board, which greatly reduces heat generation and is more efficient;
- Use the BLHeli_S open source program to upgrade the firmware or change the ESC parameters via the throttle signal line to support all BLHeli_S functions;
- ESC can support DShot150/300/600 digital throttle mode and common PWM, OneShot125, OneShot42, MultShot throttle mode;
- Built-in BEC, can supply power for flight control, camera, image transmission, LED lights, etc.
Interface definition chart
BAT: power positive electrode;GND: power negative electrode;5V: 5V regulated power supply output interface, maximum current 2A;S1-4: throttle signal input interface, S1 corresponds to M1.S2 corresponds to M2, S3 corresponds to M3, S4 corresponds to M4.Number electric adjustment;POWER INPUT: power line pads, “GND” corresponding power supply. The line negative pole, “BAT” corresponds to the positive pole of the power supply line.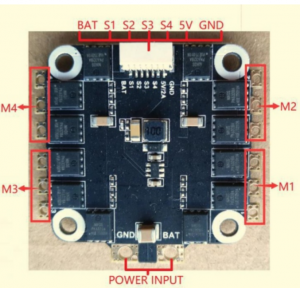
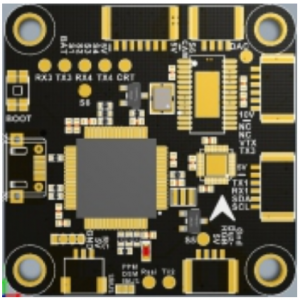
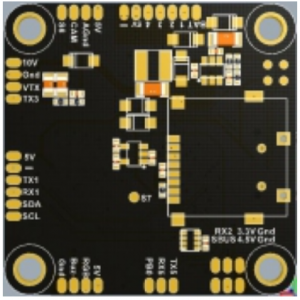
Flight controller
Flight Control Name: EACHINE F4 Flight ControllerSize: 37 × 37mmMounting hole: 30.5 × 30.5mmFirmware version: MATEKF4055V: 5V regulated power supply output interface, maximum current 2A (non-flying control, need to use Eachine BLHeli_S 40A 4in1 ESC)4.5V: Receiver power interface (voltage only when USB is powered)3.3V: 3.3V output (requires flight control to input 5V before output)NC: floating pin, no network connectedCRT: current monitoring portS6, DAC: camera tuning pin (selected according to the flight control firmware version)CAM: camera input interfaceVTX: graph transmission out interfaceRGB: RGB light strip interfaceBuz-: connect the buzzer negative pole, positive pole to 5VTX2: Receiver Smart Port interfaceRssi: Rssi signal input port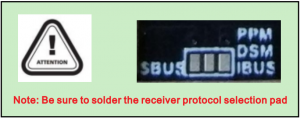
Introduction to Flight Control
- 168MHz STM32F405 main control chip, can run higher rate PID;
- The SPI bus mode MPU6000 gyroscope provides fast response time and excellent shock absorption;
- Onboard OSD chip, you can use Beta Flight assistant software to adjust parameters;
- Onboard Bosch BMP280 high precision barometer;
- MicroSD Black Box;
- Reserve 5 serial ports and I2C interface for easy GPS access;
- Onboard 10V BEC provides a cleaner image display for images;
- Reasonable layout, according to the installation requirements of most of the flying hands, put the functional pads together to avoid jumpers;
- All interfaces are available in socket and pad options and are suitable for different groups of people;
Camera
Case size: 19x19x16mmWeight: 5.5gSignal system: NTSC / PAL (Switchable)Resolution ratio(horizontal center): 1200TVLVideo output Signal: cvbsImage: 16:9Synchronization method: inter-syncCamera lens: standard 2.1mmLens operating voltage: DC 4.5-40VS/N Ratio: >52dB (AGC OFF)Audio: YES
Switchable VTX
Output power & transmission distance: ≥, ≥, ≥Transmitting power: 0mW/25mW/200mW/600mWFull video format: NTSC /PALInput voltage & power dissipation: 7V~24V, +12V/Size: 20*30*9mmWeight: ≤7g(except antenna) With output power self-check function.Nixie tube SCAN: frequency point (1-8), frequency band (A-E), power (1-3, 0=0mw, 1=25mw, 2=200mw, 3=600mw)
Frequency control method
Button frequency control (1-8): press the button for 2 seconds to enter the frequency setting, and press the button to change the frequency CH1-8.Change the frequency band (A-E), set the frequency, press the button for 2 seconds, then press the button to change the frequency group FR (A-E).
Points for attention
The antenna is installed at the output terminal before power up, so as not to damage internal components. Note that the input voltage is within the specified range and is positive or negative, so as not to damage internal components. If the antenna is replaced, choose a standing wave and a good gain antenna to obtain a longer transmission distance. Attention should be paid to electrostatic protection during transportation and installation.
Pagoda Antenna
Description:Brand name: EachineItem name: antennaQuantity: 1 PCConnector: RP-SMA Male
Eachine BN-220 GPS Module
Brand Name: EachineModel: BN-220Item Name: BN-220 GPS+GLONASS Dual GPS module – Built-in FLASH, TTLData Protocol: NMEA-0183Output Rate: 9600bps, 1HZSize: 22mm*20mm*6mm1.TX LED: blue. The data output, TX LED flashing2.PPS LED:red.PPS LED not bright when GPS not fixed, flashing when fixed
Screws
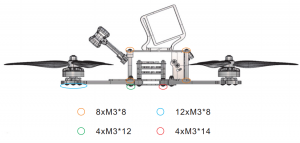
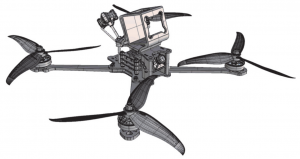
Assembly drawing

Adjusting parameter
- Click connect connection
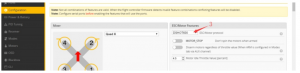
- Click the RX interface under UART2 under the ports option, as shown in the figure.
- Click CONFIGURATIN to change to dshot600.
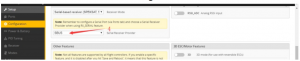
- Click CONFIGURATIN; change to SBUs
- Click modes, add arm and angle, drag the slider between 1300 and 1700, and set arm to AUX1 and angle to aux2
- Push the slider to test the positive and negative rotation of the motor, such as error,
- Click font manager, select betaflight, click upload font
- Click setup, calibrate accelerometer


Eachine TYRO129 Mini Drone Quick Start Guide – Eachine TYRO129 Mini Drone Quick Start Guide –
[xyz-ips snippet=”download-snippet”]