
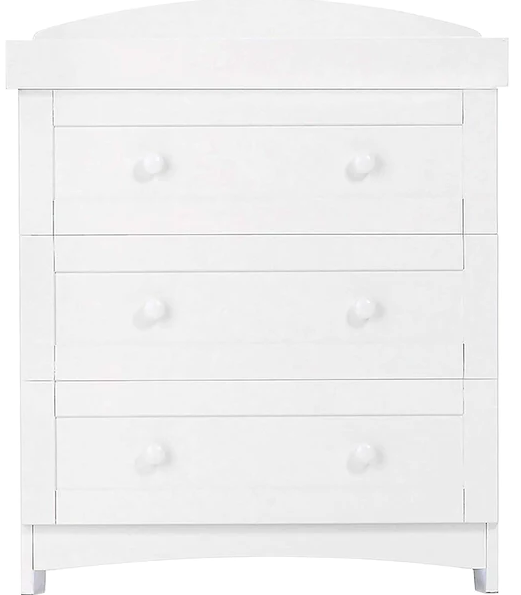
east coast Alby Dresser
IMPORTANT!READ CAREFULLY AND KEEP FOR FUTURE REFERENCE
Thank you for purchasing an East Coast product. It’s been carefully designed and constructed to offer quality, safety and reliability for you and your baby.If you have a query about this product or require replacement parts, please contact 01692 408802.Your child’s safety is your responsibility. Keep children clear during assembly as the fittings pack contains small parts which may present a choking hazard. Please read the instructions and warnings carefully before use.Lay out the parts on a soft level surface and compare to the parts checklist. Don’t throw away any packaging until you’re sure that you have all the parts.You will need the following tools to complete assembly:Flat-headed screwdriver and cross-point screwdriver
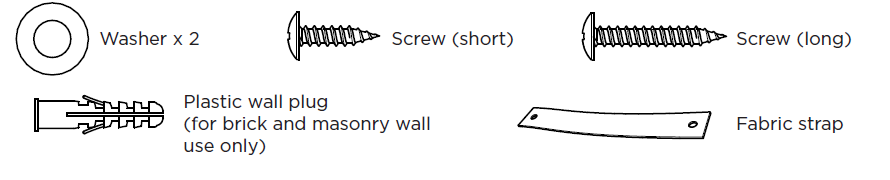
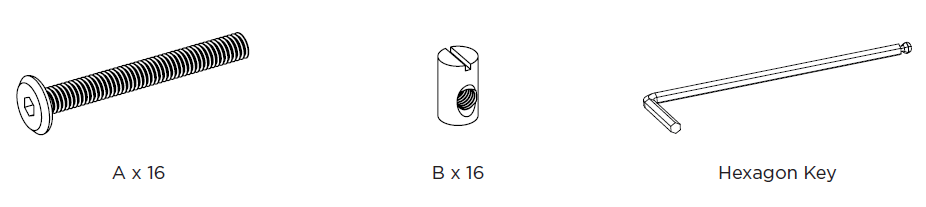
Hardware

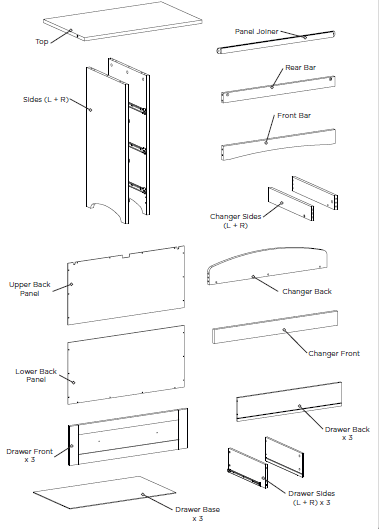
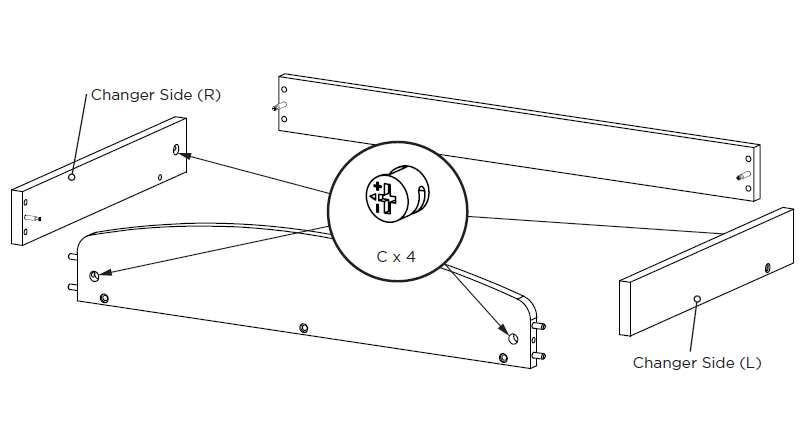
Wooden Parts
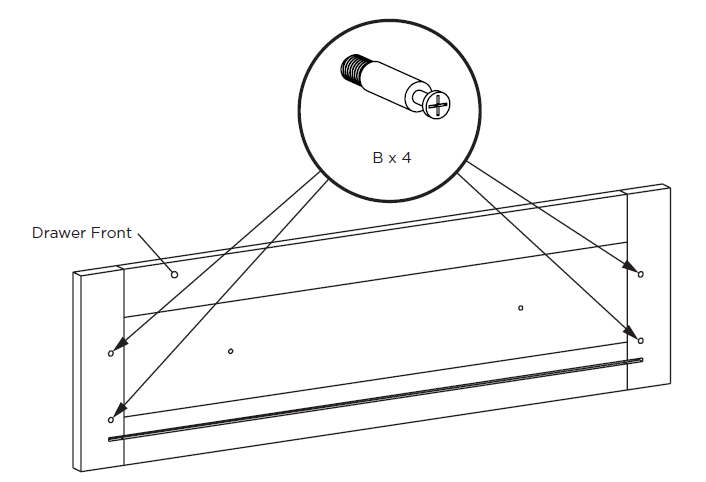
Assembly 1

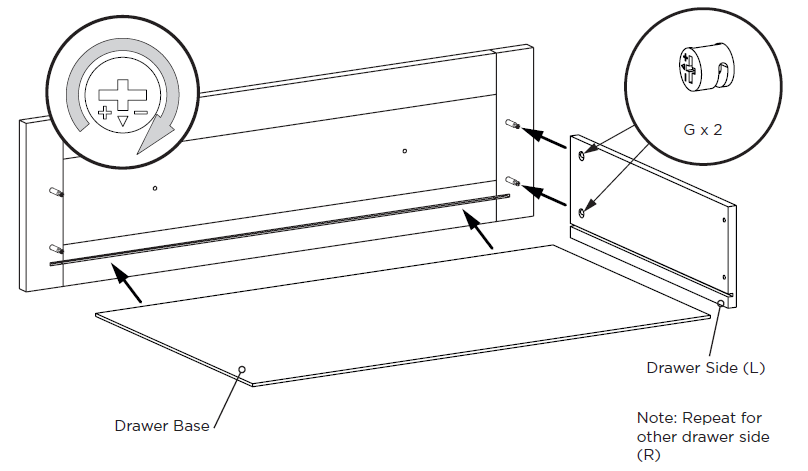
Assembly 2

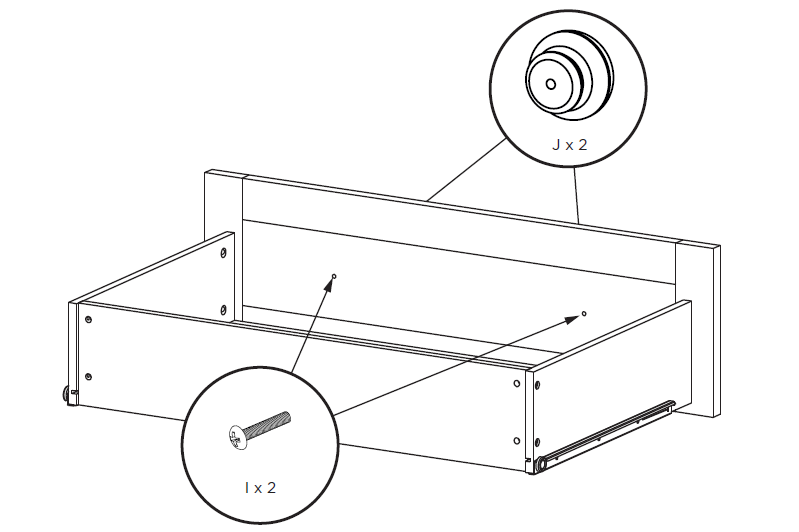
Assembly 3
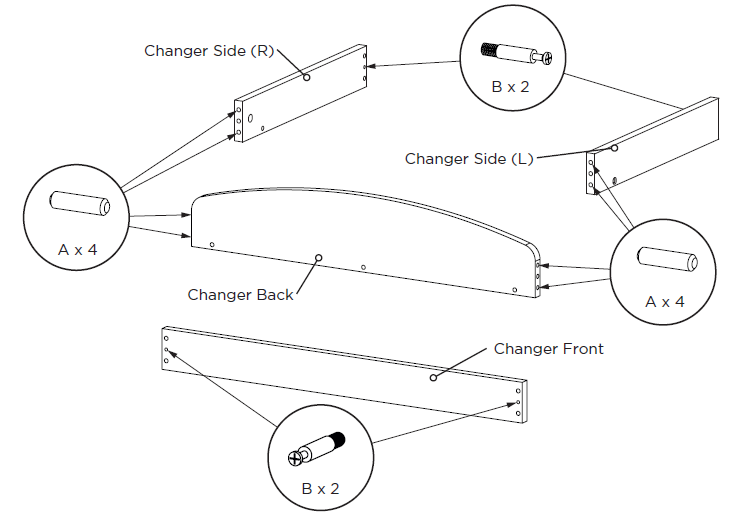
Assembly 4
Assembly 5

Assembly 6

Assembly 7
Assembly 8
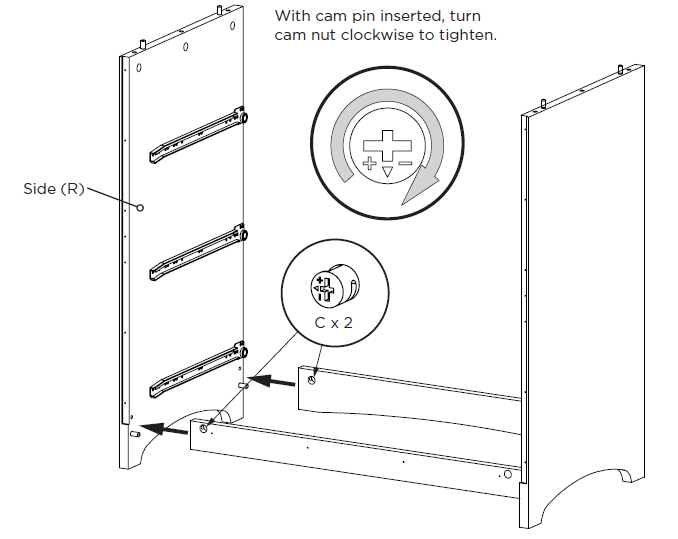
With cam pin inserted, turn cam nut clockwise to tighten.
Assembly 9

Assembly 10
 Note: Repeat assemblies 7 – 10 for other drawers
Assembly 11
Assembly 12
Assembly 13

Assembly 14
The dresser is supplied with a fixing kit which will secure it and help to guard against accidental tipping.
WARNING : Installation only to be carried out by a competent person.Check the suitability of the wall before fitting.
- Place the dresser against the wall where it is to be fitted, remove the top drawer and mark the wall through the slot in the back.
- Move the dresser away and using the long screw, washer and the appropriate wall fixing attach the fabric strap to the marked position.
- Replace the dresser and thread the fabric strap through the slot in the Back Panel.
- Attach the fabric strap to the underside of the top using the short screw and washer.
Before use, ensure that the strap is securely fixed to both the wall and the dresser. 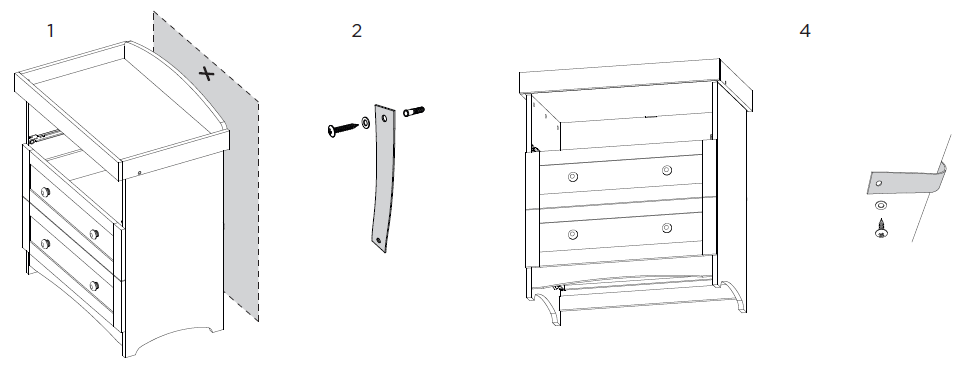 The type of wall fixing you will require depends on the construction of the wall. See below for details. If in doubt, seek professional advice.
  Wood: If fixing to wood make sure that it isn’t chipboard as screws can easily pull away the core structure.
Brick or masonry: Use the wall plug, provided you are sure that your wall is sound.
Cavity wall: Special toggle wall plugs needed. Seek expert advice.
Care and maintenance
All assembly fittings should be tightened properly and should be checked regularly and re-tightened as necessary. Take care when moving the furniture, as careless handling may cause damage.Cleaning is simple; just wipe over with a damp cloth, and avoid using strong detergents or abrasives. An occasional light application of a wax polish will help maintain the finish.
In use
Warning: Do not leave your child unattended.Ensure that all fittings are tightened properly. Loose screws could allow a child to trap part of their body or clothing, posing a strangulation risk.Be aware of the risks of open fires and other such sources of strong heat, such as electric bar fires, gas fires, etc. in the near vicinity of the dresser.Suitable for use with a flat changing mat up to 76 x 47 cm which does not compromise the effective height of the changer barriers.The changing area is suitable for use up to 12 months old or 11kg in weight.Do not use the dresser if any of the parts are broken, torn or missing.Any additional or replacement parts can only be obtained from the manufacturer or the distributor.
East Coast Nursery Ltd, Robertson House North Walsham, Norfolk, NR28 0BX, UKFor customer care or enquiries:Call: +44 (0)1692 408802Email: [email protected]eastcoastnursery.co.uk
IMPORTANT!READ CAREFULLY AND KEEP FOR FUTURE REFERENCEThank you for purchasing an East Coast product. It’s been carefully designed and constructed to offer quality, safety and reliability for you and your baby.If you have a query about this product or require replacement parts, please contact 01692 408802.Your child’s safety is your responsibility. Keep children clear during assembly as the fittings pack contains small parts which may present a choking hazard. Please read the instructions and warnings carefully before use.Lay out the parts on a soft level surface and compare to the parts checklist. Don’t throw away any packaging until you’re sure that you have all the parts.You will need the following tools to complete assembly: Flat-headed screwdriverPlease retain spare components from the hardware pack for future use.
Hardware
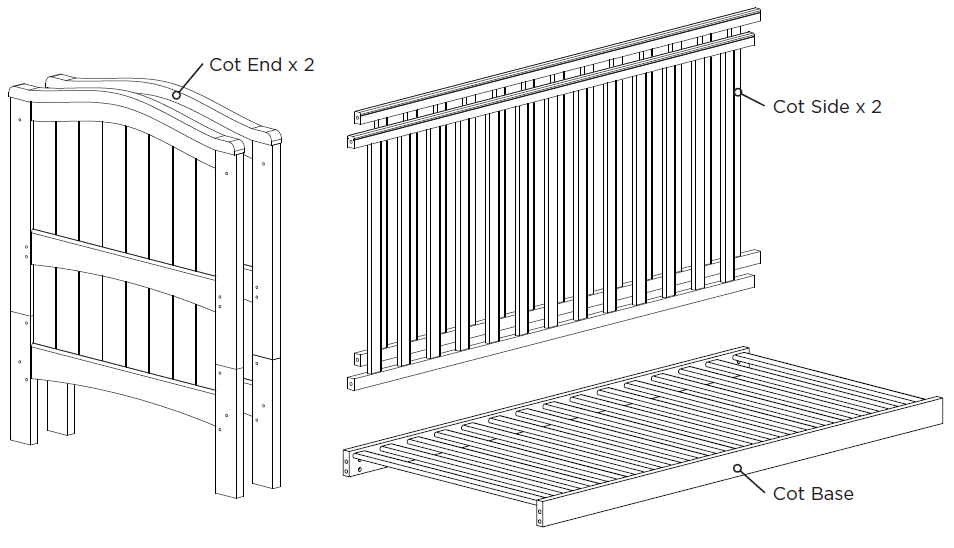
Wooden Parts
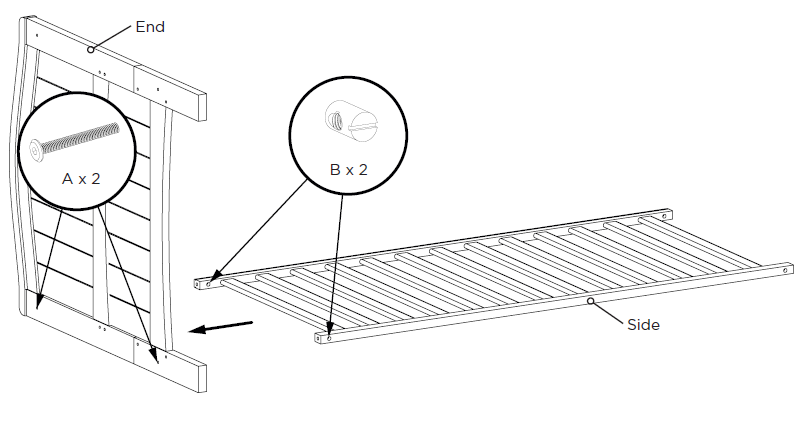
Assembly 1
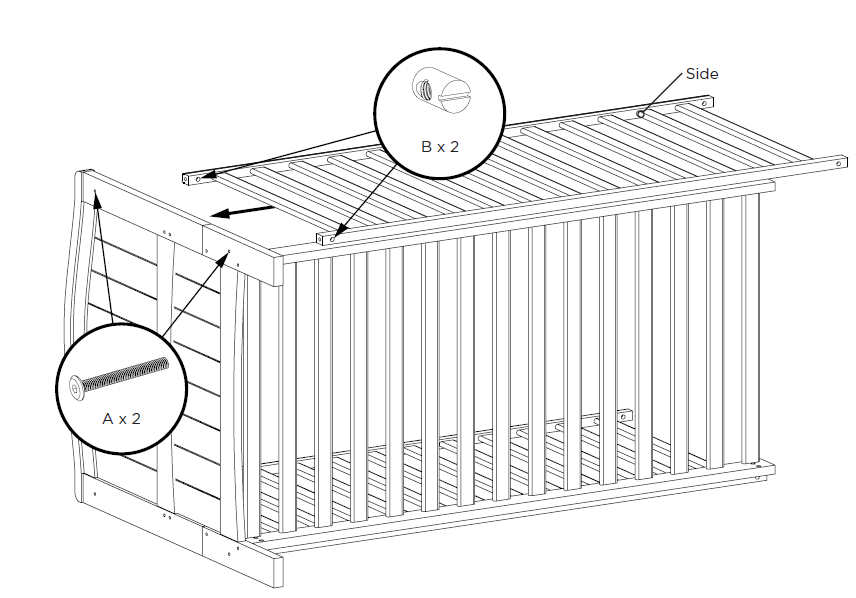
Assembly 2
 Note: Choose one of three positions. The lowest position is the safest and should always be used as soon as the baby is old enough to sit up. Retain any unused fittings for future use.
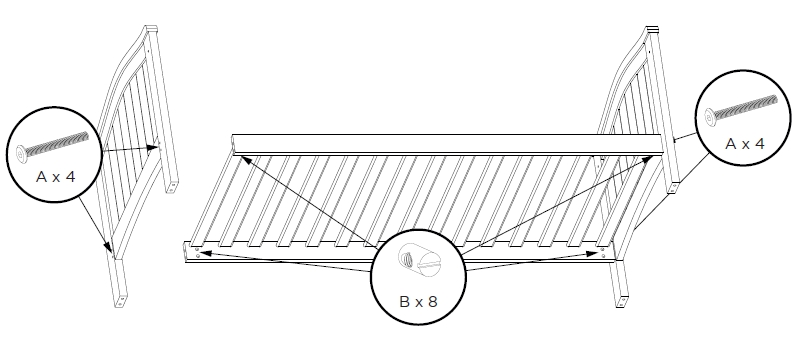
Assembly 3
Assembly 4
 Note: Ensure that all bolts are tightened fully before use. Retain any unused fittings for future use.
Assembly 1: Bed Mode

Assembly 2
 Note: Ensure that all bolts are tightened fully before use.
Care and maintenance
All assembly fittings should be tightened properly and should be checked regularly and re-tightened as necessary. Take care when moving the furniture, as careless handling may cause damage.Cleaning is simple; just wipe over with a damp cloth, and avoid using strong detergents or abrasives. An occasional light application of a wax polish will help maintain the finish.
In use
WARNING: YOUR CHILDREN’S SAFETY IS YOUR RESPONSIBILITYThe base can be adjusted in height in cot mode, but the lowest position is the safest and should always be used in that position as soon as the baby is old enough to sit up.This product is suitable for a mattress of 1400mm long and 700mm wide.Check the length and width of the mattress, to ensure the gap between the mattress and the sides and ends does not exceed 30mm.When used in cot mode, the maximum thickness of the mattress is 100mm.Check the thickness of the mattress, to ensure that the internal height (surface of the mattress to the upper edge of the cot frame) is at least 500mm in the lowest position of the cot base and at least 200mm in the highest position of the cot base.To prevent injury from falls, the cot should no longer be used for the child once they are able to climb out of the cot.The bed mode is suitable for a child from 18 months to 4 years old.Children are likely to play, bounce, jump and climb on beds, therefore the child’s bed should not be placed too close to other furniture or windows, blind cords, curtain pulls or other strings or cords.It should either be placed tightly against any wall or have a gap of 300mm between the wall and the side of the bed.This product has been designed and manufactured to: BS EN 716-1: 2017 in cot mode and BS 8509: 2008 +A1: 2011 in bed mode.Warning: Do not use the cot or bed if any part is broken, torn or missing and use only spare parts approved by the manufacturer.Warning: Do not leave anything in the cot or place the cot close to another product, which could provide a foothold or present a danger of suffocation or strangulation, e.g. strings, blind/curtain cords, etc.Warning: Do not use more than one mattress in the cot.Warning: Be aware of the risk of open fires and other sources of strong heat, such as electric bar fires, gas fires, etc. near the vicinity of the cot.Warning: Do not place the child’s bed near heat sources, windows or other furniture.This product can be dismantled carefully for storage and transportation.
East Coast Nursery Ltd, Robertson House North Walsham, Norfolk, NR28 0BX, UKFor customer care or enquiries:Call: +44 (0)1692 408802Email: [email protected]eastcoastnursery.co.uk
References
[xyz-ips snippet=”download-snippet”]