
Easypix GX2 Foldable 3-Axix Gimbal
Disclaimer
Easypix makes no representations or warranties with respect to this manual and, to the maximum extent permitted by law, expressly limits its liability for breach of any warranty that may be implied to the replacement of this manual with another. Furthermore, Easypix reserves the right to revise this publication at any time without incurring an obligation to notify any person of the revision.Easypix is not responsible or liable for misuse of the information that is contained herein. If you have any suggestions for improvements or amendments or have found errors in this publication, please notify us.All pertinent state, regional, and local safety regulations must be observed when installing and using this product. For reasons of safety and to help ensure compliance with documented system data, only the manufacturer shall perform repairs to components.Failure to observe this information can result in injury or equipment damage.Copyright © Easypix GmbHAll rights reserved. No part of this publication may be reproduced, distributed, or transmitted in any form or by any means, including photocopying, recording, or other electronic or mechanical methods, without the prior written permission of the publisher. For permission requests, please write to the publisher below.Easypix GmbH, Em Parkveedel 11, 50733 Köln, Germany[email protected] • www.easypix.eu
Retaining instructions
Read this manual and its safety instructions before using this product.Follow all the instructions. This will avoid fire, explosions, electric shocks or other hazards that may result in damage to property and/or severe or fatal injuries.The product shall only be used by persons who have fully read and understand the contents of this user manual.Ensure that each person who uses the product has read these warnings and instructions and follows them.Keep all safety information and instructions for future reference and pass them on to subsequent users of the product.The manufacturer is not liable for cases of material damage or personal injury caused by incorrect handling or non-compliance with the safety instructions.
Explanation of safety warnings
WARNING: Warning indicates a hazard with a medium level of risk which, if notavoided, could result in serious injury.NOTICE: Indicates information considered important, but not hazard-related.
Product introduction
GX2 Gimbal is a 3-axis motorised gimbal for smartphones and is used when recording video. The GX2 uses electronic sensors to detect judder and shaking and compensates for these movements.This results in distortion-free high-quality recordings.The Bluetooth feature in GX2 allows you to connect the gimbal directly to your smartphone for remote operation.Once folded up, the device can simply be placed in your pocket and taken anywhere.
Intended use
This product is intended for use anywhere videos, photos or selfies are taken and whenever image stability is a critical requirement.
Restrictions
WARNING:The product is not suitable for children under 3 years because of choking hazard.
- Contains small parts, in order to avoid swallowing, please ensure any use by children is undertaken with adult supervision.
- This product is not suitable for use under water or in wet conditions. Please ensure your gimbal is kept dry at all times.
- Ensure your gimbal is not exposed to extreme temperatures.
Safety instructions
WARNING: This product is only suitable for the purpose described, themanufacturer is not liable for damage caused by abnormal use.WARNING: Please read this instruction manual carefully before use.
- Ensure the product is not obstructed during use as this may lead to damage of the internal motor mechanism.
- Please do not disassemble the product as doing so will void the warranty.
- If the motor works continuously for an extended period the motor temperature may increase.
- Please ensure the product is not dropped or obstructed in any way during operation as this may damage the unit or cause it to operate abnormally.
- Please dispose of the waste and residues at the end of the service life of the product according to local laws and regulations.
Operating environment
- Please keep this product away from children and pets.
- Please store the product in a dry environment.
- Do not overcharge or discharge the battery as this may damage the battery cells
- Do not expose the device to abnormally high or low temperatures.
- Store the product cool (at room temperature) in a dry and dust-free location and never expose the product to high temperatures or direct sunlight.
- Protect the product from falls, shock and impact.
Description of the product

- Smartphone cradle
- Horizontal support
- Tilt axis
- Tilt axis limiter
- Vertical support
- Folding thumbscrew
- Pan axis
- Bluetooth indicator
- Joystick
- Power / Function button
- Micro-USB port
- Mode button
- Handle
- Battery level LED’s
- 1/4 thread screw
- Roll axis
- Roll axis limiter
- Pan arm
- Pan axis limiter
- Release button
- Strap hole
Step 1: Using your gimbal
- Please do not switch on the device before attaching your smartphone as doing so will not allow the device to calibrate properly before use.
- Please charge the product fully, before first use.
- Please unlock the three-axis limiter before power on and using.
- Please install the smartphone horizontally.
- Please turn off the power when not in use.
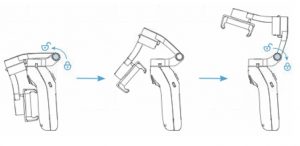
Step 2: Folding and unfolding the gimbal
UNFOLDING
- Loosen the folding thumbscrew (6) and re-tighten after unfolding the vertical arm.
- Unlock the Tilt axis limiter (4).
FOLDING
- Lock the Tilt axis limiter (4).
- Loosen the folding thumbscrew (6), and re-tighten after folding the vertical arm.
Step 3: Charging
- Your gimbal can be charged using the micro USB cable provided.
- Connect one end the cable to the micro USB port on the side of the gimbal and the other end of the cable into a computer or USB charger.
WARNING:
- To avoid the risk of electric shock, do not insert the power cord with wet hands.
- In the unlikely event of overheating, smokes or unpleasant odours coming from the unit, disconnect it immediately from the charging cable.
- Never attempt to access or replace the built-in battery
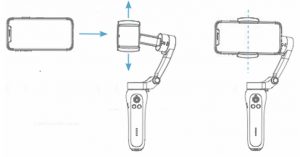
Step 4: Inserting the smartphone
Carefully expand the smartphone cradle and insert your smartphone.While keeping the smartphone in a horizontal position, slide it into the cradle until it is centred as illustrated below.
Step 5: Switch on/off the product
SWITCH ON:
Press the function/power button for 3-4 seconds until the indicator light flashes blue.
SWITCH OFF:
Press the function/power button for 3-4 seconds until the indicator light switches off.
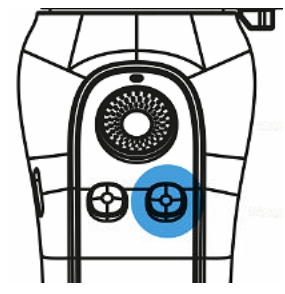
Step 6: Changing the orientation
Short-press the power button to change the smartphone position from horizontal to vertical.
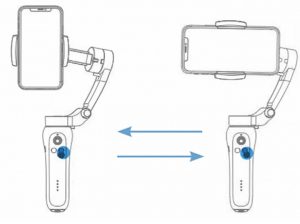
Set back to start position
Short press the mode button twice to revert the smartphone back to the original position. This works for both horizontal and vertical orientations.
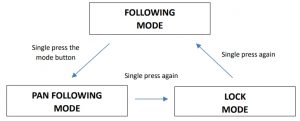
Switching between the modes
Please use the Mode Button to switch between the 3 modes.Each press of the mode button engages the next mode in the cycle.Note: If you short press the button twice, the gimbal will return to the start position.
1st mode: FOLLOWING MODE (standard mode when switched on)All axes are free.All movements follow the movement of the handle.2nd mode: PAN FOLLOW MODETilt axis and roll axis are blocked.The pan axis rotates and follows the movement of the handle.3rd mode: LOCK MODEAll axes are locked.The camera is stable. It does not follow the movement of the handle.
Power button: FunctionSingle press: Vertical/horizontal orientationDouble press: Camera direction switch (in connection with App only)Triple press: Photo/video shooting switch (in connection with App only)
Mode button: FunctionSwitch by single press:Single pressSecond pressThird press:Switch between 3 modes:Following ModePan Following ModeLock ModeDouble short press: Revert to start position
LED status indications
Bluetooth Indicator light: InstructionAlternating long and short blink: Communication failureFast blink Communication in processBluetooth light on: Bluetooth connectedSlow blink: Bluetooth disconnected
Charging status Indicated by battery level LED’s: Battery powerOne LED flashes: 0%-25%First LED on, second LED flashes: 25%-50%First and second LED’s on, third LED flashes: 50%-75%Three LED’s on, fourth LED flashes.: 75%-99%All four LED’s on: 100%
Connect to the smartphone (without App)
 You can take photos and videos using the gimbal’s release button after you connect the device to your smartphone via Bluetooth.No additional app is required for this function.
Note: The Bluetooth connection works with Android 6.0 or higher and with iOS 10.0 or higher.
- Turn on the Bluetooth function on the smartphone.
- Open the smartphone Bluetooth settings
- Connect to the device named “Stabilizer”
- When the connection is established, press the release button on the gimbal to start recording.
Connect to the “Gimbal Pro” App
For additional functionality please scan the QR Code and download the „Gimbal Pro“ App to your smartphone:
Android iOS
iOS

- Activate the Bluetooth function on smartphone.
- Open the smartphone Bluetooth settings
- Connect to the device “STABILIZER_XXXXXX”.
- Click device name to enter the camera interface.The App name is “STABILIZER_XXXXXX”.
Inside the App you will find helpful functions like, for example:Dolly Zoom, Panoramic Video, Time-Lapse and much more.
Technical specifications
Tilt angle: 160°Roll angle: 325°Pan angle: 340°Bluetooth: Bluetooth 5.0App control: YesFace tracking: YesCompatible smartphone dimensions:Diagonal: max. 18 cmThickness: max. 0.9 cmWidth: max. 5.5-9 cmBattery: 2000mAh built-inOperating voltage: 3.7VInput voltage/currency: 5V / 1AWorking time: 4,5-5 hoursCharging time: 3 hoursWeight: 348gMax carrying weight: 280gWorking temperature: 0-40C°Dimensions: 26 x 13 x 8.8 cmFolded: 15.2 x 11 x 4.6 cm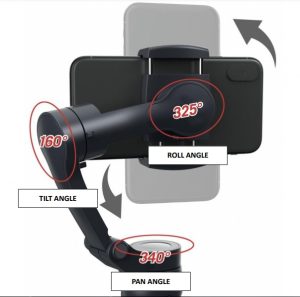
Box contents
- Gimbal
- Tripod
- Pouch
- USB cable
- Manual EN/DE
Manuals in further languages are available for download here: www.easypix.info/download-manuals/download/gx2/
NOTICE: ![]()
Devices containing built-in batteries should be disposed of in accordance with applicable local regulations, and you should not throw them into household garbage to avoid irreversible pollution.
Disposal
 Disposal of packaging.For disposal, separate packaging into different types.Cardboard and board must be disposed of as paper and foil must be recycled.
 Disposal of Waste Electrical and Electronic Equipment and/or Battery by users in private households in the European Union.This symbol on the product or on the packaging indicates that this cannot be disposed of as a household waste.You must dispose of your waste equipment and/or battery by handling it over to the applicable take-back scheme for the recycling of electrical and electronic equipment and/or battery. For more information about recycling of this equipment and/or battery, please contact your city office, the shop where you purchased the equipment or your household waste disposal service. The recycling of materials will help to conserve natural resources and ensure that it is recycled in a manner that protects human health and environment.
Easypix GX2 Foldable 3-Axix Gimbal User Manual – Easypix GX2 Foldable 3-Axix Gimbal User Manual –