EASYPIX Thermo Gun TG2 User Manual
Disclaimer
Easypix makes no representations or warranties with respect to this manual and, to the maximum extent permitted by law, expressly limits its liability for breach of any warranty that may be implied to the replacement of this manual with another. Furthermore, Easypix reserves the right to revise this publication at any time without incurring an obligation to notify any person of the revision. Easypix is not responsible or liable for misuse of the information that is contained herein. If you have any suggestions for improvements or amendments or have found errors in this publication, please notify us. All pertinent state, regional, and local safety regulations must be observed when installing and using this product. For reasons of safety and to help ensure compliance with documented system data, only the manufacturer shall perform repairs to components. Failure to observe this information can result in injury or equipment damage. Copyright © by Easypix GmbH All rights reserved. No part of this publication may be reproduced, distributed, or transmitted in any form or by any means, including photocopying, recording, or other electronic or mechanical methods, without the prior written permission of the publisher. For permission requests, please write to the publisher below.
Easypix GmbH, Em Parkveedel 11, 50733 Köln, Germany [email protected] · www.easypix.eu
Retaining instructions
Read this manual and its safety instructions before using this product. Follow all the instructions. This will avoid fire, explosions, electric shocks or other hazards that may result in damage to property and/or severe or fatal injuries. The product shall only be used by persons who have fully read and understand the contents of this user manual. Ensure that each person who uses the product has read these warnings and instructions and follows them. Keep all safety information and instructions for future reference and pass them on to subsequent users of the product. The manufacturer is not liable for cases of material damage or personal injury caused by incorrect handling or non-compliance with the safety instructions.
Explanation of safety warnings
![]() WarningWarning indicates hazard with a medium level of risk which, if notavoided, could result in serious injury.
WarningWarning indicates hazard with a medium level of risk which, if notavoided, could result in serious injury.
NOTICEIndicates information considered important, but not hazard-related.
Product introduction
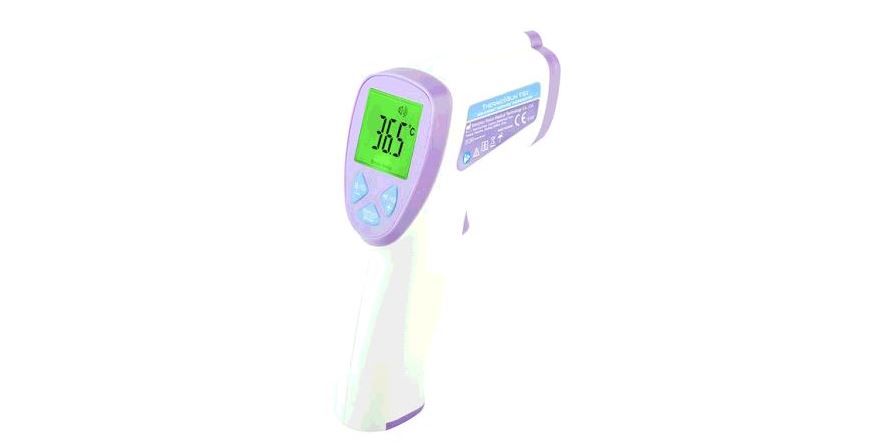
This infrared thermometer is a high-quality product. It uses infrared technology and performs a self-test every time it is turned on to ensure the accuracy of the measurement. This infrared forehead thermometer is mainly used for accurately measuring the temperature of the forehead of the human body. The user only needs to point the probe at the center of the forehead and press the measurement button for a quick and accurate measurement in around one second. In order to ensure the accuracy of the measurement and the safe use, please read the instructions carefully before using the product.
Intended use
This product is widely used at home, in schools, customs, hospitals, homes and other places.
Declaration and proven safety
The clinical accuracy or clinical deviation of the thermometer has been clinically verified, Its safety and effectiveness meet the requirements of the relevant national regulations.
Restrictions
![]() WARNINGUse of the device is for adults only. The product is not suitable for children under 3 years because of choking hazard. (Safety)Contains small parts, in order to avoid swallowing, please ensure any use by children is undertaken with adult supervision.
WARNINGUse of the device is for adults only. The product is not suitable for children under 3 years because of choking hazard. (Safety)Contains small parts, in order to avoid swallowing, please ensure any use by children is undertaken with adult supervision.
Safety instructions
![]() WARNINGThis product is only suitable for the purpose described, the manufacturer is not liable for damage caused by abnormal use.
WARNINGThis product is only suitable for the purpose described, the manufacturer is not liable for damage caused by abnormal use.
![]() WARNINGPlease read this instruction manual carefully before use, and ensure the batteries are installed correctly.
WARNINGPlease read this instruction manual carefully before use, and ensure the batteries are installed correctly.
- Do not immerse the thermometer in any liquid, and do not leave it in a high or low temperature environment for a prolonged period of time.
- Keep the thermometer out of the reach of children.
- It is recommended that you practice several times to become familiar with the measurement method, and try not to change the factory settings of the product.
- Measurement results are not a substitute for a doctors diagnosis.
- No special maintenance is required during use. Please contact the seller or manufacturer if your device displays a fault.
- Please dispose of the waste and residues at the end of the service life of the product according to local laws and regulations.
![]() WARNINGNever put this product into water or other liquids. For cleaning, wipe with a damp soft cloth.
WARNINGNever put this product into water or other liquids. For cleaning, wipe with a damp soft cloth.
- If you think this product is damaged in any way, please do not use the product.
- Do not open this product without permission.
- In the early stage of fever, vasoconstriction will occur, and the temperature of the skin surface will drop. At this time, the measured temperature will be abnormally low.
- If the measurement result does not match the diagnosis result of the patient, or the measurement temperature is too low, repeat the measurement every 10 minutes or take another measurement of the core body temperature zone to verify the measurement result.
- Contains small parts, in order to avoid swallowing, please ensure any use by children is undertaken with adult supervision.
Operating environment
- Do not bump or drop the device or store it with sharp objects and do not disassemble the device.
- Do not use the thermometer in sunlight or water.
- Do not use in an environment with strong electromagnetic interference.
- For the most accurate results, make reading with an ambient (room) temperature of 10 – 40°C.
- If the thermometer has been stored in a cold or hot environment, allow it at least 30 minutes to acclimate to room temperature before ma king measurements.
- After heavy exercise always wait at least 10 minutes before taking forehead temperature readings.
Description of the product
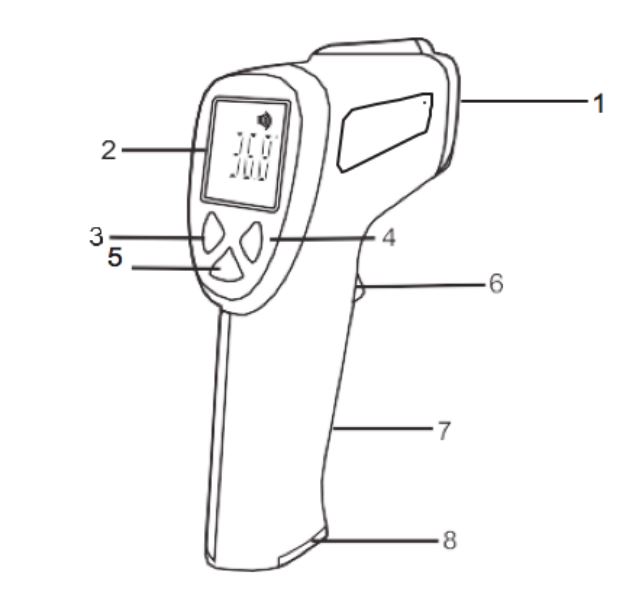
- Infrared sensor
- LCD display
- “B/O” Mode button & Down button
- Voice button & Up button
- Memory / Setting mode
- Measurement button
- Handle 8. Battery compartment cover
Description of the product display

- Memory / Memory space number
- Object temperature mode
- Body temperature mode
- Beep symbol
- Battery level
- Temperature unit
- Temperature
Installing the batteries (not included)
Have 2x AA batteries ready.
- Open the battery back cover in the direction indicated.
- Load the battery correctly according to the marked positive and negative poles.
When the low voltage icon ![]() on the screen flashes, the battery needs to be replaced.
on the screen flashes, the battery needs to be replaced.
NOTICE
When the batteries are removed from the battery compartment, the last stored measurements will be deleted from the memory.
![]() Batteries and electronic equipment should be disposed of in accordance with applicable local regulations, and you should not throw them into household garbage to avoid irreversible pollution.
Batteries and electronic equipment should be disposed of in accordance with applicable local regulations, and you should not throw them into household garbage to avoid irreversible pollution.
Operating description: Temperature mode settings
Calibrating:Your thermometer comes fully calibrated from the factory and is ready to use. However if re-calibration is required in the future please use the following steps:
Press the “Mode” button for three seconds until “F-1” appears on the display to confirm the device is in calibration drift correction mode. The previous temperature correction factor will appear on the display. To make a correction, measure a known, fixed temperature source. Enter the correction mode and press the + or – buttons to change the correction value and minimize the difference in readings. Repeat and adjust the correction value as needed until the measurement on the meter matches the known temperature. The calibration is applied to “Body Temp” readings.
“F-2”To set the temperature reading at which you wish to receive an alarm tone, press the “Mode” button a second time until “F-2” appears on the display. Press the + or – buttons to change the value. The alarm is applied to Body Temp readings.
“F-3”To set the temperature format press the “Mode” button a third time until “F-3” is displayed. The temperature units in °C or °F will be shown. Press the + or – buttons to select your preferred temperature unit.
“F-4”To set the backlight status, press the “Mode” button a fourth time until “F-4” is displayed. Press the + or – buttons to toggle the backlight function from ON to OFF.
“F-5”To set the laser status, press the “Mode” button a fifth time until “F-5” is displayed. Press the + or – buttons to switch from ON to OFF.

Body temperature measurements
NOTICEPlease note that to ensure an accurate reading, the forehead or temples must be free from sweat and cosmetics. In addition, skin irritations or taking vasoconstrictive medication can also distort the result when measuring temperature on the forehead.
- Press the trigger to switch the thermometer on. The device performs a brief self test: all elements of the display are shown for approx. 1 second. A successful test is confirmed by the color LCD display (Red-Orange-Green).
- Press the “B/O” button to enter the “Body temp” mode for accurate measurements in the range of 32.0-42.9 °C (89.6-109.2 °F).
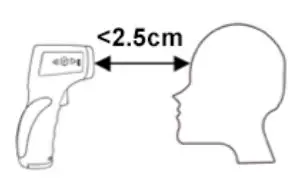
- Point the thermometer at the person to be measured ensuring a measurement distance of < 2.5cm.
- Press the trigger to take a temperature reading. The temperature reading appears in the display.

With the backlight `ON’, voice `ON’ and the alarm temperature set to 38.0°C the following results will be delivered for each temperature range:
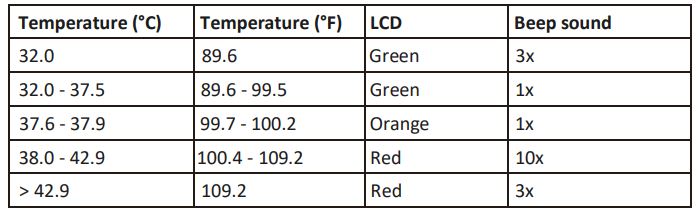
A Red display is accompanied with an alarm temperature limit (Fever alarm).
Release the trigger and the reading will display for approximately 15 seconds after which time the thermometer will automatically shut off.
Before shutting off, you can take further measurement if required.
- If the temperature goes above 109.2°F or 42.9°C, “Hi” will appear in the display.
- If the temperature goes below 89.6°F or 32.0°C,”Lo” will appear in the display.
NOTICEWhen the surrounding ambient or room temperature is lower than 10.0°C or higher than 40.0°C, measurement accuracy cannot be assured.
Object temperature measurements
- Press the trigger to switch the thermometer on. The device performs a brief self test: all elements of the display are shown for approx. 1 second. A successful test is confirmed by the color LCD display (Red-Orange-Green).
- Press the ” B/O ” until “Object temp” is displayed for accurate measurements in the range of 0.0 to 100.0°C(32.0 to 212.0°F).
- Point the device at the surface to be measured and press the trigger to take a temperature reading. The temperature reading appears in the display.
- Release the trigger and the reading will display for approximately 15 seconds after which thermometer will automatically shut off.
Before shutting off, you can take further measurements if required.
- If the temperature reading is above 212°F or 100°C, “Hi” will appear in the display.
- If the temperature reading is below 32°F or 0°C, “Lo” will appear in the display.
NOTICEThe value under this Mode is the object surface temperature and not it’s core temperature. For example, the reading on stainless steel will be obviously lower than the actual temperature.
![]() WARNINGPLEASE TAKE ADEQUATE PRECAUTIONS WHEN HANDLING ANY OBJECT MEASURED.
WARNINGPLEASE TAKE ADEQUATE PRECAUTIONS WHEN HANDLING ANY OBJECT MEASURED.
NOTICE
Measurement notes
- Keep the sensor and probe cavity clean before and after use.
- Please use the thermometer in a stable temperature environment. When the ambient temperature fluctuates greatly (such as from indoor to outdoor), please leave it for about ten minutes before taking a measurement.
- Do not start measuring body temperature immediately after measuring the temperature of extremely high or low temperature objects, please leave it for ten minutes before measuring again.
- When the measurement object comes from a place with a large difference in the temperature of the measurement environment, it should Stay in the test environment for at least 10-30 minutes before measuring.
- Try not to measure under forehead or if the skin has sweat or cosmetics applied etc. Do not take temperature readings within 10 minutes after exercise, bathing and meals.
- Before measuring, ensure surfaces are free of frost, oil, grime, etc.
- If an object’s surface is highly reflective, apply masking tape to the surface before measuring.
- Measurements through transparent surfaces such as glass may not be accurate.
Device memory
The device automatically stores the previous 32 measurements taken.
- To review the memorized readings, press the “Memory” button for one second – `M’ is displayed on the screen.
- Use the + or – buttons to scroll through the stored measurements and memory locations.
- To delete all saved measurements, simply remove the batteries while the device is turned on.
NOTICE
Browsing the memory while in `Body Temp’ mode displays the previous body temperature readings. Browsing the memory while in `Object Temp’ mode displays the previous object temperature readings.
General tips
The normal body temperature of the human body is not constant. There are differences in body temperature between different parts of the human body, morning and evening, and between men and women. There is a relatively stable range. It is normal that the same part may change by a few tenths of a degree every few minutes. In particular a Childs body is not fully developed enough to regulate temperature and therefore temperature changes will be more frequent. It is recommended to take several measurements to determine the highest reading. If you find that your baby’s temperature is abnormal you should contact your doctor immediately.
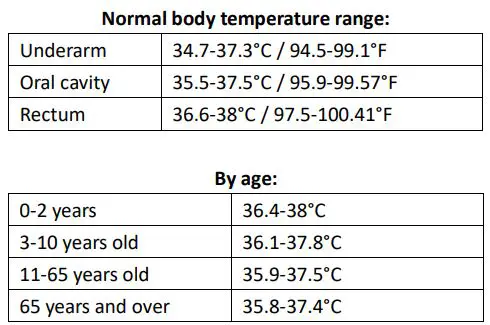
Note: The measured temperature value will be different according to the color of the human skin and parts of the body, and also in the case where the ambient temperature changes greatly, this is normal. The reason is that the exposed human body is more affected by the ambient temperature.
Cleaning
Keep the inner cavity of the sensor and probe clean, to ensure it does not affect the measurement accuracy.
![]() WARNING
WARNING
Never put this product into water or other liquids. For cleaning, wipe with a damp soft cloth.
- Surface cleaning: Use a clean soft cloth or cotton swab to apply a little medical alcohol or water to wipe the dirt.
- Clean the inner cavity of the sensor and probe: Use a clean soft cloth or cotton swab to apply a little medical alcohol to gently wipe the inner cavity of the probe or the top of the sensor. The device should only be used again after the alcohol has completely evaporated.
Technical data

Disposal
![]() Dispose of packagingFor disposal, separate packaging into different types. Cardboard and board must be disposed of as paper and foil must be recycled.
Dispose of packagingFor disposal, separate packaging into different types. Cardboard and board must be disposed of as paper and foil must be recycled.
![]() Disposal of Waste Electrical and Electronic Equipment and/or Battery by users in private households in the European Union. This symbol on the product or on the packaging indicates that this cannot be disposed of as a household waste. You must dispose of your waste equipment and/or battery by handling it over to the applicable take-back scheme for the recycling of electrical and electronic equipment and/or battery. For more information about recycling of this equipment and/or battery, please contact your city office, the shop where you purchased the equipment or your household waste disposal service. The recycling of materials will help to conserve natural resources and ensure that it is recycled in a manner that protects human health and environment.
Disposal of Waste Electrical and Electronic Equipment and/or Battery by users in private households in the European Union. This symbol on the product or on the packaging indicates that this cannot be disposed of as a household waste. You must dispose of your waste equipment and/or battery by handling it over to the applicable take-back scheme for the recycling of electrical and electronic equipment and/or battery. For more information about recycling of this equipment and/or battery, please contact your city office, the shop where you purchased the equipment or your household waste disposal service. The recycling of materials will help to conserve natural resources and ensure that it is recycled in a manner that protects human health and environment.
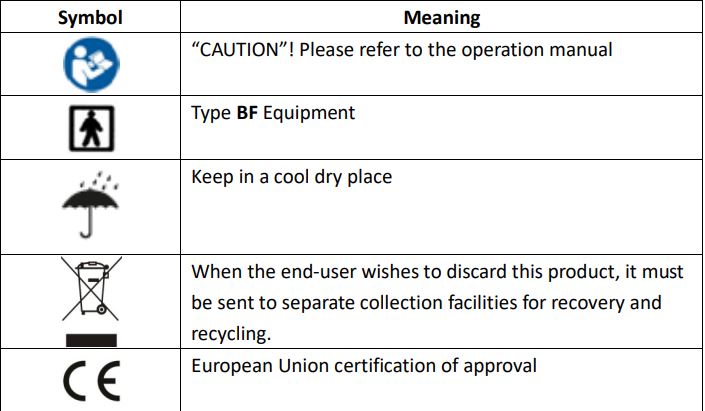
Symbol meaning

Declaration of conformity
For the product Thermo Gun TG2We hereby confirm that it meets the basic requirements laid down in Council Directive (1999/5/EC).
This declaration is based on the full compliance of that product with the following European standards:EN ISO 13485:2016, MDD 93/42/EEC Annex V
This explanation is given for the manufacturer / importerEasypix GmbHEm Parkveedel 1150733 Köln, Germany
 report this ad
![]() The EC Declaration of Conformity can be downloaded here: http://www.easypix.info/download/pdf/doc_tg2.pdf
The EC Declaration of Conformity can be downloaded here: http://www.easypix.info/download/pdf/doc_tg2.pdf![]()
References
[xyz-ips snippet=”download-snippet”]