eaz lift 48051 Bolt-Together Weight Distributing Hitch System
![]()
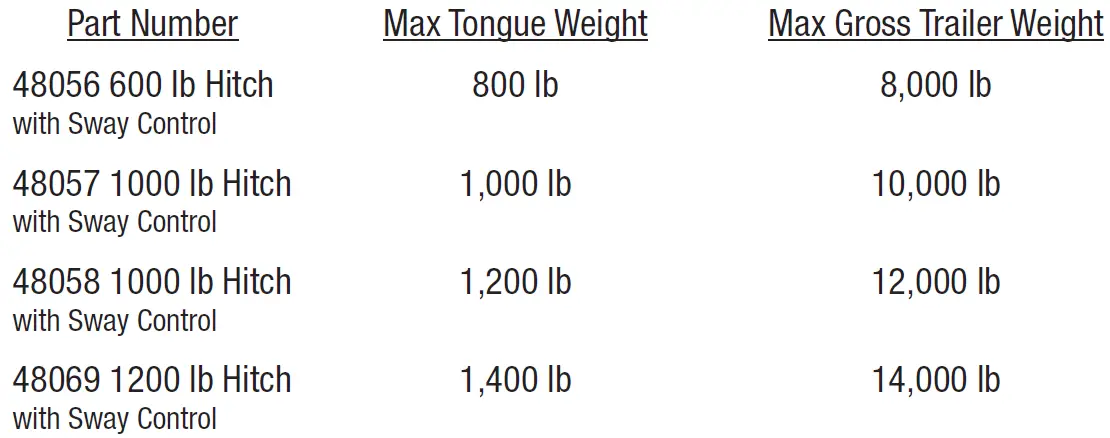
Rating when used as a weight distributing hitch with spring bars:
Part Number Max Tongue Weight Max Gross Trailer Weight
48051 600 lb Hitch 800 Ib 8,000 Ib48052 800 lb Hitch 1,000 Ib 10,000 Ib48053 1000 lb Hitch 1,200 Ib 12,000 Ib48059 1200 lb Hitch 1,400 Ib 14,000 Ib
CAUTION: The tongue weight rating of the spring bars represents the capacity of a pair of bars, not an individual bar. Always use a pair of spring bars and be sure they are of the same weight rating. Spring bars must be greased daily when in use.
Hitch Kit
Dealer / Installer: Be sure customer receives installation instructions after hitch has been installed.
Do NOT exceed the towing vehicle manufacturer’s load rating.READ ALL INSTRUCTIONS AND CHECK PACKAGE CONTENTS BEFORE BEGINNING INSTALLATION
PARTS LIST
TOLL FREE SERVICE NUMBER 800-334-2004Specifications subject to change without notice.All replacement hardware must be of a type approved by this manufacturer.

FOR BALL MOUNT
The height of the ball must be determined before any assembly work can be started.To measure ball height, measure trailer from ground level to top of ball coupler. Be sure the trailer is parallel to ground.For tow cars without overloads add approximately 1/8” for each 100 lb tongue weight.For cars with overloads, or trucks, add approximately 1/16” for each 100 lb tongue weight.This will compensate for vehicle “squat.”
EXAMPLE: If measured top of coupler height is 17” and trailer hitch weight (weight coupler would impose on ball) is 600 lb (6 x 1/8”, for car without overloads, = 3/4”).Therefore, 17”+ 3/4″= 17-3/4” hitch setting height (to top of ball; assembled.)
After ball height has been determined: write down the ascertained height.
BEFORE HOOKING UPSpring bars should hang down on a 10º to 13º angle when ball mount has been tilted back at 6º to 8º angle.
AFTER HOOKING UPSpring bar should be parallel with trailer frame, or a slight angle up or down.
WRONGReadjust degree of tilt on ball mount, if you have more than 5 links of chain hanging free. The number of links should be the same on both bars.
Slide shank into sleeve receiver; insert hitch pin (48021) and spring clip (48028). With ball attached to ball mount, slide ball mount up or down shank (shank may be used in the up or down position) until nearest dimension is obtained and holes line up with shank. Insert bolt (12c) and nut (12d) in the bottom hole, do not tighten (rest hitch head).
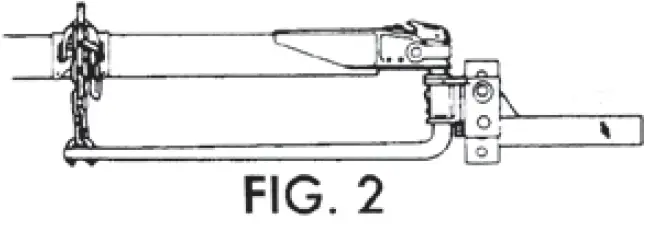
Thumbscrew (48037) is supplied in order to gain correct downward angle of spring bars. The thumbscrew is threaded into the 5/8″ tapped hole in the “U” on ball mount. Depending on angle or slope of bars that must be achieved, thread thumbscrew to the position necessary to establish the correct angle. (See Fig. 1, 2, and 3 below.)
Once the desired spring bar angle has been achieved, insert top bolt (12c) with a serrated washer (12a). Install second serrated washer and nut to secure unit in correct position. Before tightening bolts, lock set screw (48103). Tighten the 3/4″ top bolt to 260 ft. lb. torque once the head angle is set. Tighten lower bolt to 260 ft. lb. torque. After first day of towing, check set screw for tightness.
QUICK HOOK-UP
WARNING: By towing a trailer you change the handling characteristics of the tow vehicle. Conditions you may encounter can cause sudden trailer sway. When used properly, the Eaz-Lift Adjustable Weight Distributing Hitch and Sway Control damp and reduce trailer sway and by distributing trailer tongue weight reduce unsafe towing vehicle handling. IMPORTANT: Short wheel base vehicles may induce sway when towing a trailer. USE EXTREME CAUTION.
To determine whether or not a particular tow vehicle and trailer combination is suitable, you should always refer to the driver’s manual or user’s manual provided by the vehicle and trailer manufacturers and seek the recommendations and advice of the trailer dealer.The United States Department of Transportation, the American Automobile Association, and various recreational vehicle associations and RV magazines also offer good advice on trailer towing practices.
- Put Ball Mount into sleeve and insert 5/8″ Hitch Pin, using Spring Clip to lock pin in place. Hitch balls are not furnished with the hitch as there are several sizes. Normally they are supplied or may be purchased from the dealer to match the coupler of the trailer. A Ball Shank Bushing is supplied to reduce the size of the ball hole in the hitch down to 1″ if needed.
- Measure towing vehicle before adding load to towing vehicle. Measure distance between back bumper and ground, write it down. Measure distance between front bumper and ground, write it down. Hook trailer to tow vehicle. Lock-on ball. To make hooking up easier and safer-raise front of trailer and back of towing vehicle above level with trailer tongue jack. This removes some of the tension by reducing the distance between spring bar and hook- up arm.
- The Spring Bars can be inserted into either side of Ball Mount (there is no ‘right’ or ‘left bar’). To lock, insert and lock Spring Bar in socket, hold bar under socket and push up. The Spring Bar will automatically be locked into position by the Spring Bar Locking Device. (Check to make sure bar is locked in by moving it up and down at the chain end.) To remove Spring Bars, swing bar around under the bumper and it will drop free.
- To find correct location on trailer frame for Quick Hook-Up Bracket, hold chain straight up and free of twist. Center hook-up bracket on frame and finger tighten Set Screw. THEN TIGHTEN AN ADDITIONAL 1/4 TURN. DO NOT OVER TIGHTEN. DO NOT PERMANENTLY ATTACH QUICK HOOK-UP BRACKETS TO TRAILER FRAME.
- You are now ready to put tension on spring bars. For safety make sure step 2 is completed. When using the Quick Hook-Up (48029), lower the arm and slip link of chain over hook. Insert Lever Bar (48031) over end of Quick Hook-Up arm. Lift and flip over center. (See Figure A.)
 CAUTION: MAKE SURE THAT THE HOOK-UP ARM IS COMPLETELY SEATED AND THE SPRING BAR IS PUSHED DIRECTLY UNDER HOOK-UP CHAIN HOOK. Now install Hook-Up locking clip through locking ears and over hook on Hook-Up arm. (See figure B.)
 - Release Trailer Tongue Jack, by adjusting the chain links up or down, the desired levelness of the car and trailer will be gained. Remeasure front and back of towing vehicle and have both settle the same amount or up to an inch lower in back by adjusting chain on Spring Bars. You have now distributed the trailer tongue weight on both axles of the towing vehicle. (See Hook-Up instructions.)
- To release the tension on spring bars, raise front of trailer and back of towing vehicle above level (approx. 3″) with trailer tongue jack. Remove locking clip from Quick Hook-Up bracket. Insert (48031) Lever Bar over arm. Carefully lower arm with Lever Bar. It will require effort to bring arm over center and then to resist the chain tension as the arm rotates downward.
MAINTENANCE: Use lubrication such as fiber-type wheel bearing grease on the hitch ball and on spring bars. Recommended every day. Keep hitch painted to prevent rust and check the tightness of bolts regularly. Clean out old grease, do not let it harden inside of the Ball Mount.
WEIGHT DISTRIBUTING HITCH HOOK-UP FOR DIFFERENT TYPES OF TOWING VEHICLES
- PROPER METHOD OF HOOKING UP WEIGHT DISTRIBUTING HITCH WITH LOAD IN TOWING VEHICLE
- Measure distance between back bumper and ground, write it down.
- Measure distance between front bumper and ground, write it down.
- Hook up trailer to towing vehicle.
- Raise front of trailer and back of towing vehicle above level with trailer tongue jack (approx. 3″).
- Secure spring bars to Hook-Up Bracket.
- Release trailer tongue jack.
- Remeasure front and back of towing vehicle and have both settle the same amount or up to an inch lower in back by adjusting chain on spring bars.
- You have now distributed the trailer tongue weight on both axles of towing vehicle.
- See step 7 on previous page.
- PROPER METHOD OF HOOKING UP WEIGHT DISTRIBUTING HITCH WITH HEAVY LOAD IN TOWING VEHICLE
- Have proper size hitch to carry tongue weight of trailer and load in vehicle.
- Measure towing vehicle before adding load to towing vehicle.
- First measure distance between back bumper and the ground and write it down.
- Measure distance between front bumper and ground, write it down.
- Add load to towing vehicle.
- Hook up trailer to towing vehicle.
- Raise front of trailer and back of towing vehicle above level with trailer tongue jack (approx. 3″).
- Secure spring bars to Hook-up Bracket.
- Release trailer tongue jack.
- Remeasure front and back of towing vehicle and have both settle the same amount or up to an inch lower in back by adjusting chain on spring bars.
- You have now distributed the trailer tongue weight on both axles of the towing vehicle.
- See step 7 on previous page.
- PROPER METHOD OF HOOKING UP WEIGHT DISTRIBUTING HITCH WITH AIR SHOCKS OR AIRBAGS
- Air shocks or air bags should only be used to support the added weight you load in the back end of tow vehicle.
- After you have adjusted the shocks, measure distance between rear bumper and the ground, write it down.
- Measure distance between front bumper and ground, write it down.
- Hook up trailer to towing vehicle.
- Raise front of trailer and back of towing vehicle above level with trailer tongue jack (approx. 3″).
- Secure spring bars to Hook-Up Bracket.
- Release trailer tongue jack.
- Remeasure front and back of towing vehicle and have both settle the same amount or up to 1/2″ lower in back by adjusting chain on spring bars.
- CAUTION: Do not adjust air shocks or airbags to support any of the tongue weight of trailer.
- You have now distributed the trailer tongue weight on both axles of the towing vehicle.
- See step 7 on previous page.

LIMITED WARRANTY
This Warranty applies solely to the Elite Round Bar Weight Distributing Hitch (the “Product”) manufactured by Camco Manufacturing, Inc. (“Camco”)
- Warranty and Warranty Period. Camco warrants to the Product’s original purchaser or consumer (the “Purchaser”) that the Product will be free of defects in manufacture and workmanship for a period of 5 Years from the date of consumer purchase or Camco will replace the Product free of charge (the “Warranty”). This Warranty is non-transferable and applies only to the original vehicle on which the Product was installed.
- Limitations on the Warranty. This Warranty does not cover the following: (a) normal wear and tear; (b) service or labor charges which are incurred in removing or replacing any Product; (c) the finish placed on the Product; (d) Product damage or failure which occurs as a result of abuse, neglect or misuse in any manner; and (e) damage which occurs to a Product that is misapplied, overloaded, improperly installed, or altered in any manner by anyone other than Camco.
- The obligation of Purchaser. To obtain the benefits of this Warranty, the Purchaser must complete the following steps: (a) fill out online Warranty Registration within 10 days of purchase at www.camco.net/warranty; (b) promptly present the defective Product together with the proof of purchase to Camco located at 121 Landmark Drive, Greensboro, NC 27409 and (c) pay all handling, transportation, and shipping charges incurred for the return of the defective Product. Any defective Product returned to Camco shall become the property of Camco.
- Obligations of Camco. Subject to the terms and limitations set forth in this Warranty, Camco’s sole obligation will be to replace for the original Purchaser free of charge any Product that is found to be defective.
- Legal Rights. THIS WARRANTY GIVES YOU SPECIFIC LEGAL RIGHTS AND YOU MAY ALSO HAVE OTHER RIGHTS WHICH VARY FROM STATE TO STATE. CAMCO MAKES NO EXPRESSED OR IMPLIED WARRANTY OF MERCHANTABILITY OR FITNESS FOR A PARTICULAR PURPOSE. SOME STATES DO NOT ALLOW LIMITATIONS ON HOW LONG AN IMPLIED WARRANTY LASTS, SO THE ABOVE LIMITATIONS MAY NOT APPLY TO YOU. CAMCO ASSUMES NO LIABILITY OR RESPONSIBILITY FOR BODILY INJURY THAT MAY BE INFLICTED ON THE PURCHASER, OPERATOR, SPECTATOR OR GENERAL PUBLIC WHO IS THE IN THE GENERAL AREA WHILE THIS EQUIPMENT IS IN USE, FOR THE LOSS OF THE USE OF ANY VEHICLE, LOSS OF TIME, RENTAL OF VEHICLES, LOSS OR DAMAGE TO PERSONAL PROPERTY, EXPENSES SUCH AS GASOLINE, TELEPHONE, LODGING, OR TOWING, OR ANY OTHER INCIDENTAL OR CONSEQUENTIAL DAMAGES INCURRED AS A RESULT OF THE USE OR OWNERSHIP OF ANY PRODUCT. SOME STATES DO NOT ALLOW THE EXCLUSION OF A LIMITATION OF INCIDENTAL OR CONSEQUENTIAL DAMAGES, SO THE EXCLUSION OR LIMITATION SET FORTH MAY NOT APPLY TO YOU. REPLACEMENT OF THE PRODUCT IN THE MANNER PROVIDED ABOVE SHALL CONSTITUTE FULFILLMENT OF ALL LIABILITIES OF CAMCO TO THE PURCHASER WHETHER BASED ON CONTRACT OR OTHERWISE.
CAMCO RESERVES THE RIGHT TO MAKE CHANGES IN DESIGN OR TO MAKE ADDITIONS OR IMPROVEMENTS WITHOUT BEING OBLIGATED TO INSTALL THE SAME UPON PRODUCTS COVERED BY THIS WARRANTY. THIS WARRANTY IS VALID ONLY IN THE UNITED STATES AND CANADA.
CAMCO MFG., INC.121 Landmark Drive / Greensboro, NC 27409 / USA 1-800-334-2004www.eaz-lift.com
 report this ad
![]()
References
[xyz-ips snippet=”download-snippet”]