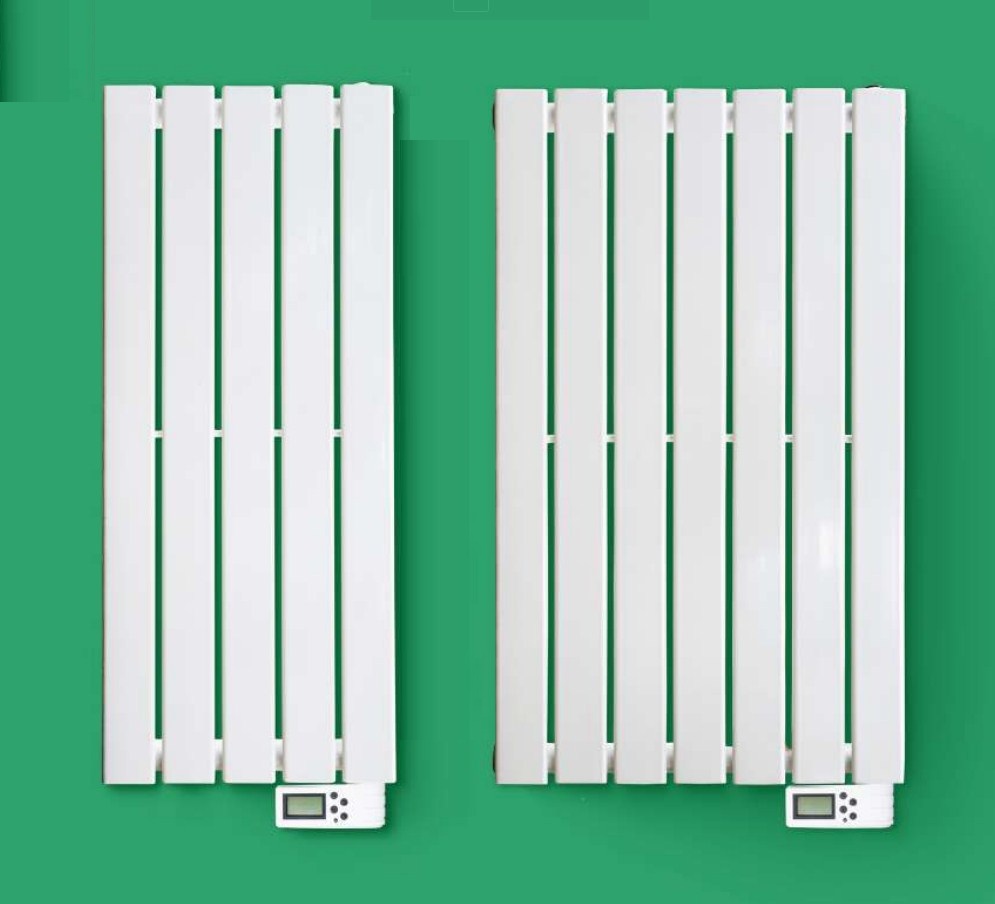
EcoVolt JT4B and JT6B Versions JTB
Electric Radiators User Manual
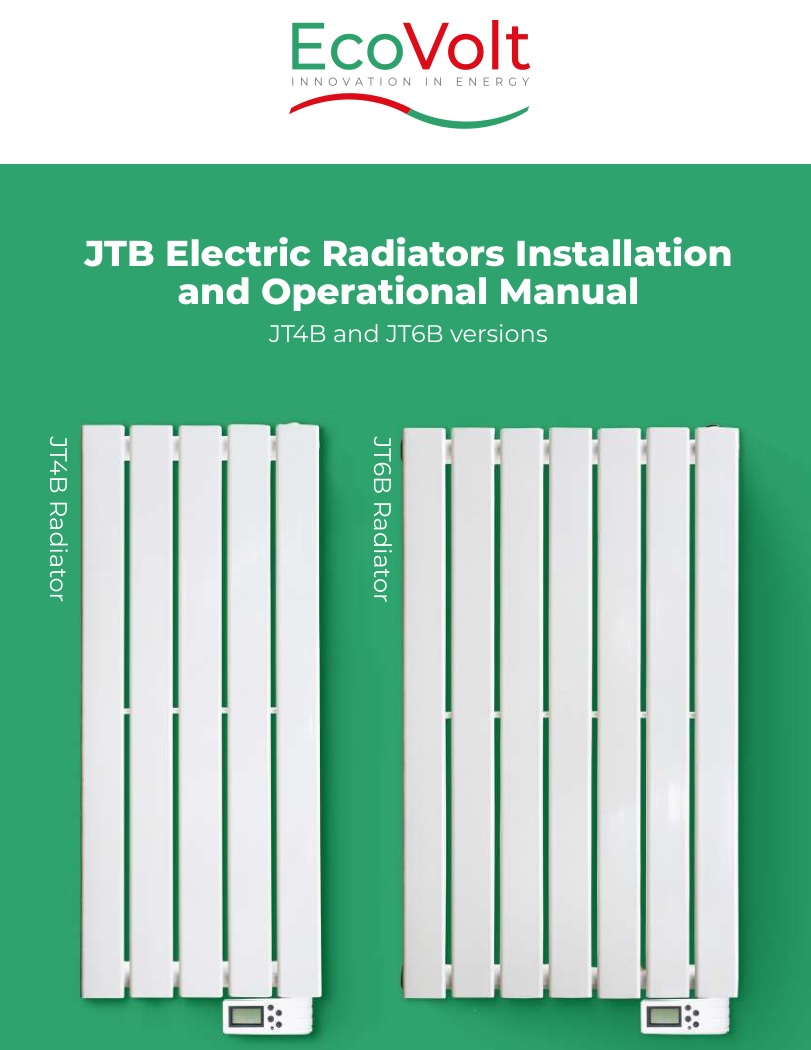
JTB Electric Radiators Installation and Operational Manual
- Read the instruction manual carefully before commencing the installation
- Installation should be completed by a competent person
- All electrical work to be completed by a qualified electrician
- Please dispose the package properly. Towel Rail Installation
Tools Required to complete the installation

Installing the female wall brackets
Using a measuring tape, spirit level and pencil, mark the wall where the 4 female brackets are to be positioned. It is important to line the male spigot bracket attached to the heater to your markings. Using the drill, drill 4 holes in the wall and insert wall plugs. Tighten the female brackets to the wall using the screws provided as illustrated below.
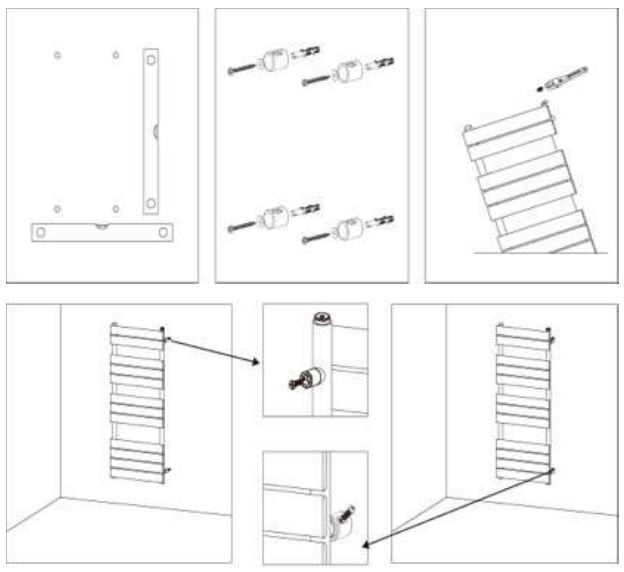
Fixing the heater to the female brackets
Line up the male spigot brackets on the back of the heater and insert them into the female brackets. Using the screwdriver and the security bolts, secure the heater and ensure the bolt is tight. The heater is now secure to the wall.
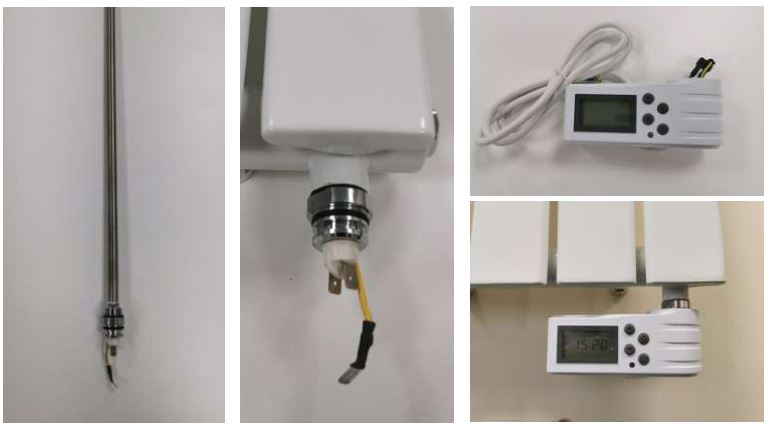
Inserting the electrical element into the heater
Remove the element from the packaging and insert it into the bottom right corner threaded end. Tighten with a tool. If you are using the digital programmer, attach the programmer and secure using the small screw supplied ensuring the spade connections are secured and tight. It is recommended that only qualified personnel carry out this.
Filling the heater with water
JT4B – Pour 3.3L of water into the heaterJT6B – Pour 4.5L of water into the heater
Fit and tighten the 4 valve locks into the sides of the heater. Fill the heater with the correct amount of water and fit the 5th valve lock with bleed valve to the top of the heater as shown below

Connecting the heater to the 230V electricity supply
WARNING: DO NOT TURN POWER ON IF THE HEATER IS EMPTY!
Note: This should only be done by a qualified electrician.With the electricity supply turned off and isolated, connect the live wire (brown) to the live terminal (L) of the isolating switch. Connect the neutral wire (blue) to the neutral terminal (N) of the isolating switch. Connect the earth wire (green/yellow) into the earth terminal (E) of the isolating switch. When all 3 wires have been terminated to the 230V supply switch is it then safe to turn on the heater.
The heater will now begin to heat up and will take approx. 30 minutes to reach uniform surface temperature.
LCD Digital Thermostat Manual
The following information is intended only for the digital thermostat that can be fitted to the JTB heater as shown below.
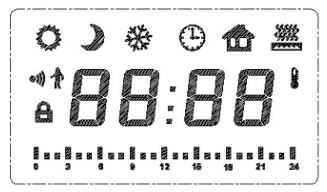
LCD Digital Thermostat Description
- General information :
- Power specification: AC230V/50HZ
- Temperature range: 0~55 o C
- Setting temperature range: 7~30 o C
- Time mode: 24 hour
- Week mode: 1~7
- Timing mode: Multiple setting, 1 hour step
- Programming mode: defrost, power off, economy, comfort, comfort-1, comfort-2
- Panel display:

- Functions and heating modes:
- Comfort mode: Setting the temperature in the daytime, Icon, available temperature range 7 o C~30 o C
- Economy mode: Setting the temperature in the night, Icon, available temperature range 7 o C~30 o C. The Max temperature shall not exceed the comfort temperature
- Defrost mode: Setting the temperature at 7 o C, Icon, this setting is fixed
- Timing mode: Timing function, Icon
- Timing setting: Time adjustment, adjustment range 0~24H, Icon
- Programming modes (Class II only): Six modes available,
- Comfort mode
- Comfort-1 mode
- Comfort-2 mode
- Economy mode
- Defrost mode
- Power off mode, Icon
- Child lock function: This will disable all buttons. Icon
- Heating function: Working status, Icon the heater is on
- Button function:
- Comfort mode: Setting the temperature in the daytime, Icon,
- Mode operation instructions:
- Start up: Press to turn on the heater. All buttons are invalid the heater is on
- Change heating modes: The factory default setting when the heater is turned on is comfort mode, press to switch the mode to the following, comfort mode → economy mode → defrost mode → timing mode → programming mode
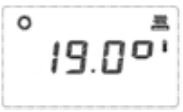
- Comfort mode : The default temperature is 19 o C As shown: Press or to set the temperature, press to increase the temperature, press to reduce the temperature in 0.5 o C steps, hold or down to speed the temperature adjustment process.
- Economy mode : The default temperature is 15.5 o C As shown: Press or to set the temperature, press (+) to increase the temperature, press (-) to reduce the temperature in 0.5 o C steps. Press (+) or (-) 1s to speed the temperature adjustment scope.
- Defrost mode : The default temperature is 7 o C As shown: The temperature is fixed in this mode
- Timing mode : Setting the timing mode for the heater. As:
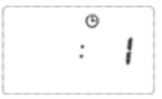
- Time setting:When enter the timing mode in the first time, the icon “00:00” is flashing, press for 3 seconds, the icon “00” is flashing. Press (+), (-) to adjust the time. Adjustment range is 0~23H, in hourly segments. Hold down (+) or (-) for 1 second to increase the adjustment speed. Press the minute “00” is flashing(0.5S every time), press , to adjust the minute. Adjustment range is 0~59 in minute segments. Hold down or to increase the adjustment speed.Note: If there is no activity in 30 seconds, the timing setting will exit and return to the previous screen.
- Week setting:Once the time setting is completed ,press to adjust the week setting as shown here: Press (+), (-) to adjust the days of the week, range 1~7Days.Press (+) or (-) to adjust. 01=Monday, 02=Tuesday, 03=Wednesday, 04=Thursday, 05=Friday, 06=Saturday, 07=SundayIt will exit the week settings if there is no activity within 30 seconds.
- Daily programming setting:After completing the week setting, press to enter the daily programming setting. Press (+) or (-) to set the daily programming setting. (P1-P5), comfort mode is indicated by(♦)in the time axis. Economy mode is indicated by ◊ in the time axis.P1: Comfort mode: 06:00 – 22:00 (Economy mode all other times outside these times) P2: Comfort mode: 06:00 – 09:00 and 16:00 – 22:00 (Economy mode all other times outside these times) P3: Comfort mode is 06:00 – 09:00, 12:00 – 14:00 and 16:00 – 22:00 (Economy mode all other times outside these times) P4: Economy mode from 00:00 to 24:00 P5: Comfort mode from 00:00 to 24:00 Once finished the setting for Monday, press to enter the Tuesday programming setting and repeat for all 7 days.
- Hold for 3s to enter the daily programming section, the (+) or (-) are used to toggle between comfort and economy heating times. Pressing (+) will select comfort heating for that hour of the day, pressing (-) will select economy heating for that hour. The icon ♦ on the display indicates the amount of time the comfort heating is set for. When there is no icon on the screen then this indicates the heating mode is set for economy. Below is an indication of a daily heating schedule with comfort heating set for 00:00 to 06:00 and the remainder for that day the heating is set for economy heating (07:00 – 23:00) After completing the selection, press to move onto the next day.Note: It will exit the day programming modification if there is no activity within 30S
- Time setting:When enter the timing mode in the first time, the icon “00:00” is flashing, press for 3 seconds, the icon “00” is flashing.
- Programming mode : It has six programming modes
-
- Comfort mode. This is your primary heating mode to reach your comfort level. This is the setting your heater will switch OFF when the room reaches this temperature.
- Comfort -1 mode (comfort temperature -1 degrees) useful to calibrate to other thermostats present
- Comfort -2 mode (comfort temperature -2 degrees) useful to calibrate to other thermostats present
- Economy mode. Sometimes called set-back temperature. This is the setting the heater will switch ON once the room falls below this temperature. It is strongly advised to select a low setting if the room is poorly insulated as the heater will come on regularly due to the high heat loss for the room.
- Defrost mode. When the heater is programmed OFF. The heater will come on when the room falls below this temperature.
- Power off mode
-
- BOOST function: It is possible to boost the heating from 30 mins to 2 hours.Press the for 3s in the BOOST function. The BOOST function will turn the heating mode to comfort for 30 minutes to 2 hours (the default time is 2 hours), press (+) or (-) to adjust the duration of the BOOST function to 30 minute segments. The boost function will runout when the time has elapsed. To cancel the boost function press and hold the for 3 seconds.
- Child lock function : Press (+) and (-) for 3 seconds to lock the keypad. A keypad lock symbol will appear on the display as shown below. The keypad is now locked. To unlock the keypad press and hold and for 3 seconds.
- Comfort mode
- Start up: Press
 Press
Press  Press
Press 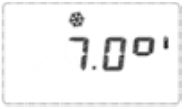 The temperature is fixed in this mode
 Press (+), (-) to adjust the days of the week, range 1~7Days.Press (+) or (-) to adjust. 01=Monday, 02=Tuesday, 03=Wednesday, 04=Thursday, 05=Friday, 06=Saturday, 07=SundayIt will exit the week settings if there is no activity within 30 seconds.
 Press (+) or (-) to set the daily programming setting. (P1-P5), comfort mode is indicated by(♦)in the time axis. Economy mode is indicated by ◊ in the time axis.P1: Comfort mode: 06:00 – 22:00 (Economy mode all other times outside these times)
  P3: Comfort mode is 06:00 – 09:00, 12:00 – 14:00 and 16:00 – 22:00 (Economy mode all other times outside these times)
  P4: Economy mode from 00:00 to 24:00
 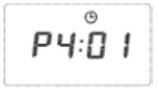 P5: Comfort mode from 00:00 to 24:00
  Once finished the setting for Monday, press to enter the Tuesday programming setting and repeat for all 7 days.
 After completing the selection, press to move onto the next day.Note: It will exit the day programming modification if there is no activity within 30S
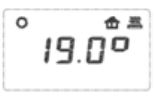
 The keypad is now locked. To unlock the keypad press and hold and for 3 seconds.
Temperature calibration setting:
Press (+) for 10 seconds when the heater is in the power off mode into the temperature compensation setting, the default temperature setting is 0

Press (+) or (-) to increase or decrease the temperature calibration from 3 o C to -3 o C. It will exit the temperature calibration setting if there is no activity within 10s.
Restore factory setting:
To restore the factory press and hold the for 20 seconds when the heater is in the power off mode as indicated on the display below.
Release the button when it indicated then press ![]() to accept. The programmer will return to factory settings
to accept. The programmer will return to factory settings
Comfort mode = 19 o CEconomy Mode = 15.5 o CThe time = “0000”,Day = “1”,The default time of the BOOST function is 2 hours,The temperature calibration is “0”,
Recycling the product
For electrical products sold within the European Community. At the end of the electrical products useful life it should be disposed of with household electronic waste. Check your local authority of retailer for recycling advice.
Ecovolt Guarantee
All Ecovolt products are tested before they leave the factory to ensure a reliable and quality product. If you are a consumer and you experience a problem with an Ecovolt product which is found to be defective due to faulty parts / materials or workmanship within the guarantee period, this guarantee will cover repair or at the discretion of Ecovolt replacement with a functionally equivalent product. The Ecovolt guarantee is valid for 2 years from the date of purchase of your Ecovolt product or date of delivery. The Ecovolt guarantee is conditional upon you providing the original purchase receipt as proof of purchase.
What is not covered by the Ecovolt Guarantee
- Any fault or damage to your product due to faulty materials or work manship occurring outside the two year period.
- Any damage caused to your product from external sources. For example, transit, weather, power surges, electrical power outages.
- Any damage caused by misuse, abuse or negligent of the Ecovolt product including but not limited to any failure to use it in accordance with the operating instructions supplied with the product.
- Caused by repairs or alterations by others other than trained Ecovolt personal.
- Service engineers expenses for call outs to repair Ecovolts products in the property of the consumer.
Terms and Conditions of the Ecovolt Guarantee
- The Ecovolt guarantee is valid for 2 years from the date of purchase of your Ecovolt product from a recogised retailer or from the date of delivery. The original receipt is required as proof of purchase to validate the guarantee period.
- You must provide Ecovolt or its authorised agents on request the original receipt as proof of purchase and if required by Ecovolt – proof of delivery. If you are unable to provide this documentation, you will be required to pay for any repair work required.
- Any repair work under the guarantee will be carried out by Ecovolt trained personel of its authorised agents and any parts that are replaced with become the property of Ecovolt. Any repairs performed under the guarantee will not extend the guarantee period.
- The Ecovolt guarantee does not entitle you to recovery of any indirect or consequential loss or damage including but not limited to loss to any other property.
- The Ecovolt guarantee is in addition to your statutory rights as a consumer and your statutory rights are not affected by this Ecovolt guarantee.
Returns
![]()
If you have a faulty product, please return it to the address below. Ecovolt Limited, Unit 3B, Rosemount Park Drive, Rosemount Business Park, Ballycoolin Dublin 11, Ireland, D11 H029
Ecovolt LimitedUnit 3B Rosemount Park Drive, Rosemount Business Park, Dublin 11, Ireland+353 (0)1 5240387[email protected]www.ecovolt.ie
EcoVolt JT4B and JT6B Versions JTB Electric Radiators User Manual – EcoVolt JT4B and JT6B Versions JTB Electric Radiators User Manual –
[xyz-ips snippet=”download-snippet”]