SLIDERONE &SLIDERONE PROUSER’S MANUALBefore operating your edelkrone,please watch the user’s manual video from the link below http://edel.kr/so
WHAT’S IN THE BOX & THE BASICS
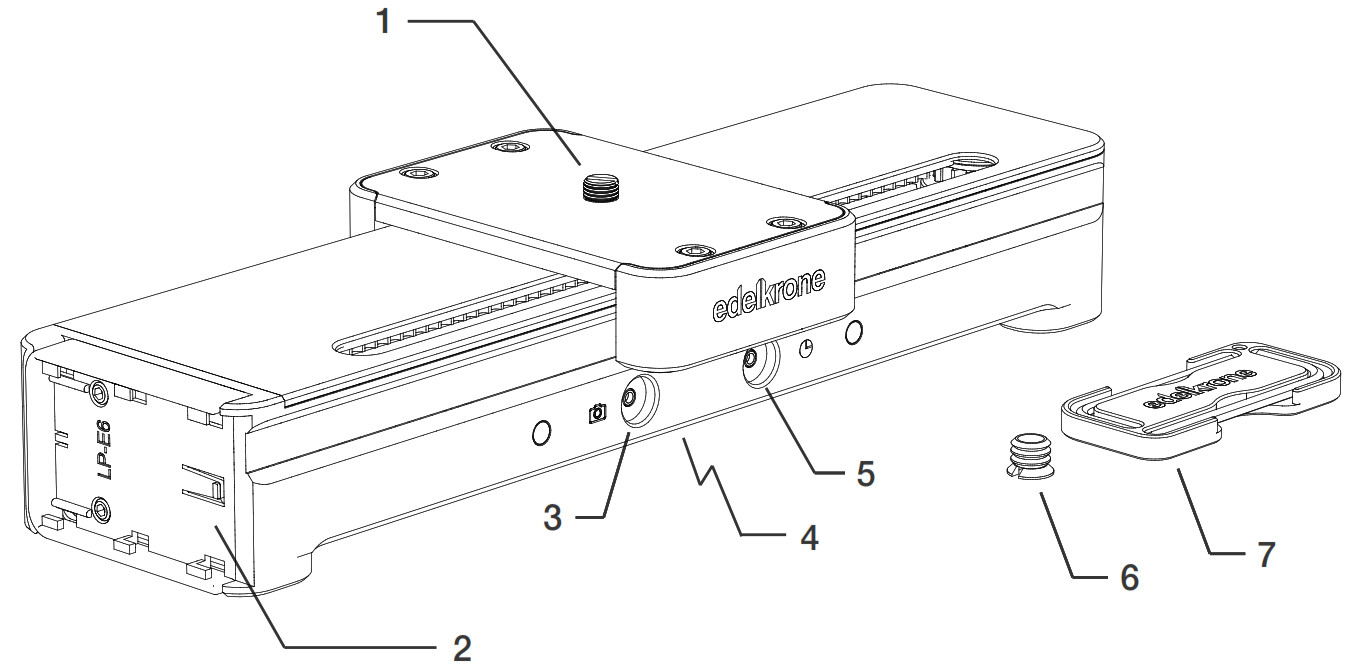
- 3/8”-16 Mounting screw
- Built-in LP-E6 battery bracket*
- Shutter trigger port
- 3/8”-16 Mounting port
- LANC port
- Reducer bushing/adapter **
- Allen keys
*The battery bracket is located in different places in SliderONE v2 & SliderONE PRO v2.**Reducer busing (6) is attached to the 3/8”-16 mounting port (4)
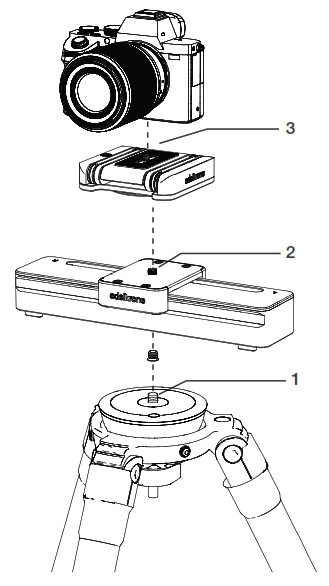
MOUNTING SLIDERONE ON A TRIPOD
 A detailed video explaining the mounting process can be found at: http://edel.kr/so
You can use your SliderONE on a tripod or flat surface.
- Place the SliderONE on your tripod and rotate until it is tight.
- SliderONE has 3/8”-16 screw on top for your tripod head. Place your tripod head or your edelkrone FlexTILT Head onSliderONE and rotate until it is tight.
- Attach your camera to your tripod head.Now, you are ready to slide.
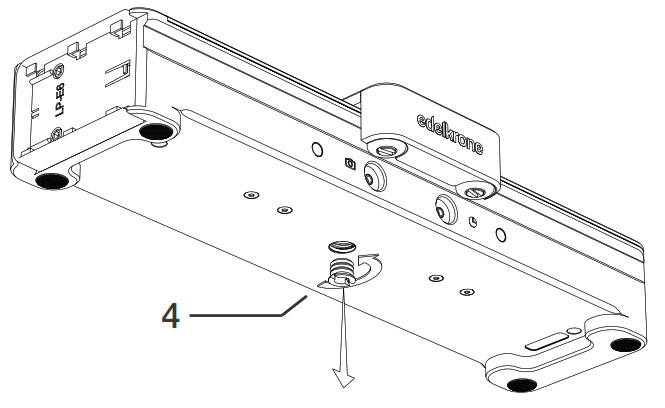
- Reducer busing is attached to the 3/8”-16 mounting port. If your tripod has 3/8”-16 mounting screw, you need to dettach the 3/8”-16 reducer bushing by turning it counterclockwise.
USING WITH FLEXTILT HEAD
The FlexTILT Head is recommended as a tripod head solution for the SliderONE.With the FlexTILT Head 2, you can easily:-Adjust the center of gravity,-Pan/tilt, and-Change the height of the camera.

A detailed video explaining how to operate the SliderONE can be found from: manuals.edelkrone.com A detailed video explaining how to use the FlexTILT Head with SliderONE can be found at: http://edel.kr/so
ADJUSTMENTS
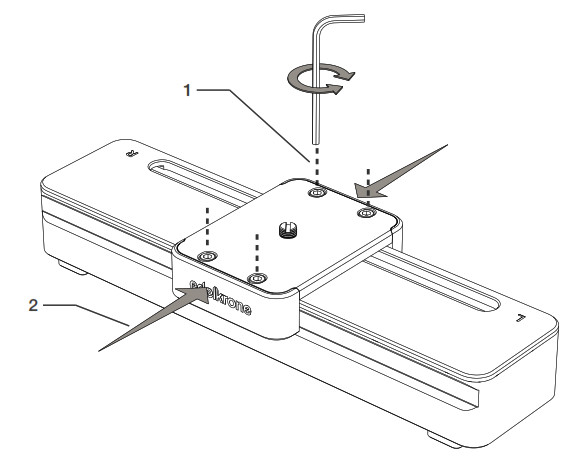
There are adjustment screws on the SliderONE. If you think there is a play on the carriage (1), use the indicated screws for adjustment. To do that, push from the sides of the carriage (2) and thighten the screws.
A detailed video explaining how to adjust your SliderONE details can be found at: http://edel.kr/so
START USING
- Download the edelkrone App to your mobile device from the App Store or Google Play. Links can be found at www.edelkrone.com/products/sliderone-v2.

- There are no on/off buttons on SliderONE. To turn on, attach the battery to the SliderONE.
- SliderONE will start the calibration and detect the limits of the slider.
- edelkrone App will automatically pair with your SliderONE.
- You are now ready to use your SliderONE!

![]() Always start using with a fully charged battery.
Always start using with a fully charged battery.![]() Make sure your mobile device’s Bluetooth connection is on.
Make sure your mobile device’s Bluetooth connection is on.![]() Battery is not included. A detailed video explaining the application usage details can be found at: http://edel.kr/so
Battery is not included. A detailed video explaining the application usage details can be found at: http://edel.kr/so
DISPOSAL OF THE PRODUCT & WARNINGS
![]() Should the product become damaged beyond repair, or if you wish to dispose of it, it must be disposed separately from the municipal waste stream via designated collection facilities appointed by the government or the local authorities. Observe the regulations of your area and country that relate to the disposal of electronic products.* Keep your electronic Motion Control Unit away from all sorts of liquids.* Do not attempt to disassemble or modify any internal parts of your Motion Control Unit. If the device appears to be malfunctioning, discontinue use immediately and contact support for qualified service.* Never force a different type of connector into a port.* Never use or store your Motion Control Unit in areas subject to extreme temperatures, or high levels of vibration.* Environmental factors may affect your Motion Control Unit’s performance. Keep your product away from environmental hazards such as dust or heavy resonance. Do not use chemical materials to clean your product.* Avoid dropping or causing physical damage to your Motion Control Unit.* Do not place heavy objects on top of your Motion Control Unit.**edelkrone cannot be held responsible for damage caused by improper use or modification of the product.
Should the product become damaged beyond repair, or if you wish to dispose of it, it must be disposed separately from the municipal waste stream via designated collection facilities appointed by the government or the local authorities. Observe the regulations of your area and country that relate to the disposal of electronic products.* Keep your electronic Motion Control Unit away from all sorts of liquids.* Do not attempt to disassemble or modify any internal parts of your Motion Control Unit. If the device appears to be malfunctioning, discontinue use immediately and contact support for qualified service.* Never force a different type of connector into a port.* Never use or store your Motion Control Unit in areas subject to extreme temperatures, or high levels of vibration.* Environmental factors may affect your Motion Control Unit’s performance. Keep your product away from environmental hazards such as dust or heavy resonance. Do not use chemical materials to clean your product.* Avoid dropping or causing physical damage to your Motion Control Unit.* Do not place heavy objects on top of your Motion Control Unit.**edelkrone cannot be held responsible for damage caused by improper use or modification of the product.
For more information and tips about your SliderONE, please watch the user’s manual videos at:
![]() FLEXTILT HEAD 2USER’S MANUALBefore operating your edelkrone,please watch the user’s manual video from the link belowmanuals.edelkrone.com
FLEXTILT HEAD 2USER’S MANUALBefore operating your edelkrone,please watch the user’s manual video from the link belowmanuals.edelkrone.com
WHAT’S IN THE BOX & THE BASICS
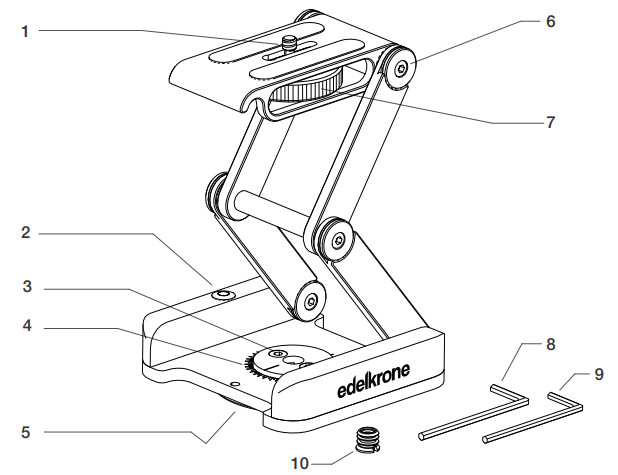
| 1. 1/4” – 20 Mounting screw | 6. 3mm Adjustment joints (x6) |
| 2. Spirit level | 7. Mounting wheel |
| 3. 2.5mm Adjustment joints (x2) | 8. 3mm allen wrench |
| 4. Pan marking | 9. 2.5mm allen wrench |
| 5. 3/8” – 16 Mounting port | 10. Reducer bushing/adapter* x2 |
*1/4”-20 to 3/8”-16 mounting screw adapter and 1/4”-20 reducer bushing for mounting port are provided.
MOUNTING YOUR FLEXTILT HEAD 2
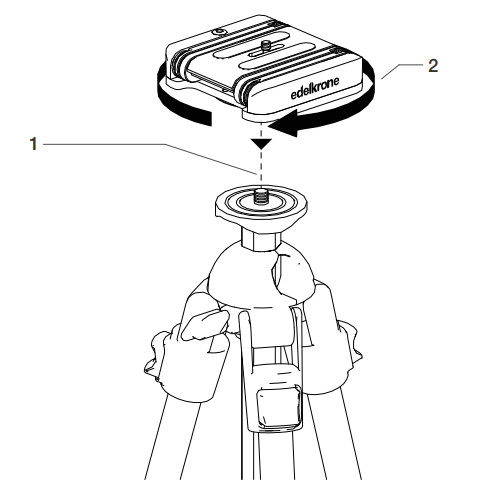
Place your FlexTILT Head 2 on the screw.Rotate clockwise to tighten.Continue rotating until it is tightened.
![]() A detailed video explaining the mounting process can be found at: manuals.edelkrone.com
A detailed video explaining the mounting process can be found at: manuals.edelkrone.com
MOUNTING THE CAMERA TO YOUR FLEXTILT HEAD 2
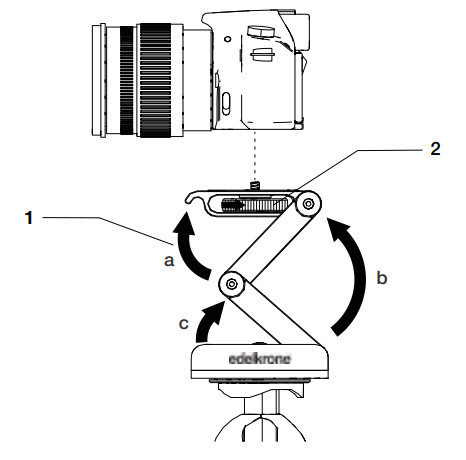
1. Unfold the FlexTILT Head 2 to access the mounting wheel.2. Attach your camera using the mounting wheel.![]() When you are adjusting height, adjust one point at a time. (a,b,c)
When you are adjusting height, adjust one point at a time. (a,b,c)![]() A detailed video explaining the mounting process can be found at: manuals.edelkrone.com
A detailed video explaining the mounting process can be found at: manuals.edelkrone.com
ADJUSTING TENSION OF YOUR FLEXTILT HEAD 2

You can adjust the tension of the system with the help of a 3mm allen wrench (1).Simply tighten or loosen the screws on each side. Panning tension is adjusted using a 2.5mm allen wrench (2).![]() A detailed video explaining the mounting process can be found at: manuals.edelkrone.com
A detailed video explaining the mounting process can be found at: manuals.edelkrone.com
CAUTIONS AND TIPS
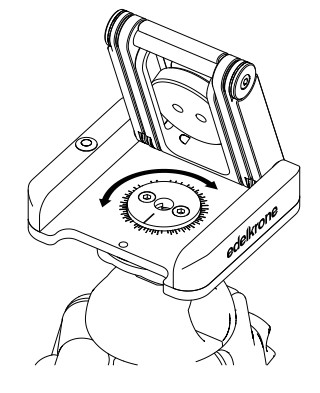
If the hash marks are turning, the FlexTILT Head 2 is panning. The FlexTILT Head 2 can pan for up to 340° degrees.
![]() When you are operating the FlexTILT Head 2 , hold your camera for safety.
When you are operating the FlexTILT Head 2 , hold your camera for safety.![]() Avoid placing your hand in the middle of the system in order to prevent pinching.
Avoid placing your hand in the middle of the system in order to prevent pinching.![]() A detailed video explaining other tips can be found at: manuals.edelkrone.com
A detailed video explaining other tips can be found at: manuals.edelkrone.com
USE WITHOUT A TRIPOD
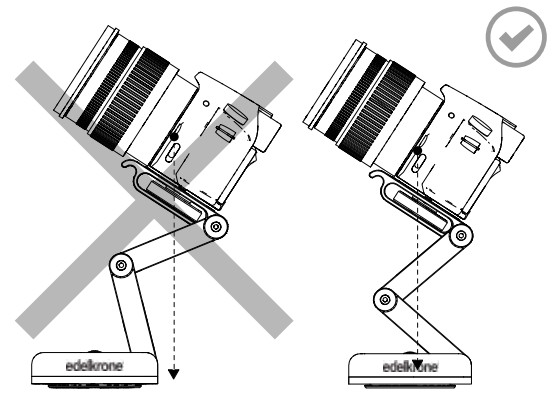
![]() To keep your setup balanced, ensure that the center of gravity is over the middle of the self-standing area.
To keep your setup balanced, ensure that the center of gravity is over the middle of the self-standing area.
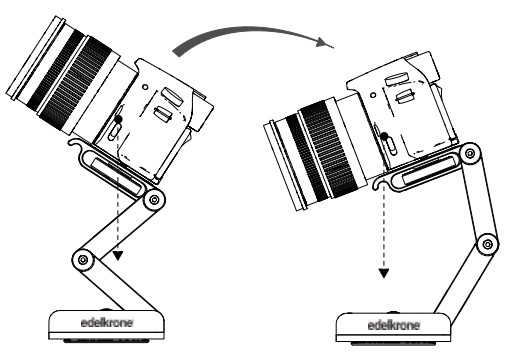
![]() If you want to aim the camera downwards/upwards, just keep the center of gravity in balance and set the height.
If you want to aim the camera downwards/upwards, just keep the center of gravity in balance and set the height.![]() A detailed video explaining how to balance and turn the camera can be found at: manuals.edelkrone.com
A detailed video explaining how to balance and turn the camera can be found at: manuals.edelkrone.com
DISCLAIMERedelkrone cannot be held responsible for damage caused by improper use or modification of the product.
References
[xyz-ips snippet=”download-snippet”]